Camtek CAM1095 Скачать руководство пользователя страница 10

10

Inspection Camera Kit 22mm

CAM1095

Recording Time Limit

•  Sometimes you may forget to stop the record-

ing after it is initiated. This unit is featured with a 

recording time limit. The default time limit is 60 

minutes. If recording time over 1 hour, the sys-

tem will record with a new file.

Scheduled Recording

•  You can schedule a recording in advance. Sim-

ply enable the schedule recording in the SETUP 

and then the unit will ask user to setup timing.  

Recording schedule can be used once. You must 

set up schedule again for the next recording.

Voice Recording 

•  A microphone button located on the front panel 

allows the user to press the button on to record a 

voice while the video is recording (This function 

is only available for new versions).
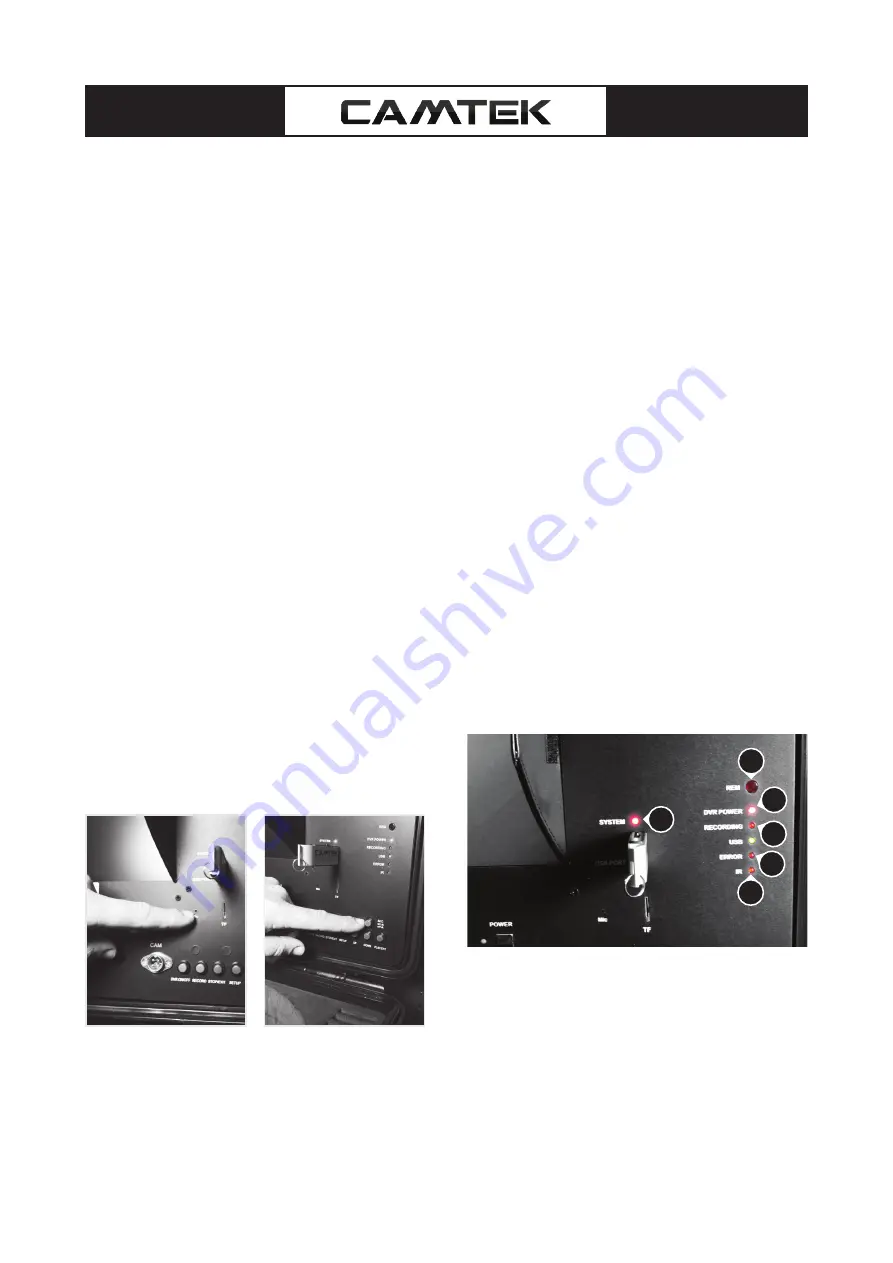
LED Indicators  

1.  REM: IR Remote receiving window
2.  Power: It indicates that the system is on
3.  Recording: It will blink during recording
4.  USB: It indicates that USB device is connect-

ed 

5.  Error: It indicates that the system or USB/

micro SD device has error

6.  IR: It blinks when the remote control is in use 

for Recording Video

7. 

The recorded video files will be found in a di

-

rectory of USB devices.

8.  You can use the on-screen menu or press 

(REC)  button  to  start  recording.  Press  (■/

EXIT) button to stop recording. During the re

-

cording, the screen will display recording time 

and time limit (up to 60 minutes).

Video Recording Format

•  The default video recording resolution is 

640*480. One-hour recording will take up stor-

age of 500MB

•  User may select 320*240 to save storage space.

Video Playing

•  You can use on-screen menu to enter “play 

video” mode. The unit will display the recorded 

video and other compatible videos stored in USB 

stick.

•  It will not list the non-compatible videos.
• 

Select the video file.

•  Press record to start the recording, the 


RECORDING Red LED light will come on. 

•  In recording, press the RECORDING button 

again, the DVR will take a photo and it is saved 

in the USB stick (The snap shooting function is 

only available for new firmware versions).

•  Press stop button to stop recording.
•  Press button play to review recording.

Microphone and Microphone ON/OFF Button

LED Indicators

1

2

4

6

3

5

Содержание CAM1095

Страница 1: ...OPERATOR S MANUAL Please read these instructions completely before operating this system Inspection Camera Kit 22mm Inspection Camera Kit 22mm CAM1095...

Страница 2: ..._______________________________________________ 8 Spring Assembly_______________________________________________________ 8 Removing Camera Head from the Reel_____________________________________ 9 Han...

Страница 3: ...erating equipment Do not use equipment while you are tired or under the influence of drugs alcohol or medication Use personal protective equipment Always wear eye protection gloves while operating Ele...

Страница 4: ...act with corrosive drain cleaners Drain cleaning chemicals can cause serious burns as well as damage the cable Neutralize or remove corro sive drain cleaners in the drain before starting the job Prote...

Страница 5: ...control SYSTEM COMPONENTS Inspection Camera Kit 22mm includes The Camera Head the Cable Reel and Frame and the Monitor Control Unit Cable Reel The pushrod is housed in a handheld metal drum which is l...

Страница 6: ...the charged battery plug the power output cord of the battery to the DC 12V Input Jack of the Monitor then press the button on the battery Monitor Control Unit Recorder Be sure you are familiar with...

Страница 7: ...see an image on the monitor check to make sure its power is turned ON Video 1 on the monitor is live view mode Video 2 on the monitor is the DVR digital video re corder mode Note Don t misuse the pow...

Страница 8: ...his system zero point at any time with a press on the Zero Key It is good practice to do this for example at the entrance to a pipe Retrieving the Camera Once the inspection has been completed pull th...

Страница 9: ...ns to the pipe When inspecting a pipe it is usually necessary to give a little extra push in the bends Back the camera head approximately 7 from the bend if necessary and give it a quick push pop ping...

Страница 10: ...USB micro SD device has error 6 IR It blinks when the remote control is in use for Recording Video 7 The recorded video files will be found in a di rectory of USB devices 8 You can use the on screen...

Страница 11: ...cket on the wall and insert the other end into the DC Jack on the battery box The battery can be charged while the battery box is on and the device is being used Howev er once the power in the battery...

Страница 12: ...contact the Camtek service department Picture BUT No Lights Check if Main Power switch is ON and in cor rect position Check to see if the LIGHT power switch is ON and intensity control is turned up C...

Страница 13: ...e and contact Camtek service department Please note USB Drives might need to be for matted on a computers prior to use please fol lowing the instruction on how to do this below Plug USB into Computer...

Страница 14: ...repaid and you will be compensated for these charges if it is determined that the part is defective If repairs are necessary due to conditions beyond our control or if the item is out of warranty we w...

Страница 15: ...15 Inspection Camera Kit 22mm CAM1095 Notes...

Страница 16: ...08 8122 0469 sales camtek net au www camtek net au...

Отзывы: