background image

Стр. 

28

 - Руково

дство 

FA01004-RU

 - 02/2018 - © C

AME S.p.A. - 

Перево

д о

ригинальных инструкций

СООБЩЕНИЯ ОБ ОШИБКАХ

 Сообщения об ошибках отображаются на дисплее.

E 1

Калибровка движения прервана из-за нажатия кнопки «СТОП»

E 2

Калибровка движения незавершена

E 3

Энкодер неисправен

E 4

Ошибка самодиагностики

E 7

Недостаточное время работы.

E 9

Препятствие при закрывании

E 10 Препятствие при открывании
E 11 Максимальное количество обнаруженных препятствий

E 13

Нормально-замкнутые контакты (Н.З.) разомкнуты (например, концевые выключатели)

E 14 Ошибка последовательного подключения
E 17 Ошибка беспроводной системы
E 18 Беспроводная система не настроена

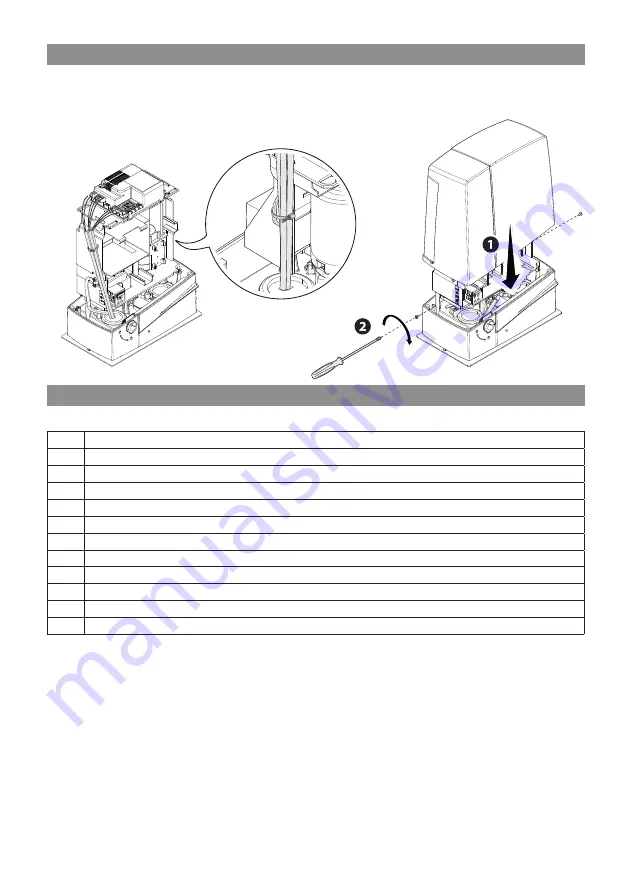
ЗАКЛЮЧИТЕЛЬНЫЕ РАБОТЫ

После выполнения всех электрических подключений и подготовки системы к работе прикрепите провода 

к вилке привода с помощью хомута. 

Установите крышку и зафиксируйте ее боковыми винтами.

Содержание BXV Series

Страница 1: ...Italiano EN English FR Français RU Pусский FA01004M04 Automazione per cancelli scorrevoli Serie BXV BXV04AGM BXV04AGS BXV06AGS BXV08AGS BXV10AGS BXV04RGS BXV06RGS BXV08RGS BXV10RGS MANUALE DI INSTALLAZIONE ...

Страница 2: ......

Страница 3: ...azione non può essere utilizzata con un cancello comprensivo di porta pedonale a meno che l azionamento non sia attivabile solo con la porta pedonale in posizione di sicu rezza assicurarsi che sia evitato l intrappolamento tra il cancello e le parti fisse circostanti a seguito del movimento del cancello stesso prima di installare l automazione controllare che il cancello sia in buone condizioni me...

Страница 4: ... di comando deve avvenire a un altezza di almeno 1 5 m e in un luogo non accessibile al pubblico per superare la prova delle forze d impatto utilizzare un adeguato bordo sensibile corret tamente installato ed eseguire le regolazioni del caso prima della consegna all utente verificare la conformità dell impianto alla norma armonizzata nella direttiva macchine 2006 42 ce Assicurarsi che l automazion...

Страница 5: ...e o condominiale Ogni installazione e uso difformi da quanto indicato nel seguente manuale sono da considerarsi vietate LIMITI D IMPIEGO Tipo BXV04AGM BXV04AGS BXV04RGS BXV06AGS BXV06RGS BXV08AGS BXV08RGS BXV10AGS BXV10RGS Lunghezza max anta m 14 18 20 20 Peso max anta kg 400 600 800 1000 Modulo pignone 4 4 4 4 DATI TECNICI Tipo BXV04AGM BXV04AGS BXV04RGS BXV06AGS BXV06RGS BXV08AGS BXV08RGS BXV10A...

Страница 6: ...uzione delle istruzioni originali DIMENSIONI IMPIANTO TIPO 1 Automazione 2 Alette di finecorsa 3 Cremagliera 4 Selettore 5 Lampeggiatore 6 Fotocellule 7 Colonnine per fotocellule 8 Battuta di arresto 9 Trasmettitore 10 Pattini guida 11 Pozzetto di derivazione 12 Bordo sensibile Pag 6 Manuale FA01004 IT 02 2018 CAME S p A Istruzioni originali ...

Страница 7: ...oro per passaggio cavo di sblocco 9 Alloggiamento per modulo RGP1 10 Alloggiamento per termostato con cartuccia riscaldante 11 Coperchio scheda protezione 12 Scheda elettronica 13 Porta scheda elettronica 14 Alloggiamento per caricabatterie RLB 15 Alloggiamento per modulo UR042 16 Alloggiamento per sensori SMA e RGSM001 17 Leva di sblocco 18 Serratura 19 Alette di finecorsa 20 Sensore magnetico so...

Страница 8: ... 2 x 0 5 mm2 Dispositivi di sicurezza fotocellule TX 2 x 0 5 mm2 RX 2 x 0 5 mm2 Con alimentazione a 230 V e utilizzo in ambiente esterno utilizzare cavi tipo H05RN F conformi alla 60245 IEC 57 IEC in ambiente interno invece utilizzare cavi tipo H05VV F conformi alla 60227 IEC 53 IEC Per alimentazioni fino a 48 V si possono utilizzare cavi tipo FROR 20 22 II conformi alla EN 50267 2 1 CEI Per il co...

Страница 9: ... pinza INSTALLAZIONE Le seguenti illustrazioni sono solo esempi in quanto lo spazio per il fissaggio dell automazione e degli accessori varia a seconda della zona di installazione Spetta all installatore scegliere la soluzione più adatta POSA DEI TUBI CORRUGATI Fare lo scavo per la cassa matta Preparare i tubi corrugati necessari per i collegamenti provenienti dal pozzetto di derivazione Per il co...

Страница 10: ...o i fori predisposti Riempire la cassa matta di cemento la piastra deve essere perfettamente in bolla e con il filetto delle viti completamente in superficie Attendere che si solidifichi per almeno 24h Togliere la cassa matta e riempire di terra lo scavo attorno al blocco di cemento Togliere i dadi e le rondelle dalle viti Inserire i cavi elettrici nei tubi fino a farli uscire di 600 mm circa Pag ...

Страница 11: ...uttore sopra la piastra di fissaggio Attenzione I cavi elettrici devono passare sotto la cassa del motoriduttore Forare il passacavo farci passare i cavi e inserirlo nella sede predisposta Sollevare il motoriduttore di 5 10 mm dalla piastra agendo sui piedini filettati per permettere eventuali regolazioni successive tra pignone e cremagliera Pag 11 Manuale FA01004 IT 02 2018 CAME S p A Istruzioni ...

Страница 12: ...iduttore saldare o fissare la cremagliera al cancello in tutta la sua lunghezza Per assemblare i moduli della cremagliera utilizzarne un pezzo di scarto appoggiandolo sotto il punto di giuntura e bloccandolo con due morsetti REGOLAZIONE ACCOPPIAMENTO PIGNONE CREMAGLIERA Aprire e chiudere il cancello manualmente e registrare la distanza dell accoppiamento pignone cremagliera con i piedini filettati...

Страница 13: ...tura sulla cremagliera fino a far scattare il micro molla e fissarla con i grani In chiusura chiudere il cancello infilare l aletta di finecorsa di chiusura sulla cremagliera fino a far scattare il micro molla e fissarla con i grani Molla FISSAGGIO DEL MOTORIDUTTORE Completata la regolazione fissare il motoriduttore alla piastra con le rondelle e i dadi Pag 13 Manuale FA01004 IT 02 2018 CAME S p A...

Страница 14: ...ta magnetica di finecorsa in apertura sulla cremagliera tenendo il magnete a una distanza compresa tra 10 e 30 mm dal sensore magnetico fissare il supporto dell aletta alla cremagliera con le viti senza testa posizionare il magnete dell aletta in perpendicolare rispetto al sensore magnetico fissare l aletta con la vite Pag 14 Manuale FA01004 IT 02 2018 CAME S p A Istruzioni originali ...

Страница 15: ...rsa in apertura sulla cremagliera tenendo il magnete a una distanza compresa tra 10 e 30 mm dal sensore magnetico fissare il supporto dell aletta alla cremagliera con le viti senza testa posizionare il magnete dell aletta in perpendicolare rispetto al sensore magnetico fissare l aletta con la vite Pag 15 Manuale FA01004 IT 02 2018 CAME S p A Istruzioni originali ...

Страница 16: ...NE DELLE PARTI 1 Morsettiera per motoriduttore 2 Morsettiere per encoder 3 Morsettiere per finecorsa 4 Morsettiere per dispositivi di comando e sicurezza 5 Morsettiera per antenna 6 Connettore per scheda AF 7 Connettore per scheda Memory Roll 8 Connettore per scheda R700 R800 9 Connettore per scheda RSE 10 Connettore per scheda RIOCN8WS 11 Display 12 Pulsanti di programmazione 13 Morsettiera per c...

Страница 17: ...ecorsa di apertura contatto NC Finecorsa di chiusura contatto NC 110 230 V AC 50 60 Hz Ingresso alimentazione scheda elettronica 24 V AC DC Uscita alimentazione accessori 24 V AC DC max 40 W Uscita collegamento lampeggiante o lampada ciclo Portata contatto 24 V AC DC 25 W max Vedi funzione F 18 Uscita segnalazione cancello aperto Portata contatto 24 V AC DC 3 W max Vedi funzione F 10 Encoder Aranc...

Страница 18: ...l pulsante di comando o un altro dispositivo di comando Vedi funzione F 1 Funzione APRE CHIUDE INVERSIONE passo passo da dispositivo di comando contatto NO In alternativa dalla programmazione delle funzioni è possibile attivare il comando APRE STOP CHIUDE STOP sequenziale ecc Vedi funzione F 7 Per poter inserire le schede a innesto nei connettori dedicati rimuovere il coperchio della scheda Connet...

Страница 19: ... del movimento fino alla completa chiusura Se non vengono utilizzati i contatti CX e CY vanno disattivati in programmazione DISPOSITIVI DI SICUREZZA Fotocellule Configurare il contatto CX o CY NC ingresso per dispositivi di sicurezza tipo fotocellule Vedi funzioni ingresso CX Funzione F2 o CY Funzione F3 in C1 riapertura durante la chiusura In fase di chiusura del cancello l apertura del contatto ...

Страница 20: ...ato di ogni accessorio Se i dispositivi non sono configurati con la scheda RIOCN8WS appare sul display l errore E18 Nel caso di disturbi di radiofrequenza nell impianto il sistema wireless inibirà il normale funzionamento dell automazione appare sul display l errore E17 Collegamento dei dispositivi di sicurezza test sicurezza A ogni comando di apertura o di chiusura la scheda verifica l efficienza...

Страница 21: ...durante la chiusura per fotocellule C2 richiusura durante l apertura per fotocellule C3 stop parziale C4 attesa ostacolo C7 riapertura durante la chiusura per bordi sensibili C8 richiusura durante l apertura per bordi sensibili OFF Disattivata default C1 C2 C3 C4 C7 C8 F3 Ingresso 2 CY Ingresso NC Possibilità di associare C1 riapertura durante la chiusura per fotocellule C2 richiusura durante l ap...

Страница 22: ...zione nella zona di manovra rimane accesa dall inizio dell apertura fino alla completa chiusura compreso il tempo di attesa prima della chiusura automatica solo con TCA attiva 0 Lampeggiatore default 1 Ciclo F19 Tempo chiusura automatica L attesa prima della chiusura automatica parte dal raggiungimento del punto di finecorsa in apertura per un tempo regolabile da 1 secondo a 180 secondi La chiusur...

Страница 23: ...memorizzate nella Memory Roll Questa funzione appare solo se nella scheda elettronica è stata inserita una Memory Roll 0 Disattivata default 1 Attivata F51 Lettura dati Caricamento dei dati salvati nella Memory Roll Questa funzione appare solo se nella scheda elettronica è stata inserita una Memory Roll 0 Disattivata default 1 Attivata F52 Passaggio parametri in modalità abbinato Caricamento dei p...

Страница 24: ...a dal pulsante collegato su 2 3P il cancello apre per un tempo regolabile da 5 secondi a 40 secondi La funzione compare solo se viene disattivata la funzione Encoder 5 5 secondi 40 40 secondi U1 Inserimento utente Inserimento fino a un max di 250 utenti e associazione a ognuno di essi di una funzione a scelta tra quelle previste L inserimento va fatto con trasmettitore o altro dispositivo di coman...

Страница 25: ...o occorre attendere la manovra completa di apertura Premere immediatamente il pulsante di STOP se si riscontrano anomalie malfunzionamenti rumorosità o vibrazioni sospette o comportamenti inattesi dell impianto GESTIONE DEGLI UTENTI Nelle operazioni di inserimento cancellazione utenti i numeri lampeggianti visualizzati sono numeri disponibili e utilizzabili per un eventuale utente da inserire max ...

Страница 26: ...r confermare un numero da 1 a 250 lampeggerà per qualche secondo Inviare il codice dal trasmettitore o altro dispositivo di comando es selettore a tastiera transponder Segnare l utente inserito nella tabella ELENCO UTENTI REGISTRATI TARATURA CORSA Prima di effettuare la taratura della corsa posizionare il cancello a metà corsa controllare che l area di manovra sia libera da qualsiasi ostacolo e ve...

Страница 27: ...oll vanno eseguite in assenza di tensione Inserire la Memory roll sul connettore dedicato della scheda elettronica Selezionare F50 e premere ENTER per confermare il salvataggio dei dati nella Memory roll Estrarre la Memory roll e inserirla sul connettore di un altra scheda elettronica Selezionare F51 e premere ENTER per confermare il caricamento dei dati dalla Memory roll Dopo aver memorizzato i d...

Страница 28: ...o indicati sul display E 1 La taratura della corsa è stata interrotta dall attivazione del pulsante di STOP E 2 Taratura corsa incompleta E 3 Encoder rotto E 4 Errore test servizi E 7 Tempo lavoro insufficiente E 9 Ostacolo in chiusura E 10 Ostacolo in apertura E 11 Numero massimo di ostacoli rilevati E 13 I contatti NC sono aperti es finecorsa E 14 Errore di comunicazione seriale E 17 Errore sist...

Страница 29: ...STER Programmazione Iniziare con l effettuare solo sul quadro MASTER le seguenti operazioni di impostazioni selezionare 1 abbinato dalla funzione F49 e premere ENTER per confermare selezionare la direzione di apertura dalla funzione F54 e premere ENTER per confermare selezionare ON dalla funzione F52 e premere ENTER per confermare il passaggio dei parametri in modalità abbinato Procedere con le su...

Страница 30: ...so la raccolta e lo smaltimento differenziato nei centri autorizzati Altri componenti schede elettroniche batterie dei trasmettitori etc possono invece contenere sostanze inquinanti Vanno quindi rimossi e consegnati a ditte autorizzate al recupero e allo smaltimento degli stessi Prima di procedere è sempre opportuno verificare le normative specifiche vigenti nel luogo di smaltimento NON DISPERDERE...

Страница 31: ...4 45 46 47 48 49 50 51 52 53 54 55 56 57 58 59 60 61 62 63 64 65 66 67 68 69 70 71 72 73 74 75 76 77 78 79 80 81 82 83 84 85 86 87 88 89 90 91 92 93 Pag 31 Manuale FA01004 IT 02 2018 CAME S p A Traduzione delle istruzioni originali ELENCO UTENTI REGISTRATI Pag 31 Manuale FA01004 IT 02 2018 CAME S p A Istruzioni originali ...

Страница 32: ...136 137 138 139 140 141 142 143 144 145 146 147 148 149 150 151 152 153 154 155 156 157 158 159 160 161 162 163 164 165 166 167 168 169 170 171 172 173 174 175 176 177 178 179 180 181 182 183 184 185 186 187 188 189 Pag 32 Manuale FA01004 IT 02 2018 CAME S p A Traduzione delle istruzioni originali Pag 32 Manuale FA01004 IT 02 2018 CAME S p A Istruzioni originali ...

Страница 33: ... 214 215 216 217 218 219 220 221 222 223 224 225 226 227 228 229 230 231 232 233 234 235 236 237 238 239 240 241 242 243 244 245 246 247 248 249 250 Pag 33 Manuale FA01004 IT 02 2018 CAME S p A Traduzione delle istruzioni originali Pag 33 Manuale FA01004 IT 02 2018 CAME S p A Istruzioni originali ...

Страница 34: ...Pag 34 Manuale FA01004 IT 02 2018 CAME S p A Traduzione delle istruzioni originali Pag 34 Manuale FA01004 IT 02 2018 CAME S p A Istruzioni originali ...

Страница 35: ...Pag 35 Manuale FA01004 IT 02 2018 CAME S p A Traduzione delle istruzioni originali Pag 35 Manuale FA01004 IT 02 2018 CAME S p A Istruzioni originali ...

Страница 36: ...l 39 0422 4940 fax 39 0422 4941 Manuale FA01004 IT 02 2018 CAME S p A Traduzione delle istruzioni originali I contenuti del manuale sono da ritenersi suscettibili di modifica in qualsiasi momento senza obbligo di preavviso Manuale FA01004 IT 02 2018 CAME S p A Istruzioni originali ...

Страница 37: ...Sliding gate operator BXV series BXV04AGM BXV04AGS BXV06AGS BXV08AGS BXV10AGS BXV04RGS BXV06RGS BXV08RGS BXV10RGS INSTALLATION MANUAL EN English FA01004 EN ...

Страница 38: ......

Страница 39: ...d fixed parts due to the gate s movement Before installing the operator check that the gate is in proper mechanical condition that it is properly balanced and that it properly closes if any of these conditions are not met do not continue before having met all safety requirements Make sure the gate is stable and the carriage function properly and are well greased and that it opens and closes smooth...

Страница 40: ...st 1 5 m from the ground and unreachable by any unauthorized persons To pass the collision force test use a suitable sensitive safety edge Install it properly and adjust as needed Before handing over to users check that the system is compliant with the 2006 42 CE uniformed Machinery Directive Make sure the settings on the operator are all suitable and that any safety and protection devices and als...

Страница 41: ...tial and apartment block settings Do not install of use this device in any way except as specified in this manual LIMITS TO USE Type BXV04AGM BXV04AGS BXV04RGS BXV06AGS BXV06RGS BXV08AGS BXV08RGS BXV10AGS BXV10RGS Maximum gate leaf length m 14 18 20 20 Maximum gate leaf weight kg 400 600 800 1000 Pinion module 4 4 4 4 TECHNICAL DATA Type BXV04AGM BXV04AGS BXV04RGS BXV06AGS BXV06RGS BXV08AGS BXV08R...

Страница 42: ... 6 Manual FA01004 EN 01 2018 CAME S p A Translated original instructions STANDARD INSTALLATION 1 Operator 2 Limit switch fins 3 Rack 4 Selector 5 Flashing light 6 Photocells 7 Photocell post 8 Mechanical gate stop 9 Transmitter 10 Slide guides 11 Junction pit 12 Sensitive safety edge DIMENSIONS ...

Страница 43: ...tteries 6 Transformer 7 Mechanical limit switch 8 Release cable threading hole 9 Housing for the RGP1 module 10 Housing for thermostat with heating rod 11 Protection card lid 12 Control board 13 Control board holder 14 Housing for the RLB battery charger 15 Housing for UR042 module 16 Housing for SMA and RGSM001 sensors 17 Release lever 18 Lock 19 Limit switch fins 20 Magnetic sensor BXV04AGM only...

Страница 44: ...5 mm2 Command and control devices 2 x 0 5 mm2 Safety devices photocells TX 2 x 0 5 mm2 RX 2 x 0 5 mm2 When operating at 230 V and outdoors use H05RN F type cables that are 60245 IEC 57 IEC compliant whereas indoors use H05VV F type cables that are 60227 IEC 53 IEC compliant For power supplies up to 48 V you can use FROR 20 22 II type cables that comply with EN 50267 2 1 CEI To connect the antenna ...

Страница 45: ... the junction pit For connecting the gearmotor we suggest using a Ø 40 mm corrugated tube whereas for the accessories we suggest Ø 25 mm tubes Set up a Ø 20 mm tube for running through the external release cable 🅰 The number of tubes depends on the type of system and the accessories you are going to fit LAYING THE ANCHORING PLATE Set up a foundation frame that is larger than the anchoring plate an...

Страница 46: ...n frame with concrete The plate must be perfectly level with the bolts which are entirely above surface Wait at least 24 hrs for the concrete to solidify Remove the foundation frame and fill the hole with earth around the concrete block If the rack is already there place the anchoring plate being careful to respect the measurements shown in the drawing Careful The tubes must pass through their cor...

Страница 47: ... its corresponding housing Raise the gearmotor by 5 to 10 mm from the plate by turning the threaded feet to make room for further pinion and rack adjustments SETTING UP THE GEARMOTOR Remove the gearmotor cover by loosening the side screws Place the gearmotor above the anchoring plate Careful The electric cables must pass under the gearmotor case ...

Страница 48: ... This prevents the gate s weight from bearing down on the operator FASTENING THE RACK If the rack is already set up the next step should be to adjust the rack and pinion coupling distance otherwise fasten it release the gearmotor see RELEASING THE GEARMOTOR paragraph rest the rack above the gearmotor pinion weld or fasten the rack to the gate along its entire length To assemble the rack modules us...

Страница 49: ...rs and nuts Spring For closing close the gate fit the closing limit switch fin into the rack until the micro switch is activated spring and fasten it using the grub screws ESTABLISHING THE LIMIT SWITCH POINTS Mechanical limit switches For opening open the gate fit the opening limit switch fin onto the rack until the micro switch activates spring and fasten it using the grub screws ...

Страница 50: ...icularly to the magnetic sensor tighten the screw to fasten the tab Fasten the tab brace to the rack by using the headless screws Limit switch with magnetic sensor BXV04AGM only For opening open the gate switch magnetic tab onto the rack while keeping the magnet between 10 and 30 mm away from the magnetic sensor ...

Страница 51: ...e the tab magnet perpendicularly to the magnetic sensor tighten the screw to fasten the tab Fasten the tab brace to the rack by using the headless screws For closing close the gate switch magnetic tab onto the rack while keeping the magnet between 10 and 30 mm away from the magnetic sensor ...

Страница 52: ... F 230 V 3 15 A F 110 V Accessories 2 A F DESCRIPTION OF PARTS 1 Terminal for gearmotors 2 Terminals for encoders 3 Terminals for limit switches 4 Command and safety devices terminals 5 Antenna terminal 6 AF card slot 7 Memory Roll card connector 8 R700 R800 board connector 9 RSE card slot 10 Connector for the RIOCN8WS card 11 Display 12 Programming buttons 13 Terminals for paired of CRP connectio...

Страница 53: ...ling output Contact rated for 24 V AC DC 3 W max See function F 10 Either flashing light or cycle light connection output Contact rated for 24 V AC DC 25 W max See function F 18 24 V AC DC max 40 W accessories power supply output 24 V AC DC control board power supply input 110 230 V AC 50 60 Hz Closing limit switch NC contact Opening limit switch NC contact FACTORY WIRING Green Brown White 24 V DC...

Страница 54: ...tor for AF card AF868 or AF43S for remote control To be able to snap in the cards into the dedicated connectors remove the card cover OPEN CLOSE INVERT function step step from control device NO contact Alternatively in the functions programming you can activate the OPEN STOP CLOSE STOP sequential etc See function F 7 STOP button NC contact For stopping the gate while excluding automatic closing To...

Страница 55: ...ion of movement until the gate is completely closed C3 partial stop Stopping of the gate if it is moving with consequent automatic closing if the automatic closing function has been entered C4 obstruction wait Stopping of the gate if it is moving which resumes movement once the obstruction is removed If contacts CX and CY are not used they should be deactivated during programming Sensitive Safety ...

Страница 56: ...efficacy of the safety devices such as photocells Any malfunction inhibits any command and is signaled on display E4 Enable function F 5 in programming RIO WIRELESS DEVICES Plug the RIOCN8WS card into its corresponding connector on the control board Set the function to be associated to the wireless device F65 F66 F67 e F68 Configure the RIOED8WS RIOPH8WS and RIOLX8WS wireless accessories by follow...

Страница 57: ...erly The safety test is always active for wireless devices 0 Deactivated default 1 CX 2 CY 4 CX CY F6 Maintained action The barrier opens and closes by keeping a button pressed Opening button on contact 2 3 and closing button on contact 2 4 All other control devices even radio based ones are excluded 0 Deactivated default 1 Activated F7 Command 2 7 From the control device connected to 2 7 it perfo...

Страница 58: ...n the driveway It stays lit from when the gate starts opening to when it closes including the waiting time prior to automatic closing only with with TCA activated 0 Flashing light default 1 Cycle F19 Automatic Closing Time The automatic closing wait starts when the opening limit switch point is reached and can be set to between 1 and 180 seconds The automatic closing does not work if any of the sa...

Страница 59: ...rs and settings saved in the Memory Roll This function only appears if a Memory Roll has been plugged into the control board 0 Deactivated default 1 Activated F51 Reading of data Uploading data saved in the Memory Roll This function only appears if a Memory Roll has been plugged into the control board 0 Deactivated default 1 Activated F52 Transferring parameters in paired mode Uploading settings f...

Страница 60: ...econds This function only appears if the Encoder function is deactivated 5 5 seconds 40 40 seconds U1 Entering users Entering up to 250 users and associating to each one a function of choice among those included This must be done via transmitter or other control device see ENTERING USERS WITH ASSOCIATED COMMAND paragraph 1 Step step command open close 2 Sequential command open stop close stop 3 Op...

Страница 61: ...ming is done verify that the operator and all the accessories are working properly Use the keys to open and close the gate and ESC to stop it After powering up the system the first maneuver is always the opening In this phase the gate cannot be closed You will need to wait for the gate to completely open Immediately press the STOP button if any suspicious malfunctions noises or vibrations occur in...

Страница 62: ... the travel calibration operation ENTERING A USER WITH AN ASSOCIATED COMMAND Select U 1 Press ENTER to confirm Select a command to associate to the user The commands are 1 step step open close 2 sequential open stop close stop 3 only open 4 partial opening pedestrian Press ENTER to confirm a number between 1 and 250 will start flashing for a few seconds Send the code from the transmitter or other ...

Страница 63: ...user and configuration data by using the Memory Roll so they can be used with another control board even on another system Caution Fitting and extracting the Memory Roll must be done with the mains power disconnected Fit the Memory Roll into the its corresponding connector on the control board Select F50 and press ENTER to confirm the saving of data in the Memory Roll Extract the Memory roll and f...

Страница 64: ... 7 Insufficient operating time E 9 Closing obstruction E 10 Opening obstruction E 11 Maximum number of detected obstructions E 13 The NC contacts are open for example the limit switches E 14 Serial communication error E 17 Wireless system error E 18 The wireless system configuration is missing FINAL OPERATIONS Once the electrical connections are done and the set up is finished fasten the cables to...

Страница 65: ...ommand on the MASTER panel Programming Start by performing the following settings only on the MASTER control panel select 1 paired mode from the F49 function and press ENTER to confirm select the opening direction from the F54 function and press ENTER to confirm select ON from the F52 function and press ENTER to confirm the transferring of the parameters to paired mode Proceed with the next settin...

Страница 66: ...emises which is compliant with the UNI EN ISO 14001 standard to ensure the environment is safeguarded Please continue safeguarding the environment At CAME we consider it one of the fundamentals of our operating and market strategies Simply follow these brief disposal guidelines DISPOSING OF THE PACKAGING The packaging materials cardboard plastic and so on should be disposed of as solid household w...

Страница 67: ...32 33 34 35 36 37 38 39 40 41 42 43 44 45 46 47 48 49 50 51 52 53 54 55 56 57 58 59 60 61 62 63 64 65 66 67 68 69 70 71 72 73 74 75 76 77 78 79 80 81 82 83 84 85 86 87 88 89 90 91 92 93 p 31 Manual FA01004 EN 01 2018 CAME S p A Translated original instructions LIST OF REGISTERED USERS ...

Страница 68: ... 127 128 129 130 131 132 133 134 135 136 137 138 139 140 141 142 143 144 145 146 147 148 149 150 151 152 153 154 155 156 157 158 159 160 161 162 163 164 165 166 167 168 169 170 171 172 173 174 175 176 177 178 179 180 181 182 183 184 185 186 187 188 189 p 32 Manual FA01004 EN 01 2018 CAME S p A Translated original instructions ...

Страница 69: ...4 205 206 207 208 209 210 211 212 213 214 215 216 217 218 219 220 221 222 223 224 225 226 227 228 229 230 231 232 233 234 235 236 237 238 239 240 241 242 243 244 245 246 247 248 249 250 p 33 Manual FA01004 EN 01 2018 CAME S p A Translated original instructions ...

Страница 70: ...p 34 Manual FA01004 EN 01 2018 CAME S p A Translated original instructions ...

Страница 71: ...p 35 Manual FA01004 EN 01 2018 CAME S p A Translated original instructions ...

Страница 72: ...ella Libertà 15 31030 Dosson di Casier Treviso Italy tel 39 0422 4940 fax 39 0422 4941 Manual FA01004 EN 01 2018 CAME S p A Translated original instructions The contents of this manual may change at any time and without notice ...

Страница 73: ...Automatisme pour portails coulissants Série BXV BXV04AGM BXV04AGS BXV06AGS BXV08AGS BXV10AGS BXV04RGS BXV06RGS BXV08RGS BXV10RGS MANUEL D INSTALLATION FR Français FA01004 FR ...

Страница 74: ......

Страница 75: ...évenir tout risque S assurer durant toutes les phases d installation que l automatisme est bien hors tension L automatisme peut être utilisé sur un portail intégrant un portillon uniquement s il peut être actionné avec le portillon en position de sécurité S assurer que l actionnement du portail ne provoque aucun coincement avec les parties fixes présentes tout autour Avant d installer l automatism...

Страница 76: ...upteurs en modalité action maintenue doivent être positionnés à l écart des parties en mouvement mais dans des endroits permettant de bien voir les vantaux en mouvement ainsi que les zones de passage et les sorties de véhicules À défaut d actionnement par badge les dispositifs de commande doivent en outre être installés à une hauteur minimum de 1 5 m et être inaccessibles au public Pour passer le ...

Страница 77: ...s à usage résidentiel ou collectif Toute installation et toute utilisation autres que celles qui sont indiquées dans ce manuel sont interdites LIMITES D UTILISATION Type BXV04AGM BXV04AGS BXV04RGS BXV06AGS BXV06RGS BXV08AGS BXV08RGS BXV10AGS BXV10RGS Longueur max vantail m 14 18 20 20 Poids max vantail Kg 400 600 800 1000 Module pignon 4 4 4 4 DONNÉES TECHNIQUES Type BXV04AGM BXV04AGS BXV04RGS BXV...

Страница 78: ...04 FR 02 2018 CAME S p A Traduction des instructions originales INSTALLATION STANDARD 1 Automatisme 2 Ailettes de fin de course 3 Crémaillère 4 Sélecteur 5 Clignotant 6 Photocellules 7 Colonnes pour photocellules 8 Butée d arrêt 9 Émetteur 10 Patins de guidage 11 Boîtier de dérivation 12 Bord sensible DIMENSIONS ...

Страница 79: ...se mécanique 8 Orifice de passage du câble de déblocage 9 Logement pour module RGP1 10 Logementpourthermostataveccartouchechauffante 11 Couvercle de protection de la carte 12 Carte électronique 13 Support carte électronique 14 Logement pour chargeur de batteries RLB 15 Logement pour module UR042 16 Logement pour capteurs SMA et RGSM001 17 Levier de déblocage 18 Serrure 19 Ailettes de fin de course...

Страница 80: ...ommande 2 x 0 5 mm2 Dispositifs de sécurité photocellules TX 2 x 0 5 mm2 RX 2 x 0 5 mm2 En cas d alimentation en 230 V et d une utilisation en extérieur adopter des câbles H05RN F conformes à la norme 60245 IEC 57 IEC en intérieur utiliser par contre des câbles H05VV F conformes à la norme 60227 IEC 53 IEC Pour les alimentations jusqu à 48 V il est possible d utiliser des câbles FROR 20 22 II conf...

Страница 81: ...s du boîtier de dérivation Il est conseillé de prévoir un tuyau annelé Ø 40 mm pour la connexion du motoréducteur et des tuyaux Ø 25 mm pour les accessoires Prévoir un tuyau de Ø 20 mm pour l éventuel passage du câble de déblocage de l extérieur Le nombre de gaines dépend du type d installation et des accessoires prévus POSE DE LA PLAQUE DE FIXATION Préparer un coffrage plus grand que la plaque de...

Страница 82: ...emplir le coffrage de ciment la plaque doit être parfaitement nivelée et avec le filet des vis totalement en surface Attendre que le tout se solidifie pendant au moins 24 heures Enlever le coffrage et remplir de terre le trou autour du bloc de ciment En présence de la crémaillère positionner la plaque de fixation en respectant les dimensions indiquées sur le dessin Attention Les tuyaux doivent pas...

Страница 83: ...réducteur de 5 à 10 mm de la plaque en intervenant sur les pieds filetés afin de permettre par la suite les éventuels réglages entre pignon et crémaillère PRÉPARATION DU MOTORÉDUCTEUR Enlever le couvercle du motoréducteur en dévissant les vis latérales Positionner le motoréducteur sur la plaque de fixation Attention Les câbles électriques doivent passer sous le carter du motoréducteur ...

Страница 84: ... que le poids du portail ne pèse sur l automatisme FIXATION DE LA CRÉMAILLÈRE Si la crémaillère existe déjà régler directement la distance d accouplement pignon crémaillère ou bien effec tuer la fixation débloquer le motoréducteur voir paragraphe DÉBLOCAGE DU MOTORÉDUCTEUR poser la crémaillère sur le pignon du motoréducteur souder ou fixer la crémaillère au portail sur toute sa longueur Pour l ass...

Страница 85: ... de fermeture fermer le portail enfiler l ailette de fin de course de fermeture sur la crémaillère jusqu au déclic du micro interrupteur ressort et la fixer à l aide des goujons DÉTERMINATION DES POINTS DE FIN DE COURSE Fins de course mécaniques En phase d ouverture ouvrir le portail enfiler l ailette de fin de course d ouverture sur la crémaillère jusqu au déclic du micro interrupteur ressort et ...

Страница 86: ...apteur magnétique fixer l ailette à l aide de la vis fixer le support de l ailette à la crémaillère à l aide des vis sans tête Fin de course avec capteur magnétique BXV04AGM uniquement En phase d ouverture ouvrir le portail enfiler l ailette magnétique de fin de course d ouverture sur la crémaillère en maintenant l aimant à environ 10 30 mm du capteur magnétique ...

Страница 87: ...iculairement par rapport au capteur magnétique fixer l ailette à l aide de la vis fixer le support de l ailette à la crémaillère à l aide des vis sans tête En phase de fermeture fermer le portail enfiler l ailette magnétique de fin de course d ouverture sur la crémaillère en maintenant l aimant à environ 10 30 mm du capteur magnétique ...

Страница 88: ... ZN7 Ligne 1 6 A F 230 V 3 15 A F 110 V Accessoires 2 A F DESCRIPTION DES PARTIES 1 Bornier pour motoréducteur 2 Borniers pour encodeur 3 Borniers pour fin de course 4 Borniers pour dispositifs de commande et de sécurité 5 Bornier pour antenne 6 Connecteur pour carte AF 7 Connecteur pour carte Memory Roll 8 Connecteur pour carte R700 R800 9 Connecteur pour carte RSE 10 Connecteur pour carte RIOCN8...

Страница 89: ... portail ouvert Portée contact 24 VAC DC 3 W max Voir fonction F 10 Sortie connexion clignotant ou lampe cycle Portée contact 24 VAC DC 25 W max Voir fonction F 18 Sortie alimentation accessoires 24 VAC DC max 40 W Entrée alimentation carte électronique 24 VAC DC 110 230 VAC 50 60 Hz Fin de course de fermeture contact NF Fin de course d ouverture contact NF CONNEXION PAR DÉFAUT Vert Marron Blanc M...

Страница 90: ...our la commande radio Soulever le volet de la carte pour pouvoir insérer les cartes enfichables dans les connecteurs dédiés Fonction OUVERTURE FERMETURE INVERSION pas à pas depuis un dispositif de commande contact NO Il est également possible d activer la commande OUVERTURE ARRÊT FERMETURE ARRÊT séquentielle etc depuis la programmation des fonctions Voir fonction F 7 Bouton d ARRÊT contact NF Perm...

Страница 91: ...rsion du mouvement jusqu à fermeture totale du portail C3 arrêt partiel Arrêt du portail en mouvement avec fermeture automatique si la fonction de fermeture automatique a été activée C4 attente obstacle Arrêt du portail en mouvement avec reprise du mouvement après élimination de l obstacle En cas de non utilisation des contacts CX et CY les désactiver durant la phase d auto apprentissage Bords sen...

Страница 92: ...ande d ouverture ou de fermeture Toute éventuelle anomalie désactive les commandes quelles qu elles soient et apparaît à l écran E 4 Activer la fonction F 5 depuis la programmation DISPOSITIFS SANS FIL RIO Insérer la carte RIOCN8WS sur le connecteur dédié sur la carte électronique Configurer la fonction à associer au dispositif sans fil F65 F66 F67 et F68 Configurer les accessoires sans fil RIOED8...

Страница 93: ...hotocellules avant chaque commande d ouverture ou de fermeture Pour les dispositifs sans fil le test sécurité est toujours activé 0 Désactivée par défaut 1 CX 2 CY 4 CX CY F6 Action maintenue La barrière s ouvre et se ferme lorsque le bouton reste enfoncé Bouton d ouverture sur le contact 2 3 et bouton de fermeture sur le contact 2 4 Tous les autres dispositifs de commande même radio sont désactiv...

Страница 94: ...teur Configuration du type d accessoire pour la commande de l automatisme 0 commande avec capteur transpondeur ou lecteur de cartes magnétiques 1 commande avec clavier à code par défaut F18 Lampe supplémentaire Sortie sur le contact 10 E Clignotant clignote durant les phases d ouverture et de fermeture du portail Cycle cette lampe extérieure prévue pour augmenter l éclairage dans la zone de manœuv...

Страница 95: ...ut du ralentissement en phase de fermeture Cette fonction n apparaît qu en cas d activation de la fonction Encodeur 10 10 de la course 25 25 de la course par défaut 60 60 de la course F49 Gestion connexion série Pour activer le fonctionnement vis à vis ou CRP Came Remote Protocol 0 Désactivée par défaut 1 Vis à vis 3 CRP F50 Sauvegarde des données Sauvegarde des utilisateurs et des configurations ...

Страница 96: ...cle Pour la programmation voir les instructions fournies avec l accessoire Cette fonction n apparaît que si la carte électronique est dotée d une RIOCN8WS OFF Désactivée P1 par défaut P2 P3 P4 F71 Temps d ouverture partielle Après une commande d ouverture par le biais du bouton connecté sur 2 3P le portail s ouvre pendant un délai réglable entre 5 et 40 secondes La fonction n apparaît qu en cas de...

Страница 97: ...anique aussi bien à l ouverture qu à la fermeture Mettre sous tension et configurer l installation Important Lancer la programmation à partir des fonctions F54 Sens d ouverture et F1 Arrêt Total Au terme de la programmation s assurer du fonctionnement correct de l automatisme et de tous les accessoires y étant connectés Utiliser les touches pour ouvrir et fermer le portail et la touche ESC pour l ...

Страница 98: ... la course INSERTION UTILISATEUR AVEC COMMANDE ASSOCIÉE Sélectionner U 1 Appuyer sur ENTER pour confirmer Sélectionner une commande à associer à l utilisateur Les commandes sont 1 pas à pas ouverture fermeture 2 séquentielle ouverture arrêt fermeture arrêt 3 ouverture uniquement 4 ouverture partielle piétonne Appuyer sur ENTER pour confirmer un numéro de 1 à 250 clignotera pendant quelques seconde...

Страница 99: ...ation avec la Memory roll de manière à ce qu elles soient réutilisables sur une autre carte électronique voire une autre installation Attention Mettre hors tension avant d exécuter les opérations d installation et d extraction de la Memory roll Insérer la Memory roll sur le connecteur de la carte électronique Sélectionner F50 et appuyer sur ENTER pour confirmer la sauvegarde des données sur la Mem...

Страница 100: ...de fonctionnement insuffisant E 9 Obstacle à la fermeture E 10 Obstacle à l ouverture E 11 Nombre maximum d obstacles détectés E 13 Les contacts NF sont ouverts ex butées de fin de course E 14 Erreur de communication série E 17 Erreur du système sans fil E 18 Absence de configuration du système sans fil OPÉRATIONS FINALES Au terme des branchements électriques et de la mise en fonction fixer les câ...

Страница 101: ...TRE Programmation Effectuer tout d abord les opérations de configuration suivantes uniquement sur l armoire MAÎTRE sélectionner 1 vis à vis au moyen de la fonction F49 et appuyer sur ENTER pour valider sélectionner le sens d ouverture au moyen de la fonction F54 et appuyer sur ENTER pour valider sélectionner ON depuis la fonction F52 et appuyer sur ENTER pour confirmer le passage des paramètres en...

Страница 102: ...ous demandons de poursuivre ces efforts de sauvegarde de l environnement que CAME considère comme l un des fondements du développement de ses propres stratégies opérationnelles et de marché en observant tout simplement de brèves indications en matière d élimination ÉLIMINATION DE L EMBALLAGE Les composants de l emballage carton plastiques etc sont assimilables aux déchets urbains solides et peuven...

Страница 103: ...4 35 36 37 38 39 40 41 42 43 44 45 46 47 48 49 50 51 52 53 54 55 56 57 58 59 60 61 62 63 64 65 66 67 68 69 70 71 72 73 74 75 76 77 78 79 80 81 82 83 84 85 86 87 88 89 90 91 92 93 Page 31 Manuel FA01004 FR 02 2018 CAME S p A Traduction des instructions originales LISTE UTILISATEURS ENREGISTRÉS ...

Страница 104: ...128 129 130 131 132 133 134 135 136 137 138 139 140 141 142 143 144 145 146 147 148 149 150 151 152 153 154 155 156 157 158 159 160 161 162 163 164 165 166 167 168 169 170 171 172 173 174 175 176 177 178 179 180 181 182 183 184 185 186 187 188 189 Page 32 Manuel FA01004 FR 02 2018 CAME S p A Traduction des instructions originales ...

Страница 105: ... 206 207 208 209 210 211 212 213 214 215 216 217 218 219 220 221 222 223 224 225 226 227 228 229 230 231 232 233 234 235 236 237 238 239 240 241 242 243 244 245 246 247 248 249 250 Page 33 Manuel FA01004 FR 02 2018 CAME S p A Traduction des instructions originales ...

Страница 106: ...Page 34 Manuel FA01004 FR 02 2018 CAME S p A Traduction des instructions originales ...

Страница 107: ...Page 35 Manuel FA01004 FR 02 2018 CAME S p A Traduction des instructions originales ...

Страница 108: ...0 Dosson di Casier Treviso Italy tel 39 0422 4940 fax 39 0422 4941 Manuel FA01004 FR 02 2018 CAME S p A Traduction des instructions originales Le contenu de ce manuel est susceptible de subir des modifications à tout moment et sans aucun préavis ...

Страница 109: ...Автоматика для откатных ворот Серия BXV BXV04AGM BXV04AGS BXV06AGS BXV08AGS BXV10AGS BXV04RGS BXV06RGS BXV08RGS BXV10RGS РУКОВОДСТВО ПО УСТАНОВКЕ RU Русский FA01004 RU ...

Страница 110: ......

Страница 111: ...елей электрические подключения и наладку системы в соответствии с установленными правилами мерами безопасности и соответствующим использованием указанными в технической документации на эти товары Если кабель электропитания поврежден он должен быть заменен фирмой изготовителем уполномоченным центром технической поддержки или квалифицированным персоналом во избежание любых рисков Убедитесь в отсутст...

Страница 112: ...одключения к сети электропитания необходимо предусмотрите автоматический выключатель с расстоянием между контак тами не менее 3 мм обеспечивающий защиту от перенапряжения III степени Все устройства управле ния и контроля должны устанавливаться на расстоянии не менее 1 85 м от периметра зоны движения ворот или там где до них невозможно дотянуться с внешней стороны Все устройства управления в режиме...

Страница 113: ...мплексах Запрещается использовать устройство не по назначению и устанавливать его методами отличными от описанных в настоящей инструкции ОГРАНИЧЕНИЯ В ИСПОЛЬЗОВАНИИ Модель BXV04AGM BXV04AGS BXV04RGS BXV06AGS BXV06RGS BXV08AGS BXV08RGS BXV10AGS BXV10RGS Максимальная длина створки м 14 18 20 20 Макс масса створки кг 400 600 800 1000 Модуль шестерни 4 4 4 4 ТЕХНИЧЕСКИЕ ХАРАКТЕРИСТИКИ Модель BXV04AGM ...

Страница 114: ... S p A Перевод оригинальных инструкций ВАРИАНТ ТИПОВОЙ УСТАНОВКИ 1 Автоматика 2 Упоры концевых выключателей 3 Зубчатая рейка 4 Считыватель 5 Сигнальная лампа 6 Фотоэлементы 7 Стойки под фотоэлементы 8 Механические упоры 9 Пульт ДУ 10 Направляющие скобы с роликами 11 Разветвительный колодец 12 Чувствительный профиль ГАБАРИТНЫЕ РАЗМЕРЫ ...

Страница 115: ...ческий концевой выключатель 8 Отверстие для протяжки кабеля устройства разблокировки 9 Место установки модуля RGP1 10 Место установки термостата с картриджем 11 Защитная крышка платы 12 Плата управления 13 Держатель платы 14 Место установки платы аварийного электропитания RLB 15 Место установки модуля UR042 16 Место установки датчиков SMA и RGSM001 17 Рычаг разблокировки 18 Замок 19 Упоры концевых...

Страница 116: ...ти фотоэлементы передатчики 2 x 0 5 мм2 приемники 2 x 0 5 мм2 При напряжении 230 В и применении снаружи необходимо использовать кабели типа H05RN F соответствующие 60245 IEC 57 IEC в помещениях следует использовать кабели типа H05VV F соответствующие 60227 IEC 53 IEC Для электропитания устройств напряжением до 48 В можно использовать кабель FROR 20 22 II соответствующий EN 50267 2 1 CEI Для подклю...

Страница 117: ...етвительного колодца Для подключения привода рекомендуется использовать гофрированную трубу Ø40 мм а для аксессуаров трубы Ø25 мм Подготовьте гофрированную трубу Ø 20 мм для прокладки кабеля наружного устройства разблокировки Количество гофрошлангов зависит от варианта автоматической системы и предусмотренных дополнительных устройств УСТАНОВИТЕ МОНТАЖНОЕ ОСНОВАНИЕ Подготовьте опалубку большего чем...

Страница 118: ... раствором Монтажное основание должно быть абсолютно ровным резьба винтов должна находиться полностью на поверхности Подождите не менее 24 часов чтобы раствор полностью затвердел Удалите опалубку засыпьте пространство вокруг цементного блока землей Если в системе уже предусмотрена зубчатая рейка установите монтажное основание соблюдая указанные на рисунке расстояния Внимание Трубы должны проходить...

Страница 119: ...тренное для него отверстие Приподнимите привод над монтажным основанием на 5 10 мм используя стальные регулировочные шпильки чтобы позднее произвести регулировку зацепления между шестерней и зубчатой рейкой ПОДГОТОВКА ПРИВОДА Снимите крышку привода отвернув боковые винты Установите привод на монтажное основание Внимание Электрические кабели должны проходить под корпусом привода ...

Страница 120: ...я для горизонтальной настройки Это позволит избежать излишнего давления ворот на привод КРЕПЛЕНИЕ ЗУБЧАТОЙ РЕЙКИ Если зубчатая рейка уже предусмотрена необходимо перейти непосредственно к регулировке рассто яния в паре зубчатое колесо зубчатая рейка разблокируйте привод смотрите раздел о РАЗБЛОКИРОВКЕ ПРИВОДА установите зубчатую рейку на шестерню привода приварите или прикрепите зубчатую рейку к в...

Страница 121: ...рывании закройте ворота установите упор концевого выключателя закрывания на зубчатую рейку так чтобы он соприкасался с микровыключателем пружиной и зафиксируйте его винтами РЕГУЛИРОВКА КРАЙНИХ ПОЛОЖЕНИЙ Механические концевые выключатели При открывании откройте ворота установите упор концевого выключателя открывания на зубчатую рейку так чтобы он соприкасался с микровыключателем пружиной и зафиксир...

Страница 122: ...ндикулярно магнитному датчику зафиксируйте упор винтом прикрепите крепление упора концевого выключателя к зубчатой Концевой выключатель с магнитным датчиком только BXV04AGM При открывании откройте ворота вставьте магнитный упор концевого выключателя открывания в зубчатую рейку удерживая магнит на расстоянии от 10 до 30 мм от магнитного датчика ...

Страница 123: ...установите магнит упора перпендикулярно магнитному датчику зафиксируйте упор винтом прикрепите крепление упора концевого выключателя к зубчатой При закрывании закройте ворота вставьте магнитный упор концевого выключателя открывания в зубчатую рейку удерживая магнит на расстоянии от 10 до 30 мм от магнитного датчика ...

Страница 124: ... 2 A ОСНОВНЫЕ КОМПОНЕНТЫ 1 Контакты подключения мотор редуктора 2 Контакты подключения энкодера 3 Контакты подключения концевых выключателей 4 Контакты подключения устройств управления и безопасности 5 Контакты подключения антенны 6 Разъем для платы радиоприемника AF 7 Разъем для карты памяти 8 Разъем для платы R700 R800 9 Разъем для платы RSE 10 Разъем для платы RIOCN8WS 11 Дисплей 12 Кнопки прог...

Страница 125: ...зка контакта 24 В 3 Вт См настройки функции F 10 Контакты подключения сигнальной лампы или лампы цикла макс нагрузка 24 В 25 Вт См настройки функции F 18 Контакты электропитания аксессуаров 24 В 40 Вт макс Контакты электропитания платы управления 24 В 110 230 В 50 60 Гц Концевой выключатель закрывания нормально замкнутые контакты Концевой выключатель открывания нормально замкнутые контакты ЗАВОДСК...

Страница 126: ...равления Чтобы вставить платы в соответствующие разъемы снимите крышку платы управления Функция ОТКРЫТЬ ЗАКРЫТЬ ИЗМЕНИТЬ НАПРАВЛЕНИЕ пошаговый режим с помощью устройства управления нормально разомкнутые контакты В качестве альтернативы при программировании функций можно установить режим ОТКРЫТЬ СТОП ЗАКРЫТЬ последовательный и т д См настройки функции F 7 Кнопка СТОП нормально замкнутые контакты Да...

Страница 127: ...ротивоположное вплоть до полного закрывания C3 Частичный стоп Остановка движущихся ворот с последующим включением автоматического режима закрывания если эта функция выбрана C4 Обнаружение препятствия Ворота останавливаются при обнаружении препятствия и возобновляют движение после его исчезновения или устранения Если контакты CX и CY не используются отключите их при программировании функций Чувстви...

Страница 128: ... собность устройств безопасности например фотоэлементов При обнаружении отклонений в работе устройств безопасности любая команда управления блокируется а на дисплее появляется сообщение E 4 Активируйте функцию F5 с помощью меню программирования функций БЕСПРОВОДНЫЕ УСТРОЙСТВА RIO Вставьте плату RIOCN8WS в специальный разъем на плате управления Выберите функцию присваиваемую беспроводному устройств...

Страница 129: ...ельных профилей ВЫКЛ Выключено по умолчанию C1 C2 C3 C4 C7 C8 F5 Самодиагностика устройств безопасности После каждой команды на открывание или закрывание плата управления проверяет исправность фотоэлементов Для беспроводных устройств функция самодиагностики всегда активна 0 Выключено по умолчанию 1 CX 2 CY 4 CX CY F6 Присутствие оператора Открывание и закрывание ворот осуществляются при постоянном...

Страница 130: ...ка типа аксессуара для управления автоматикой 0 управлениепосредствомпроксимити считывателяилисчитывателямагнитных карт 1 управление с помощью кодонаборной клавиатурой по умолчанию F18 Выбор режима работы вспомогательной лампы Контактный выход 10 E Сигнальная лампа мигает во время движения ворот Лампа цикла лампа в зоне проезда остается включенной от начала открывания до полного закрывания ворот в...

Страница 131: ...замедления ворот при открывании в процентном отношении ко всей траектории движения Регулировка доступна только в том случае если активирована функция Энкодер 10 10 от траектории движения 25 25 от траектории движения по умолчанию 60 60 от траектории движения F38 Начало замедления при закрывании Функция позволяет определить начало замедления ворот при закрывании в процентном отношении ко всей траект...

Страница 132: ...чае если в плату управления вставлена RIOCN8WS ВЫКЛ Выключено по умолчанию P0 P7 P8 F67 Беспроводной вход RIOPH8WS T1 RIOPH8WS присваивается одна из следующих функций на выбор P1 открывание в режиме закрывания P2 закрывание в режиме открывания P3 частичный стоп P4 обнаружение препятствия Для программирования смотрите инструкции прилагаемые к устройству Эта функция доступна только в том случае если...

Страница 133: ...ящего момента Функция позволяет регулировать крутящий момент в диапазоне от 1 минимальный до 5 максимальный 1 2 3 4 5 H1 Версия Отображает версию прошивки ВВОД В ЭКСПЛУАТАЦИЮ По завершении выполнения электрических подключений опытный и квалифицированный персонал должен произвести первое включение автоматики Перед тем как продолжить убедитесь в отсутствии каких либо препятствий и наличии механическ...

Страница 134: ...АЗНЫМИ ФУНКЦИЯМИ УПРАВЛЕНИЯ Выберите U1 Подтвердите нажав ENTER Выберите режим управления который хотите присвоить данному пользователю Режимы управления 1 пошаговый режим открыть закрыть 2 последовательный режим открыть стоп закрыть стоп 3 только открыть 4 частичное открывание пропуск пешехода Подтвердите нажав кнопку ENTER на дисплее появится число от 1 до 250 которое будет мигать в течение неск...

Страница 135: ...ы а также их последующего использования в другой системе с помощью другой платы управления Внимание Операции добавления и извлечения данных с карты памяти выполняются после обесточивания системы Вставьте карту памяти в специальный разъем платы управления Выберите F50 и нажмите ENTER для подтверждения сохранения данных на карте памяти Вытащите карту памяти и вставьте ее в разъем на другой плате упр...

Страница 136: ...боты E 9 Препятствие при закрывании E 10 Препятствие при открывании E 11 Максимальное количество обнаруженных препятствий E 13 Нормально замкнутые контакты Н З разомкнуты например концевые выключатели E 14 Ошибка последовательного подключения E 17 Ошибка беспроводной системы E 18 Беспроводная система не настроена ЗАКЛЮЧИТЕЛЬНЫЕ РАБОТЫ После выполнения всех электрических подключений и подготовки си...

Страница 137: ...ния на блоке управления MASTER Программирование Начните с выполнения только на блоке управления MASTER следующих операций настройки выберите 1 синхронный для функции F49 и нажмите ENTER для подтверждения выберите направление открывания для функции F54 и нажмите ENTER для подтверждения выберите ВКЛ для функции F52 и нажмите ENTER для подтверждения передачи параметров в синхронном режиме Выполните н...

Страница 138: ... безопасность на ее заводах Мы просим чтобы вы продолжали защищать окружающую среду САМЕ считает одним из фундаментальных пунктов стратегии рыночных отношений выполнение этих кратких руководящих принципов УТИЛИЗАЦИЯ УПАКОВКИ Упаковочные компоненты картон пластмасса и т д твердые отходы утилизируемые без каких либо специфических трудностей Необходимо просто разделить их так чтобы они могли быть пер...

Страница 139: ...5 36 37 38 39 40 41 42 43 44 45 46 47 48 49 50 51 52 53 54 55 56 57 58 59 60 61 62 63 64 65 66 67 68 69 70 71 72 73 74 75 76 77 78 79 80 81 82 83 84 85 86 87 88 89 90 91 92 93 Стр 31 Руководство FA01004 RU 02 2018 CAME S p A Перевод оригинальных инструкций СПИСОК ЗАРЕГИСТРИРОВАННЫХ ПОЛЬЗОВАТЕЛЕЙ ...

Страница 140: ...7 128 129 130 131 132 133 134 135 136 137 138 139 140 141 142 143 144 145 146 147 148 149 150 151 152 153 154 155 156 157 158 159 160 161 162 163 164 165 166 167 168 169 170 171 172 173 174 175 176 177 178 179 180 181 182 183 184 185 186 187 188 189 Стр 32 Руководство FA01004 RU 02 2018 CAME S p A Перевод оригинальных инструкций ...

Страница 141: ...05 206 207 208 209 210 211 212 213 214 215 216 217 218 219 220 221 222 223 224 225 226 227 228 229 230 231 232 233 234 235 236 237 238 239 240 241 242 243 244 245 246 247 248 249 250 Стр 33 Руководство FA01004 RU 02 2018 CAME S p A Перевод оригинальных инструкций ...

Страница 142: ...Стр 34 Руководство FA01004 RU 02 2018 CAME S p A Перевод оригинальных инструкций ...

Страница 143: ...Стр 35 Руководство FA01004 RU 02 2018 CAME S p A Перевод оригинальных инструкций ...

Страница 144: ...31030 Dosson di Casier Treviso Italy tel 39 0422 4940 fax 39 0422 4941 Руководство FA01004 RU 02 2018 CAME S p A Перевод оригинальных инструкций Содержание данного руководства может быть изменено в любое время без предварительного уведомления ...

Отзывы: