


119T70541
119T70541
- ver.
1.0
1.0
- 09/2012
119T70541
119T70541
- ver.
1.0
1.0
- 09/2012
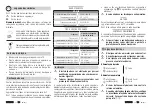
⚠
Once the electrical connection has been made,
check that the direction of rotation of the motor
is as required. If it is not, invert the brown wire
①
and the black one
②
.
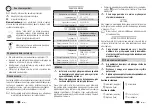
AUTOMATIC operating mode
AUTOMATIC operating mode
/
is pressed, the
moving part opens or closes completely.
HOLD-TO-RUN mode
Each time the
/
button is pressed, the moving part
moves by 1/10 of a revolution (about 36°).
When a button is held down for more than 2 seconds, the
motor switches temporarily into automatic mode until the
fi rst stop, then switching back to hold-to-run mode.
Putting into operation
All the memorised sequences are timed.
When powered, the unit beeps and makes the motor
move if no transmitters are memorised. Otherwise, it
beeps only.
In addition to the radio control, the unit can also be controlled
by an external button that is activated after storing the 1st TX.
When pressed once, the motor begins to move in the chosen
direction. Pressing the same button again or the one for the
opposite direction stops the motor.
STORING THE TX
Act within a minute of having powered the motor.
⚠
Any other motors or virgin accessories in the range
of action of the TX must not be powered.
ADJUSTING THE ERS ON THE SHUTTERS
To adjust the ER points, use the adjustment rod or a
4 mm hex head screwdriver.
• Release the shutter from the roller tube.
• Move the tube without the roller shutter downwards until
the motor comes to a stop on its own.
• Holding down the button,
turn the lower ER
adjustment screw towards (+)
until reaching a
suitable position to couple the belt.
• Attach the shutter to the tube.
• Control of the ascent of the shutter until the motor stops.
I
F
IT
EXCEEDS
THE
REQUIRED
UPPER
POINT
required, stop the
movement, move the shutter under the required stopping
point and adjust the
ER by turning the adjustment
screw towards (-).
I
F
IT
STOPS
AT
A
POINT
BELOW
that required,
turn the ER
adjustment screw towards (+)
until the shutter reaches
the required position.
ADJUSTING THE ERS ON AWNINGS
⚠
Adjust the ER with a margin of safety, considering
the changes in size of the material due to
weather conditions.
After a few days of operation, check the installation
and adjust the
ERs
again if necessary.
AUTOMATIC/HOLD-TO-RUN MODE
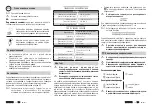
DELETING ALL THE MEMORISED TXS
In order to delete all the memorised TXs, refer to the fi gure
or hold down the unit programming button for 10 seconds.
This procedure will delete all the TXs and the direction
of rotation in the memory.
The buttons remain active to move the moving part
until the fi rst time the electricity is disconnected.
⚠
After deletion, wait 10" before performing other
operations.
TX management
Memorising an additional TX (2
nd
)
In order to memorise a second TX, refer to Fig.
or press
the unit programming button briefly, wait for the beep and
press
UP
on the TX to be memorised.
A maximum of 20 TXs (including weather stations and/or
timers) can be memorised.
If you attempt to add 21 TXs, the unit beeps 5 times
in a row, indicating that the memory is full.
Dismantling and disposal
Before proceeding with these operations, it is always advisable
to check specifi c regulations in force in the place of installation.
Packaging components (cardboard, plastic etc) can be disposed
of together with normal household waste without any diffi culty, by
simply separating the diff erent types of waste and recycling them.
Other components (circuit boards, transmitter batteries etc.), may
contain pollutants. They should therefore be removed and handed
over to companies authorised to recover and dispose of them.
DISPOSE OF PROPERLY!
The data and information provided in this manual are subject to change at any
time without prior notice.
EC Declaration of Incorporation
Came Cancelli Automatici S.p.A. declares that this device com-
plies with the essential requirements and other relevant provisions
established in Directives 2006/95/EC, 2004/108/EC, 1999/5/EC.
To request a true copy, contact Came Cancelli Automatici S.p.A.
For further information or solutions to problems please send your request to
Содержание 8050456001429
Страница 2: ...119T70541 119T70541 ver 1 0 1 0 09 2012 119T70541 119T70541 ver 1 0 1 0 09 2012 K ...
Страница 4: ...119T70541 119T70541 ver 1 0 1 0 09 2012 119T70541 119T70541 ver 1 0 1 0 09 2012 8 1 1 x x x x ...
Страница 5: ...119T70541 119T70541 ver 1 0 1 0 09 2012 119T70541 119T70541 ver 1 0 1 0 09 2012 8 8 8 1 2 1 x x x3 ...


