background image


Paragon-neo

 Getting Started Guide


Page 

16

 of 

21


Workflow 


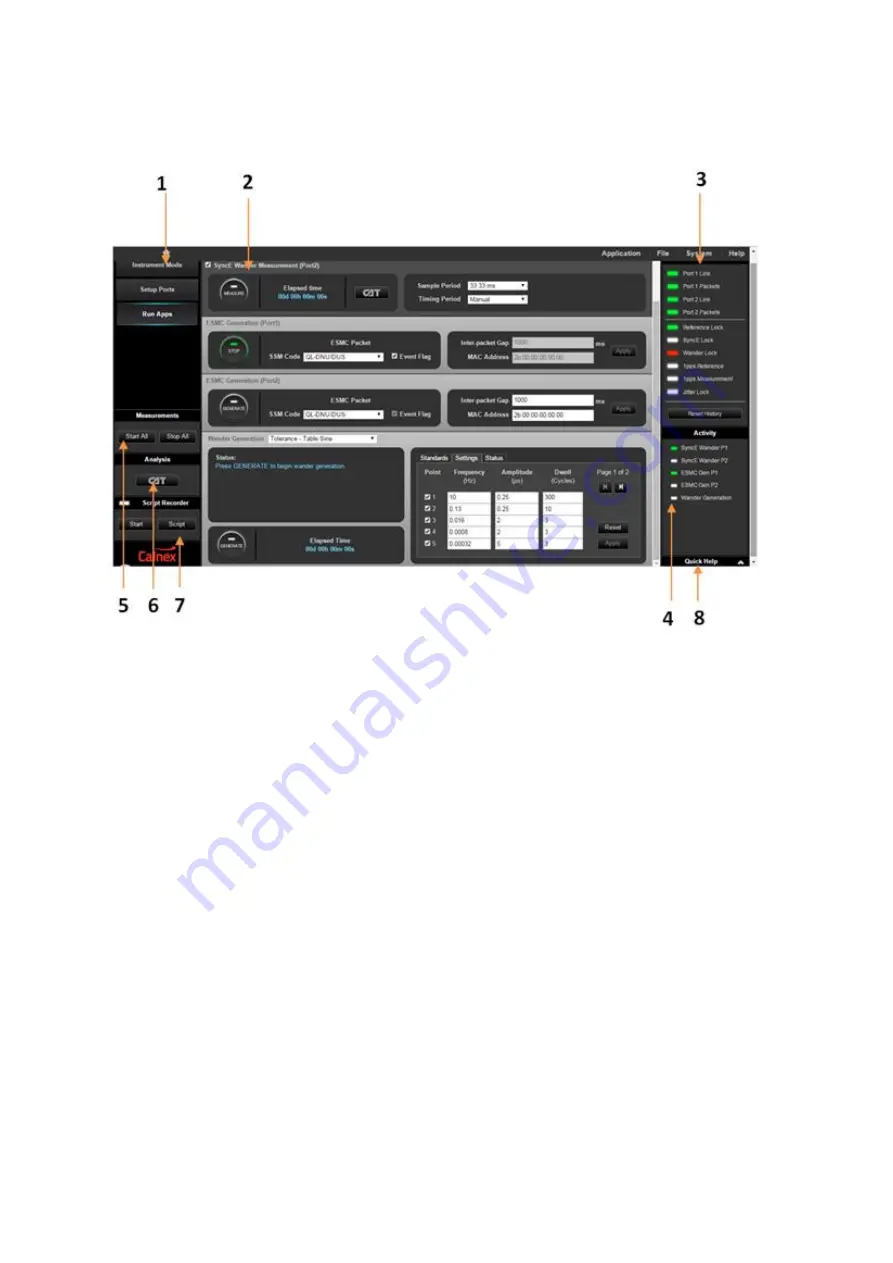
1. Instrument Mode 

Not used. 

2. Run Apps 

Run Apps

 is the main instrument control screen where you can setup and start defined 

synchronization testing 

3. STATUS 

The colors of the following are indications of their status, with green = no alarms, red = current 
alarm, yellow= historical alarm and white = not active in selected Paragon-neo configuration. 


Link

: indicates if there is a physical Ethernet connection to Paragon-neo test ports


by detecting 

transitions on the selected port Rx side. 


Packets:

 indicates if Paragon-neo is receiving Ethernet packets with no PCS or checksum 

errors.   


Reference Lock

: indicates if Paragon-neo is locked to the selected frequency reference source 

as configured under the 

Setup Ports 

key. 


SyncE Lock:

 active when 

Sync-E Clock Rx 

>

Tx

 mode is selected: indicates Paragon-neo Tx 

clock is locked to the incoming SyncE line signal. 


Wander Lock:

 indicates that Paragon-neo is locked to the selected wander measurement input 

signal. 

Содержание Paragon-neo

Страница 1: ...Paragon neo Getting Started Guide Page 1 of 21 ...

Страница 2: ...r moisture To avoid electrical shock Use only power cord supplied or one with adequate ratings and connect only to a properly grounded power socket outlet Ensure the power socket outlet is easily accessible and near the unit Do not open covers Refer servicing to qualified personnel only Power Requirements The unit requires a power source of Voltage 100 240Vac Power 800W max Frequency 50 60Hz Weigh...

Страница 3: ...de mounted strap handle This should be used for carrying the equipment Cleaning If the surface of the Paragon neo becomes dirty remove the AC power and clean with a soft lint free cloth Never use flammable liquids to clean the instrument Warning Use of this equipment in a manner not specified by Calnex Solutions may impair the protection afforded by the equipment and invalidate the warranty Note t...

Страница 4: ...irect insight into actual device and service behavior and the ability to generate a broad range of real world disruption scenarios to validate the operation of your network devices Paragon neo functions with appropriate options installed Ethernet interface rates of 100M 1GbE 10GbE 25GbE 40GbE and 100GbE PTP Master Slave emulation impairments and time error measurements to ITU T G 826x and G 827x s...

Страница 5: ...Jitter testing for 25G 40G and 100G rates certain performance characteristics and internal settings must be applicable to the inserted Optics For the complete list of Calnex supported optics please see the relevant section of the Calnex FAQ keyword optics accessed through the support pages at calnexsol com ...

Страница 6: ...SFP Ethernet ports P2 P9 These are for connections to 1G interfaces on Ethernet devices The pluggable interface supported is SFP 1G 4 a 25G SFP28 Ethernet ports P3 P8 These are for connections to 25G interfaces on Ethernet devices The pluggable interface supported is SFP28 25G 4 b 10G SFP Ethernet ports P3 P8 These are for connections to 10G interfaces on Ethernet devices The pluggable interface s...

Страница 7: ...ng and 2 tip balanced frequency input All other pins must be left unconnected Max differential input voltage 3 6V Input impedance 100Ω T1 120Ω E1 8 b Unbalanced Clock Frequency Measurement Input P16 BNC connector Connection to unbalanced clock frequency measurement input Impedance 75ohm 9 a Balanced 1PPS and ToD Measurement Inputs P17 RJ48 connector Connection to balanced 1pps and ToD measurement ...

Страница 8: ...nternet Explorer Firefox or Chrome The connection to the Paragon neo LAN control port RJ45 is 1GbE 14 Reset Switch Using a pointed instrument press the RESET button to return the Paragon neo to its power on condition This resets IP address to factory default 15 a Balanced 1PPS and ToD Test Output J8 RJ48 connector Connection to balanced 1pps and ToD test output Pins 3 and 6 1pps balanced output Pi...

Страница 9: ...input voltage 6V Input impedance 100Ω Differential 16 d Unbalanced 1PPS Reference Input J7 BNC connector Connection to unbalanced 1pps reference input 17 Unbalanced Clock Reference Outputs J3 Connection to unbalanced clock reference output BNC 2 048MHz or 10MHz Impedance 75ohm 18 a Unbalanced Clock Reference Input J1 Connection to unbalanced clock reference signals BNC 2 048MHz 5MHz 6 312MHz 10MHz...

Страница 10: ...reserved for a future release WARNING It is essential the GPS Antenna input is connected properly and safely to the GPS antenna The GPS antenna and associated cables require an EMP Protector to be fitted for safety reasons The EMP Protector should be professionally fitted as per the manufacturer s instructions These instructions come with the EMP Protector Observe all local regulations on the fitt...

Страница 11: ...With gas discharge tube protectors take care that the GDT has been properly installed before putting the equipment into operation Labels and Disposal Information The Waste Electrical and Electronic Equipment regulations label indicates that the equipment should only be disposed of through an approved method At the end of life please dispose of the equipment through a recognized and approved scheme...

Страница 12: ...the LCD Status Display s keypad 8 The IP address shown on the display is factory set You can alter this to meet your networking needs 9 In the IP Editor menu select DHCP or Static depending on your network configuration by pressing the Enter button to clear or set the checkbox as required Connecting your Computer to Paragon neo 1 First of all configure your computer The exact instructions depend o...

Страница 13: ...erent from the Paragon X IP address shown on its display only in the last 3 digits e g for a Paragon X IP address of 192 168 3 100 a suitable host PC IP address would be 192 168 3 105 This ensures Paragon X will have an IP address on the same subnet as the host PC Microsoft Windows 10 1 Open the Windows Start Menu then type Connections in the search box and select the View Network Connections item...

Страница 14: ... 1 G 8262 3 SyncE Jitter Select if you want to test SyncE Jitter up to 100GbE to ITU T G 8262 1 G 8262 4 PTP Select if you want to test PTP up to 100GbE in user defined scenarios For ITU T testing the Conformance Test selection is recommended 5 Conformance Test Select if you want to test PTP up to 100GbE to ITU T G 826x G 827x standards 6 Application Select to browse to the main application page t...

Страница 15: ... Switch Off This selection in the bottom right of the User Interface allows the user to switch the instrument Off It doesn t enable you to power the instrument On The instrument needs to be switched On before you can control it via the User Interface ...

Страница 16: ... Link indicates if there is a physical Ethernet connection to Paragon neo test ports by detecting transitions on the selected port Rx side Packets indicates if Paragon neo is receiving Ethernet packets with no PCS or checksum errors Reference Lock indicates if Paragon neo is locked to the selected frequency reference source as configured under the Setup Ports key SyncE Lock active when Sync E Cloc...

Страница 17: ...s the Calnex Analysis Tool CAT Select CAT to open up a separate tab in your browser The CAT provides graphical Timing Analysis measurements and results as well as Pass Fail performance against selected metrics and masks for example to ITU T standards 7 Script Recorder The Script Recorder records all key presses and stores them as a script enabling you to cut and paste the recorded script into your...

Страница 18: ...rface is displayed as shown below From the Workflow keys 1 Start the Paragon neo GUI 2 Select SyncE Wander 3 Verify that Using Internal or External Clock is selected 4 Select 5 Select to the required external Clock Reference Input 6 Select the Ethernet tab then select Line Rate and Optical Interface by pressing the appropriate Port 1 and Port 2 Interface selection Pressing the selected Port 1 and ...

Страница 19: ...erfaces only Note Once you have selected this Port 1 and Port 2 Link Status should be green The Reference Lock should be green Select Run Apps 7 Select the button on the connected port Port 1 or Port 2 or select button to start the measurement 8 To stop the measurement after running the test select the button ...

Страница 20: ...Page 20 of 21 9 Select to pull up the results in a separate TAB on the browser Please refer to appropriate Calnex Application Notes and Release Notes for detailed operational steps and result interpretation in relation to specific tests ...

Страница 21: ... 21 of 21 Calnex Solutions Ltd Oracle Campus Linlithgow West Lothian EH49 7LR United Kingdom tel 44 0 1506 671 416 email info calnexsol com calnexsol com Calnex Solutions Ltd 2019 This document is subject to change without notice April 2019 ...

Отзывы: