background image

4)

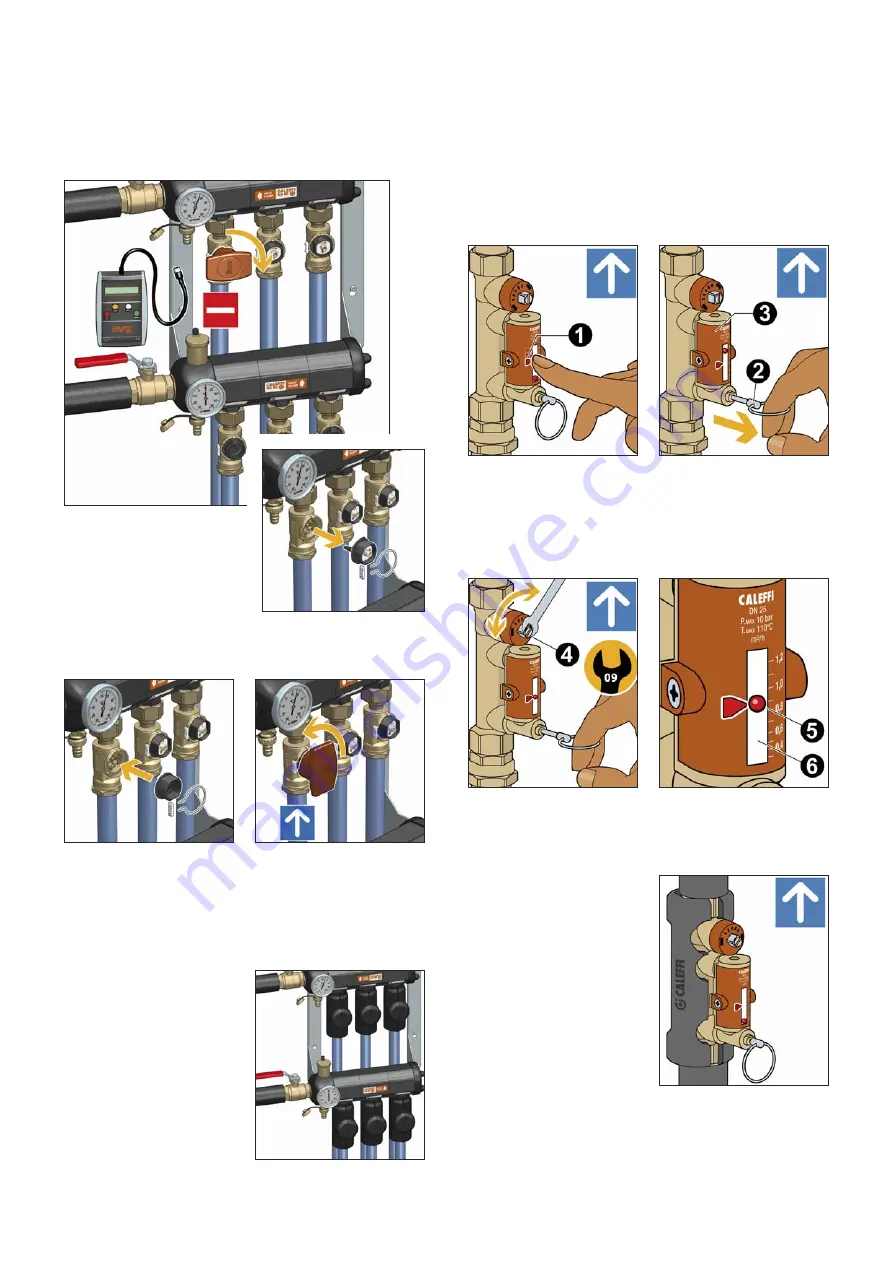
After completing the balancing, release the ring (2) of the flow

meter obturator which, thanks to an internal spring, will

automatically go back

̀

into the closed position.

5)

After balancing the system

insert

the

insulation

and

ensure that it is correctly

closed.

13

Balancing valve – 112 series

Flow rate regulation is carried out as follows:

3)

Keeping the obturator open, use a 9 mm fixed hex spanner on

the valve’s control stem (4) to regulate the flow rate. The flow

rate is indicated by a metal ball (5) running inside a transparent

guide (6) along

̀

a graduated scale in m

3

/min.

1)

With the aid of the indicator

(1), mark the reference flow

rate on which the

̀

valve is to

be set.

2)

Use the ring (2) to open the

obturator that shuts off the

flow of medium in the flow

meter

(3)

under

normal

operating conditions.

After balancing, disconnect the electronic meter and put the

shut-off valves back into their standard operating condition as

follows:

10)

Close the valve using the specific knob and take out the sensor

by removing the ring stop and the seal ring.

Repeat the operations for all the circuits.

The sensors, the electronic meter and the control lever are only

used for start-up. The installer requires a single kit to operate all

systems of this type: this notably reduces costs and prevents

needless system head loss caused by the presence of an obstacle

in the flow.

11)

Fit the cap back in and

secure it with the seal ring

and the stop.

12)

Reopen the valve with the

knob.

13)

After balancing the system

insert

the

insulation

and

ensure that it is correctly

closed.

Содержание GEO 110 Series

Страница 1: ... test Commissioning and circuit balancing 11 Shut off valve fitted for flow rate measuring sensor with Vortex effect 111 series 12 Balancing valve 112 series 13 Float flow meter 113 series Installation in external pocket 14 Accessories 15 16 Function The CALEFFI GEO 110 series manifolds are used for the control and distribution of medium in closed circuit geothermal plants In circuits with geother...

Страница 2: ...ust be made while taking the operational characteristics of both units into consideration An incorrect coupling could compromise the operation of the device and or system The unit must be installed in an environment where any leakage would not cause personal injury or property damage Leave this manual as a reference guide for the user Dispose of the product in compliance with current legislation P...

Страница 3: ...al and clamping Package content The package contains modules for flow and return manifold 8 stainless steel rods including screws and bolts for clamping seal end fitting and closure plates with corresponding insulation 2 automatic air vents 2 fill drain cocks 2 temperature gauges with pockets pair of stainless steel brackets with corresponding wall anchors for wall fixing assembly instructions set...

Страница 4: ...as locks to connect the manifold to the brackets 3 Connect the manifolds to the brackets using the quick coupling before mounting the brackets on the wall If necessary the manifolds can be connected without the insulation inserted on the end fitting so that the screws for connecting the manifold to the brackets remain visible PRE ASSEMBLED MANIFOLD The pre assembled manifold is supplied in the rig...

Страница 5: ...ts to the wall using the mounting slots If more convenient the brackets can be installed on the wall first then connect the manifold to the brackets 2 Uncouple the flow manifold the one with medium flowing from the geothermal probes to the heat pump and connect the regulating valves The manifold is fitted for use with three different circuit balancing systems 6 Determine the manifolds flow directi...

Страница 6: ...end stop Snugly tighten the locking nut Do not disassemble the fitting and then put the elements on the pipe 3 In all three situations simply position the seal and fully tighten the nut on the manifold outlet 2 To make it easier to insert the pipe into the DECA fitting uncouple the shut off balancing valve from the manifold couple the pipe to the fitting and then reconnect the valve to the manifol...

Страница 7: ...ve is fully closed A when the stem is turned 90 anti clockwise to the end stop and the slot is parallel with the valve axis this indicates that the valve is fully open B When the control lever is in the vertical position the ball is open and the medium is flowing A When the lever is in the horizontal position the ball is closed the seats ensure a tight seal and impede the flow of medium B 5 Connec...

Страница 8: ...peat the tightening sequence several times To mount the manifold on the brackets follow the instructions under Mounting brackets manifold 7 Install the drain fully into the lower connection and the pocket for the temperature gauge into the front connection 8 Reassemble the manifold by alternately inserting a seal and a module using the studs as a reference the studs on each module should be aligne...

Страница 9: ...acing the inside and the tightening nuts MODULAR MANIFOLD The distribution manifold has been designed so that it is easy to mount on a bench Since the manifold is reversible it can be mounted with the main connections on the right or left depending on the heat pump position The following instructions refer to the manifold with right side connections although it is also possible to mount the left s...

Страница 10: ...lves in the first circuit and repeat the same sequence of operations for all the other circuits 3 Connect the system testing pump to the fill cock on the flow manifold and a drain pipe to the cock on the return manifold Direct the drain pipe into a container if the medium in the system contains glycol 4 Fill the first circuit by opening the corresponding valves making sure that all the air in the ...

Страница 11: ...sioning and circuit balancing 1 Open all the circuit shut off valves and the ball valves on the main pipes if any 2 Let the medium circulate so as to completely eliminate the air in the system 3 Balance the circuits by operating the regulating valves or shut off valves based on the configuration of the manifold 4 Bring the circuit up to pressure to a maximum of 10 bar for the set period of time Du...

Страница 12: ...t is correctly positioned by means of the holder tabs The tabs when seated must slide underneath the sealing profile when the sensor rotates 8 Insert the spacer so as to ensure the correct position of the ring and turn the control knob to the closed position 7 Insert the measuring sensor and retain it with the seal ring 9 Open the ball using the specific knob These operations must also be repeated...

Страница 13: ...e ring 2 to open the obturator that shuts off the flow of medium in the flow meter 3 under normal operating conditions After balancing disconnect the electronic meter and put the shut off valves back into their standard operating condition as follows 10 Close the valve using the specific knob and take out the sensor by removing the ring stop and the seal ring Repeat the operations for all the circ...

Страница 14: ... the upper connection 3 Close the insulation making holes where necessary 4 Fully install the air vent in the central connection Float flow meter 113 series 1 Adjust the flow rate by using a 9 mm fixed hex spanner on the ball valve 2 The flow rate can be read on the graduated scale in correspondence with the upper edge of the float 3 Carry out the balancing operations on all circuits To obtain the...

Страница 15: ...ermal conductivity DIN 52612 at 0 C 0 038 W m K at 40 C 0 045 W m K Coefficient of resistance to steam DIN 52615 1 300 Working temperature range 0 100 C Reaction to fire DIN 4102 class B2 Ø 25 Ø 32 Ø 40 Application 112001 112003 Code Code Ø 25 Ø 32 Application 111620 111630 111640 Ø 25 Ø 32 Ø 40 Connection Ø 25 Ø 32 Ø 40 Application 111 Ball shut off valve fitted for integrated flow rate measuring...

Страница 16: ...mbient temperature range 10 55 C Medium water glycol solutions saline solutions Max percentage of glycol 50 A saline solution can be used as the medium changing the provided pressure gauge with the stainless steel version code 557596 Code 115080 900 x 860 x 175 Dimensions h x b x d 115 Box for coupling with instrument holder anchoring base 115 series Made of painted steel Composed of outer casing ...

Отзывы: