EVERSKY
™
MS-CDF-019
–
Manufacturing Nr: 22
0001→
Version B
Update: 2022/06/14
15/70
VIII.5.a.
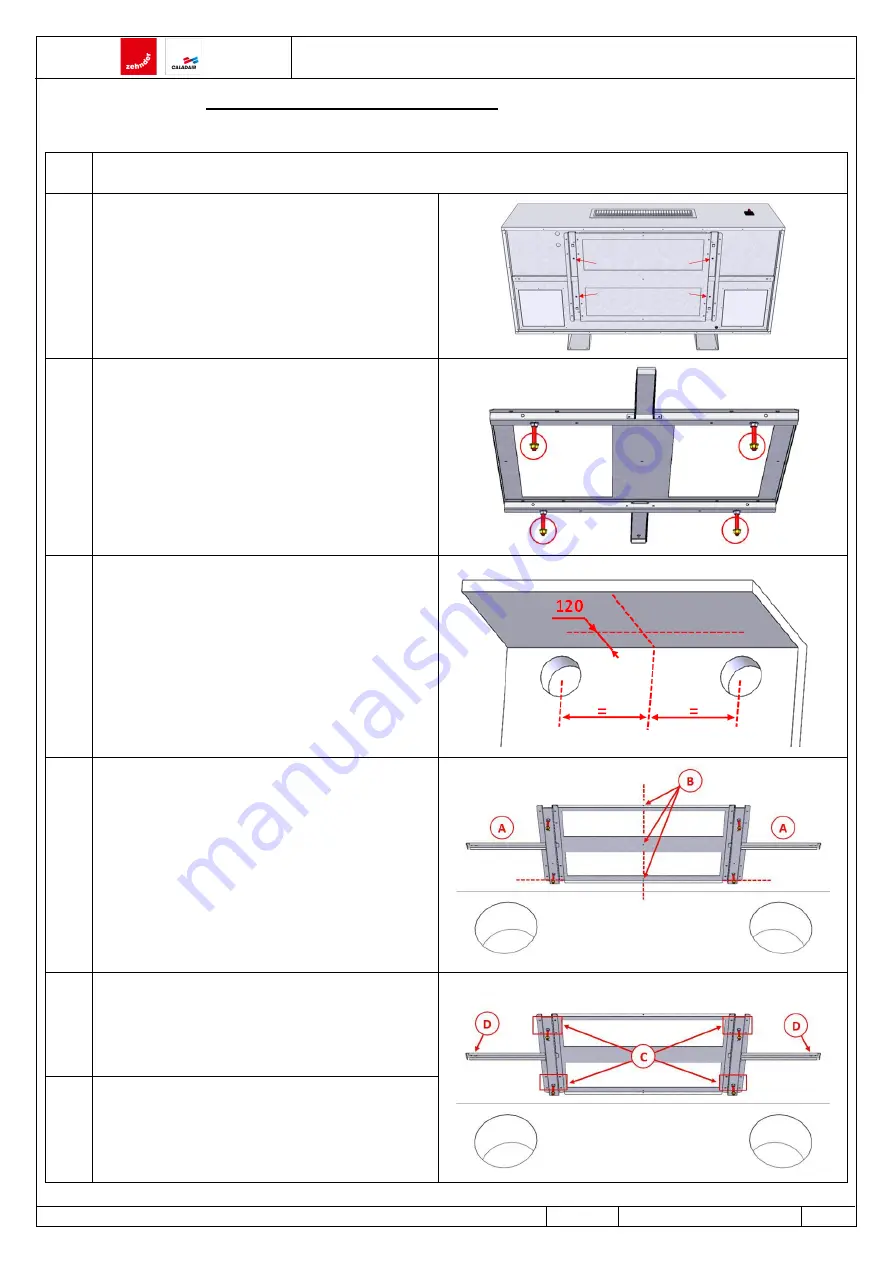
Attachment of the support to the ceiling
Example of unit fastening with duct connection on the back side and leaning against the wall.
Step
Description
1
Remove the bracket from the top panel of the unit by
unscrewing the 4 fixing screws.
Note: the position of the bracket thus fitted at the
factory corresponds to the clamping position once
the un unit is leaning against the wall.
This position may refer to the prior dimensions taking
depending on the installation configuration chosen.
2
Check the presence of clamping nuts on the threaded
rods of the fixing support (nuts to be engaged
approximately 10mm after the end of the threaded
rods).
3
Draw 2 markers on the ceiling:
•
1 line 120mm from the wall to which the unit
is leaning
•
1 line perpendicular to the first above and
centered in relation to the 2 cores made in
the wall.
4
Align the edge of the support on the first line and
centered the frame on the second line by means of
the holes (B) acting as markers (templates plates (A)
can optionally be removed beforehand to facilitate
the installation of the frame and rewound
afterwards).
5
Attach the frame by means of 4 x 4 fixing holes (C).
6
Attach the 2 template plates on their ends by means
of fixing holes (D).
Содержание EVERSKY 1100
Страница 43: ...EVERSKY MS CDF 019 Manufacturing Nr 220001 Version B Update 2022 06 14 43 70 Supply fan Extract fan...
Страница 48: ...EVERSKY MS CDF 019 Manufacturing Nr 220001 Version B Update 2022 06 14 48 70 XVII GENERAL WIRING DIAGRAM...
Страница 49: ...EVERSKY MS CDF 019 Manufacturing Nr 220001 Version B Update 2022 06 14 49 70...
Страница 69: ...EVERSKY MS CDF 019 Manufacturing Nr 220001 Version B Update 2022 06 14 69 70 NOTES Date Stakeholder Comments...
Страница 70: ...EVERSKY MS CDF 019 Manufacturing Nr 220001 Version B Update 2022 06 14 70 70 Date Stakeholder Comments...


