background image

33

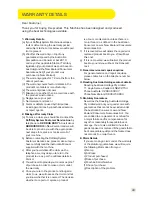
WARRANTY DETAILS

Dear Customer,
Thank you for buying this product. This Machine has been designed and produced  
using the best technologies available.

1. Warranty Details:

(a)   If your Caffitaly System Machine develops a 

fault or defect during the warranty period, 
and subject to the terms below, we will repair 
it or replace it.

(b)   We offer this warranty on top of any 

guarantees imposed by the Australian 
Competition and Consumer Act 2010 
and any other applicable State or Territory 
legislation (if your product was purchased in 
Australia] and the New Zealand Consumers 
Guarantees Act (if your product was 
purchased in New Zealand).

(c)   The warranty applies for 12 months from the 

date of purchase.

(d)   The warranty covers fault or defects in the 

product’s materials or manufacturing.

(e)   The warranty does not cover:
(f )   Misuse, or use other than in accordance with 

the product’s instructions;

(g   Negligence on your part;
(h   Normal wear and tear; or
(i)    Faults or defects caused by third parties, 

including work done by unauthorised service 
or repair agents.

2. Making a Warranty Claim

(a)  To make a claim you should first contact the 

Caffitaly System Customer Service Line

 by 

telephone on 

02 9846 0307

 in Australia or 

0800 450 894

 in New Zealand and we will 

be able to provide you with the appropriate 
next steps for service or replacement of 
your machine.

b)    Before contacting the Caffitaly System 

Customer Service Line, please make sure you 
have carefully read the Instruction Manual 
supplied with the machine.

c)    After you have initiated the claim via the 

telephone, we may ask you to return the 
product to us, as per the address details in 
Point 4.

d)    You will need to provide your receipt as proof 

of purchase in order to make a claim under 
the warranty.

e)    Once you return the product and lodged a 

claim to us, we will assess the claim and let 
you know whether it is covered. The decision 
whether to repair or replace a product 

is at our sole discretion unless there is a 
‘major failure’ as defined in the Australian 
Consumer Law or New Zealand Consumers 
Guarantees Act. 

f)    If it is covered we will deliver the repaired or 

replaced product back to you. We will bear 
this cost.

g)    If it is not covered, we will deliver the product 

back to you and you will bear the transport 
cost.

3. General service and repair enquiries


 For general service and repair enquiries, 
please contact us on the telephone number 
below.

4. Roasting Australia Holdings contact details 


 Roasting Australia Holdings Pty Limited  
11 Hoyle Avenue, Castle Hill, NSW 2154  
Phone Australia: 02 9846 0307 
Phone New Zealand: 0800 450 894

5. Statutory Guarantees


 As well as the Roasting Australia Holdings 
Pty Limited warranty, our goods come with 
guarantees that cannot be excluded under 
the Australian Consumer Law and New 
Zealand Consumers Guarantees Act . You 
are entitled to a replacement or refund for 
a major failure and for compensation for 
any other reasonably foreseeable loss or 
damage. You are also entitled to have the 
goods repaired or replaced if the goods fail to 
be of acceptable quality and the failure does 
not amount to a major failure. 

6. Claim Details


 If you are making a claim under the warranty 
or the statutory guarantees, we will require 
the following information from you:  
a) Name; 
b) Address; 
c) Product purchased; 
d) Date of purchase; 
e) Machine Serial Number; 
f)  Shop of purchase; 
g) Description of the problem.

Содержание S23

Страница 1: ...affitaly System Capsules INSTRUCTION MANUAL Imported by Roasting Australia Holdings Pty Limited 11 Hoyle Avenue Castle Hill NSW 2154 Phone AU 02 9846 0307 NZ 0800 450 894 Email caffitalysystem rfg com...

Страница 2: ...he quantity of Beverage in a cup 16 General Operating Indications 17 Cleaning and Maintenance Daily Maintenance House Keeping 19 Cleaning Rinse Cycle 20 Cleaning Milk System Rinse Cycle 21 Detaching t...

Страница 3: ...amed up with one of the many Caffitaly System capsules from your favourite brands Your Taste Your Choice Brought to you by Roasting Australia proudly part of JOIN the Caffitaly Club to recieve Member...

Страница 4: ...oise or odours or if any other problem is detected inside the appliance do not use it and contact the Caffitaly System Customer Service Line on AU 02 9846 0307 NZ 0800 450 894 The packaging elements p...

Страница 5: ...the lever is raised during the delivery of a product the machine can emit jets of hot water Risk of Burns Do not remove parts of the appliance OR insert objects into the openings This could cause ele...

Страница 6: ...pensing Head Cover Milk Jug Inlet Dispensing Spout Milk Outlet Tube Reverse Side of Dispensing Head Milk Connector Out Knob Reverse Side of Dispensing Head Used Capsule Drawer Drip Tray Power On Off S...

Страница 7: ...ram 4 Dial Settings Always ensure the Milk Jug is placed back into position gently but firmly onto your machine There should be NO GAP between the Milk Jug Connector and the Machine The Milk Jug Cover...

Страница 8: ...ct espresso coffee or any other beverages except tea Capsules appropriate for the Tea Button will be indicated on the packaging Inappropriate use of this button may damage the machine and void your wa...

Страница 9: ...ted Replace the Milk Jug Cover onto the Milk Jug return into position on your machine Place a large empty container at least 500ml under the Dispensing Spout Note You can remove the Drip Tray if requi...

Страница 10: ...Remove the Milk Jug empty rinse with fresh water return to your machine Fill the Milk Jug with fresh milk and return back into position After Step 7 has successfully been completed all the button lig...

Страница 11: ...lose the Lever fully place a cup or mug under the Dispensing Spout NOTE If the Milk Jug is not in position only the bottom lights will flash When the machine has warmed up the bottom lights only will...

Страница 12: ...prox 30 seconds until warmed up When all the button lights remain steadily lit your machine is ready for use 2 Insert the capsule pressing gently into place 4 Continued on next page Raise the Lever to...

Страница 13: ...button lights remain steadily lit your machine is ready for use Remove the Milk Jug from your machine Note The Milk Jug is removed from the side not the front 2 5 Continued on next page NOTE The quant...

Страница 14: ...Milk Jug Dial This will regulate the amount and density of froth that is dispensed If you prefer a smaller amount of froth for example a Flat White turn the Milk Jug Dial to the left If you like Latte...

Страница 15: ...h 9 10 DISPENSING MILK BASED DRINKS continued PLEASE NOTE To maintain the freshness of the milk the Milk Jug should be removed and stored in the refrigerator between uses Please ensure a Milk Jug Syst...

Страница 16: ...mpartment Insert the capsule pressing gently into place Close the Lever place a cup or mug under the Dispensing Spout Press and hold the desired beverage button Machine will beep once indicating the r...

Страница 17: ...inuously blink the machine is warming up This will take approx 30 seconds 1 1 2 Press the Single or Double Espresso button Wait for the machine to complete the Priming Cycle as it fills with water Emp...

Страница 18: ...raised during the delivery of a beverage the machine can emit jets of hot water Risk of burns The Indicator light blinks RED and beeps The appliance will immediately stop dispensing 1 Close the Lever...

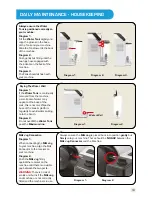
Страница 19: ...mal Wipe the base of the tank platform regularly to avoid water spilling onto the bench Diagram 2 Do not overfill the Water Tank past the Maximum line Milk Jug Connection Diagram 1 When connecting the...

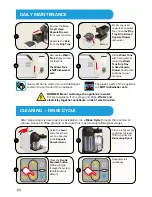
Страница 20: ...ere are no capsules in the Capsule Compartment Empty any used capsules and water then rinse the Drip Tray Grid Used Capsule Drawer with water Place a large empty container at least 500ml under the Dis...

Страница 21: ...er must be completed at the end of each day It is recommended to perform a complete clean of the Milk Jug and components at least twice a week or more Refer to instructions on the following page NOTE...

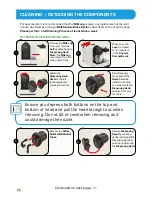
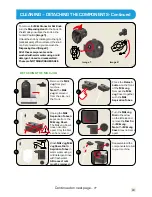
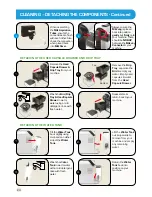
Страница 22: ...capsule is in the Capsule Compartment DETACHING THE DISPENSING HEAD 3 Simultaneously press both of the Detach buttons located on the top and underneath the Dispensing Head Remove from your machine Ro...

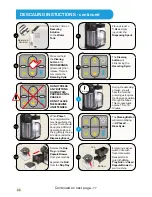
Страница 23: ...the Milk Jug from your machine Note The Milk Jug is removed from the side not the front Press the Detach button on the front of the Milk Jug Remove the Milk Jug Cover together with the Milk Aspiration...

Страница 24: ...k slightly using two hands on either side of the Water Tank Remove the Drip Tray separate the Grid empty any water Empty used capsules water from the Used Capsule Drawer Lift the Water Tank out upward...

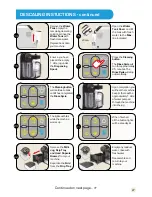
Страница 25: ...vanced program that monitors how much water is used to dispense beverages Descaling Signal When the Descaling Indicator Light blinks Orange it is advisable to perform the Decaling Cycle with 48 hours...

Страница 26: ...l stop the pumps There should be approx 600ml of descaling solution in the jug Empty the jug replace under the Dispensing Spout Remove the Drip Tray and Used Capsule Drawer from your machine Separate...

Страница 27: ...er the Dispensing Spout Remove the Milk Jug Drip Tray and Used Capsule Drawer from your machine Separate the Grid from the Drip Tray The Cleaning button will continue to blink until it has completed t...

Страница 28: ...OLE of Step 3 and Step 4 2 Switch ON using the ON OFF button then after 1 second close and open the Lever within 1 second The button lights will flash and the RED Indicator light will blink indicating...

Страница 29: ...e button lights will slowly and sequentially blink To start using your machine again press any button or lift the Lever 1 2 All the button lights will blink as the machine warms up Approx 20 to 30 sec...

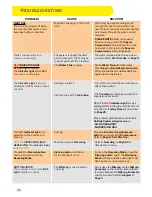
Страница 30: ...Incorrect use of the Tea button Turn off the machine then turn it back on after a few minutes The Tea button is only to be used for Tea capsules and hot water Note If the RED Indicator Light remains s...

Страница 31: ...hine Ensure there is no gap between the Milk Jug Connector and the machine Diagram 3 Page 7 Ensure the Milk Aspiration Tubes are connected correctly Refer to Page 24 Undo the Coffee Dispensing Head tu...

Страница 32: ...can be a source of danger The appliance has been manufactured using high quality materials that can be reused or recycled Dispose of the appliance in a suitable waste collection centre Refer to data...

Страница 33: ...oduct to us as per the address details in Point 4 d You will need to provide your receipt as proof of purchase in order to make a claim under the warranty e Once you return the product and lodged a cl...

Страница 34: ...34 NOTES...

Страница 35: ...35 NOTES...

Страница 36: ...ly System capsule there are two innovative filters Thanks to the upper one we can obtain a uniform distribution of water over the entire surface of the coffee Then the bottom filter ensures the best c...

Отзывы: