19
DAILY MAINTENANCE - HOUSEKEEPING
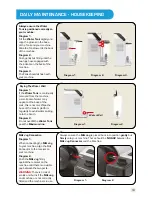
Always ensure the Water
Tank is positioned correctly on
your machine.
Diagram 1.
Tilt the
Water Tank
slightly and
align the groves on the base
of the Tank and your machine.
Slide the Tank towards the back
of the machine.
Diagram 2.
Push gently but firmly until the
two lugs have engaged with
the indents on the back of the
machine.
Diagram 3.
The Tank should sit flush with
your machine.
Drying The Water Well
Diagram 1.
If the
Water Tank
is continually
removed from the machine,
a small pool of water may
appear at the base of the
tank, this is normal. Wipe the
base of the tank & platform
regularly to avoid water spilling
onto the bench.
Diagram 2.
Do not overfill the
Water Tank
past the
Maximum line.
Milk Jug Connection
Diagram 1.
When connecting the
Milk Jug
to your machine, align the Milk
Connector to the receiver on
your machine.
Diagram 2.
Push the
Milk Jug
firmly
against the receiver on the
machine until there is no visible
gap between the two parts.
WARNING:
There is a risk of
scolds and burns if the
Milk Jug
and machine are not correctly
fitted and the machine is in use.
Always ensure the
Milk Jug
is placed back into position
gently
but
firmly
onto your machine. There should be
NO GAP
between the
Milk Jug Connector
and the Machine.
Diagram 1.
Diagram 1.
Water Well
Diagram 1.
Diagram 2.
Diagram 2.
Diagram 2.
Diagram 3.
Содержание S23
Страница 34: ...34 NOTES...
Страница 35: ...35 NOTES...


