23
CLEANING – DETACHING THE COMPONENTS - Continued
Continued on next page... >>
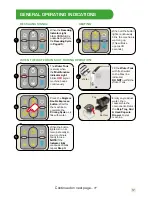
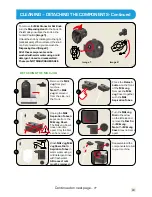
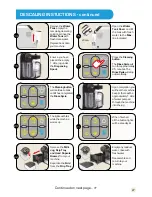
To remove the
Milk Connector Out
Knob
,
turn the
Dispensing Head
to the back. On
the left side you will see the knob in the
‘Locked Position
(Image 1).
Unlock the knob by rotating it to the right
(anticlockwise). When unlocked, the knob
can be removed and you can wash the
Dispensing Head (Image 2).
All of these components can be
washed with warm water using a mild
detergent, rinsed and reassembled.
These are NOT DISHWASHER SAFE.
Image 1
Image 2
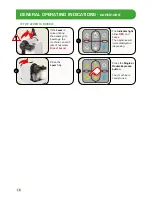
Remove the
Milk
Jug
from your
machine.
Note:
The
Milk
Jug
is removed
from the side, not
the front.
Press the
Detach
button
on the front
of the
Milk Jug
.
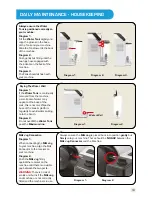
Remove the
Milk
Jug
Cover together
with the
Milk
Aspiration Tubes.
Unplug the
Milk
Aspiration Tubes
&
separate from the
Milk Jug Cover.
The Milk Jug Cover
does not come
apart. Only the Dial
can be removed.
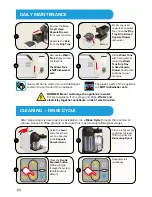
Wash
Milk Jug, Milk
Jug Cover, Dial
&
Aspiration Tubes
in
warm water using a
mild detergent, rinse
with fresh water.
All traces of milk
must be removed.
Turn the
Milk Jug
Dial
to the arrow
on the left side and
remove the
Dial
from
the
Milk Jug
.
Note:
The
Milk Jug
Cover
does not come
apart.
Reassemble all the
components & return
to your machine.
3.
5.
4.
6.
DETACHING THE MILK JUG
1.
2.
Содержание S23
Страница 34: ...34 NOTES...
Страница 35: ...35 NOTES...


