background image

Black plate (77,1)

Cadillac SRX Navigation System (Include Mex) - 2012

Infotainment System

77

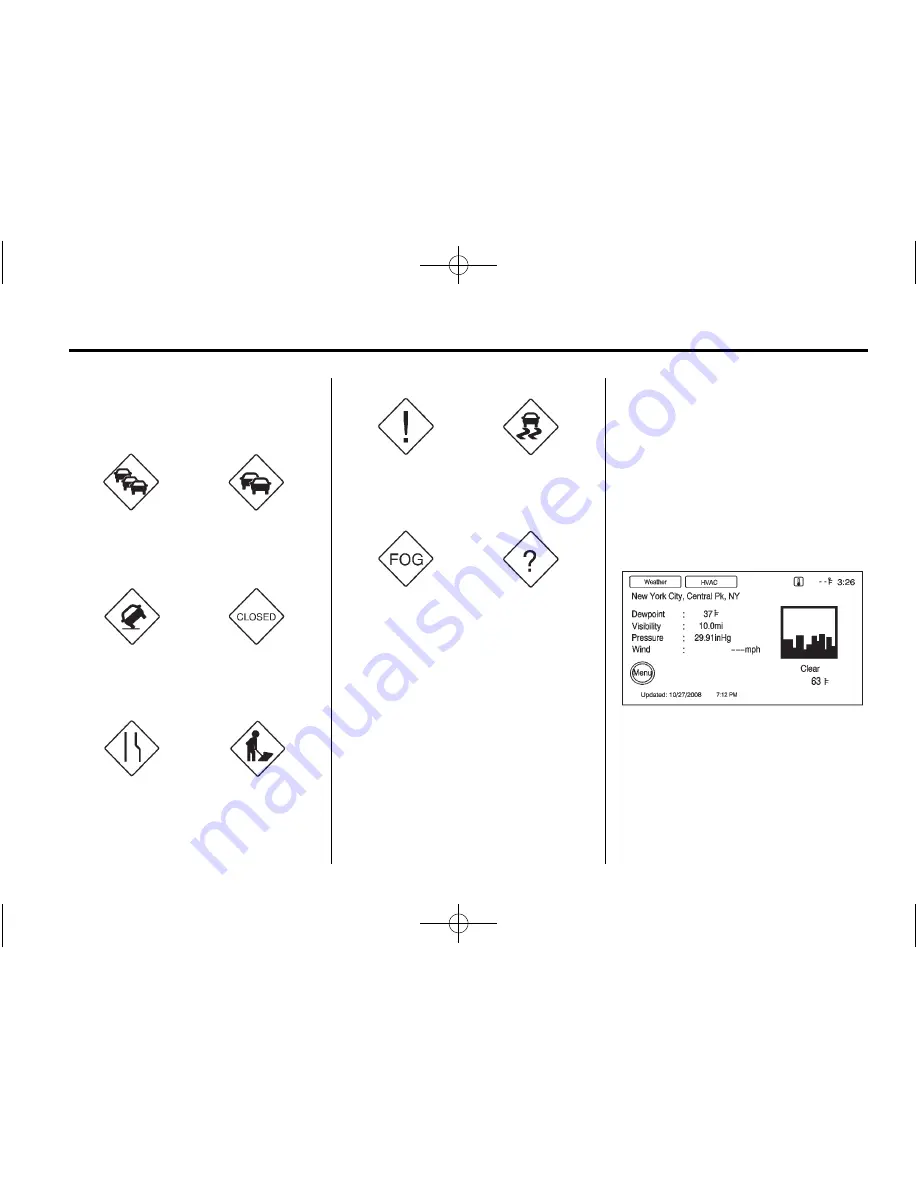
Traffic Condition Symbols

The following are traffic condition
symbols may display:

Stopped Traffic

Traffic Jam

Accident

Road Closed

Lane Narrows

Road work,

Construction

Alert

Road Condition

Road Visibility

Other

XM

Weather (If Equipped)

Press INFO, then press INFO again
until the Weather screen button is
selected or press the Weather
screen button.

Current Condition

Press INFO until the Weather tab is
selected to show the current
weather condition of the city of the
vehicle

s current position.

Allow up to 15 minutes for the
current weather in the area to
display.

Содержание 2011 SRX CROSSOVER

Страница 1: ...t RSE System 39 Navigation 45 Using the Navigation System 45 Maps 50 Navigation Symbols 52 Destination 56 OnStar Destination Download 68 Configure Menu 70 Global Positioning System GPS 79 Vehicle Posi...

Страница 2: ...Black plate 2 1 Cadillac SRX Navigation System Include Mex 2012...

Страница 3: ...me familiar with how the navigation system operates The navigation system includes navigation and audio functions Keeping your eyes on the road and your mind on the drive is important for safe driving...

Страница 4: ...test road changes it may suggest using a road that is now closed for construction or a turn that is prohibited by signs at the intersection Always evaluate whether following the system s directions is...

Страница 5: ...tem Overview A NAV m n Navigation Screen B VOL O Volume Power C TUNE INFO Tune Information D PHONE E TONE F O REC Record G DEL Delete H FAV Favorite I l SEEK Forward J g SEEK Reverse K Y Eject L RADIO...

Страница 6: ...s current location displays 2 Press NAV to change between a map audio split view or a full map view Config Menu Press CONFIG to display the Config Menu The Config Menu is used to change the screens fo...

Страница 7: ...dress Book Fav Route Preset Destinations and HDD music files Storing Radio Station Presets Up to 36 preset stations can be stored AM FM and XM if equipped can be mixed To store presets 1 Press O to tu...

Страница 8: ...tically selected 6 Press OK The address information screen displays the address entered 7 Press Go if correct The route will calculate 8 Select the route preference for Fastest Shortest or Easiest The...

Страница 9: ...name appears in that preset destination screen button and is now available to select from the Select Destination screen See Using the Stored Preset Destinations next in this section to select it as a...

Страница 10: ...es could scratch the glass Use only a soft cloth and do not spray cleaner directly on the system as it could affect the mechanical parts Do not wipe the panel with a hard cloth or use a volatile liqui...

Страница 11: ...he audio system is on and a map screen is being viewed audio information displays at the top of the map screens Press the audio display screen button to display the current audio source screen The dis...

Страница 12: ...position balances the sound between the left and right speakers To adjust the speaker fade Press and hold the w for more sound from the front speakers and the x for more sound from the rear speakers...

Страница 13: ...urned on There is no need to adjust audio controls For more details visit www bose com centerpoint Radio Settings To access the Radio settings menu press CONFIG to display the Config Menu Turn the MEN...

Страница 14: ...ns in the current band AM or FM band press MENU SELECT The radio performs a search for available stations Mixed Band Presets Up to 36 preset stations can be stored Each page can store six preset stati...

Страница 15: ...vehicle off press k so that timeshift keeps recording for 20 minutes If the vehicle is still off after 20 minutes the system stops recording and all information is lost If a low battery condition occu...

Страница 16: ...displays on the screen XM Categories XM stations are organized in categories Removing or Adding Categories 1 Press CONFIG Turn the MENU SELECT knob until Radio displays Press the MENU SELECT knob to...

Страница 17: ...s Do not apply labels to discs The labels could get caught in the player Insert only one disc at a time Keep the loading slot free of foreign materials liquids and debris If a description label is nee...

Страница 18: ...me displays g SEEK Reverse Press to seek to the beginning of the current or previous track If the track has been playing for less than five seconds it seeks the previous track If longer than five seco...

Страница 19: ...the menu options display on the DVD screen The menu options time out and a full screen appears after about 10 seconds Press anywhere on the navigation system screen or press FAV CD AUX HDD or BACK to...

Страница 20: ...the beginning of the current or previous chapter If the chapter has played for less than five seconds it goes to the previous chapter If the chapter has played longer than five seconds the current ch...

Страница 21: ...ms or languages depending on the DVD Subtitle 1 Select while a DVD is playing to view with subtitles on or off or to change the language of the subtitles 2 Continue pressing to cycle through the avail...

Страница 22: ...th a maximum hierarchy of eight folders Each folder or album should contain 18 songs or less Maximum of 1024 files on a disc Recorded on a CD R or CD RW with a maximum capacity of 700 MB When an MP3 i...

Страница 23: ...elect the track from the list The system plays the selected track and returns to the CD screen Disc Music Menu Press the Disc Menu screen button or press the MENU SELECT knob while on the Disc audio s...

Страница 24: ...the list and it begins to play Songs are displayed in alphabetical order based on the Song Title ID3 tag if available Root Directory The root directory is treated as a folder All files contained direc...

Страница 25: ...the disc is clean with no damage otherwise the system might partically record the track To select the hard drive audio source Press CD AUX HDD cycle through the available audio source until the HDD so...

Страница 26: ...B screen 3 Press l SEEK g SEEK or press the USB Music Menu to select a song for recording 4 Press REC 5 A confirmation displays 6 Select the song name to record A progress bar displays Duplicate Conte...

Страница 27: ...playing for less than five seconds the previous track plays If longer than five seconds the current track restarts 2 Press and hold this button to reverse quickly through playback Release this button...

Страница 28: ...aylists on the hard drive 2 Select a playlist to view a list of all songs in the playlist 3 Select a song from the list Once selected Playlist Mode displays Artists 1 Press to view the artists on the...

Страница 29: ...on at the bottom of the HDD screen 2 Select FAV from the HDD Music Menu Favorite Artist Album and Genre are in the corresponding list USB Host Support The USB connector uses the USB 2 0 USB Supported...

Страница 30: ...has been playing for less than five seconds the previous track plays If playing longer than five seconds the current track restarts 2 Press and hold to reverse quickly through playback 3 Release the b...

Страница 31: ...ll songs on the album 3 Select a song from the list Once selected Album Mode displays All Songs 1 Press to view a list of all songs stored on the USB 2 Select a song from the list Once selected All So...

Страница 32: ...ck connector Connect the other end to the USB port in the center console iPod music information displays on the radio s display and begins playing through the vehicle s audio system The iPod battery r...

Страница 33: ...t an album name to view a list of all songs on the album 3 Select the desired song from the list Once a song has been selected Album Mode appears on the iPod main screen All Songs 1 Press to view a li...

Страница 34: ...CD or recording it to a USB storage device Audible com is a provider of spoken word audio entertainment information and educational programming The use of the audible com playback feature requires th...

Страница 35: ...ctivating and transferring audible com files to the system play the files by 1 Press CD AUX HDD until the HDD source is selected 2 Enter the HDD Menu the HDD Music Menu displays Scroll down to the Aud...

Страница 36: ...book begins playback Selecting Another Audio Book To play a different audio book from the one selected return to the Audio Book menu options To change the audio book currently playing 1 Press the MEN...

Страница 37: ...RX Navigation System Include Mex 2012 Infotainment System 37 2 The Audio Book screen displays a list of the available audio books for playback Select a book 3 Select a chapter to start playback 4 The...

Страница 38: ...puter MP3 player Tape player This jack is not an audio output Do not plug headphones into the auxiliary input jack Drivers are encouraged to set up any auxiliary device while the vehicle is in P Park...

Страница 39: ...This feature can be controlled through the navigation radio screen A DVD can play in the navigation radio or from an auxiliary video source To use the rear seat displays 1 Insert a DVD into the naviga...

Страница 40: ...power if the RSE system is shut off or if the headphones are out of range of the transmitters for more than three minutes Moving too far forward or stepping out of the vehicle can cause the headphone...

Страница 41: ...nnect the auxiliary device cables to the A V jacks 2 Power on both the auxiliary device and the RSE video screen Changing the Source on the Video Display Screens The image from the auxiliary device ca...

Страница 42: ...the desired viewing position Push the video screen down into its locked position when it is not in use the screen turns off automatically Only the left RSE seatback console contains the infrared tran...

Страница 43: ...l dry place Remote Control Buttons O Power Press to turn the video screens on and off P Illumination Press to turn the remote control backlight on The backlight times out after several seconds if no o...

Страница 44: ...release r This button might not work when the DVD is playing the copyright information or the previews Fast Forward Press to fast forward the DVD or CD To stop fast forwarding a DVD video press s To...

Страница 45: ...page 3 Various functions are disabled when the vehicle is moving Navigation Control Buttons The control buttons are on the faceplate of the navigation system VOL O Volume Power 1 Press to turn the sys...

Страница 46: ...split screen displays both map and audio information DEST Destination Press to plan a route through the Select Destination menu If route guidance is active press to access the Route Menu See Destinati...

Страница 47: ...on screen as alpha or numeric keyboard The alpha keyboard displays when data needs to be entered All characters are touch screen buttons Press to select Accent Alphabet To select letters with accent s...

Страница 48: ...voice recognition prompts by pressing or or by turning the MENU SELECT knob on the infotainment system Press the Guidance Volume screen button to preview the selected sound level Voice Guidance Enable...

Страница 49: ...ed path is recorded Delete Back Track Points Deletes the recorded path Map Database Information Displays map database version information Press the Coverage button to view the major metropolitan cover...

Страница 50: ...up 4 Press the Update screen button when the Update Confirmation screen displays 5 Enter the Authentication Code screen button then press the Enter screen button 6 If the correct code is entered the s...

Страница 51: ...change from English to metric see Driver Information Center DIC in the Index of the vehicle owner manual Scroll Features To scroll within the map press anywhere on the map screen and the scroll symbol...

Страница 52: ...the vehicle on the map The destination symbol marks the final destination after a route has been planned The waypoint symbol marks a set waypoint and is numbered depending on how many have been set A...

Страница 53: ...ing at the top of the map screen The shaded triangle indicates North Select this screen symbol to change the view to North up or 3 D Press this screen symbol to change to 3 D mode The 3 D symbol is th...

Страница 54: ...es away on freeway Driving on the Freeway Driving on the Residential Road Non Urgent Maneuver A non urgent maneuver is when your distance to the next maneuver is greater than 0 8 km 0 5 mi when drivin...

Страница 55: ...Select the main map view to display the distance and time remaining from the current vehicle position to any of the set waypoints or final destination Save Saves a specific location to the Address Bo...

Страница 56: ...iew on the map To display go to the Map menu select the Show POI Icons menu and select the Show option Press this button to change the full map screen to the half map screen and half exit information...

Страница 57: ...ype Use the space U screen button between street and city names Use the backspace q screen button to delete an incorrectly entered character A list displays if four or fewer names are available If the...

Страница 58: ...y selected 6 Press OK The address information screen displays the address entered 7 Press Go if correct The route is calculated 8 Select the route preference for Fastest Shortest or Easiest The chosen...

Страница 59: ...nd city 6 Select a category then a sub category The available POI names will display 7 Select the POI name 8 If the POI is correct press Go the route is calculated 9 Select the route preference for Fa...

Страница 60: ...tton and the route is now ready to be started Address Book Choose a destination by selecting an address that has been stored in the address book 1 Press DEST 2 Press the Address Book screen button A l...

Страница 61: ...est or Easiest See Navigation Settings under Using the Navigation System on page 45 for more information 6 Press the Start Guidance screen button and the route is now ready to be started Preset Destin...

Страница 62: ...o change the volume of voice prompts and voice recognition Press the Voice Guidance Speech Confirmation Feedback or Traffic Voice Prompt screen buttons to turn voice prompts on or off for each categor...

Страница 63: ...s See Destination on page 56 or more information The system calculates and highlights the route and the route can be started 4 To add more waypoints press DEST Press the Add screen button to add the w...

Страница 64: ...oll S T Reverse or Forward Scroll Press the reverse scroll arrow to go to the start point Select the forward scroll arrow to go to the final destination Suspend Resume Guidance Press the Suspend Resum...

Страница 65: ...book entry 1 Press DEST 2 Press the Address Book screen button A list displays the address book entries 3 Select the address book entry to be changed 4 Press the Edit screen button 5 Press the Change...

Страница 66: ...s book entry to be deleted 4 Press the Delete screen button A confirmation message displays To add a preset destination from the address book 1 Press DEST 2 Press the Address Book screen button 3 Sele...

Страница 67: ...lect the Favorite Route entry to be edited 4 Press OK The new name will be in the Favorite Route Menu To add a voice tag 1 Select Add Voice Tag 2 Speak the name after the beep within four seconds The...

Страница 68: ...from a list of six pre programmed POI sub categories Scroll through a list of categories or select nearby and on route options Press this screen button to minimize the guidance window and expand the m...

Страница 69: ...nce Not Active If an OnStar destination is downloaded while route guidance is not active the navigation system displays a pop up screen and does the following screen functions Press Go the navigation...

Страница 70: ...re they can be accessed or saved to the address book Map Destination Screen Functions If the map screen is used to show destination it has map screen capabilities such as Go Save Zoom Scroll etc The a...

Страница 71: ...accidents and disabled vehicles Scheduled traffic incident data such as road construction and road closures Traffic flow information rate of speed data Flow data might not be available in all markets...

Страница 72: ...play in the order of distance from the vehicle for up to approximately 125 km 75 mi With a route planned traffic events display on the route Not all traffic conditions may display To view the traffic...

Страница 73: ...dition to get more detailed information Select the Options screen button A Traffic Options menu displays Select the traffic related option Traffic Select to enable or disable the traffic function Show...

Страница 74: ...flow data arrows display on the map when scaled up to eight miles Closed Road Traffic Delays Incidents and Advisories Select the traffic event ICONS that appear on the map screens Alert for Approachi...

Страница 75: ...Event Display Categories The following are traffic event categories and symbols that can appear on the display q Road Closed Road and or ramps closed o Stopped Traffic Traffic stopped stop and go tra...

Страница 76: ...Traffic Voice Prompt in Voice Prompt on the CONFIG Nav screen If the navigation voice prompts are turned off all traffic prompts are also turned off If the voice prompts are on and an Alert for Appro...

Страница 77: ...arrows Road work Construction Alert Road Condition Road Visibility Other XM Weather If Equipped Press INFO then press INFO again until the Weather screen button is selected or press the Weather screen...

Страница 78: ...ew weather conditions for up to three locations Current vehicle s position Midway point from current position to final destination The current weather condition of the destination city From the XM Wea...

Страница 79: ...splay screen button to turn the display of the clock on the screen on or off Global Positioning System GPS The position of the vehicle is determined by using satellite signals various vehicle signals...

Страница 80: ...f carrier is installed on the vehicle Tire chains have been installed The tires are replaced or worn The tire pressure for the tires is incorrect The first navigation use after the map data is updated...

Страница 81: ...Canada For questions about the operation of the navigation system or the update process contact the GM Nav Disc Center toll free phone number 1 877 NAV DISC 1 877 628 3472 or go to the center s websit...

Страница 82: ...y works if the map database is installed in the system If the radio is off the only commands would be Hands Free and Help Navigation voice commands are not available until the OK button has been selec...

Страница 83: ...arated by a mean there is a choice of using a word on either side of the slash For example the command CD DVD Disc help you can say CD help or DVD help or Disc help When the system recognizes the comm...

Страница 84: ...aking frequency numbers CD DVD Disc help Helpful advice about disc commands and some common disc commands which are available Use this command to learn about how to select Disc mode playback and how t...

Страница 85: ...out radio commands and some common radio commands which are available to the user CD DVD Disc Commands The following commands are only available when a CD MP3 or DVD is loaded Radio CD radio DVD radio...

Страница 86: ...ion show hide shopping Instructs the system to display and hide shopping POIs on the map screen Destination and Guidance Commands Navigation go to preset destination number one two three four five or...

Страница 87: ...e such as NY for New York If the state is correct then go to Step 4 Otherwise say Change State For example if the desired destination is in Ohio but the system shows New York NY in the pop up list say...

Страница 88: ...the spoken city name Say the correct city name 5 Reply with the street name including the suffix Blvd Ave Rd etc when prompted The radio might display a candidate list with the closest matches to the...

Страница 89: ...nd once these voice tags are stored they can be used as part of a voice recognition command that sets the particular address book entry as a destination See the Address Book and Voice tag sections ear...

Страница 90: ...dio select frequency AM Radio select frequency FM Radio select frequency XM CD DVD Disc Commands Radio CD DVD Disc Radio CD DVD Disc select track number General Navigation Commands Feedback On Feedbac...

Страница 91: ...luetooth For vehicles equipped with Bluetooth capability the system can interact with many cell phones allowing Placement and receipt of calls in a hands free mode Sharing of the cell phone s address...

Страница 92: ...The system responds with a tone After the tone say Hands Free to use the bluetooth voice recognition system The system then responds with Ready followed by a tone After the tone say a command For add...

Страница 93: ...delete 4 Say the name of the phone you want to delete Connecting to a Different Phone To connect to a different cell phone the bluetooth system looks for the next available cell phone in the order in...

Страница 94: ...follow the directions given by the system to save a name tag for this number Using the Digit Store Command If an unwanted number is recognized by the system say Clear at any time to clear the last nu...

Страница 95: ...command allows a phone number to be dialed by entering the digits one at a time Re dial This command is used to dial the last number used on the cell phone Using the Dial or Call Command 1 Press b g...

Страница 96: ...e audio system mutes and a ring tone is heard in the vehicle Press b g to answer the call Press 0 c to ignore a call Call Waiting Call waiting must be supported on the cell phone and enabled by the wi...

Страница 97: ...uring a call with the audio in the vehicle 1 Press b g 2 Say Transfer Cali To Transfer Audio to the Bluetooth System From a Cell Phone During a call with the audio on the cell phone press b g The audi...

Страница 98: ...or name tag to send Clearing the System Unless information is deleted out of the in vehicle Bluetooth system it will be retained indefinitely This includes all saved name tags in the phone book and ph...

Страница 99: ...e instructions given on the cell phone or follow the voice prompts to enter the four digit Personal Identification Number PIN that has been provided 4 The system voice prompt requests that you say the...

Страница 100: ...MENU SELECT knob then press it to select the Device List submenu A list of all previously paired phones will be displayed If there is a currently connected phone a check mark will appear on the right...

Страница 101: ...the Bluetooth submenu 3 Turn the MENU SELECT knob then press it to select the Device List submenu 4 Turn the MENU SELECT knob then press it to select the phone to be deleted Follow the on screen promp...

Страница 102: ...to the Bluetooth system before the process is started 1 Press the CONFIG control button Turn the MENU SELECT knob until the Phone menu displays Press the MENU SELECT knob to display other phone option...

Страница 103: ...s PHONE located on the faceplate of the infotainment system to access the phone menu Enter Number Use this option to enter a phone number and make a call To do this 1 Turn the MENU SELECT knob then pr...

Страница 104: ...CT knob to select the person or place to call Press the MENU SELECT knob or press the desired person or place to display the number Press the MENU SELECT knob or press the number to make the call The...

Страница 105: ...s Press the MENU SELECT knob or press the Phone screen button to display other options 2 Turn the MENU SELECT knob then press this knob or press on either Incoming Calls Outgoing Calls or Missed Calls...

Страница 106: ...wireless service carrier to work Switching Calls Only Available with Call Waiting This feature allows you to switch between calls making one call active and placing the other on hold Switch Call Turn...

Страница 107: ...limited by your wireless service carrier Ending a Call To end a call 1 Press the PHONE control button 2 Select Hang Up Mute or UnMute a Call 1 Press the PHONE control button 2 Select the Mute call 3...

Страница 108: ...buttons located on the infotainment system and the steering wheel to operate the UHP system Steering Wheel Controls Steering wheel controls can be used to Answer incoming calls Confirm system informa...

Страница 109: ...culty pairing your mobile phone you can change the code at any time 1 Press the CONFIG button 2 Press PHONE on the faceplate 3 Select Bluetooth 4 Select Change Bluetooth Code 5 Enter a new four digit...

Страница 110: ...Start the pairing process on the mobile phone that will be paired to the vehicle Reference the mobile phone manufacturer s user guide for information on this process Locate the device named UHP follo...

Страница 111: ...urer s user guide or contact your wireless provider to find out if this feature is supported by your mobile phone The time it takes to download the phone book and call list from your mobile phone to t...

Страница 112: ...MENU SELECT knob to decline and press the MENU SELECT knob or press the b g button on the steering wheel controls Call Waiting Call waiting must be supported on the mobile phone and enabled by the wi...

Страница 113: ...em enables you to operate several functions of the mobile phone using your voice The UHP system uses voice commands to control the system and dial phone numbers After input of the command the infotain...

Страница 114: ...t of main menu commands that are available when voice control is first started After the voice control is activated a short tone indicates that the voice control system is waiting for a command Availa...

Страница 115: ...hone and follow the instructions on the mobile phone and enter the four digit code provided by the system Voice output Do you want to pair the device User Yes Voice output Paired ending session Select...

Страница 116: ...of 25 digits To be able to make a call abroad you can say the word Plus at the beginning of your number The plus allows you to call from any country without knowing the prefix for calls made abroad in...

Страница 117: ...dialing command re dials the last number dialed Saving a Name Tag The Save command is used to store a telephone number in the telephone book under as a name tag The name entered must be repeated once...

Страница 118: ...d is used to delete a previously saved name tag Available commands Yes No Help Cancel Listening to Stored Name Tags The Directory command is used to listen to all stored name tags Available commands C...

Страница 119: ...0 Operation is subject to the following two conditions 1 this device may not cause interference and 2 this device must accept any interference including interference that may cause undesired operation...

Страница 120: ...the registration Made for iPod and Made for iPhone mean that an electronic accessory has been designed to connect specifically to iPod or iPhone respectively and has been certified by the developer t...

Страница 121: ...tem or that support the XM website the Online Service or any of its content Furthermore the AMBER voice compression software included in this product is protected by intellectual property rights inclu...

Страница 122: ...nd the Powered by Gracenote logo are either registered trademarks or trademarks of Gracenote in the United States and or other countries If you require more information regarding the use of the Gracen...

Страница 123: ...eries without knowing anything about who you are For more information see the web page for the Gracenote Privacy Policy for the Gracenote service The Gracenote Software and each item of Gracenote Data...

Страница 124: ...N THE NAVIGATION SYSTEM BY USING THE NAVIGATION SYSTEM AND THE DATABASE YOU ACCEPT AND AGREE TO BE BOUND BY ALL TERMS AND CONDITIONS SET FORTH BELOW LICENSE GRANT DENSO CORPORATION DENSO as a licensed...

Страница 125: ...E IS PROVIDED ON AN AS IS AND WITH ALL FAULTS BASIS AND DENSO AND TANA AND THEIR LICENSORS AND SUPPLIERS EXPRESSLY DISCLAIM ALL OTHER WARRANTIES EXPRESS OR IMPLIED INCLUDING BUT NOT LIMITED TO THE IMP...

Страница 126: ...ITED or RESTRICTED rights as described in DFARS 252 227 7014 a 1 JUN 1995 DOD commercial computer software definition DFARS 227 7202 1 DOD policy on commercial computer software FAR 52 227 19 JUN 1987...

Страница 127: ...the DATABASE shall immediately be destroyed BTV 461060 2 END USER NOTICE PLEASE READ THIS NOTICE CAREFULLY BEFORE USING THIS NAVIGATION SYSTEM The Point Of Interest Data POI Data in the navigation sy...

Страница 128: ...to use it at your own risk DENSO and its licensors and their licensors and suppliers collectively DENSO make no guarantees representations or warranties of any kind express or implied arising by law...

Страница 129: ...eholders agents and representatives of each of them free and harmless from and against any liability loss injury including injuries resulting in death demand action cost expense or claim of any kind o...

Страница 130: ...Black plate 130 1 Cadillac SRX Navigation System Include Mex 2012 130 Infotainment System 2 NOTES...

Страница 131: ...Player 16 CD DVD Disc Commands 85 Cleaning the Display 10 Clearing the System 98 Conference Calling 106 Config Menu 6 Configure Menu 70 D Database Coverage Explanations 82 Deleting Personal Informatio...

Страница 132: ...ntrols 92 Installing the DVD Map Disc 50 Introduction 3 L Languages 7 Lat Long Coordinates 61 Listing Stored Numbers 95 Loading and Ejecting Discs 17 M Making a Call 95 103 Map Adjustments 51 Map Cove...

Страница 133: ...Video DVD 19 Playing an Audio CD 18 Playing an MP3 CD and DVD 22 Playing from an iPod 31 Playing from USB 29 Playing Hard Disc Drive Content 27 Playing HDD Favorites 29 Playing the Radio 10 Point of I...

Страница 134: ...Transferring a Call 97 U UHP Controls 108 USB Host Support 29 USB Music Menu 30 USB Supported Devices 29 Using Destination Download 69 Using the Stored Preset Destinations 9 Using UHP with Infotainme...

Отзывы: