background image

9

2 Installation

2.3 

Mounting the Stacker to the Printer

!

Attention!


Disconnect the printer from the electrical outlet before mounting or removing the stacker.

!

Caution!

Risk of tilting.

When using the stacker with printers of the A+ series the stacker protrudes the base plate of the printer. 
Therefore the system must be positioned at the edge of the platform or on a mounting unit. 


Position the system in such a way that a risk of tilting will be avoided.


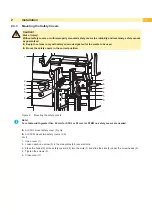
1

2

1

4 5 4

6

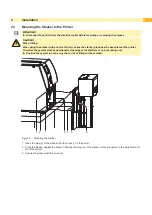
Figure 6 

Mounting the stacker

1.  Insert the pins (4) of the stacker into the holes (1) of the printer.

2.  Press the stacker against the printer. That way the plug (5) of the stacker will be connected to the peripheral port 

(2) of the printer.

3.  Secure the stacker with the screw (6).

Содержание ST4 Series

Страница 1: ...Made in Germany Operator s Manual ST4 Stacker with Cutter ...

Страница 2: ...tion and product can occur Please check www cab de for the latest update Terms and conditions Deliveries and performances are effected under the General conditions of sale of cab Operator s Manual for the following products Germany cab Produkttechnik GmbH Co KG Postfach 1904 D 76007 Karlsruhe Wilhelm Schickard Str 14 D 76131 Karlsruhe Telefon 49 721 6626 0 Telefax 49 721 6626 249 www cab de info c...

Страница 3: ... 8 2 2 Preparing the Printer 8 2 3 Mounting the Stacker to the Printer 9 2 4 Adapting the Stacker to the Media Size 10 2 4 1 Adjusting the Side Plates 10 2 4 2 Mounting the Table 10 2 4 3 Mounting the Safety Covers 11 3 Printer Configuration 12 4 Loading Material 13 5 Operation 13 6 Maintenance 14 7 Error Messages Problem Solutions 15 8 Reference to the EU Declaration of Conformity 16 ...

Страница 4: ...e display 1 2 Intended Use The device is manufactured in accordance with the current technological status and the recognized safety rules However danger to the life and limb of the user or third parties and or damage to the device and other tangible assets can arise during use The device may only be used for its intended purpose and if it is in perfect working order and it must be used with regard...

Страница 5: ...touch the area of the blades Warning stickers 1 2 must not be removed as then you and other people cannot be aware of dangers and may be injured 1 2 1 2 3 4 5 6 1 2 3 4 5 6 5 ST4 L ST4 M Figure 1 Safety covers safety marking The device may only be used in a dry environment do not expose it to moisture sprays of water mists etc Do not use the device in an explosive atmosphere Do not use the device ...

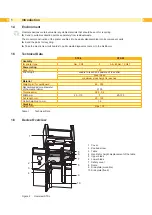
Страница 6: ...ST4 M Usability for printer type A4 XC4 A4 M A4 T XD4T Power rating Cuts min 120 Print stop if unable to reach end position of the cutter cover open maximum stack height is reached Material Weight g m for cardboard 60 300 Recommended core diameter of the media roll mm 100 Thickness mm 0 05 0 8 Width mm 20 110 20 100 Cut length mm 20 150 Outlet height up to mm 1 2 Stacking Height mm max 100 Table 1...

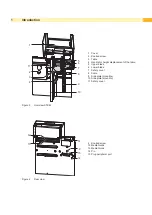
Страница 7: ...lacement of the table 5 Upper blade 6 Lower blade 7 Safety cover 8 Scale 9 Side plate movable 10 Side plate movable 11 Safety cover Figure 3 Overview ST4 M 12 13 2 14 14 15 2 Knurled screw 12 Media Guide 13 Media Guide 14 Pin 15 Plug peripheral port Figure 4 Rear view 1 Introduction ...

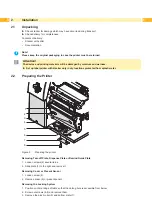
Страница 8: ...label printer with stacker only in dry locations protected from splash water 2 2 Preparing the Printer 1 2 4 3 5 6 7 8 Figure 5 Preparing the printer Removing Tear off Plate Dispense Plate or Rewind Guide Plate 1 Loosen screws 2 several turns 2 Slide plate 1 to the right and remove it Removing Cover or Present Sensor 1 Loosen screw 4 2 Remove cover 3 or present sensor Removing the Locking System 1...

Страница 9: ... plate of the printer Therefore the system must be positioned at the edge of the platform or on a mounting unit X X Position the system in such a way that a risk of tilting will be avoided 1 2 1 4 5 4 6 Figure 6 Mounting the stacker 1 Insert the pins 4 of the stacker into the holes 1 of the printer 2 Press the stacker against the printer That way the plug 5 of the stacker will be connected to the ...

Страница 10: ...ing the Side Plates X X At ST4 L adjust side plate 4 only X X At ST4 M adjust both side plates 4 5 For it 1 Loosen screws 2 2 Adjust the side plates 4 5 to the media width using the scale 1 Use the edges 3 of the side plates as pointers 3 Tighten screws 2 2 4 2 Mounting the Table 1 2 4 3 1 Loosely screw the knurled nuts 3 contained in the delivery contents of the table onto the threaded pins 2 2 I...

Страница 11: ...vers in the correct position 2 5 6 8 7 9 1 3 3 5 4 4 Figure 9 Mounting the safety covers i Note For a table width greater than 95 mm for ST4 L or 80 mm for ST4 M no safety covers are needed X X At ST4 L mount safety cover 5 only X X At ST4 M mount two safety covers 2 5 For it 1 Open cover 1 2 Loosen each one screw 5 in the side plates 6 9 several turns 3 Place the hooks 3 of the safety covers 2 8 ...

Страница 12: ...nt print jobs should be implemented additional offsets available in the software The offset values from setup and software are added together for execution Under Setup Print parameters the method for recognizing the material and the method of backfeed when using cut mode can be selected Parameter Meaning Default Label sensor Method for detecting the starting end of the label Gap Sensor Detection u...

Страница 13: ...and the matching safety covers X X Do not operate the stacker when the table is lowered manually X X Move the table 2 upwards using the handle 3 until it stops X X Switch on the printer The cutter performs a cut X X Press the feed key For synchronization the media will be moved forward and cut off Synchronization is not necessary when the printhead was not opened between print jobs even if the pri...

Страница 14: ...tter shaft can be reached trough the hole 2 If necessary turn the cutter shaft with an Allen key 2 5 mm and that way displace the upper blade 3 5 Remove dust and paper particles with a soft brush or a vacuum 6 Remove all deposits at the cutter blades 3 4 with isopropyl alcohol and a soft cloth i Note When cutting through the label material instead of the label gap remains of adhesive may accumulat...

Страница 15: ...ached the lower end position and cannot take anymore labels Remove stack Move table upwards until it stops Press pause key to continue the print job Table 4 Error messages concerning the stacker with cutter Problem Solution Problem Remedy Table moves downwards without cutter action when heavy stacks are produced Augment the brake of table movement When stacking stiff pre bulged labels the media sp...

Страница 16: ...tal regulations of the EU Rules for Safety and Health Directive 2014 30 EU relating to electromagnetic compatibility Directive 2011 65 EU on the restriction of the use of certain hazardous substances in electrical and electronic equipment EU Declaration of Conformity https www cab de media pushfile cfm file 2720 ...

Отзывы: