background image

11

Loading Material

i

Note! 
For adjustments and simple installation work, use the accompanying Allen key located in the top section of 
the print unit. No other tools are required for the work described here.

4.1 

Loading Labels

5

6

2

1

7

8

11

12

9

13

14

10

4

3

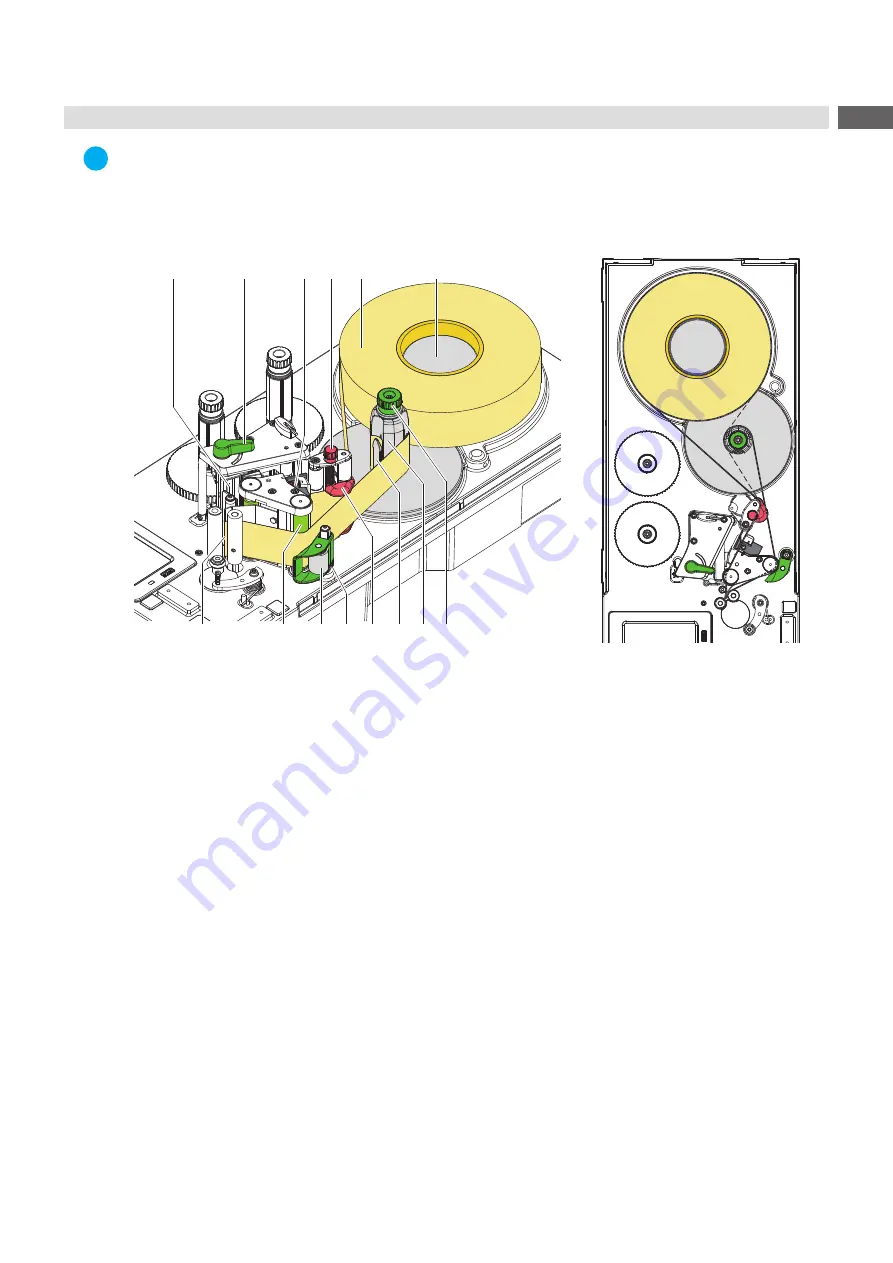
Figure 8 

Loading media

Figure 9 

Label feed path

1.  Put the label roll (5) onto the roll retainer (6).

2.  Unroll a label strip of approx. 60 cm.

3.  Turn lever (2) counterclockwise to lift the printhead (1).

4.  Unlock the pinch roller (12) from the rewind assist roller (13).

5.  Remove the labels from the 30 cm of the label strip.

6.  Guide the label strip as shown in Figure 9 trough the label sensor (3), around the dispense plate (14) and the 

rewind assist roller (13) to the rewinder (8).

7.  Adjust the guide (10) with the knob (4) in such a way that the label strip will be guided without clamping.

8. 

Hold rewinder (8) firmly and turn knob (7) clockwise until it stops.

9.  Push label strip under a bracket (9) of the rewinder (8) and align the outer edge of the label strip to the label roll.

10. Turn knob (7) counterclockwise until it stops. 

The rewinder is fully spread, thus gripping the label strip firmly.

11. Turn rewinder (8) counterclockwise to tighten the label strip.

12. Align the locking system (12) to the middle of the liner.

13. Position the adjusting ring (11) directly below the locking system (12) and tighten it with the set screw.

14. Swing the pinch roller (12) to the rewind assist roller (13).

15. Turn lever (2) clockwise to lock the printhead. 

4.2 

Removing the Wound Roll


Cut the label strip.


Hold rewinder (8) firmly and turn knob (7) clockwise.


The rewinder spindle relaxes and the wound roll is released.


Remove wound roll from rewinder (8).

Содержание AXON 1

Страница 1: ...Original Instructions AXON 1 MADE IN GERMANY Labelling System ...

Страница 2: ...te Terms and conditions Deliveries and performances are effected under the General conditions of sale of cab Further documentation Configuration Manual cab Printers https www cab de media pushfile cfm file 3257 Programming Manual cab Printers https www cab de media pushfile cfm file 3047 Instructions for the following products Germany cab Produkttechnik GmbH Co KG Karlsruhe Phone 49 721 6626 0 www...

Страница 3: ...ll 11 4 3 Loading Transfer Ribbon 12 4 4 Setting the Feed Path of the Transfer Ribbon 13 5 Setting up the Applicator 14 5 1 Adjusting the Supporting Plate 14 5 2 Adjusting the Transport Rollers 15 5 3 Adjusting the Pressure Roller 15 5 4 Menu Settings 16 6 Operation 17 6 1 Synchronization of the Paper Feed 17 6 2 Standard Operation 18 7 Cleaning 19 7 1 Cleaning Information 19 7 2 Cleaning the Prin...

Страница 4: ...ronment Handling instruction Reference to section position illustration number or document Option accessories peripheral equipment special fittings Time Information in the display 1 2 Intended Use The device is intended exclusively for printing suitable labels and applying the labels onto tubes Any other use or use going beyond this shall be regarded as improper use The manufacturer supplier shall...

Страница 5: ...unctions Other unauthorized work on or modifications to the device can also endanger operational safety Always have service work done in a qualified workshop where the personnel have the technical knowledge and tools required to do the necessary work There are various warning stickers on the device They draw your attention to dangers Warning stickers must therefore not be removed as then you and o...

Страница 6: ...13 14 15 16 17 18 8 9 10 11 12 22 19 20 23 21 13 14 AXON 1 1 AXON 1 2 8 Ribbon deflection 9 Printhead retainer with printhead 10 Printhead locking lever 11 Allen key 12 Label sensor 13 Guide adjusting knob 14 Guide 15 Locking lever with pinch roller 16 Rewind assist roller 17 Print roller 18 Dispense plate 19 Lever with pressure roller 20 Transport roller 21 Supporting plate 22 USB host interface ...

Страница 7: ...near the printhead X Check delivery for completeness Contents of delivery Labelling system Power cable USB interface cable Instructions X Set up the labelling system on a level surface 2 3 Connecting the Device 2 3 1 Connecting to the Power Supply X Check that the device is switched off X Plug the power cable into the power connection socket 24 X Plug the power cable into a grounded socket 2 3 2 C...

Страница 8: ...r s own commands For details Programming Manual cab printers Settings made on the touchscreen display make the basic settings of the device i Note It is advantageous whenever possible to make adaptations to various print jobs in the software 3 1 Start Screen After switching on During printing After print job Figure 4 Start screen The touchscreen display is operated directly by touch To open a menu...

Страница 9: ... data are stored in a lbl file Warning ribbon end Configuration Manual cab printers The remaining diameter of the ribbon supply roll undershoots the set value SD card installed USB memory installed gray Bluetooth adapter installed white Bluetooth connection active WiFi connection active The WiFi strength is displayed by the number of white arcs Ethernet connection active USB connection active abc ...

Страница 10: ...t a function The will carry out the function possibly after a preparing dialogue or Select a parameter to set The setup possibilities are depending from the parameter type Logical parameters Selection parameters Numerical parameters Date time Figure 7 Samples for parameter setting Scroll bar for rough value setting Decreasing the value step by step Increasing the value step by step Return without ...

Страница 11: ...t the guide 10 with the knob 4 in such a way that the label strip will be guided without clamping 8 Hold rewinder 8 firmly and turn knob 7 clockwise until it stops 9 Push label strip under a bracket 9 of the rewinder 8 and align the outer edge of the label strip to the label roll 10 Turn knob 7 counterclockwise until it stops The rewinder is fully spread thus gripping the label strip firmly 11 Tur...

Страница 12: ...secured 5 Slide suitable transfer ribbon core 6 onto the transfer ribbon take up hub 5 and secure it in the same way 6 Guide transfer ribbon through the print unit as shown in Figure 11 7 Secure starting end of transfer ribbon to the transfer ribbon core 6 with adhesive tape Ensure counterclockwise rotation direction of the transfer ribbon take up hub here 8 Turn transfer ribbon take up hub 5 coun...

Страница 13: ...kles 1 2 3 Figure 12 Setting the feed path of the transfer ribbon i Note The adjustment is best carried out during printing X Read current setting on the scale 1 and record if necessary X Turn screw 2 with Allen key and observe the behavior of the ribbon In the direction the inner edge of the ribbon is tightened and the outer edge is tightened in the direction 4 Loading Material ...

Страница 14: ...er edge labeling area R Distance label liner edge P Distance paper guiding edge chassis N Distance chassis supporting plate Supporting plate over chassis N 0 Supporting plate under chassis N 0 The following correlation can be deduced from the figure L N F E B R P The measure for the positioning of the supporting plate results in N F B R P L E Figure 13 Measures for supporting plate positioning 3 2...

Страница 15: ...longest possible length and the top edges of the transports rollers are below the thread or cap 2 of the tube respectively the area over the transport rollers is long enough to insert and remove the tubes X Tighten the screws 3 5 3 Adjusting the Pressure Roller 2 1 3 Figure 16 Adjusting the pressure roller The pressure roller 1 can be shifted on the axle 3 X Loosen the screw 3 X Set the pressure r...

Страница 16: ...ent to lock the tube Automatic Locking occurs automatically START signal Tube unlocking Mode of tube unlocking after labelling START signal A START signal must be sent to unlock the tube Automatic Unlocking occurs automatically START signal Check tube removal Checking the tube removal after labelling only for Tube unlocking START signal On Check diameter Checking the tube diameter before labelling...

Страница 17: ... 1 Synchronization of the Paper Feed After the label stock has been inserted for peel off or cutting mode a synchronization of the paper feed is required That way the first label which is detected by the label sensor will be transported to the print position and all labels in front will be fed out of the device So the synchronization avoids that blank labels are peeled off together with the first ...

Страница 18: ... following parameters page 16 Setup Labelling Tube locking Setup Labelling Tube unlocking Setup Labelling Check tube removal Attention The following steps can be released by selecting or sending the IO signal START Within one cycle only that release method will be accepted which was used for the first step X Send a print job X Insert the first tube X Press The tube will be pressed against the tran...

Страница 19: ...er Accumulations of dirt on the print roller may impair the media transport and the print quality X Lift the printhead X Remove labels and transfer ribbon from the labelling system X Remove deposits with roller cleaner and a soft cloth X If the roller appears damaged replace it Service Manual 7 3 Cleaning the Printhead Cleaning intervals every ribbon roll change Substances may accumulate on the pr...

Страница 20: ...ably RTS CTS Device not conn Programming addresses a non existent device Either connect this device or correct the programming Device not locked The tube applicator is not in operating position Fold up the applicator File not found Requested file is not on the card Check the contents of the card Font not found Error with the selected download font Cancel current print job change font Initializatio...

Страница 21: ...rect thermal printing For direct thermal printing remove ribbon For thermal transfer printing set the device in the configuration or in the software to transfer printing Ribbon ink side Identified ribbon unwinding direction does not match to the setup setting Ribbon loaded incorrectly Clean the printhead 7 3 on page 19 Load the ribbon correctly Setting does not match to the used ribbon Correct the...

Страница 22: ... the monitor mode Device transports label media but transfer ribbon does not move Transfer ribbon incorrectly inserted Check and if necessary correct the transfer ribbon web and the orientation of the label side Unsuitable combination of labels and transfer ribbon Use different type of ribbon Device only prints each second label Setting of the size in the software is too large Change the size in t...

Страница 23: ...ity change in diameter max 0 8 Labels1 Material Paper plastics such as PET PP Width mm 5 25 4 5 56 Height mm at least 12 Thickness mm at least 0 05 Roll diameter mm max 205 Core diameter mm 76 Winding outside Liner Width mm 16 30 24 60 Thickness2 mm at least 0 05 Ribbon Color side outside or inside Roll diameter mm max 80 Core diameter mm 25 Length m max 600 Width mm 25 38 1 25 60 Printer dimensio...

Страница 24: ...an Greek Chinese traditional Latin Chinese simplified Hebrew Thai Arabian Bitmap Widths and heights 1 3 mm Zoom factors 2 10 0 90 180 270 orientations Vector TrueType Widths and heights 0 9 128 mm Continuous zoom 360 orientation in steps of 1 Font styles Bold italic underlined outline inverse depending on the font type Character pitch Variable or monospace standard option Graphics Elements Lines a...

Страница 25: ...alteration which has not been approved by us being made to any device as designated below this statement shall thereby be made invalid Marcel Michalski cab Produkttechnik Sömmerda GmbH Am Unterwege 18 20 D 99610 Sömmerda EN 349 1993 A1 2008 EN IEC 63000 2018 EU Declaration of Conformity EN 55032 2015 Directive 2014 30 EU relating to electromagnetic compatibility Labeling System AXON 1 1 AXON 1 2 A...

Страница 26: ...ssages 20 types 20 EU Declaration of Conformity 25 I Important information 4 Intended use 4 L Lithium battery 5 Loading labels 11 Loading transfer ribbon 12 M Menu Settings 16 O Operation 17 P Peel off position 16 Power supply 5 Printhead cleaning 19 damage 17 Print roller cleaning 19 Problem solution 22 R Removing the wound roll 11 S Safety instructions 5 Service work 5 Setting up 7 Switching on ...

Отзывы: