Bushnell ONIX 110 36-1100 Скачать руководство пользователя страница 11

11

input information such as name, comment, etc.

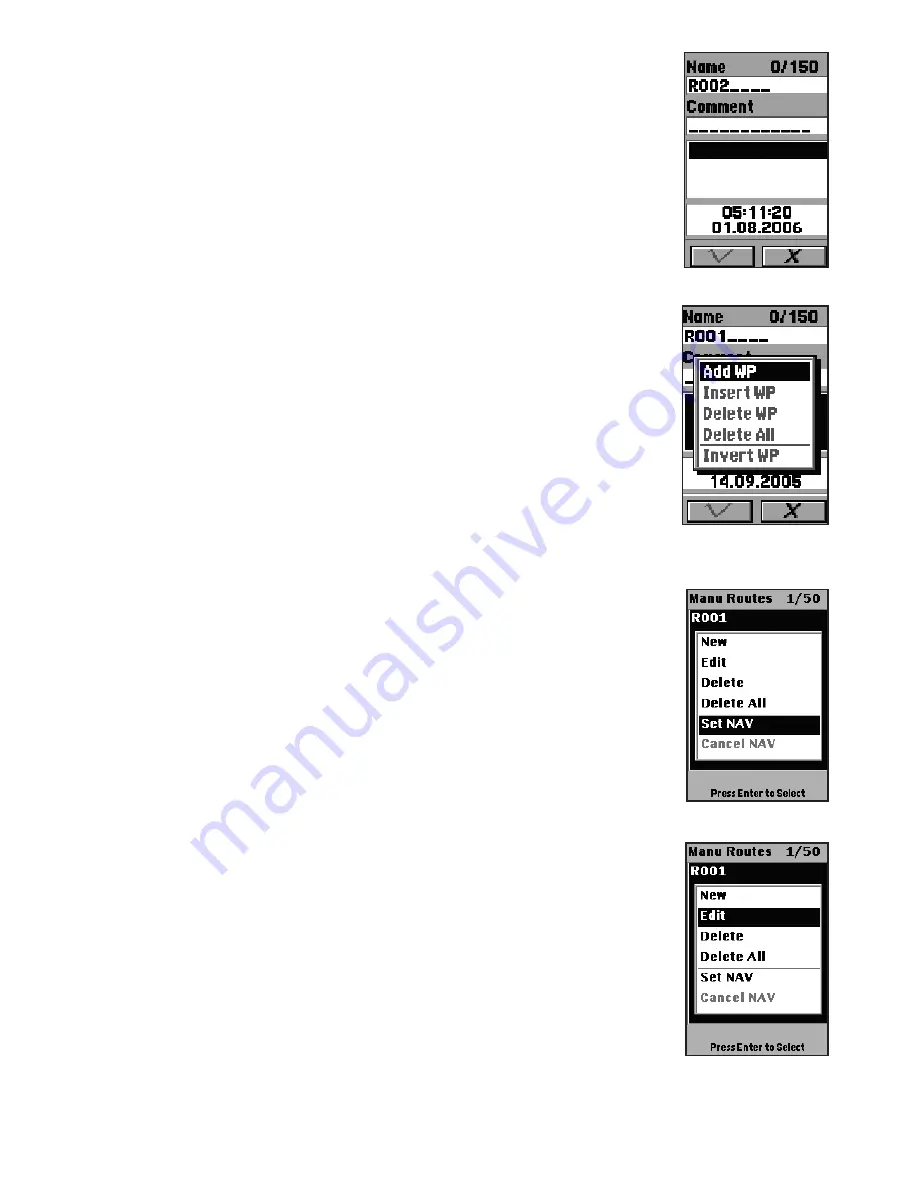
3.  Highlight  the  waypoints  field  (

Fig.  16

).  Press  the 

Menu


button  and  select  from  the  following  options  to  create  a 

route:

• Select 

Add WP

 to add existing waypoints to the route (

Fig. 

17

).

•  Select 

Insert  WP

  to  insert  a  waypoint  starting  at  the 

selected location on the route.

4. You can set the priority of the waypoints on the route by 

selecting  the  waypoint  and  pressing 

OK

.  The  order  of  the 

waypoints on the route is displayed in the column to the right 

of the waypoint names.

5.  Press  the 

Page

  button  to  highlight  the  waypoints  field, 

highlight the 

 option and press 

OK

 to save changes.

6. Select the route you just created and press the 

Menu

 button 

to view the menu options. Highlight the 

Set NAV

 option (

Fig. 

18

) and press 

OK

 to confirm. The selected route is activated 

and the ONIX 110 switches to navigation mode.

Editing Routes

You  can  modify  or  delete  all  the  routes  that  you  created  as 

required. 

To edit routes:

1. In Advanced mode, press the 

Menu

 button and select 

My 

Routes

. A list of  all the routes is displayed. The route being 

navigated has an asterisk  next to it.

2.  Press  the 

Menu

  button  to  display  the  routes  menu  (

Fig. 

19

).  Select  from  the  following  options  to  modify  the  routes 

as required:

• Select 

Edit

 to modify the chosen route.

• Select 

Delete

 to delete the chosen route

• Select 

Delete All

 to delete all routes.

• Select 

Set


NAV

 to activate navigation mode.

• Select 

Cancel NAV

 to disable navigation mode.

Creating a Trail Log

The  ONIX  110  also  features  a “trail  log”  function  that  records 

information about your trip to help you find and follow the same 

path or trail in the future.

To create a trail:

1. In Advanced mode, press the 

Menu

 button, highlight 

My 

Trails

 and press 

OK 

(

Fig. 20

). Under the 

My Trails

 tab, highlight 

the 

Trail

 field and press 

OK

 to display the drop down menus.

2. Select from the following options:

Fig. 16

Fig. 17

Fig. 18

Fig. 19

Содержание ONIX 110 36-1100

Страница 1: ...Model 36 1100 Lit 98 1324 11 08 ONIX 110 GPS NAVIGATOR Quick Start Guide...

Страница 2: ...it does not distract the operator does not interfere with the operator s field of view and does not block or interfere with the air bags or other safety mechanisms of the motor vehicle Software Licen...

Страница 3: ...issing or damaged contact your local Bushnell dealer or distributor for a replacement ONIX 110 Handheld GPS Navigator Documentation Quick Start Guide Software CD Rom inc PC Companion USB Driver PDF Ma...

Страница 4: ...to display the OSD menu Press twice to display the Main Features menu Press and hold to turn the backlight on off 2 Zoom Out Press to zoom out on a map page Hold for 3 seconds to hide or display road...

Страница 5: ...sor right in the OSD menus or on the map page 5 Power ESC Page Press and hold to turn the power on off Press to exit ESCape the OSD menu Press to toggle between the map page and the compass page 6 Zoo...

Страница 6: ...odes on the next page and press the OK button Press the Menu button twice and select Satellite The unit will start acquiring satellite information Note When the ONIX 110 is used indoors the device may...

Страница 7: ...mpass points in the direction in which you are moving The outer small pointer indicates north To view the compass page press the ESC button once on the map page NOTE If a navigable route is not availa...

Страница 8: ...ou can start navigation and begin recording trail logs Press OK to clear the log history and start recording a new log The navigation log recording is automatically updated every 50 meters To turn on...

Страница 9: ...button select Nearest POI and press OK 2 Select A Type first using the navigation keys then press OK Select the Distance then Select A Name with the navigation keys and press OK Use the up down keys...

Страница 10: ...ctive waypoint which is currently used for navigation has an asterisk sign next to it 2 Highlight the waypoint you want to delete and press the Menu button then select Delete Fig 13 to delete only the...

Страница 11: ...gation mode Editing Routes You can modify or delete all the routes that you created as required To edit routes 1 In Advanced mode press the Menu button and select My Routes A list of all the routes is...

Страница 12: ...e end point Select Delete to delete the selected trail log Select Show ON to display the trail log 4 Under the Type tab Fig 23 follow the steps below to select the tracking method using distance or ti...

Страница 13: ...a cross icon Move the cursor to the location you want to go to 2 Press the Menu button to display the menu options select Shortcut On and press OK Fig 25 A route between your current location and the...

Страница 14: ...Speed shows the speed at which you are traveling Heading shows the tracking direction TripOdom shows the distance traveled so far TripTime shows the time elapsed AltGPS shows the altitude of your cur...

Страница 15: ...ton and select the Compass tab 2 The compass shows the direction and distance to the next waypoint Press the Menu button to display the menu options select Change Next WP and press OK Fig 34 3 A list...

Страница 16: ...creen opens click anywhere in the PC Companion box Follow the on screen directions to install the software on your PC including the USB driver for the device and US Canadian base maps Making Connectio...

Страница 17: ...ecords from the ONIX 110 to a PC See Uploading Data To transfer data to your laptop or PC use the PC Companion program you installed The following sections provide more information about using this ut...

Страница 18: ...item that you want to display on the map Move the cursor over the map and hold it over a road or any other point of interest to view information about the location The exact latitude longitude name o...

Страница 19: ...in Cursor changes to a magnifier with a plus sign in the center Click to zoom in and view more details of the map New Waypoint Click the map on any location that you want to mark as a waypoint You ar...

Страница 20: ...set the measurement units on the map to the metric system Distances are shown in meters m or kilometers km If not enabled distances are shown in miles mi List Menu The List menu enables you to merge m...

Страница 21: ...ap Show POIs Name displays the names of the points of interest Display Icons enables you to choose which points of interests are displayed on the map You can select locations such as government buildi...

Страница 22: ...ONIX 110 3 The selected waypoint and route file gets copied to the internal memory of the ONIX 110 through the USB cable The correct USB port will be detected automatically Download status is display...

Страница 23: ...NOTES...

Страница 24: ...at do I do to return to my current position on the map page after I have moved the map Check if the symbol is showing in the bottom right corner of the map page Press the ESC button to return to your...

Страница 25: ...en sky and 15 seconds indoors Update Rate every second Accuracy Position within 5 to 25m CEP Velocity 0 1m sec Time 1 s Dynamic Conditions Altitude 1 000 to 18 000m Velocity 515m sec Acceleration 4G I...

Страница 26: ...ion which can be determined by turning the equipment off and on the user is encouraged to try to correct the interference by one or more of the following measures Reorient or relocate the receiving an...

Страница 27: ...return postage 10 00 to the address listed below IN U S A Send To IN CANADA Send To Bushnell Outdoor Products Bushnell Outdoor Products Attn Repairs Attn Repairs 8500 Marshall Drive A East Pearce Stre...

Страница 28: ...www bushnell com 2008 Bushnell Outdoor Products Customer Service 800 423 3537...

Отзывы: