background image

Page 3

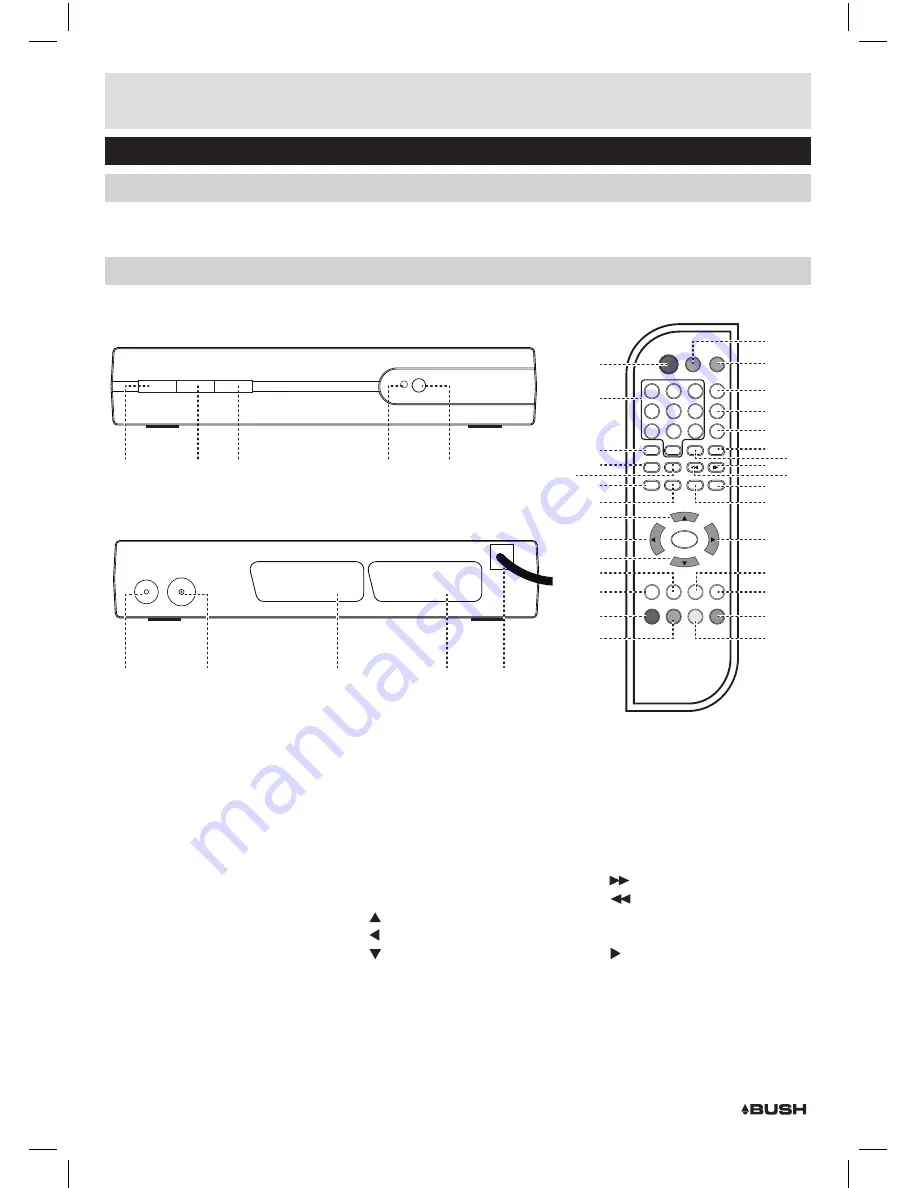
Functions & controls

Please familiarize yourself with the parts and accessories listed below

Accessories included

•  1 X CDVB52

•  1 X Instruction Manual

•  2 X AAA batteries

Overview of controls

MAIN UNIT

 1:

 STANDBY button

 2:

  CHANNEL - button

 3:

  C button

 4:

 LED indicator

 5:

 IR sensor

 6:

 LOOP output socket

 7:

 ANTENNA input socket

 8:

 TV output SCART socket

 9:

 VCR output SCART socket

10:

 MAINS cable

REMOTE CONTROL

11:

 STANDBY button

12:

 NUMERIC kaypad

13:

 FAVOURITE program button

14:

 Electronic Program Guide button

15:

 SUBTITLE button

16:

 MENU button

17:

 ZOOM button

18:

   SCROLL UP button

19:

   SCROLL LEFT button

20:

   SCROLL DOWN button

21:

 C button

22:

 CHANNEL - button

23:

 FAV./DAILY button (RED)

24:

 DELETE button (GREEN)

25:

 MUTE button

26:

 LANGUAGE button

27:

 ASPECT RATIO Button 

Press to cycle between: 4:3LB, 4:3 
PS & 16:9 aspect ratios.

28:

 TV/RADIO mode button

29:

 INFO button

30:

 RECALL button

31:


 NEXT/ +24HR button

32:


 PREV/ -24HR button

33:

 EXIT button

34:

 TEXT button

35:

   SCROLL RIGHT button

36:

 VOLUME - button

37:

  button

38:

 LOCK / TIMER button (BLUE)

39:

 MOVE/PROGRAM INFO button 

(YELLOW)

40:

 VCR INPUT button

MUTE

VCR

LANG

1

4

7

2

5

8

0

3

6

9

ASPECT

TV/RADIO

INFO

RECALL

FAV

EPG SUBTITLE

MENU

ZOOM

TEXT

Group

EXIT

CH-

CH+

VOL-

ENTER

VOL+

FAV.

DEL.

MOVE

LOCK

DAILY

P.INFO

TIMER

POWER

11

1

6

7

8

9

10

2

3

4

5

12

13

29

31

33

34

14

15 16

19

22

20

18

17

21

32

30

28

27

26

25

40

35

37

23
24

38
39

36

Содержание CDVB52

Страница 1: ...instructions fully before installing or using 152 6019 D BUSH Set Top Box Theseinstructionscontainimportantinformationwhichwillhelpyougetthebestfromyourapplianceand ensuresafeandcorrectinstallation us...

Страница 2: ...itechannels 8 Deleteachannel 8 Moveachannel 8 Lockachannel 8 Renameachannel 8 Channelsorting 9 Channelgrouping 9 Deleteall 9 Installation 10 Configuration 10 OSDsettings 10 TVsettings 10 TVsettings co...

Страница 3: ...ock even after power is disconnected StoreyourCDVB52inaclean dry environment Unplugthe CDVB52immediatelyifit gets wet and consulta servicingtechnician AlwaysunplugtheCDVB52beforecleaningit Wipedustoff...

Страница 4: ...UAGEbutton 27 ASPECTRATIOButton Presstocyclebetween 4 3LB 4 3 PS 16 9aspectratios 28 TV RADIOmodebutton 29 INFObutton 30 RECALLbutton 31 NEXT 24HRbutton 32 PREV 24HRbutton 33 EXITbutton 34 TEXTbutton...

Страница 5: ...do nothave the scart to scartcableconnected RECORDINGFROMTHECDVB52 1 Connectasdescribedtotheleft 2 UsingasecondscartcableconnecttheSCART VCR outputontherearoftheCDVB52totheSCARTinput onaVCRorrecordin...

Страница 6: ...ainunit 1 Switching between radio TV 1 PressingtheTV RADIObuttonswitchesbetweenthe TVstationlist theradiostationlist Volume controls YoucanchangethevolumeofyourCDVB52byusing theVOL andVOL buttonsonthe...

Страница 7: ...lectastation 3 ToexittheQUICKSELECTmenupresstheEXIT button NOTE Youcancustomisethequickselect menufurtherusingchannelgroupingtoassign descriptionstochannels alsoaddafavourite marktofilterchannelsbased...

Страница 8: ...gram guide 6 PressingtheP INFObutton yellow willdisplay detailedinformationaboutthecurrentlyselected program PressEXITtoreturntotheEPG Program reminder 1 Theprogramreminderfunctioncanbeactivatedfrom t...

Страница 9: ...tivate themovefunction 3 Usethe buttonstoscrollthroughthelistof channelsuntilyoureachtherequirednewlocation 4 PresstheENTERbuttontore locatethechannel listing NOTE the channelwillbere locatedabove the...

Страница 10: ...lmanagermenu 2 Usethe buttonstoscrollthroughthelistof availablechannels 3 Whenselectedchoosewhichdescription onthe rightofthedisplay matchesthestationandpress thecorrespondingnumerickey EG ESPNIwouldl...

Страница 11: ...lowsyoutoalterthedefault settingsoftheCDVB52 OSD settings OSD Usethe buttonstocyclethroughvarious colouredversionsofthegraphicinterface OSDTimeout SetsthedurationtheOn Screendisplay staysvisibleforwhe...

Страница 12: ...ngifyou dliketostoptheauto standbyprocess SimplyselectNOandpressthe ENTERbuttontoremainviewing ChannelUpdate Thisfunctionkeepschannel listingscurrentifanyalterationsaremadetothe transmission OADUpgrad...

Страница 13: ...thewakeupoperation Example2 Youwishtomakearecordingofaprogram toaPVRorVCRviathescartsocketwhileyourout TheselectedprogramisonBBC2at3 30pmandlasts for2hours 1 Thesettingswouldbeasfollows TimerNo 1 TIme...

Страница 14: ...efaultis 0000 3 SelectYESfromthepopupoptionsscreenaskingdo youwanttoperformtheoperation PresstheENTER buttontoinitiate 4 Thedisplaywillshow factoryDefault andreturn totheInitialinstallscreenoutlinedon...

Страница 15: ...nsplugiscorrectly connectedtothesocket CheckcableconnectionsinboththeTV unit NoSignal Istheaerialinstallationworking Theaerialcablemaynotbe connected Thetransmissionsignalmaynot bebroadcasting Theprog...

Страница 16: ...eproductoritspackagingindicatesthatthisproductmaynotbetreatedas householdwaste Insteaditshouldbehandedovertotheapplicablecollectionpointfortherecycling ofelectricalandelectronicequipment Byensuringthi...

Страница 17: ...uarantee does not cover accidental damage misuse cabinet parts knobs or consumable items The product must be correctly installed and operated in accordance with the instructions contained in this manu...

Отзывы: