background image

MM3156A DRUM SANDER 

25


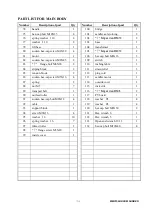
PART LIST FOR MAIN BODY 

Number 

Description of part 

Qty 


Number 

Description of part 

Qty 

extention table 

41 

"

" flange bolt M4X30 

hex-cap bolt M8X20 

42 

spring   

protection cover A 

43 

fasten bar fixer 

self-locking nut M8 

44 

fasten bar spring fixer(left) 

hook plate 

45 

fasten bar spring fixer(right) 

handle 

46 

self-locking nut M4 

hex-cap bolt M8X25 

47 

fasten bar sleeve 

"

" dormant screw M4X8 

48 

fasten bar 

10 

Sanding clamp A 

49 

nut M12 

11 

Spring washer 

50 

washer 

12 

12 

nut 

51 

turning lable 

13 

sanding sleeve 

52 

wheel 

14 

sand belt 

53 

lift axle 

15 

spring (for sanding clamp B) 

54 

ket A5X5X16 

16 

Spring washer   

28 

55 

hex cap bolt M5X16 

17 

Sanding clamp B 

56 

fasten cover 

18 

internal nip guard 

57 

steel ball 3 

23 

19 

"

" dormant screw M6X30 

58 

sleeve 

20 

elastomer 

59 

lift frame 

21 

Screw M8X25 

60 

steel washer 

22 

out-side bear cover 

61 

nut M16X1.5 

23 

bear 6205 

62 

"

" flange bolt M6X35 

24 

in-side bear cover 

63 

hex cap bolt M8X40 

25 

sanding sleeve body 

64 

spring pin 6X25 

26 

washer 

28 

65 

scale lable 

27 

nut M8 

15 

66 

feed roller support (left) 

28 

nut M6 

67 

feed roller support (right) 

29 

thin nut M6 

68 

spring washer

18 

30 

big Washer 

69 

hex cap bolt M8X25 

31 

hex cap bolt M8X16 

70 

arch stand 

32 

sucken hex-cap bolt M6X14 

71 

bolt M8X50 

33 

axle joining protect cover 

72 

support stand 

34 

"

" flange bolt M5X16 

73 

big washer 

35 

axle joining 

74 

handle 

36 

sucken hex-cap bolt M6X8 

75 

hex-cap bolt M10X35 

37 

indicating bar 

76 

spring washer 

10 

38 

indicating block 

77 

washer 

10 

39 

washer 

72 

support stand 

40 

spring washer 

73 

big washer 

Содержание MM3156A

Страница 1: ...OWNER S OPERATING MANUAL MM3156A DRUM SANDER Please keep this operating manual for future reference 0101 ...

Страница 2: ...RT SYMBOL Indicates caution warning or danger May be used in conjunction with other symbols photographs DANGER Failure to obey a safety warning will result in serious injury to yourself or others Always follow the safety precautions to reduce the risk of fire electric shock and personal injury WARNING Failure to obey safety warning can result in serious injury to yourself or to others Always follo...

Страница 3: ... IN DANGEROUS ENVIRONMENTS Do not use power tools near gasoline or other flammable liquids in damp or wet locations or expose them to rain Keep the work area well lighted 5 KEEP CHILDREN AWAY FROM POWER TOOLS All visitors should be kept at a safe distance from the work area 6 MAKE THE WORKSHOP CHILDREN PROOF with padlocks and master switches or by removing starter keys 7 DO NOT FORCE THE TOOL It w...

Страница 4: ...UNATTENDED Turn off the power Do not leave the tool until it comes to a complete stop and is disconnected from power source 22 STAY ALERT Never operate a power tool when tired or while under the influence of drugs alcohol or medication 23 MAKE SURE A TOOL IS CONNECTED only to the voltage marked on the nameplate 24 NEVER USE A TOOL if its cover or any bolts are missing If the cover or bolts have be...

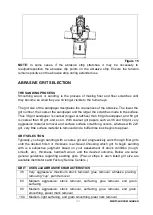
Страница 5: ...STAND DIRECTLY IN LINE with either the infeed or outfeed sides Stand to one side 16 MAKE SURE THE ABRASIVE STRIP IS ATTACHED as described in the operation instructions An improperly attached abrasive could come loose during operation and damage the work piece or intenal components 17 NEVER PUT YOUR FINGERS into the dust port or under the drum dust cover See Figure2 18 ALLOW THE SANDING DRUM to rea...

Страница 6: ... shock CAUTION Keep the cord away from the sanding area and position the cord so that it will not be caught on lumber tools or other objects during sanding INTRODUCTION TO DRUM SANDING FUNCTION Drum sanding sometimes referred to as abrasive planting is a repetitive process of sanding both sides of wooden stock to a desired thickness and or smoothness When this performed correctly both face surface...

Страница 7: ...p the board over and sand it flat Do not be shocked by how thin the board may become after all cup has been removed Board warp and twist will not be remedied by a drum sander or a planer for that matter Always inspect your lumber for warp and twist before drum sanding since it is prone tp hanging up in the machine shorter length lumber in this condition is especially troublesome PLAN YOUR WORK IN ...

Страница 8: ...y damaged parts should be replaced before attempting to use the tool LOOSE PARTS LIST The following items are included with the Wide Drum Sander 1 Owner s Operating Manual 1 Height adjustment handle 1 Height adjustment crank See Figure 3 2 Extension table 1 Set of machine support 1 Dust collection port elbow Familiarize yourself with the follwing components and features of the Wide Drum Sander usi...

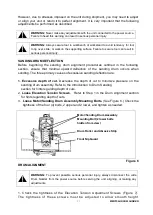
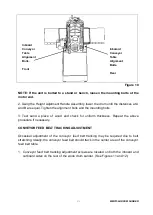
Страница 9: ... 1 Screw the Height Adjustment Handle into the threaded nut in the Height Adjustment Crank using a slotted screwdriver until snug See Figure 4 Figure 3 Conveyor Feed Motor Extension Table Elevation Tension Adjustment Screws Evevation Tension Adjustment Screws Feeding Conveyor Sanding Drum Nip Guard Sanding Drum Motor On Off Switch and Variable Speed Control Box Height Adjustment Handle Height Adju...

Страница 10: ...Adjustment Crank over the Height Adjustment Shaft with the set screw aligned with the machined flat area on the Height Adjustment Shaft Height Adjustment Shaft with machined flat Figure 4 3 Lower the Height Adjustment Handle Assembly onto the Height Adjustment Shaft and tighten the set screw with the Wrench Key See Figure 5 ...

Страница 11: ...lug to a source outlet until you have read and understand the safety and operating instructions for your Wide Drum Sander WARNING Make certain that the switch is in the OFF position before inserting the plug into a power source Do not connect the power until you are ready to operate the machine Be sure that the bolts are firmly tightened before connecting to power source CAUTION The surface to whi...

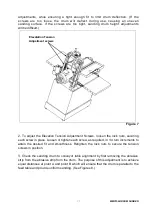
Страница 12: ...g The three primary causes of excessive sanding deflection are 1 Excessive depth of cut Decrease the depth of cut to minimize pressure on the sanding drum assembly Refer to the Introduction to Drum Sanding section for hints regarding depth of cuts 2 Loose Elevation Tension Screws Refer to Step 1 in the Drum Alignment section for hints regarding depth of cuts 3 Loose Motor Sanding Drum Assembly Mou...

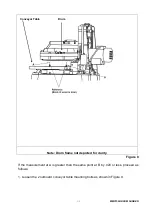
Страница 13: ...ecuring each screw in place Loosen or tighten each screw as required in 1 4 turn increments to attain the desired fit and smoothness Retighten the lock nuts to secure the tension screws in position 3 Check the sanding drum to conveyor table alignment by first removing the abrasive strip from the abrasive strip from the drum The purpose of this adjustment is to achieve equal distances at point A an...

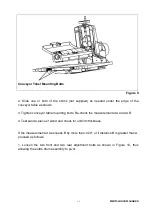
Страница 14: ...um frame not depicted for clarity Figure 8 If the measurement at A is greater than the same point at B by 020 or less proceed as follows 1 Loosen the 2 outboard conveyor table mounting bolts as shown in Figure 9 Conveyor Table Drum ...

Страница 15: ...3 Tighten conveyor table mounting bolts Re check the measurement at A and at B 4 Test sand a piece of wood and check for uniform thickness If the measurement at A exceeds B by more than 020 or if distance B is greater than A proceed as follows 1 Loosen the two front and two rear adjistment bolts as shown in Figure 10 thus allowing the entire drum assembly to pivot ...

Страница 16: ... thickness Repeat the above procedure if necessary CONVEYOR FEED BELT TRACKING ADJUSTMENT Occasioal adjustment of the conveyor feed belt tracking may be required due to belt stretching ldeally the conveyor feed belt should track in the center area of the conveyor feed belt table 1 Conveyor feed belt tracking adjustment screws are located on both the inboard and outboard sides on the rear of the wo...

Страница 17: ... counterclockwise while the nut is held with the wrench 3 If the converyor feed belt is tracking towards the inboard motor side of the machine tighten add tension to the tracking adjustment screw on that side of the machine NOTE Due to the width of the conveyor feed belt tracking adjustments may not become apparent immediately Increase the speed of the conveyor feed belt to hasten the effects of y...

Страница 18: ...d on the right side of the drum support frame NOTE Depth settings used during surface sanding of stock are adjusted by considering several variables The hardness of the material the width of the material being surfaced and the feed rate selected are all considered when determing the amount of material to be removed on each pass Never remove more than 1 32 of material in one pass The variable feed ...

Страница 19: ...y refer to Figure2 Several variables affect the proper depth of cut selected They are abrasive grit choice width of stock hardness of stock feed rate and moisture content of stock INSTALLING NEW REPLACEMENT ABRASIVE STRIPS WARNING To prevent possible serious personal injury always disconnect the Wide Drum Sander from the power source before serving the unit or changing the abrasive strips Abrasive...

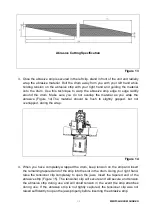
Страница 20: ...Figure 14 The material should be flush to slightly gapped but not overlapped during the wrap Figure 14 4 When you have completely wrapped the drum keep tension on the strip and insert the remaining tapered end of the strip into the slot in the drum Using your right hand raise the tensioner clip completely to open the jaws Insert the tapered end of the abrasive strip Figure 15 The tensioner clip wi...

Страница 21: ... removal and surface surface scratching occurs whereas with 220 grit very little surface material is removed and a buffed like look begins to appear GRIT SELECTION Typically you begin sanding with a coarse grit and progressively work through finer grits until the desired finish or thickness is achieved Choosing which grit to begin sanding with is a subjective judgment based on your assessment of s...

Страница 22: ...ving parts using a non petroleum based lubricant including the threadec depth control sliding surfaces and bronze bushings associated with the depth control menchanism Do not use oil or grease because they tend to attract and hold sawdust 2 Periodically check the tightness of all frame bolts and motor drum mounting bolts screws 3 Keep sanding drum feed belt clean 4 Use only clean sanding abrasives...

Страница 23: ... causes which require replacement of the conveyor feed belt are normal wear and tear inadvertent contact with the sanding drum abrasive during operation teats caused by mis tracking of the conveyor feed belt or excessive build up of non removable film The following steps describe how to remove and replace the conveyor feed belt when necessary 1 Disconnect the machine from the power source 2 Using ...

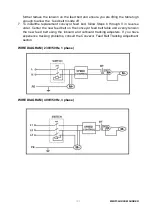
Страница 24: ...acement conveyor feed belt follow Steps 6 through 3 in reverse order Center the new feed belt on the conveyor feed belt table and evenly tension the new feed belt using the inboard and outboard tracking adjusters If you have experience tracking problems consult the Convevor Feed Belt Tracking Adjustment secton WIRE DIAGRAM 230V 50Hz 1 phase WIRE DIAGRAM 400V 50Hz 3 phase ...

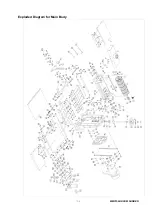
Страница 25: ...MM3156A DRUM SANDER 24 Exploded Diagram for Main Body ...

Страница 26: ...en cover 1 18 internal nip guard 1 57 steel ball 3 23 19 十 dormant screw M6X30 4 58 sleeve 1 20 elastomer 1 59 lift frame 1 21 Screw M8X25 4 60 steel washer 1 22 out side bear cover 1 61 nut M16X1 5 4 23 bear 6205 2 62 十 flange bolt M6X35 1 24 in side bear cover 3 63 hex cap bolt M8X40 4 25 sanding sleeve body 1 64 spring pin 6X25 2 26 washer 8 28 65 scale lable 1 27 nut M8 15 66 feed roller suppo...

Страница 27: ...83 十 flange bolt M6X90 2 110 inching lable 1 84 sliping block 2 111 strain relief 3 85 tension block 2 112 plug cord 1 86 sucken hex cap screw M5X16 4 113 samller motor 1 87 spring 2 114 outside cover 1 88 nut M5 7 115 dielectric 1 89 transport belt 1 116 十 flange screw M5X6 2 90 outfeed roller 1 117 PV board 1 91 sucken hex cap bolt M8X12 4 118 washer 8 4 92 table 1 119 washer 8 4 93 support bloc...

Страница 28: ...MM3156A DRUM SANDER 27 Exploded diagram and part list for Cabinet Number Description Qty B 1 Cabinet 1 B 2 Lock 1 B 3 Spring washer 10 4 B 4 Nut M10 8 B 5 Pad 4 ...

Отзывы: