background image

33

RÉGLAGES DE LA MACHINE

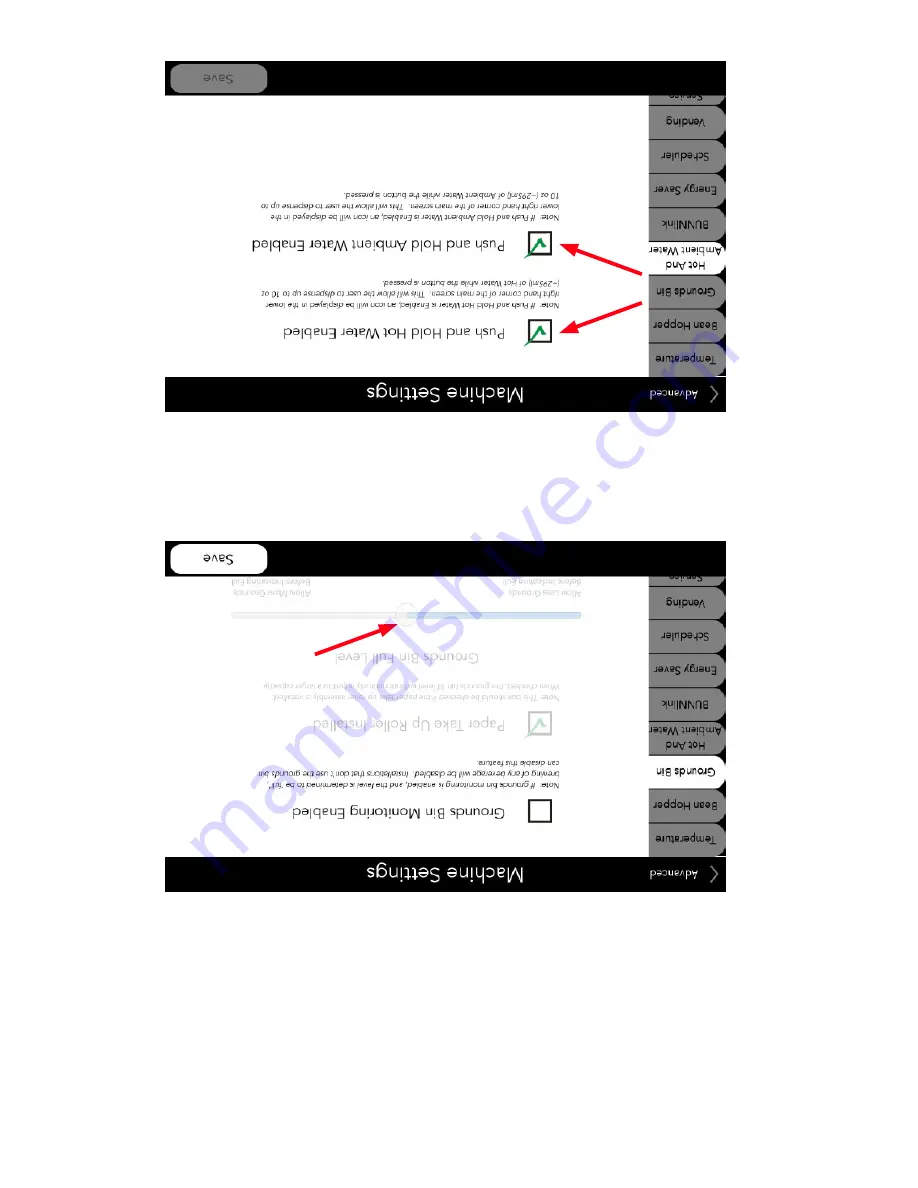
11. Casier à mar

c – Le niveau du casier 

à marc 

est surveillé 

en mesurant les durées de fonctionnement 

du 

moulin. Quand la machine a déterminé que suffisamment de café a été utilisé, un message de casier plein sera 

affiché. Le niveau réel de marc dans le casier quand le niveau plein est affiché peut être obtenu en fonction 

de la torréfaction et mouture du café. Si le seau à marc est trop plein, faire coulisser le bouton vers la gauche 

diminuera la quantité de marc dans le seau avant l'indication de remplissage. S'il y a de la place dans le seau 

quand l'indication de remplissage est affichée, faire coulisser le bouton vers la droite permettra de recevoir 

davantage de marc avant l'indication de seau complètement plein. Si des changements sont faits à l'écran, ap

-

puyez sur "Save" (sauvegarder) pour confirmer. (Remarque: "Paper T

ake Up Roller Installed" (rouleau récepteur 

de papier installé) doit demeurer coché sur le modèle SI220).

12. Eau chaude et ambiante - Avec les cases validées pour l'eau chaude et ambiante, les icônes seront affichées 

dans le coin inférieur droit de l'écran principal pour la distribution en poussant et maintenant enfoncé. La dis-

tribution d'eau 

chaude ou 

ambiante peut être 

neutralisée en 

appuyant sur 

la case 

pour enlever la 

coche verte 

et 

neutraliser. Ceci supprimera également l'icône correspondante de l'écran principal. Si des changements sont 

faits à l'écran, appuyez sur "Save" (sauvegarder) pour confirmer.

54377.7000 120117

Содержание Sure Immersion 220

Страница 1: ...sion 220 PROGRAMMING GUIDE BUNN O MATIC CORPORATION OF CANADA 280 INDUSTRIAL PARKWAY SOUTH AURORA ONTARIO L4G 3T9 PHONE 905 841 2866 FAX 905 841 2775 www bunn com 54377 7000C 12 17 2016 Bunn O Matic C...

Страница 2: ...rranties that are binding on BUNN Accordingly statements by such individuals whether oral or written do not constitute warranties and should not be relied upon If BUNN determines in its sole discretio...

Страница 3: ...up 8 New Product Setup 17 New Recipe Setup 19 Machine Settings 28 Exporting Importing via USB 39 Creating New Media 41 Additional Advanced Screens 45 Setting Up Cashless Vending 52 For additional info...

Страница 4: ...4 Press and hold BUNN logo for 3 seconds PROGRAMMING FLOWCHART Advance paper roll Rinsing and Cleaning 54377 7000 120117...

Страница 5: ...ROGRAMMING FLOWCHART Enter 4 digit password 6601 Lists any current error messages press Event log for past errors Disables screen for 15 second count down to allow cleaning the surface 54377 7000 0915...

Страница 6: ...6 PROGRAMMING FLOWCHART continued 54377 7000 091517...

Страница 7: ...7 PROGRAMMING FLOWCHART continued 54377 7000 120117...

Страница 8: ...seconds to access the SERVICE ACCESS screen 2 At the SERVICE ACCESS screen select the Advanced button 54377 7000 071417 4 At the ADVANCED service screen select RECIPES NOTE In the upper left corner o...

Страница 9: ...screen 8 From the Editing Product Product Grinder Calibration screen the user can load the grind er with the chosen product Note The Bean Hopper selector automatically defaults to the Left hopper Use...

Страница 10: ...tion screen the user can now calibrate the grinder to the product the user has chosen 2 Remove the brew funnel and place a cup or container below the grinder chute capable of holding twelve ounces 12...

Страница 11: ...ription Product type is for future use and will default to coffee Product badge is the icon located on right side of this screen that is used to reference hopper names Press the gray bar on the icon t...

Страница 12: ...or swipe up down to choose the correct product badge for your beans Hit Save to exit PRODUCT and RECIPE SETUP continued 54377 7000 120117 3 At the ADVANCED service screen select Product Setup Select t...

Страница 13: ...t the General tab from the Editing Recipe screen Once a recipe has been set up user can utilize this screen to change or edit all of the param eters similar to setup on page 7 Pressing any text box wi...

Страница 14: ...ets the amount of air infusion time in seconds Air infusion ensures complete saturation of the coffee grounds Infusion Power Sets the air infusion intensity Immersion Time Sets the amount of time in s...

Страница 15: ...15 PRODUCT and RECIPE SETUP continued 54377 7000 072217...

Страница 16: ...this screen if enabled on previous page Press Save to save selections To exit back to main screen press Advanced at the upper left corner In the Advanced screen press Service Ac cess at the upper lef...

Страница 17: ...OTE In the upper left corner of the screen is a back arrow button that will allow the user to return to the previous Service Access screen 1 Press and hold the BUNN Logo Icon for three 3 seconds to ac...

Страница 18: ...w product name then press en ter to confirm 7 The Editing Product screen now appears From this screen the user can edit product badges Image select product type and add product descriptions Grinder mu...

Страница 19: ...screen appears Un der the General tab the user can select a bev erage icon if the beverage is to be iced and edit descriptions further The user must also choose the product beans for this recipe 54377...

Страница 20: ...n select the Products Tab then at the bottom of the screen press the New button 3 Enter the new product name In this example we entered Hot Water as the product is dispensing hot water to make tea Pre...

Страница 21: ...is screen the user can edit product badges Image select product type and add product descriptions 5 Press the Product Description Line 1 box to enter a product description This is an optional step NEW...

Страница 22: ...2 NEW PRODUCT SETUP HOT WATER for TEA 6 Use the drop down box for Product Type to select HOT WATER 7 After selections have been made pressing the Ok button will create the new product 54377 7000 12011...

Страница 23: ...ipes screen select the Recipes tab To create a new recipe select New We will now create the recipe for the TEA product previously created 9 Enter your recipe name Hot water for tea to link to product...

Страница 24: ...en appears Press the General tab to choose product for this recipe 11 Use the drop down tab to select TEA product previously created In this example the Recipe Descrip tion Line 1 default information...

Страница 25: ...to picture in step 11 will enable you to select a new icon for the product badge Select desired icon then press OK to confirm Custom icons can be uploaded to the list see Create New Media section 13 A...

Страница 26: ...OT WATER for TEA 14 The TEA recipe setup has been created Press the recipe name TEA to edit the recipe 15 Dispense times for the hot water for the Hot water tea recipe can be adjusted in the Hot Water...

Страница 27: ...t Setup 17 Select the Beverages offered tab 18 To enable Hot water for tea select the check box directly below the TEA beverage picture Small medium large extra large and carafe sizes can be enabled a...

Страница 28: ...ETTINGS 19 The TEA selection will now be available on the home screen for dispensing 1 Press and hold the BUNN Logo Icon for three 3 seconds to access the SERVICE ACCESS screen MACHINE SETTINGS 54377...

Страница 29: ...29 MACHINE SETTINGS 2 At the SERVICE ACCESS screen select the Advanced button 3 At the Password screen enter 6601 4 At the ADVANCED service screen select MACHINE SETTING 54377 7000 120117...

Страница 30: ...If the temperature needs to be adjusted for high altitude press the Altitude Chart button 6 On the chart find your current altitude the move to the right to find the suggested tank temperature setting...

Страница 31: ...mperature falls below the ready temperature setting brewing will be disabled until the ready temperature is reached Press the ready temperature box to alter the ready temperature Press in the check bo...

Страница 32: ...een check mark If any changes to the screen have been made press Save to confirm 10 Grounds Bin The grounds bin may be removed and lower panels removed for through the counter grounds disposal In this...

Страница 33: ...e bucket at the full signal sliding the button to the right will allow more grounds before indicating full If any changes to the screen have been made press Save to confirm Note Paper Take Up Roller I...

Страница 34: ...en installed in the machine this screen will indicate that it is ac tive and provide other data There is no editable information on this screen Once enabled the blue droplet ambient and red H droplet...

Страница 35: ...ped and the backlight will dim After four hours of inactivity the brew tank temperature setting will drop to 140 F Touching the main screen at any time will exit the Energy Saver feature If any change...

Страница 36: ...dicate that it is active and provide other data There is no editable information on this screen In this example the machine is set to allow vending between 6 00 AM through 6 00 PM on Monday through Fr...

Страница 37: ...he box to enable the Vending mode If the information shown is populated Serial Number Software Version etc then a successful connection to the vending card reader has been established If any changes t...

Страница 38: ...shipped from the factory Caution This will remove custom setting and images and can NOT be undone 18 Service Information In the event service may be required information for contacting the appropriate...

Страница 39: ...ow the user to return to the previous Service Access screen 1 Press and hold the BUNN Logo Icon for three 3 seconds to access the SERVICE ACCESS screen 2 At the SERVICE ACCESS screen select the Advanc...

Страница 40: ...rompted to please insert the USB stick and press Start 6 Remove the large SST cover from back of door The USB port is located on the top of the display screen 8 Once you press Start the exporting proc...

Страница 41: ...ome screen 1280 wide x 800 png Beverage Icons bvg selection icons 350 x 350 png Product Badges 100 x 132 png End of Sequence Banner image to be displayed over the Beverage Complete Background 1240 x 4...

Страница 42: ...4 At the Advanced screen select YOUR BRAND 5 Select the Export tab on the YOUR BRAND screen a DO NOT insert USB stick or press OK at this time The USB stick requires a secure format and the EXPORT cre...

Страница 43: ...se the first icon New Background Images 7 Choose the icon for the image you are importing for instance if you are loading a custom graphic for the background wallpaper choose the first icon New Backgr...

Страница 44: ...Import All or Select Import All will import all content that was written to the USB Select is used to import individual graphics 18 Once the images have been imported pressing the Details button will...

Страница 45: ...and lifetime usage for that coffee bean After each recipe type the current value can be reset by pressing the reset button associated with that product Statistics Cup Count Pressing the Cup Count but...

Страница 46: ...nd Since Power Cycle Statistics Reports Pressing the Reports button will display three report offerings Daily Totals report Hourly Beverage Report and Beverage Database Note Make sure a USB stick is i...

Страница 47: ...the Regional Settings screen Regional Settings From the Regional Settings screen the user can set Language Units Date and Time Once the changes are complete press the save buttom at the bottom of the...

Страница 48: ...button to save the changes and return to the previous screen Cleaning lockout enabaled will prevent brewing after the preset time To clear this lockout run a cleaning cycle Reminders Rinse From the R...

Страница 49: ...low the directions Once changes are complete press the Ok button to save the selection Press the Cancel button to return to the previous screen without saving any changes Your Brand Home Screen From t...

Страница 50: ...t message this brings up a tablet that allows the user to edit their message and to change the Background by Touching the screen There is also a Preview button that allows the user to preview the endi...

Страница 51: ...rand Screensaver From the Your Brand button the user can change the Screen Saver Time out time for customers as well as change the time out time needed during Setup Once the changes are complete press...

Страница 52: ...at will allow the user to return to the previous Service Access screen 1 To set up vending prices for the beverages being offered Press and hold the BUNN Logo Icon for three 3 seconds to access the SE...

Страница 53: ...a replacement for an aborted or wrong vend This button is located on the bottom row beneath the main icons 5 On this screen each recipe and it s avail able prices for enabled sizes can be viewed and...

Страница 54: ...everage and the size you wish to dispense Press Start to dispense a single beverage 13 The Single Dispense is deactivated once a beverage has been dispensed If the machine sits idle long enough for th...

Страница 55: ...ue vous souhaitez distribuer Appuyez Start pour distribuer une boisson unique 13 La Distribution unique est d sactiv e une fois qu une boisson a t distribu e Si la machine reste assez longtemps au rep...

Страница 56: ...de distribution annul e ou d fectueuse Ce bouton est situ sur la rang e inf rieure sous les ic nes principales 5 Sur cet cran chaque recette et ses prix dis ponibles pour les tailles valid es peuvent...

Страница 57: ...de retour en arri re qui permettra l utilisateur de retourner sur l cran d Acc s de service pr c dent 1 Pour configurer les prix de vente des boissons propos es appuyez trois 3 secondes sur le logo d...

Страница 58: ...Your Brand votre marque l utilisateur peut changer le d lai d expiration de l cran de veille et changer la dur e du d lai d expiration n cessaire pendant la configuration Une fois les changements ef f...

Страница 59: ...ssage textuel ceci affiche une tablette qui permet l utilisateur d diter son message et changer le fond d cran en touchant l cran Il y a galement un bouton Preview visualisation qui permet l utilisate...

Страница 60: ...ns Une fois les changements ter min s appuyez sur le bouton OK pour sauveg arder le choix Appuyez sur le bouton Cancel annuler pour retourner l cran pr c dent sans sauvegarder aucun changement Votre m...

Страница 61: ...ents et retourner l cran pr c dent Le verrouillage de net toyage valid emp chera toute infusion apr s l heure r gl e Pour supprimer ce verrouillage effectuez un cycle de nettoyage Rappels rin age Du b...

Страница 62: ...ram tres r gionaux Param tres r gionaux Sur l cran Regional Settings param tres r gionaux l utilisateur peut param trer la Langue la Date et l Heure Une fois les changements ex cut s appuyez sur le bo...

Страница 63: ...ise en service Statistiques Rapports Appuyer sur le bouton Reports rapports af fichera trois propositions de rapports Rapport de totaux quotidiens rapport horaire de bois sons et base de donn es de bo...

Страница 64: ...in de caf Apr s chaque type de recette la valeur actuelle peut tre remise z ro en appuyant sur le bouton de remise z ro cor respondant ce produit Statistiques compte de tasses Appuyer sur le bouton de...

Страница 65: ...rter tout ou Select choisir Import All importera tout le contenu crit dans la cl USB Select permet d importer des graphiques individuels 18 Une fois que les images ont t import es appuyer sur le bouto...

Страница 66: ...vous chargez un graphique particularis pour le fond d cran choisissez la premi re ic ne New Background Images nouveaux fonds d image 7 8 Une fois que vous avez t sollicit in troduisez la cl USB dans l...

Страница 67: ...ANCED choisissez YOUR BRAND votre marque 5 Choisissez l tiquette d exportation sur l cran de YOUR BRAND votre marque a N introduisez PAS de cl USB et n appuyez pas sur OK ce moment l La cl USB exige u...

Страница 68: ...e de fond fond d cran d accueil png 1280 large x 800 Ic nes de boisson ic nes de choix de boisson png 350 x 350 Insignes de produit png 100 x 132 Banni re de fin de s quence image affich sur le fond b...

Страница 69: ...cl USB et appuyer sur Start commencer 6 Enlevez le grand couvercle en inox de l arri re de la porte Le port USB est situ au dessus de l cran de visualisation 8 D s lors qu on appuie sur Start le proc...

Страница 70: ...arri re qui permettra l utilisateur de retourner sur l cran d Acc s de service pr c dent 1 Appuyez trois 3 secondes sur le logo BUNN pour acc der l cran SERVICE ACCESS acc s de service 2 l cran SERVI...

Страница 71: ...n Ceci supprimera les param tres et les images particularis s et ne peut PAS tre annul 18 Information de service Si une intervention de service est n cessaire l information pour entrer en contact avec...

Страница 72: ...r de mode Vente Si l information montr e est renseign e num ro de s rie Version de logiciel etc alors une connexion r ussie au lecteur de cartes de vente a t tablie Si des changements ont t faits l cr...

Страница 73: ...qu il est actif et fournira d autres donn es Il n y a aucune information editable sur cet cran Dans cet exemple la machine est r gl e pour permettre la vente entre 6 h et 18 h du lundi par vendredi La...

Страница 74: ...ures d inactivit le r glage de la temp rature de r servoir d infusion chutera 140 F Toucher l cran principal tout moment annulera le dispositif d conomie d nergie Si des changements sont faits l cran...

Страница 75: ...t install dans la machine cet cran indiquera qu il est actif et fournira d autres donn es Il n y a aucune information editable sur cet cran Une fois valid la gouttelette bleue ambiante et la gouttelet...

Страница 76: ...e bouton vers la droite permettra de recevoir davantage de marc avant l indication de seau compl tement plein Si des changements sont faits l cran ap puyez sur Save sauvegarder pour confirmer Remarque...

Страница 77: ...hangements sont faits l cran de la Temp rature Appuyez sur Save sauvegarder pour confirmer 10 Casier marc Le casier marc peut tre enlev et les panneaux inf rieurs enlev s pour une vacuation du marc tr...

Страница 78: ...mbe au dessous de la temp rature de service r gl e l infusion sera invali d e jusqu ce que la temp rature de service soit atteinte Appuyez sur la fen tre de temp rature de service pour modifier la tem...

Страница 79: ...r gl e en haute altitude appuyez sur le bouton Altitude chart Tableau des altitudes 6 Sur le tableau trouvez votre altitude actuelle puis regardez sur la droite le r glage de temp rature de tem p rat...

Страница 80: ...S DE LA MACHINE 2 l cran SERVICE ACCESS choisissez le bouton Advanced 3 l cran Password mot de passe saisissez 6601 4 l cran de service ADVANCED choisis sez MACHINE SETTING r glage de machine 54377 70...

Страница 81: ...CHAUDE pour le TH 19 Le choix TEA sera d sormais disponible sur l cran d accueil pour la distribution 1 Appuyez trois 3 secondes sur le logo BUNN pour acc der l cran SERVICE ACCESS acc s de ser vice...

Страница 82: ...it 17 Choisissez l onglet Beverages offered boissons propos es 18 Pour valider Hot water for tea choisissez la case situ e directement sous l image de boisson TEA Les tailles petite moyenne grande tr...

Страница 83: ...La configuration de recette de TH a t cr e Appuyez sur le nom de recette TEA pour diter la recette 15 Les dur es de distribution d eau chaude pour la recette Hot water tea th l eau chaude peuvent tre...

Страница 84: ...ous permettra de choisir une nouvelle ic ne pour l insigne de produit Choisissez l ic ne d sir e puis ap puyez sur OK pour confirmer Des ic nes particularis es peuvent tre t l charg es sur la liste vo...

Страница 85: ...nt Appuyez sur l onglet General pour choisir le produit pour cette recette 11 Utilisez l onglet d roulant pour choisir le produit TEA pr c demment cr Dans cet exemple le rensei gnement implicite de la...

Страница 86: ...l onglet Recettes Pour cr er une nouvelle recette choisissez New Nous cr erons maintenant la recette pour le produit TEA th pr c demment cr 9 Saisissez votre nom de recette Hot water for tea eau chau...

Страница 87: ...DE PRODUIT EAU CHAUDE pour le TH 6 Utilisez la fen tre d roulante Product Type type de produit pour choisir HOT WATER eau chaude 7 Une fois les choix faits appuyer sur le bouton Ok cr era le nouveau...

Страница 88: ...diter des insignes de produit Image choisir le type de produit et ajouter des descriptions de produit 5 Appuyez sur la Ligne 1 de la fen tre de description de produit pour saisir une description de pr...

Страница 89: ...nglet Produits puis au bas de l cran appuyez sur le bouton New nouveau 3 Saisissez le nom du produit Dans cet exemple nous avons saisi Eau chaude car le produit distribue l eau chaude pour faire le th...

Страница 90: ...ich maintenant Sous l tiquette Gener al l utilisateur peut choisir une ic ne de bois son si la boisson doit tre glac e et diter des descriptions plus loin L utilisateur doit gale ment choisir le produ...

Страница 91: ...p puyez sur saisir pour confirmer 7 L cran Editing Product Edition de produit appara t maintenant partir de cet cran l utilisateur peut diter des insignes de produit Image choisir le type de produit e...

Страница 92: ...QUE Dans le coin sup rieur gauche de l cran il y a un bouton fl che de retour en arri re qui permettra l utilisateur de retourner sur l cran d Acc s de service pr c dent 1 Appuyez trois 3 secondes sur...

Страница 93: ...la page pr c dente Appuyez sur Sauvegarder pour enregistrer les choix Pour sortir et retourner l cran principal appuyez sur Advanced dans le coin sup rieur gauche Sur l cran Advanced appuyez sur Servi...

Страница 94: ...15 CONFIGURATION DE PRODUIT ET DE RECETTE suite 54377 7000 072217...

Страница 95: ...e REMARQUE R talonnez quand on change de produit Dur e d Infusion R gle la quantit de temps d infusion d air en secondes L infusion d air assure la satura tion compl te du caf moulu Intensit d infusio...

Страница 96: ...n Edit ing Recipe diter la recette Une fois qu une recette a t choisie l utilisateur peut utiliser cet cran pour modifier ou diter tous les param tres semblable la configura tion de la page 7 Le fait...

Страница 97: ...bas pour choisir l insigne de produit correct pour vos grains Tapez sur Save sauvegarder pour quitter CONFIGURATION DE PRODUIT ET DE RECETTE suite 54377 7000 120117 3 l cran de service AVANC choisiss...

Страница 98: ...t se mettra implicitement sur caf L insigne de produit est l ic ne situ e sur le c t droit de cet cran qui est utilis e pour d signer la tr mie les noms Appuyez sur la barre grise de l ic ne pour acc...

Страница 99: ...ut talonner le moulin en fonction du produit choisi par l utilisateur 2 Enlevez l entonnoir d infusion et placez une tasse ou un r cipient d au moins 12 oz sous la goulotte de moulin R f rez vous au G...

Страница 100: ...e du moulin sur l cran Ed iting Product dition de produit 8 partir de l cran dition de produit talonnage de moulin produit l utilisateur peut charger le moulin avec le produit choisi Remarque Le s lec...

Страница 101: ...l cran ACC S DE SERVICE 2 l cran ACC S de SERVICE choisissez le bouton Advanced 54377 7000 071417 4 l cran de service ADVANCED Avanc choisissez RECIPES Recettes REMARQUE Dans le coin sup rieur gauche...

Страница 102: ...7 ORGANIGRAMME de PROGRAMMATION suite 54377 7000 120117...

Страница 103: ...6 ORGANIGRAMME de PROGRAMMATION suite 54377 7000 091517...

Страница 104: ...ot de passe 4 chiffres 6601 num re tous les messages d erreur ac tuels Appuyez sur Event Log registre des v nements pour les erreurs pass es Invalide l cran pour le compte rebours de 15 secondes perme...

Страница 105: ...4 Appuyez sur le logo de BUNN pendant 3 secondes ORGANIGRAMME DE PROGRAMMATION Avancement du rouleau de papier Rin age et nettoyage 54377 7000 120117...

Страница 106: ...duit 17 Configuration de nouvelle recette 19 R glages de la machine 28 Exportation importation via port USB 39 Cr ation des nouveaux m dias 41 crans avanc s suppl mentaires 45 Configuration de la vent...

Страница 107: ...ssionnaires ou membres du personnel de BUNN ne sont pas autoris s apporter des modifications cette garantie ou proposer des garanties suppl mentaires contraignantes pour BUNN En cons quence les d clar...

Страница 108: ...GUIDE DE PROGRAMMATION BUNN O MATIC CORPORATION OF CANADA 280 INDUSTRIAL PARKWAY SOUTH AURORA ONTARIO L4G 3T9 T L PHONE 905 841 2866 T L COPIEUR 905 841 2775 www bunn com 54377 7000C 12 17 2016 Bunn O...

Отзывы: