


User Guide
19
www.bull.com
4.
DISK ACCESS lamp
Lights green
: the hard disk drives is being accessed.
5.
POWER/SLEEP lamp
Lights green
: the server is powered.
Off
: the server is off-powered.
If the OS supports a power-saving mode, the green lamp flashes while the
server is in this power-saving mode. Pressing the POWER switch places the
server back in the normal mode.
6.
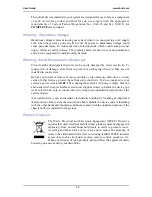
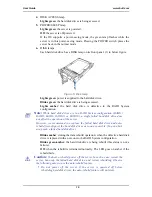
DISK lamps
Each hard disk drive has a DISK lamp on its front panel. (1) in below figure
Figure 5: Disk lamp
Lights green
: power is supplied to the hard disk drive.
Blinks green
: the hard disk drive is being accessed.
Lights amber
: the hard disk drive is defective in the RAID System
configuration.
Note:
While hard disk drives are in a RAID System configuration (RAID1/
RAID5, RAID6, RAID10, or RAID50), a single failed hard disk drive does
not affect the operation of the server.
However, we recommend you replace the failed hard disk drive and auto-
rebuild (reconfigure) the hard disk drives as soon as possible. (You can hot-
swap such a failed hard disk drive.)
Blinks amber
: during the data rebuild operation; when the defective hard disk
drive is replaced with a new one in the RAID System configuration.
Blinks green/amber
: the hard disk drive is being rebuilt (this status is not a
failure).
Off
: when the rebuild is terminated normally. The LED goes on amber if the
rebuild fails.
Caution:
To abort a rebuild, power off the server. In such a case, restart the
server, hot-swap the failed hard disk drive, and restart rebuilding. Observe
the following notes to use the auto-rebuild feature.
•
Do not power off the server. If the server is powered off before
rebuilding hard disk drives, the auto-rebuild feature will not start.
Содержание NovaScale T840 E2
Страница 1: ...NovaScale T840 E2 User s Guide NOVASCALE REFERENCE 86 A1 43FB 01 ...
Страница 2: ......
Страница 34: ...User Guide 34 www bull com ...
Страница 58: ...User Guide 58 www bull com 3 5 HDD cover 3 metric screws M4 Figure 16 Securing the HDD cover ...
Страница 112: ...User Guide 112 www bull com Refer to Advanced Menu on page 174 for more information ...
Страница 130: ...User Guide 130 www bull com The installation is completed ...
Страница 134: ...User Guide 134 www bull com Installing the Operating System without Express Setup ...
Страница 169: ...User Guide 169 www bull com Figure 76 Diagnostic LED POST Code Decoder continued ...
Страница 195: ...User Guide 195 www bull com Error Manager Menu The Error Manager Menu displays any errors encountered during POST ...
Страница 209: ......
Страница 210: ...BULL CEDOC 357 AVENUE PATTON B P 20845 49008 ANGERS CEDEX 01 FRANCE REFERENCE 86 A1 43FB 01 ...