


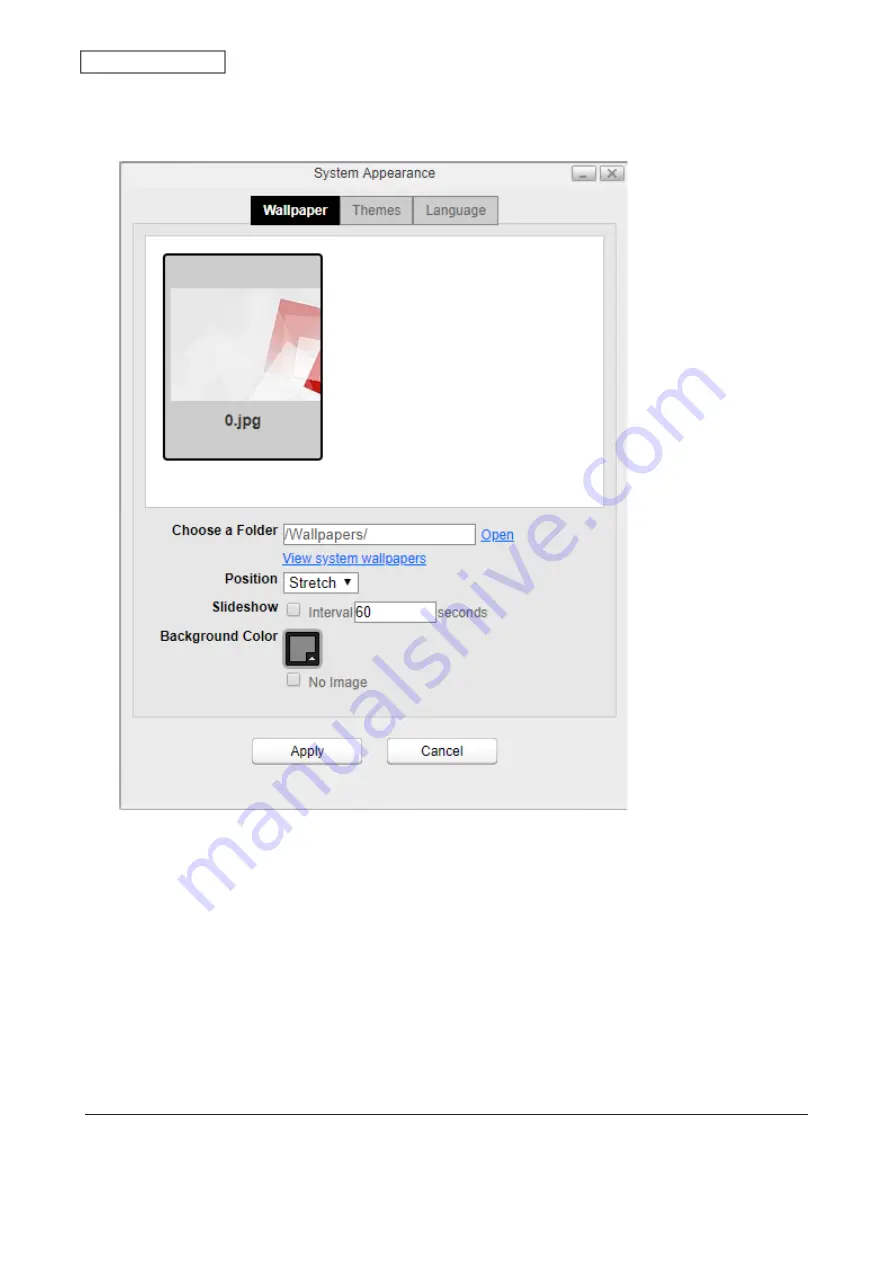
2
Click the
Wallpaper
tab, then
Open
. Select the folder where your images are stored, or click
View system
wallpapers
to view stock images included on your LinkStation. Click on the image you want to set as your
wallpaper.
3
From the “Position” drop-down list, select how the image will be displayed.
• Stretch: Stretch the wallpaper to desktop size.
• Center: Places the wallpaper in the center of the desktop.
• Tile: Displays the wallpaper in a tile-like pattern.
• Fill: Make the wallpaper fill the desktop and cut any overflow.
• Fit: Make the wallpaper fit the desktop without overflow.
4
If you enable “Slideshow”, you can set an interval in seconds to cycle through images in the selected folder as
the background.
5
If you don’t want to use an image as the wallpaper, you can set the background as a solid color and enable the
“No Image” option.
Changing Display Languages
You can change the display language before or after you log in to Settings.
21
Chapter 2 Configuration
Содержание LinkStation 500
Страница 38: ...2 Click the RAID tab 3 Click the array to delete 37 Chapter 5 Disk Manager ...
Страница 40: ...2 Click the RAID tab 3 Click Create RAID Array 39 Chapter 5 Disk Manager ...
Страница 57: ...3 The system log window will open 56 Chapter 6 System Information ...
Страница 59: ...3 Click Add 4 Enter a folder name and configure the desired settings then click OK 58 Chapter 7 Services ...
Страница 66: ...2 Click Folder Setup 3 Select a shared folder for the DLNA server 65 Chapter 7 Services ...
Страница 77: ...76 Chapter 7 Services ...
Страница 82: ...Groups Adding a Group 1 From Settings click System Settings 2 Click Groups 3 Click Add 81 Chapter 8 System ...
Страница 97: ...2 From Settings click System Settings 3 Click Firmware 4 Click Browse 96 Chapter 8 System ...
Страница 100: ...2 Click Folder Setup 3 Choose the folder to set as a backup destination 99 Chapter 8 System ...
Страница 104: ...6 Click Refresh The Buffalo NAS devices will be added to the list 7 Close the window 103 Chapter 8 System ...
Страница 108: ...2 Click Folder Setup 3 Choose a shared folder as your backup destination for Time Machine 107 Chapter 8 System ...
Страница 110: ...2 Click Time Machine 109 Chapter 8 System ...
Страница 111: ...3 Click Select Backup Disk 4 Select the shared folder then click Use Disk 110 Chapter 8 System ...
Страница 118: ...3 Enter the new password twice and click Apply 4 Tap Close when completed 117 Chapter 9 Configuring from Mobile Devices ...


