


2004 Buell Lightning: Drive/Transmission
6-35
HOME
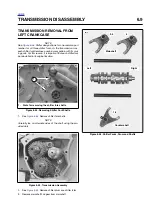
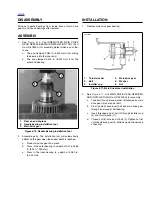
COUNTERSHAFT DISASSEMBLY
NOTES
●
Once the transmission assembly has been pressed out
of the left crankcase half, the mainshaft and countershaft
assemblies can be serviced separately.
●
All thrust washers are one common part number. There
is no shimming required with this transmission.
1
1
WARNING
1
WARNING
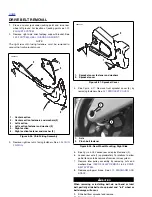
Always wear proper eye protection when removing re-
taining rings. Use the correct retaining ring pliers. Verify
that the tips of the pliers are not damaged or excessively
worn. Slippage could propel the ring with enough force
to cause death or serious injury.
1.
See
Figure 6-63.
Remove spacer (1) and countershaft
4th gear (2) from the end of the of the countershaft with
internal threads.
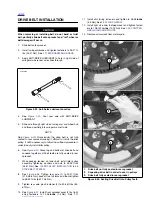
2.
Using
RETAINING RING PLIERS (Part No. J-5586),
remove and discard retaining ring (3) next to counter-
shaft 5th gear (4).
a. Slide countershaft 5th (4), and countershaft 2nd (5)
off end of countershaft.
b.
Remove split bearing (6) that was under counter-
shaft 2nd gear (5) and thrust washer (7).
c. Remove retaining ring (8) on the countershaft and
slide countershaft 3rd gear (9) off free end of coun-
tershaft.
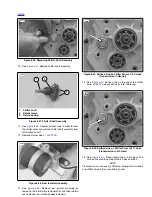
3.
Expand retaining ring (10) located next to countershaft
1st gear (11). Remove retaining ring (10) and thrust
washer (11).
a.
Slide countershaft 1st gear (13) off end of shaft.
b.
Remove split bearing (12).
4.
Remove thrust washer (14). Expand remaining retaining
ring (15) and slide off countershaft.
Cleaning And Inspection
1
1
WARNING
1
WARNING
Never use compressed air to “spin-dry” bearings. Spin-
ning bearings with compressed air can also cause a
bearing to fly apart, which could result in death or seri-
ous injury.
1.
Clean all parts (except bearings) in cleaning solvent and
blow dry with compressed air.
2.
Check gear teeth for damage. If gears are pitted, scored,
rounded, cracked or chipped, they should be replaced.
3.
Inspect the engaging dogs on the gears. Replace the
gears if dogs are rounded, cracked, battered, chipped or
dimpled.
4.
Discard all retaining rings that were removed.
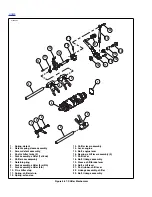
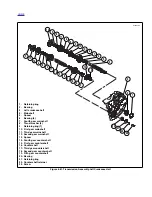
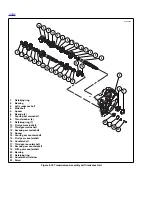
Figure 6-63. Transmission Countershaft Assembly Once Removed from Left Crankcase/Disassembly
11
12
10
13
14
15
9
8
7
6
3
4
5
1.
Spacer
2.
Countershaft 4th
3.
Retaining ring
4.
Countershaft 5th
5.
Countershaft 2nd
6.
Split bearing
7.
Thrust washer
8.
Retaining ring
9.
Countershaft 3rd
10. Retaining ring
11. Thrust washer
12. Split bearing
13. Countershaft 1st
14. Thrust washer
15. Retaining ring
16. Countershaft
b1020x6x
2
1
Left Crankcase
16
Содержание 2004 XB9S
Страница 2: ......
Страница 35: ...D 2 2004 Buell Lightning Appendix D HOME Rear Brake Systems Top View b1115xbsx ...
Страница 36: ...2004 Buell Lightning Appendix D D 3 HOME Rear Brake Systems Left Side View b1116xcsx ...
Страница 44: ...2004 Buell Lightning Appendix D D 11 HOME Clutch Cable Right Side View b1124xasx ...
Страница 47: ...HOME NOTES ...
Страница 49: ......
Страница 103: ......
Страница 201: ...HOME NOTES ...
Страница 203: ......
Страница 275: ...HOME NOTES ...
Страница 307: ...HOME NOTES ...
Страница 311: ...HOME NOTES ...
Страница 351: ...HOME NOTES ...
Страница 441: ......
Страница 463: ...HOME NOTES ...
Страница 465: ......
Страница 511: ...HOME Figure 6 83 Crankcase Fasteners D b1016x3x Indicates Bolt Pattern Location One Behind Shifter Mechanism ...
Страница 517: ...HOME NOTES ...
Страница 519: ......
Страница 563: ...HOME Figure 7 48 Headlight Housing 20º Alignment Marks for Rubber Boot Wiring Harness Guides or Spigots 10525 10526 ...
Страница 595: ...HOME NOTES ...
Страница 597: ......