3-66
2004 Buell Lightning: Engine
HOME
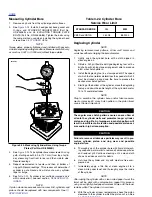
Measuring Cylinder Bore
1.
Remove any burrs from the cylinder gasket surfaces.
2.
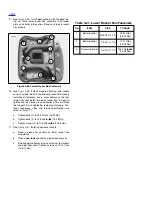
See
Figure 3-94.
Install a head gasket, base gasket and
O-rings, and CYLINDER TORQUEPLATES (Part No.
HD-33446B) and XL EVOLUTION TORQUE PLATE
BOLTS (Part No. HD-33446-86). Tighten the bolts using
the same method used when installing the cylinder head
screws. See
3.6 CYLINDER HEAD
.
NOTE
Torque plates, properly tightened and installed with gaskets,
simulate engine operating conditions. Measurements will vary
as much as 0.001 in. (0.025 mm) without torque plates.
3.
See
Figure 3-94.
Take cylinder bore measurement in ring
path, starting about 0.50 in. (12.7 mm) from top of cylin-
der, measuring from front to rear and then side to side.
Record readings.
4.
Repeat measurement at center and then at bottom of
ring path. Record readings. This process will determine if
cylinder is out-of-round and will also show any cylinder
taper or bulge.
5.
See
Table 3-22.
If cylinder is not scuffed or scored and is
within service limit, see next section,
DEGLAZING CYL-
INDER
.
NOTE
If piston clearance exceeds service wear limit, cylinders and
pistons should be replaced with new components. See
3.1
SPECIFICATIONS.
Deglazing Cylinder
NOTE
Deglazing removes wear patterns, minor scuff marks and
scratches without enlarging the bore diameter.
1.
Lightly swab the cylinder bore with a cloth dipped in
clean engine oil.
2.
Obtain a 240 grit flexible ball-type deglazing tool with a
bristle tip or finishing stone arrangement able to produce
a 60˚ cross hatch pattern.
3.
Install the deglazing tool in a slow-speed drill. The speed
at which the tool rotates determines the speed at which it
must be stroked up and down the bore to produce the
desired cross hatch pattern.
4.
Starting at the bottom of the cylinder, move the deglazing
tool up and down the entire length of the cylinder bore for
10 to 12 complete strokes.
NOTE
Stop to examine the cylinder bore and/or take measure-
ments. A precise 60˚ cross hatch pattern in the piston travel
area is the most important.
CAUTION
The angular cross hatch pattern ensures an even flow of
oil onto the cylinder walls and promotes longer cylinder,
piston and ring life. An Improper crosshatch pattern will
result in insufficient oil retention and possible piston sei-
zure and/or high oil consumption.
CAUTION
Failure to remove all abrasive particles may result in pre-
mature cylinder, piston and ring wear and possible
engine failure.
5.
Thoroughly wash the cylinder bore with liquid dishwash-
ing soap and warm water to remove all abrasive particles
and residual grit. Continue cleaning until a clean cloth
shows no evidence or dirt or debris.
6.
Hot rinse the cylinder and dry with moisture free com-
pressed air.
7.
Immediately apply a thin film of clean engine oil to a
clean white paper towel and thoroughly wipe the inside
of the cylinder.
NOTE
After wiping the cylinder with a clean, oiled paper towel, the
towel will be dark with contamination. repeat this process
using a new lightly oiled paper towel each time until the towel
remains white. The cylinder is now clean.
8.
With the cylinder at room temperature, check the piston
clearance in the cylinder in which the piston will run. See
3.1 SPECIFICATIONS
.
Figure 3-94. Measuring Cylinder Bore Using Torque
Plates (Part No. HD-33446B)
b0306x3x
Table 3-22. Cylinder Bore
Service Wear Limit
STANDARD BORE
IN.
MM
XB9S and XB12S
3.5008
88.9203
Содержание 2004 XB9S
Страница 2: ......
Страница 35: ...D 2 2004 Buell Lightning Appendix D HOME Rear Brake Systems Top View b1115xbsx ...
Страница 36: ...2004 Buell Lightning Appendix D D 3 HOME Rear Brake Systems Left Side View b1116xcsx ...
Страница 44: ...2004 Buell Lightning Appendix D D 11 HOME Clutch Cable Right Side View b1124xasx ...
Страница 47: ...HOME NOTES ...
Страница 49: ......
Страница 103: ......
Страница 201: ...HOME NOTES ...
Страница 203: ......
Страница 275: ...HOME NOTES ...
Страница 307: ...HOME NOTES ...
Страница 311: ...HOME NOTES ...
Страница 351: ...HOME NOTES ...
Страница 441: ......
Страница 463: ...HOME NOTES ...
Страница 465: ......
Страница 511: ...HOME Figure 6 83 Crankcase Fasteners D b1016x3x Indicates Bolt Pattern Location One Behind Shifter Mechanism ...
Страница 517: ...HOME NOTES ...
Страница 519: ......
Страница 563: ...HOME Figure 7 48 Headlight Housing 20º Alignment Marks for Rubber Boot Wiring Harness Guides or Spigots 10525 10526 ...
Страница 595: ...HOME NOTES ...
Страница 597: ......

