background image

Adjusting handlebar height:

Quill stem:

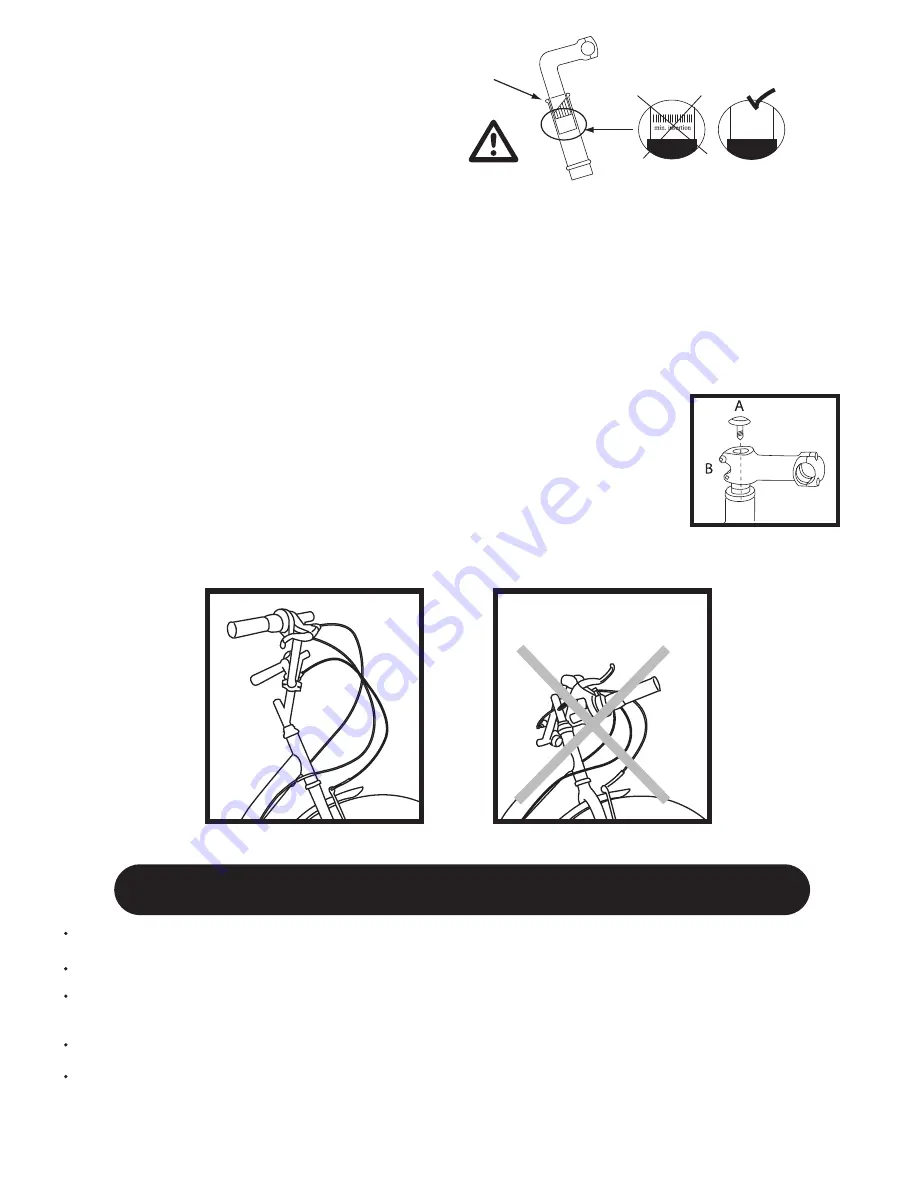
Please note the quill stem insertion limit:
For your safety, the stem should not be pulled out further 
than the mark shown on the stem: "min. insertion".

Headset stem:

All MTBs with aheadset stems are sold with setting rings. The handlebar height suggested in the shop is the highest. If you would
prefer to raise the handlebar position, you will need to choose a higher stem.

Adjusting aheadset stems on your bicycle:

To reduce the height you need to use appropriate tools (T-bars 5 or 6 depending on the model - see tools chapter).
- Completely unscrew screw A, then the two screws (B) on the stem. 
- Remove the stem.
- Take 1 or more setting rings
- Replace the stem.
- Replace the setting rings above the stem.
- Tighten up screw A and tighten the screws (B).

Checking that aheadset stems are properly fitted to your bicycle:

To check the adjustment of your stem, close the front brake and rock forwards
and backwards on your bicycle.
If you feel any movement in the steering system, tighten up screw A.
Secondly, check by raising the front of the bicycle and turning the handlebars from left to right:
if you have any difficulty turning the handlebars, tighten up screw A.
If this procedure seems too complex, please ask the staff in the workshop at your nearest shop.

Checking that the handlebars are properly mounted in the stem

On Elops (1, 3, 5 and 7), b’Twin Pack and BMX bicycles, the handlebars are set at a significant angle. The angular position of the
handlebars should not be modified by more than 10° compared with the assembly position (see pictures below).

max

SAFETY CHECKS BEFORE USE

Adjusting the seat post and seat: check that the whole bicycle is solidly assembled and that the seat is solidly clamped in the frame, respecting the
minimum insertion point indicated on the tube.
Tightening the stem: before each use, check that the stem is properly adjusted using appropriate tools (see tools chapter) and tighten to the torque
indicated. Check the value in the stem/steering system torque table.
Tyre inflation, dimensions and mounting direction: Inflate your tyres to the correct pressure, referring to the pressure range indicated
on the side of the tyre by the manufacturer; your tyre’s resistance to wear depends on it. Mount the tyre in the direction indicated
on the side (the arrows indicating the rotation direction).
Always tighten fasteners to the correct torque. Bolts that are too tight can stretch and deform. Bolts that are too loose can move and fatigue. Either
mistake can lead to a sudden failure of the bolt, causing you to lose control and fall.

WARNING:

An insufficiently tightened stem clamp bolt, handlebar clamp bolt or bar end extension clamping bolt may compromise steering action,

which could cause you to lose control and fall. Place the front wheel of the bicycle between your legs and attempt to twist the handlebar/stem
assembly. If you can twist the stem in relation to the front wheel, turn the handlebars in relation to the stem, or turn the bar end extensions in
relation to the handlebar, the bolts are insufficiently tightened.

- 9 -

Содержание Bicycle

Страница 1: ...User guide and terms of guarantee...

Страница 2: ...entre so that you can enjoy your passion to the full Design Our design office ensures that our products satisfy your desires just like b Twin They pay particular attention to ensuring that the technic...

Страница 3: ...ITION ON THE BICYCLE 8 SAFETY CHECKS BEFORE USE 9 ADJUSTMENTS AFTER SEVERAL HOURS USE 10 TAKING GOOD CARE OF YOUR BICYCLE 10 A REGULAR MAINTENANCE AND CHECKS 11 B NECESSARY TOOLS 12 C CLEANING 12 D LU...

Страница 4: ...component s expected life span is exceeded it may break suddenly thus risking injury to the cyclist Cracks chips and discolouring in areas subject to great stresses show that the component has exceede...

Страница 5: ...theft You ll forget it s there Multiple transport modes the foldable bike is designed to help you getting around town over long distances as a complementary mode of transport to the car train public...

Страница 6: ...your next outing Stick to the paths Be respectful to pedestrians and horse riders Keep skidding to a minimum Respect flora and fauna Avoid muddy areas Here are a few rules for responsible trail ridin...

Страница 7: ...eries required Two 1 5 Volt LR14 alkaline batteries To open press on one of the chrome plated strips 1 and open by turning the front of the light 2 Battery direction is shown on the bulb holder and on...

Страница 8: ...n a high position for greater efficiency When travelling downhill the seat should be slightly lowered to improve bicycle control and to make it easier to get over obstacles PLEASE NOTE THE INSERTION L...

Страница 9: ...e The angular position of the handlebars should not be modified by more than 10 compared with the assembly position see pictures below max SAFETY CHECKS BEFORE USE Adjusting the seat post and seat che...

Страница 10: ...ore every ride you must check that there is no movement between any of the different parts of the assembly If there is only consult qualified personnel and or your nearest shop in order that they can...

Страница 11: ...AD MTB Change bottom bracket Change cables and brake and derailleurhousings Change drive train chain rings chain andfreewheel Change tyres and inner tubes Change bottom bracket Change cables and brake...

Страница 12: ...oil gear system components derailleur shifter suspension parts brake levers caliper and brake mountsand the chain Check the chain and replace it if necessary see the section entitled maintenance check...

Страница 13: ...S ROAD COMPETITION ROAD Stem Handlebar NOT APPLICABLE Quick release or 10 12 NOT APPLICABLE 17 RR 5 1 24 17 8 16 15 18 22 30 22 30 30 45 16 16 8 10 aluminium frame 5 7 carbon frame 8 10 aluminium fram...

Страница 14: ...eel Replacing the wheel Place the wheel in a central position between the frame dropouts and the fork Tighten up the nuts Reconnect the brake as in the diagram 4 Wheels with a coaster brake Removing t...

Страница 15: ...3 The pedal marked L is the left hand pedal Turn it anticlockwise to attach it to the crank 4 Adjusting shoe and pedal clamping systems Please see your manufacturer s instructions Important when repla...

Страница 16: ...The rims disks and pads must never be treated with a lubricant or another greasy substance If necessary clean using an anti static polish You are advised not to use solvents which may damage the mark...

Страница 17: ...at the intervals described in the chapter entitled regular maintenance and checks Replacing worn disk brakes or pads the surface markings are no longer visible or the metal structure is under 0 07 in...

Страница 18: ...ing brake pads 1 Open the calipers 2 Remove the pad using a suitable spanner Allen key or flat key depending on the model 3 Replace the pad being careful to follow the assembly sequence of washers and...

Страница 19: ...erailleur so that each lever position corresponds to a cog If the chain does not move down every time you shift the lever loosen the cable by turning the cable tension adjusting screw clockwise If the...

Страница 20: ...win retailer that accessories to be fitted to your bicycle are compatible with it Check that all the elements of your bicycle work correctly when the accessory is fitted The bicycle may respond differ...

Страница 21: ...isers see the manufacturer s instructions for mounting and adjustment guidance Compatibility of b Twin accessories with b Twin bikes For the safety of our customers we recommend installation is only c...

Страница 22: ...s and stem are centred and tightened Check the headset Check the suspension is working 3 HOUSINGS Check the cable housings are correctly positioned in the cable stops 4 WHEELS Check that the wheels ar...

Страница 23: ...23 2 2 3 h Hs Hg 2 3...

Страница 24: ...4 43 25 41 26 20 27 19 2 8 2 6 28 37 Hs in h in Triban Trail S in 59 1 61 07 61 07 62 65 63 04 64 62 65 01 66 59 66 98 68 56 68 95 70 53 70 92 72 5 72 89 74 47 74 86 76 83 23 05 1 4 24 03 25 02 26 00...

Страница 25: ...169 170 174 175 179 180 185 62 64 5 66 5 69 7 6 5 72 Hs cm h cm Triban Trail S cm 150 155 155 159 160 164 165 169 170 174 175 179 180 184 185 189 190 195 58 5 3 5 61 63 5 66 3 2 5 2 68 5 71 73 5 76 7...

Страница 26: ...in 59 1 60 68 61 07 62 65 63 04 64 62 65 01 66 59 66 98 68 56 68 95 70 53 70 92 72 6 72 89 74 47 74 86 76 44 23 64 24 63 25 61 26 60 27 58 28 57 29 55 2 76 2 96 3 15 3 55 3 74 3 94 4 33 30 54 31 52 4...

Страница 27: ...5 200 82 7 5 Competition Performance S cm 150 154 155 159 160 164 165 169 170 174 175 179 180 184 185 189 190 194 60 62 5 65 67 5 70 72 5 75 7 7 5 8 9 9 5 10 11 77 5 80 11 5 12 Hs cm h cm 195 200 82 5...

Страница 28: ...5 01 66 59 66 98 68 56 68 95 70 53 70 92 72 6 72 89 74 47 74 86 76 44 76 83 78 80 31 72 0 39 Performance S in 23 44 24 43 25 41 26 40 27 38 28 37 29 55 2 56 2 96 3 15 3 35 3 55 3 74 30 54 31 52 3 94 4...

Страница 29: ...95 200 80 5 1 Performance S cm 150 154 155 159 160 164 165 169 170 174 175 179 180 184 185 189 190 194 59 5 62 64 5 67 69 5 72 75 6 5 7 5 8 8 5 9 9 5 77 5 80 10 10 5 Hs cm h cm 195 200 82 5 11 5 Off r...

Страница 30: ...45 31 47 28 12 61 14 78 18 97 19 31 19 70 19 11 19 31 19 50 Hs in hg in 20 others 4x4 FS S in 47 28 48 86 49 25 50 83 51 22 53 19 47 28 48 86 49 25 50 83 51 22 53 19 47 28 48 86 16 55 20 09 20 29 20 4...

Страница 31: ...4 95 99 100 105 105 109 110 114 115 120 32 37 5 48 49 50 48 5 49 49 Hs cm hg cm 20 others 4x4 FS S cm 120 124 125 129 130 135 120 124 125 129 130 135 120 124 42 51 51 5 52 42 56 5 125 129 45 130 135 H...

Страница 32: ...7 55 16 56 74 57 13 61 07 53 19 54 77 21 28 24 82 25 22 21 28 24 03 24 43 55 16 56 74 21 27 57 13 61 07 Hs in hg in 22 46 22 66 22 85 24 RR 5 0 Girl RR 5 11 b Twin Flower S cm 135 139 140 144 145 155...

Страница 33: ...d Ascq cedex France TURKSPORT Spor Ur nleri Sanayi ve Ticaret Ltd ti Mega Center C 36 Blok D 374 Bayrampa a 34235 Istanbul Turkey 16 GB 14746 20 GB 3565 CNPJ 02 314 041 0001 88 141031 84 3 3 Importad...

Отзывы: