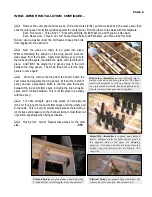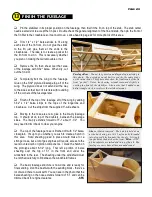
Wing Panel, Upside Down -
The idea here is to
position the top TE sheeting flat against the table.
This requires a support at the front; I used a piece of
lumber that was lying around. Worked well! You
can see the TE sheeting overhangs at the rear. It
will be trimmed later.
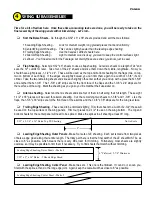
Aileron Servo Mount -
with balsa sheeting
ready to be glued in place. Note the extra-long
cutout in the balsa. The servo flanges should
sit flat against the lite-ply, not the balsa.
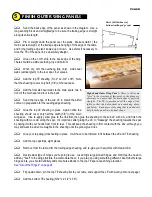
Finished Outer Wing Panel -
The leading edge cap
has been carved and sanded, and all of the sheeting
has been carefully trimmed. Note the fillets in the
corners of the wing joint sheeting. Not necessary,
but it adds a touch of class
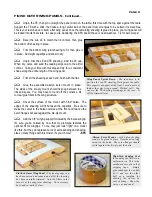
High-Tech Sanding Tool
for sanding the fillets to a
uniform curve. This is the
cardboard core of a roll of
shipping tape. Simply
glue sandpaper to one half
of it, and use the other
half as a template for
drawing the curves on
your sheeting. Draw the
curve, cut, and sand!
FINISH OUTER WING PANELS, Continued...
Unpin the TE, then pin or weight the panel down on the table, this time with the top spar against the table.
Support the TE with a stick, then take a long careful look at the panel from all angles to be certain it is warp-free.
This is your last chance to build a flat wing panel; once the remaining sheeting is glued in place, your wing panel will
be locked into its final state. In case you're wondering, the SFK doesn't have or need washout. Try for zero warps!
Bevel the sub LE to match the rib contour, then glue
the bottom LE sheeting in place.
Trim the bottom wing joint sheeting to fit, then glue it
in place. Add eight capstrips and allow to dry.
Unpin, trim the LE and TE sheeting. Add the LE cap.
When dry, carve and sand the leading edge cap to the airfoil
contour. Take your time with this step and try for a consistent
shape along the entire length of the wing panel.
Trim all the sheeting at each end, flush with the ribs.
Glue the assembled aileron servo mount in place.
The sides of the lite-ply mount should fit snug between the
ribs and spars. You may have to round off the corners a bit
to clear glue fillets in the wing structure.
Sheet the surface of the mount with 3/32" balsa. The
edges of the sheeting will fit between the capstrips. Be sure to
make the cutout in the balsa oversize at the front and rear so the
servo flanges will seat against the lite-ply mount.
Add the 3/8" wingtip support followed by the balsa wingtip.
I'm sure you've noticed by now that my prototype features the
optional STOL wingtips. To me, they just look "right" on a model
like this, but they do represent a lot of extra sanding and shaping.
Like so many things with this model, it's your choice!
-SFK
PAGE 9
Содержание SUPER FLYIN' KING
Страница 2: ...TABLE OF CONTENTS 0 1 2 0 3 4 5 4 4 2 22 0 2 0 0 0 6 0 7 1 0 2 2 8 9 6 7 5 2 1...
Страница 22: ...0 1 2 3 4 1 5 6 7 PHOTO 1 PHOTO 2 PHOTO 3 PHOTO 4...
Страница 23: ...0 1 2 3 PHOTO 1 PHOTO 2 PHOTO 3 PHOTO 4...
Страница 24: ...4 5 4 6 4 0 7 0 8 0 0 9 4 1 PHOTO 5 PHOTO 6 PHOTO 7 PHOTO 8 PHOTO 9...
Страница 25: ...1 0 1 9 5 9 7 6 A PHOTO 10 PHOTO 11 PHOTO 12...
Страница 28: ...0 12 3 4 5 6 7 6 8 3 9 7 9...
Страница 31: ......


