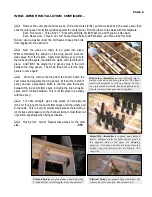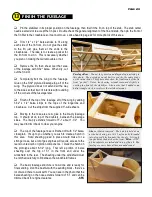
Right-hand Outer Wing Panel -
There is still some
"give" in the structure at this point, so the plans are
necessary to ensure that the main spar is perfectly
straight. The TE is positioned off the edge of the
table so that the balsa sheet can overhang above
and below. Each piece of sheeting that is added will
help lock the panel into its final shape.
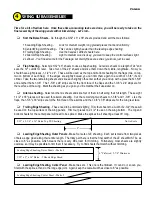
1 FINISH OUTER WING PANELS >
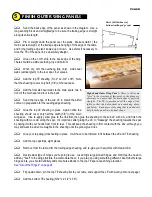
Sand the back edge of the panel as shown in the diagram. Use a
long sanding block and straightedge to be sure the trailing edge is straight
along its entire length.
Pin or weight down the panel over the plans. Make certain 1) the
main spar is straight, 2) the trailing edge is hanging off the edge of the table,
and 3) the trailing edge isn't bowed up or down. Use shims if necessary to
force the TE of the panel to be absolutely straight.
Glue on the 1-3/8" strip to the back edge of the wing.
There should be a little overhang, top and bottom.
When dry, trim the overhang (top only). Add shear
webs (vertical grain) to the rear spar, four places.
Add the top TE sheeting (3/32" x 2-3/4" x 36"). Note
that the sheeting covers only half (1/4") of the rear spar.
Add the final six shear webs to the main spars, two in
front of the main spar and four in the back.
Sand the top edge of the sub LE to match the airfoil
contour in preparation for the leading edge sheeting.
Glue the top LE sheeting in place. Again notice the
sheeting should cover only half the width (3/8") of the main
wing spar. I like to apply yellow glue to the ribs first, then glue the sheeting to the sub LE with CA, and finish the
sheeting with more CA along the spar. It's important, after gluing the LE, to "massage" the sheeting towards the spar
by wiping it with your hands from front to rear. This will keep the sheeting in firm contact with the ribs, although you
may still want to add some weights to the sheeting until the yellow glue dries.
Glue your top wing joint sheeting in place. It will have to be trimmed to fit between the LE and TE sheeting.
Add the top capstrips, eight places.
Remove from the table, trim the trailing edge sheeting, and re-glue your new joints with medium CA.
Decide what type of hinges you're going to use. I used Sig's large pinned hinges, and didn't feel the need to
add any "beef" to the wing structure to accomodate them. If you plan on using something different, like Robart's large
hinge points, you should definitely add some balsa blocks to the top TE spar at each hinge location.
See "About the Hinges" on page 24.
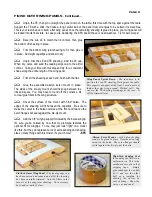
Flip upside down, pin the top TE sheeting flat to your table, and support the LE with wood (photo next page).
Add the bottom TE sheeting (3/32" x 2-1/2" x 36").
5
PAGE 8
Bevel full thickness of
bottom trailing edge spar
Содержание SUPER FLYIN' KING
Страница 2: ...TABLE OF CONTENTS 0 1 2 0 3 4 5 4 4 2 22 0 2 0 0 0 6 0 7 1 0 2 2 8 9 6 7 5 2 1...
Страница 22: ...0 1 2 3 4 1 5 6 7 PHOTO 1 PHOTO 2 PHOTO 3 PHOTO 4...
Страница 23: ...0 1 2 3 PHOTO 1 PHOTO 2 PHOTO 3 PHOTO 4...
Страница 24: ...4 5 4 6 4 0 7 0 8 0 0 9 4 1 PHOTO 5 PHOTO 6 PHOTO 7 PHOTO 8 PHOTO 9...
Страница 25: ...1 0 1 9 5 9 7 6 A PHOTO 10 PHOTO 11 PHOTO 12...
Страница 28: ...0 12 3 4 5 6 7 6 8 3 9 7 9...
Страница 31: ......


