background image

17 

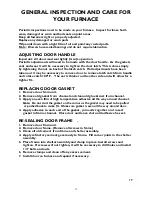
GENERAL INSPECTION AND CARE FOR 

YOUR FURNACE 

Periodic inspections need to be made on your furnace.  Inspect for loose hard-
ware, damaged or worn and bad seals on joint areas. 
Keep all fasteners tight or properly adjusted. 
Replace any damaged or worn parts 
Wipe unit down with a light film of oil and paint any rusted parts.  
Note

:  Blowers have sealed bearings and do not  require lubrication.  


ADJUSTING DOOR HANDLE 

Important:  All doors must seal tightly for safe operation. 

Periodic adjustments will need to be made with the door handle.  As the gaskets 
seal  and wear it will be necessary to tighten the door latch. This is done simply   
by tightening the nut on back of the latch catch.  If all adjustments have been 
taken out it may be necessary to remove door to remove latch catch from handle 
and rotate catch 180° F.   The ear is thicker on the other side and will  allow for a 
tighter fit. 


REPLACING DOOR GASKET 

1.  Remove door from unit. 
2.  Remove old gasket from  channel and clean old glue & rust from channel. 
3.  Apply an even film of high temperature adhesive all the way around channel. 

     Note:  Do not start the gasket on the corner as the gasket may need to be pulled   
      or pushed back to make fit.  Make sure gasket is even all the way around door

4.  Apply adhesive to each end of the gasket,  join ends together and  insert      

gasket in frame channel.  Close door and leave shut until adhesive has set. 


RE-SEALING DOOR FRAME    .    


1.  Remove door from unit 
2.  Remove door frame. (Remove all screws in frame) 
3.  Clean all old cement from frame and shelter assembly. 
4.  Apply refractory cement generously to frame.  Fill corner joints in the shelter 

assembly. 

5.  Place frame into shelter assembly and clamp in place. Install screws and 

tighten.  If screws will not tighten, it will be necessary to drill holes and install 

1/4” bolts and nuts. 

6.  Remove clamps and clean off any excess cement. 
7.  Install door on furnace and repaint if necessary. 


17


Содержание 450

Страница 1: ...779 1616 TOLL FREE 1 800 927 9947 FAX 979 822 0540 All installations must be in accor dance with local and state codes which may differ from this man ual SAVE THESE INSTRUCTIONS FIRE BOX BUILT FROM 3 16 STEEL PLATE ALL WELDED CONSTRUCTION WITH CAST IRON GRATES EXTERIOR COVERING BUILT FROM 1 16 INCH GALVNIZED PLATE CAST IRON DOORS FRAMES GRATES AND DOOR LATCHES P N 3000 002 ...

Страница 2: ...ing your Bryan Furnace Check with your local building officials to be in con formance with local building plumbing and electrical codes These instructions can help you now as well as in the future and should be retained for your refer ence If after installing your Bryan Furnace you encounter a situation that you are not comfortable with feel free to call our toll free number 1 800 927 9947 and ask...

Страница 3: ... Group 10 Shelter Group 11 Firebox Brick and Grates 12 Door Assemblies 13 Wiring Diagram Model 450 14 Electrical System 15 Supplies 16 INSPECTION AND CARE Periodic Inspections 17 Adjusting Door Handles 17 Replacing Door Gaskets 17 Resealing Door Frame 17 WARRANTY 18 OPERATING INSTRUCTIONS PAGE How itWorks 4 Operation 4 Building a Fire 4 Temperature Adjustments 5 Creosote and Soot Formation and the...

Страница 4: ...ce required for refueling and ash removal Firewood varies greatly in quality due to species and moisture content Wood that is seasoned and dry greatly improves the efficiency of the furnace Wood of over 20 moisture will not burn well Pine and some other softwoods burn very quickly with high creosote production and very few coals These woods are best used to start hardwood fires BUILDING A FIRE Pla...

Страница 5: ...ws uncontrolled combustion air to enter the chamber and can cause overheating NEVER leave the ash door open with a hot fire going as this can cause the grates to warp CREOSOTE AND SOOT FORMATION AND NEED FOR REMOVAL When wood is burned slowly it produces tar and other organic vapors which com bined with expelled moisture may form creosote The creosote vapors condense in the relatively cool chimney...

Страница 6: ... completely before starting NOTICE TO OUR CUSTOMERS Your Bryan Furnace is absolutely the safest cleanest solid fuel furnace system available Your furnace has been assembled from the finest materials available by skilled craftsmen under the su pervision of a strict quality control program Bryan Furnace Works Inc however has no control over the handling of your furnace during shipment or installatio...

Страница 7: ...rnace must be grounded either through the electric cord third prong or by driving a copper coated steel rod 6 six feet into the ground and attaching it to the base of the furnace with a 14 gauge copper wire Also install the provided thermo stat at a desired location inside the heated area preferably near the return air You will need to provide required thermostat wire from the thermostat to the we...

Страница 8: ...ivered down stream from the central system Run the return air duct separate from the return air from your central system or the hot air from The Bryan Furnace may try to short circuit back through the central system NEW DUCTWORK SYSTEM If possible run your ductwork under the floor to deliver heat at floor level or into the attic where you can locate outlets at an area of your choice With the Model...

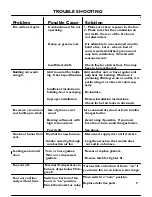
Страница 9: ...insulate Improper installation Review installation instructions Check for hot air leaks in ductwork Excessive creosote or Use of green or wet Use seasoned dry wood or burn smaller soot build up in stack wood charges hotter Burning softwoods with Avoid using if possible If you must high resin content burn them burn small charges hotter Poor draft See above Smoke or fumes from Normal for new furnace...

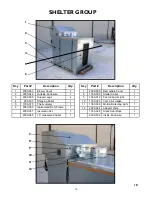
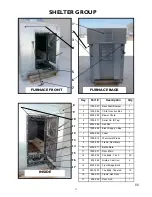
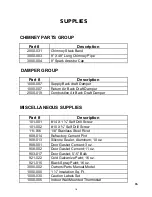
Страница 10: ... 5 1000 015 Thermometer 1 6 2000 050 Galvanized Door Frame 1 2000 037 Insulation Set 1 2000 048 10 Galvanized Collar 1 Key Part Description Qty 7 2000 059 Removable Panel 1 8 1000 003 Starter Collar 1 9 1000 012 Fan Indicator Light 1 10 1000 023 Comb Air Intake 1 11 1000 009 Motion Detecting Light 1 12 2000 044 Adaptor Plate 1 1000 028 Stack Seal Rope 1 2000 032 Inside Enclosure 1 ...

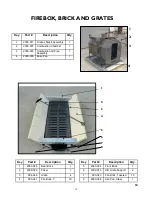
Страница 11: ...er Chute 2 4 1000 017 Serial No ID Tag 1 5 2000 028 Ash Pan 1 6 1000 024 Elect Supply J Box 1 7 2000 026 Poker 1 8 1000 015 Thermostat Probe 1 9 1000 002 Frame Door Main 1 10 2000 011 Baffle Plate 1 11 1000 001 Door Main 1 12 903 042 Fire Brick 1 inch 30 13 904 048 Grates Cast Iron 4 14 2000 024 Front Bridge Brick 1 15 950 1400 Fire Brick Tapered 10 16 904 043 Frame Ash Door 1 17 904 042 Door Ash ...

Страница 12: ...ion Chamber 1 3 2000 018 Combustion Air Pipe Assembly 1 4 2000 000 Base Pan 1 Key Part Description Qty 1 2000 025 Rear Brick 1 2 2000 026 Poker 1 3 904 048 Grate 4 4 903 041 Fire Brick 1 30 Key Part Description Qty 5 2000 024 Front Brick 1 6 2000 015 S S Grate Support 2 7 903 042 Fire Brick Tapered 10 8 2000 028 Ash Pan Steel 1 12 ...

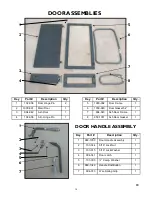
Страница 13: ...2 006 A D Hinge Pin 1 Key Part Description Qty 5 1000 002 Door Frame 1 6 1000 029 Door Gasket 54 1 7 904 043 Ash Door Frame 1 8 950 1351 Ash Door Gasket 1 Key Part Description Qty 1 960 1350 Door Handle Assembly 1 2 103 024 5 16 Lock Nut 1 3 103 015 5 16 Lock Washer 1 4 904 041 Door Latch 1 5 101 000 Comp Washer 1 6 960 1349 Handle Rod Button 1 7 904 073 Wire Spring Grip 1 ...

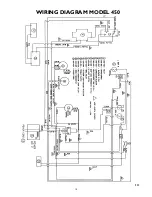
Страница 14: ...14 WIRING DIAGRAM MODEL 450 14 ...

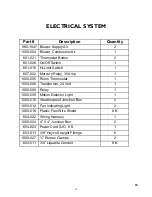
Страница 15: ... 35 Amp 1 1000 005 Room Thermostat 1 1000 006 Transformer 24 Volt 1 1000 008 Relay 1 1000 009 Motion Detector Light 1 1000 010 Weatherproof Junction Box 2 1000 012 Fan Indicating Light 2 1000 016 Plastic Flex Wire Shield 8 ft 604 022 Wiring Harness 1 1000 024 4 X 4 Junction Box 2 604 023 Power Cord SJO 8 ft 1 603 013 3 8 Heyco Straight Fittings 6 1000 027 Romex Clamps 2 603 011 3 8 Liquatite Condu...

Страница 16: ...ll Screw 101 002 10 X Self Drill Screw 111 016 1 8 Stainless Steel Rivet 908 014 Refractory Cement Pint 908 013 Silicone Sealer Aluminum 10 oz 908 001 Door Gasket Cement 3 oz 908 002 Door Gasket Cement 11 oz 903 017 Door Gasket 5 5 Bulk 921 022 Cold Galvanize Paint 16 oz 921 015 Black Spray Paint 16 oz 3000 002 Owners Parts Manual Model 1000 000 1 Insulation Sq Ft 1000 030 Caution Labels Set 1000 ...

Страница 17: ... and will allow for a tighter fit REPLACING DOOR GASKET 1 Remove door from unit 2 Remove old gasket from channel and clean old glue rust from channel 3 Apply an even film of high temperature adhesive all the way around channel Note Do not start the gasket on the corner as the gasket may need to be pulled or pushed back to make fit Make sure gasket is even all the way around door 4 Apply adhesive t...

Страница 18: ... inspection of unit to insure all parts and workmanship are satis factory the following parts are not warranted A Cast iron grates B Door gasket and latches C Fire Brick and front and rear refractory 7 Claims shall be made under this warranty by written notice to Manufacturer s lo cal distributor If the service is not covered by this warranty purchaser shall pay for all related labor and material ...

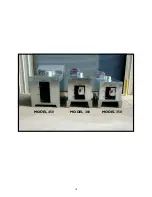
Страница 19: ...19 MODEL 450 MODEL 300 MODEL 350 ...

Страница 20: ...and has con tinued to build furnaces through the pre sent time at our facility Rik Mar Inc also manufactures scientific animal cages which are shipped world wide The cages are shipped to hospitals universities research facilities and zoos Rik Mar s operation consists of 30 000 sq ft of manufacturing facilities and main tains a work force of approximately fif teen full time employees The Bryan Fur ...

Страница 21: ...21 ...

Страница 22: ...22 ...

Страница 23: ...23 ...

Отзывы: