background image

5

h

Print the saved PDF file with a printer.

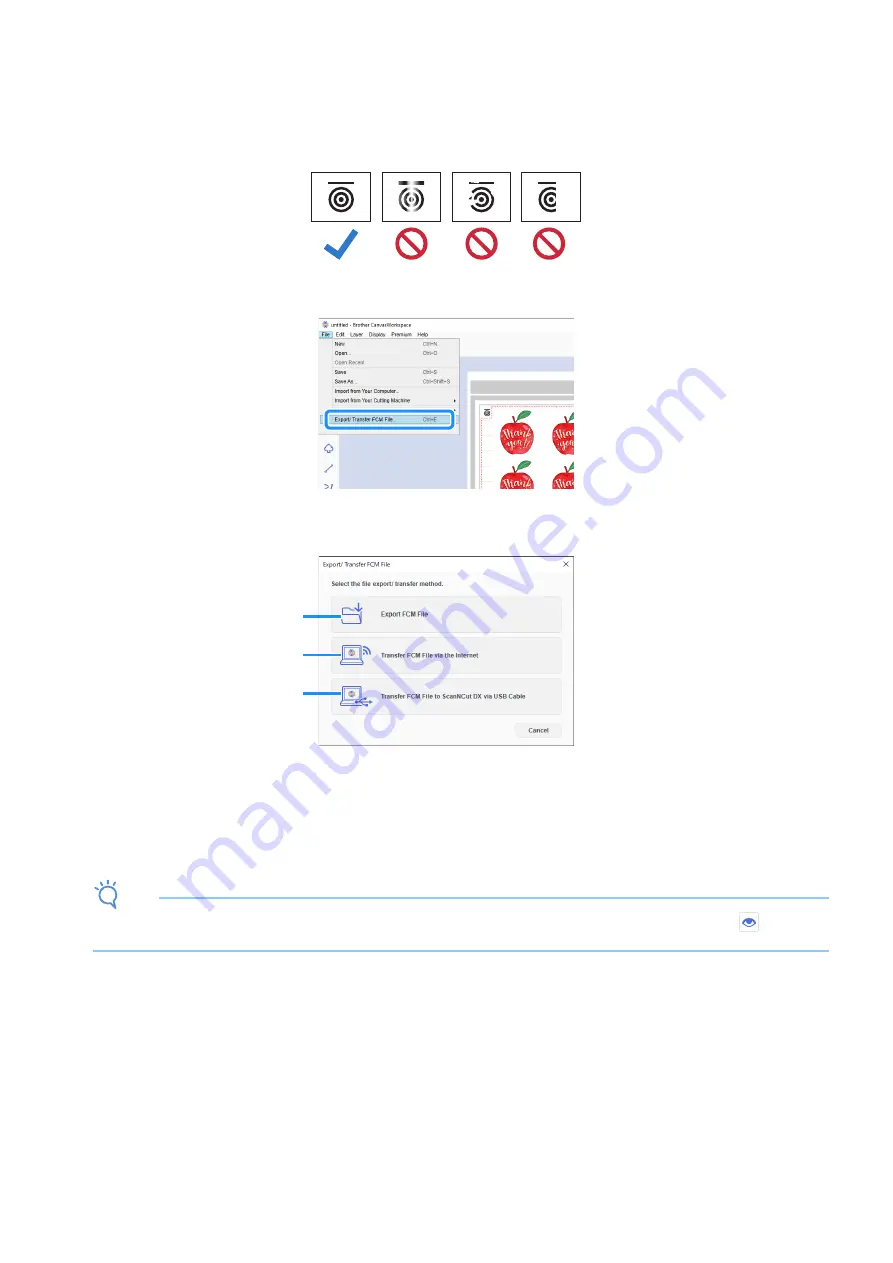
• Print on plain white material supported by the printer. If dark or patterned material is used, the machine may not be able to detect the 

registration marks.

• When printing, print at the actual size specified for the artboard. If the pattern is printed larger or smaller than the actual size, the machine 

may not be able to detect the registration marks.

• Check the condition of the printed registration marks. If any registration mark is smeared or missing, alignment may not be performed 

properly. Check the printer, and then print the pattern again.

i

Click [Export/Transfer FCM File] on the [File] menu.

j

Use the desired method from the screen that appeared to transfer the cutting data to the cutting machine. For details on the 
transfer methods, refer to the Brother support website (http://s.brother/cfrab/).

a

Transferring using a USB flash drive

Save the FCM file to a USB flash drive, and then transfer the file to the cutting machine.

b

Transferring via a wireless network connection

Specify the wireless network settings on the cutting machine, and then transfer the FCM file.

c

Transferring using a USB cable (compatible only with 64-bit version of Windows)

Connect the USB cable to the cutting machine and computer, and then directly transfer the FCM file.

Note

• The cutting data for layers that are not visible will not be transferred. Before transferring cutting data, make sure that 

 appears for 

the cutting data layer in the Layers panel.

1

2

3

Содержание ScanNCut DX Series

Страница 1: ...5 Transfer the FCM file cutting data to the cutting machine Step 6 Cut the printed material with the cutting machine In order to use the Print to Cut function make the following preparations in advance It is necessary to update the software of the cutting machine to the latest version For detailed instructions on updating the machine refer to the Operation Manual supplied with it The dedicated app...

Страница 2: ...then update it according to the on screen instructions a Start up CanvasWorkspace b In CanvasWorkspace select Account Settings from the Help menu c Click Premium Function Activation d Type in the activation code on the included activation card and then click Activate A connection to the Internet is required for activation The uppercase letters O and I are not used in the activation code The activa...

Страница 3: ...ant to print and cut For this example we will import an image saved on the computer and then trace the image by using the Image Tracing function to create cutting lines If the Image Tracing function is not used the image can be imported by clicking Import from Your Computer and cutting lines can be created by combining built in patterns available with Shapes or by using Path a Start up CanvasWorks...

Страница 4: ...ber of copies to be cut out and then arrange them within the artboard g From Export PDF File on the File menu select what data will be exported with registration marks into the PDF file Save the exported PDF file onto the computer a Images Only Only the displayed images will be exported to the PDF file for printing Select this option if the cutting lines will not be printed b All Visible Layers Al...

Страница 5: ...j Use the desired method from the screen that appeared to transfer the cutting data to the cutting machine For details on the transfer methods refer to the Brother support website http s brother cfrab a Transferring using a USB flash drive Save the FCM file to a USB flash drive and then transfer the file to the cutting machine b Transferring via a wireless network connection Specify the wireless n...

Страница 6: ... drive on the cutting machine d Select the location where the data has been saved and then retrieve the pattern a Retrieve a pattern saved on a USB flash drive If there are folders on the USB flash drive touch a folder to display the list of patterns that it contains Registration marks appear in alignment data b Retrieve a pattern transferred from CanvasWorkspace via a wireless network connection ...

Страница 7: ...g lines and image are not significantly misaligned Note If the cutting lines and image are significantly misaligned the retrieved data and printed image may be a wrong combination Check that the data retrieved in step b and the printed image are the correct combination i Touch the Start key to start scanning and cutting After the material is scanned to detect the registration marks cutting starts ...

Страница 8: ...in the machine s Operation Manual and then adjust the cutting position The registration marks were not printed correctly The mark is smeared The mark is missing The mark has a color other than black Print again The registration marks were not printed in the correct positions Check the print settings on the printer and then print again Error Messages Error Messages Cause Solution Failed to recogniz...

Отзывы: