- 30 -
3.
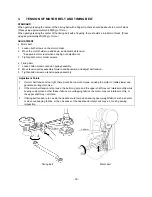
TENSION OF MOTOR BELT AND TIMING BELT
STANDARD
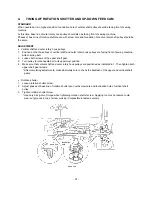
When gently pressing the center of the driving belt with a finger tip, there should be about 4-4.5mm of slack.
(Press using approximately 0.6N(60g) of force.)
When gently pressing the center of the timing belt with a fingertip, there should be 4-4.6mm of slack. (Press
using approximately 2N(200g) of force.)
ADJUSTMENT
•
Motor belt
1.
Loosen both screws on the motor holder.
2.
Move the motor holder up and down, and adjust belt tension.
* Keep main motor level when carrying out adjustments.
3.
Tighten both motor holder screws.
•
Timing belt
1.
Loosen Allen screw on tension pulley assembly.
2.
Move tension pulley assembly forward and backward, and adjust belt tension.
3.
Tighten Allen screw on tension pulley assembly
Adjustment Points
1
If motor belt tension is too tight, there would be too much torque, causing the motor to rotate slower and
generate an irregular noise.
2
If the motor belt tension is too loose, the belt may jump and the upper shaft may not rotate smoothly while
sewing on denim and other thicker fabrics or overlapping fabrics, the motor may not rotate smoothly, or
the upper shaft may not rotate.
3
If timing belt tension is too weak, the needle could jump when sewing heavyweight fabrics such as denim,
or when overlapping fabrics, or the closeness of the needle and rotary hook may err, making sewing
impossible.
Timing belt
Motor belt
4-4.5mm
4-6mm
Содержание PE-300S
Страница 1: ... 2 1999 ...
Страница 4: ... 2 1 MECHANICAL CHART EMBROIDERY UNIT MECHANISM ...
Страница 6: ... 4 3 ELECTRONIC PARTS ARRANGEMENT CHART ...
Страница 7: ... 5 4 CONTROL SYSTEM BLOCK DIAGRAM ...
Страница 11: ... 9 9 1 1 9 9 8 7 7 3 3 6 6 2 2 3 1 1 9 5 5 5 ...
Страница 13: ... 11 12 11 17 20 20 15 16 19 20 18 13 14 10 10 ...
Страница 15: ... 13 25 2 25 1 23 36 29 29 37 32 22 22 24 24 27 27 30 30 31 31 33 33 34 32 28 36 35 26 ...
Страница 17: ... 15 39 39 38 ...
Страница 19: ... 17 Diagram A 45 1 45 2 42 53 48 52 49 50 43 42 41 44 47 47 46 40 51 ...
Страница 21: ... 19 Diagram A 55 60 56 54 58 64 64 65 61 61 59 59 54 57 ...
Страница 23: ... 21 diagram A 74 69 69 68 69 75 73 72 70 67 67 ...
Страница 25: ... 23 77 78 84 68 84 78 78 79 86 86 84 ...
Страница 27: ... 25 5 3 2 2 2 2 3 4 1 5 ...
Страница 28: ... 26 3 LEAD WIRE ARRANGEMENT ...
Страница 57: ...PE 300S H8080132 ...


