Brother MFC-J3540DW Скачать руководство пользователя страница 494

 Home > 

Routine Maintenance

 > 

Check Your Brother Machine

 > Check the Print Quality

Check the Print Quality

If faded or streaked colours and text appear or if text is missing on your printouts, the print head nozzles may be
clogged. Print the check sheet and look at the nozzle check pattern.

1. Press 

[Ink]

 > 

[Improve Print Quality]

 > 

[Check Print Quality]

.

2. Press 

[Start]

.

The machine prints the check sheet.

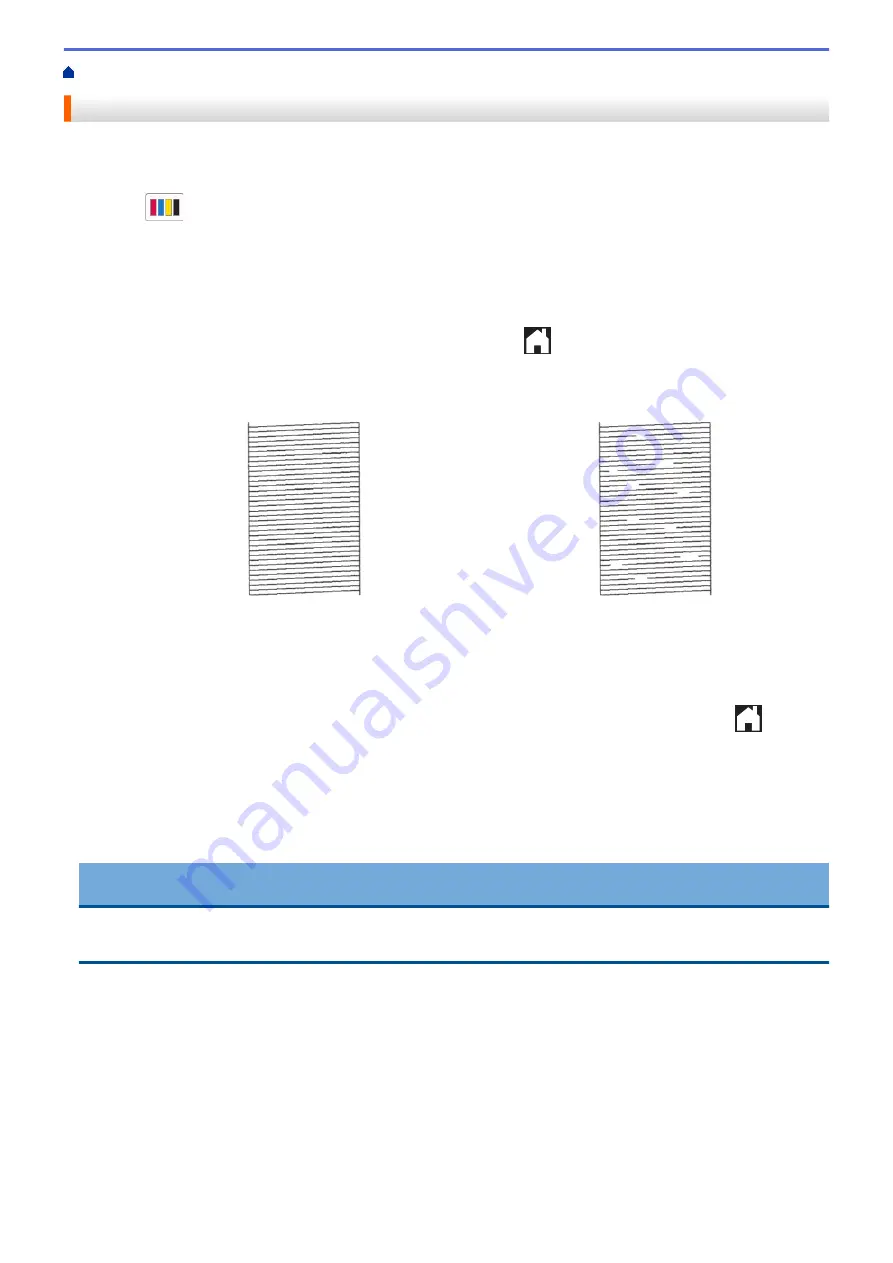
3. Check the quality of the four colour blocks on the sheet.
4. When an LCD message prompts you to check the print quality, do one of the following:

If all lines are clear and visible, press 

[No]

, and then press 

 to finish the Print Quality check.

If lines are missing (see 

Poor

, as follows), press 

[Yes]

.

OK

Poor

5. When the LCD message prompts you to check the print quality of each colour, press the number of the

pattern (1–4) that most closely matches the printing result.

6. Do one of the following:

If print head cleaning is needed, press 

[Start]

 to start the cleaning procedure.

If print head cleaning is not needed, the menu screen reappears on the touchscreen. Press 

.

7. After the cleaning procedure is finished, the LCD message prompts you to print the check sheet again. Press

[Yes]

, and then press 

[Start]

.

The machine prints the check sheet again. Check the quality of the four colour blocks on the sheet again.

If you clean the print head several times and the print has not improved, try the Special cleaning method. See

Related Information

.

IMPORTANT

DO NOT touch the print head. Touching the print head may cause permanent damage and may void the print
head's warranty.

487

Содержание MFC-J3540DW

Страница 1: ...MFC J3540DW MFC J3940DW CAUTION Before using this product read carefully these instructions for correct operation Keep the User s Guide in a secure place for future reference 2021 Brother Industries Ltd All rights reserved ...

Страница 2: ...29 Load Paper in the Multi purpose Tray MP Tray 44 Load Paper in the Manual Feed Slot 52 Unprintable Area 55 Paper Settings 56 Acceptable Print Media 61 Load Documents 67 Load Documents in the Automatic Document Feeder ADF 68 Load Documents on the Scanner Glass 70 Unscannable Area 71 Print 72 Print from Your Computer Windows 73 Print a Photo Windows 74 Print a Document Windows 75 Cancel a Print Jo...

Страница 3: ...125 Scan to an Editable Text File Using OCR 126 Save Scanned Data as an Email Attachment 128 Send Scanned Data to an Email Recipient 130 Scan to FTP 132 Scan to Network Windows 136 Web Services for Scanning on Your Network Windows 7 Windows 8 1 and Windows 10 140 Change Scan Settings Using Brother iPrint Scan 144 Scan Using Brother iPrint Scan Windows Mac 145 Scan from Your Computer Windows 146 Sc...

Страница 4: ...ting Groups 230 Telephone Services and External Devices 234 Phone Line Services 235 Caller ID 236 Voice Over Internet Protocol VoIP Telephone Line Interference 239 External TAD Telephone Answering Device 240 External and Extension Telephones 244 Fax Reports 249 Set the Transmission Verification Report s Style 250 Set the Fax Journal s Interval Period 251 PC FAX 252 PC FAX for Windows 253 PC FAX fo...

Страница 5: ...1 Configure an IPsec Template Using Web Based Management 363 Use IEEE 802 1x Authentication for a Wired or a Wireless Network 371 What Is IEEE 802 1x Authentication 372 Configure IEEE 802 1x Authentication for a Wired or a Wireless Network Using Web Based Management Web Browser 373 IEEE 802 1x Authentication Methods 375 Use Secure Function Lock 3 0 376 Before Using Secure Function Lock 3 0 377 Con...

Страница 6: ... the Back of the Machine 433 Remove Paper Scraps 437 If You Are Having Difficulty with Your Machine 438 Paper Handling and Printing Problems 439 Telephone and Fax Problems 445 Other Problems 451 Network Problems 453 AirPrint Problems 461 Check the Machine Information 462 Reset Your Machine 463 Reset Functions Overview 464 Routine Maintenance 465 Replace the Ink Cartridges 466 Clean Your Brother Ma...

Страница 7: ...chine Settings from the Control Panel 504 In the Event of Power Failure Memory Storage 505 General Settings 506 Save Your Favourite Settings as a Shortcut 521 Print Reports 527 Settings and Features Tables 530 Change Machine Settings Using Web Based Management 549 What is Web Based Management 550 Access Web Based Management 551 Set or Change a Login Password for Web Based Management 554 Set Up You...

Страница 8: ...Home Before You Use Your Machine Before You Use Your Machine Definitions of Notes Trademarks Open Source Licensing Remarks Copyright and License Important Notes 1 ...

Страница 9: ...y hazardous situation which if not avoided may result in damage to property or loss of product functionality NOTE NOTE specifies the operating environment conditions for installation or special conditions of use Tips icons indicate helpful hints and supplementary information Electrical Hazard icons alert you to possible electrical shock Bold Bold style identifies buttons on the machine s control p...

Страница 10: ...s are those of their respective owners Mopria and the Mopria Logo are registered and or unregistered trademarks and service marks of Mopria Alliance Inc in the United States and other countries Unauthorized use is strictly prohibited Adobe is a registered trademark of Adobe Systems Incorporated in the United States and or other countries Each company whose software title is mentioned in this manua...

Страница 11: ...ing Remarks Open Source Licensing Remarks This product includes open source software To view Open Source Licensing Remarks and Copyright Information go to your model s Manuals page at support brother com Related Information Before You Use Your Machine 4 ...

Страница 12: ...ll rights reserved This product includes software developed by the following vendors This product includes the KASAGO TCP IP software developed by ZUKEN ELMIC Inc Copyright 1989 2020 Datalight Inc All Rights Reserved FlashFX Copyright 1998 2020 Datalight Inc Related Information Before You Use Your Machine 5 ...

Страница 13: ...Pro Windows 10 Education and Windows 10 Enterprise Windows Server 2008 in this document represents Windows Server 2008 and Windows Server 2008 R2 In this User s Guide the LCD messages of the MFC J3940DW are used unless otherwise specified In this User s Guide the illustrations of the MFC J3940DW are used unless otherwise specified The screens or images in this User s Guide are for illustration pur...

Страница 14: ...o Your Machine Before Using Your Machine Control Panel Overview Touchscreen LCD Overview Enter Text on Your Brother Machine Access Brother Utilities Windows Access Brother iPrint Scan Windows Mac USB Ethernet Port Locations on Your Brother Machine 7 ...

Страница 15: ...r machine can print from your computer while sending or receiving a fax into memory or while scanning a document into the computer Fax sending will not be stopped during printing from your computer However when the machine is copying or receiving a fax on paper it pauses the printing operation and then continues printing when copying or fax receiving has finished Firewall Windows If your computer ...

Страница 16: ...el Press to cancel an operation 3 Dial Pad Press the numbers to dial telephone or fax numbers and to enter the number of copies 4 LED Power Indicator The LED lights up depending on the machine s power status When the machine is in Sleep Mode the LED blinks 5 Power On Off Press to turn the machine on Press and hold to turn the machine off The touchscreen displays Shutting Down and stays on for a fe...

Страница 17: ...he control panel If your Android device supports the NFC feature you can print from your device by touching it to the NFC symbol 2 Touchscreen Liquid Crystal Display LCD Access menus and options by pressing them on the touchscreen 3 Menu Buttons Back Press to go back to the previous menu Home Press to return to the Home screen Cancel Press to cancel an operation 4 Dial Pad Press the numbers to dia...

Страница 18: ...elephone Answering Device TAD will always remain available If you turn the machine off using it will still clean the print head periodically to maintain print quality To prolong print head life provide better ink efficiency and maintain print quality keep your machine connected to a power source at all times Related Information Introduction to Your Machine Related Topics Print with Near Field Comm...

Страница 19: ...s icon appears when the Quiet Mode setting is set to On The Quiet Mode setting can reduce printing noise When Quiet Mode is turned on the print speed becomes slower 3 Modes Press to switch to each mode Fax Copy Scan Apps USB A3 Copy Shortcuts 2 in 1 ID Copy Download Software Print Head Cleaning 4 Ink Displays the approximate available ink volume Press to access the Ink menu When an ink cartridge i...

Страница 20: ...rtcuts for frequently used operations such as sending a fax copying and scanning Three Shortcuts tabs are available with six Shortcuts on each tab Press displayed at the bottom of the screen to access the Home Screens 8 Information icon 8 New information from Brother appears in the information bar when the notification settings such as Message from Brother and Firmware Auto Check are set to On An ...

Страница 21: ...the machine NOTE DO NOT touch the LCD immediately after plugging in the power cord or turning on the machine Doing this may cause an error This product adopts the font of ARPHIC TECHNOLOGY CO LTD Related Information Introduction to Your Machine Settings Screen Overview Set the Ready Screen Set Default Function Screens Related Topics Reduce Printing Noise Check the Ink Volume Page Gauge Use the A3 ...

Страница 22: ...eck Print Quality Auto Check 2 Receive Mode Displays the current Receive Mode 3 Date Time Displays the date and time Press to access the Date Time menu 4 Network Press to set up a network connection If you are using a wireless connection a three level indicator on the screen displays the current wireless signal strength 5 Fax Preview Displays the Fax Preview setting Press to access the Fax Preview...

Страница 23: ...Related Information Touchscreen LCD Overview Related Topics Check the Ink Volume Page Gauge 16 ...

Страница 24: ... or Shortcut screen When the machine is idle or you press the machine will go back to the screen that you have set 1 Press Settings All Settings General Setup Screen Settings Home Screen 2 Press a or b to display the screen options and then select the option you want 3 Press The machine will go to your new Home screen Related Information Touchscreen LCD Overview 17 ...

Страница 25: ...on Screens You can set the Scan default screen using the Screen Settings 1 Press Settings All Settings General Setup Screen Settings Scan Screen 2 Press a or b to display the scan options and then select the option you want to set as the default screen 3 Press Related Information Touchscreen LCD Overview 18 ...

Страница 26: ... enter a space press Space Or you can press c to move the cursor Making corrections If you entered an incorrect character and want to change it press d or c to highlight the incorrect character Press and then enter the correct character To insert a character press d or c to move the cursor to the correct place and then enter the character Press for each character you want to erase or press and hol...

Страница 27: ...ther Utilities Windows 8 1 Move your mouse to the lower left corner of the Start screen and click if using a touch based device swipe up from the bottom of the Start screen to bring up the Apps screen When the Apps screen appears tap or click Brother Utilities Windows 7 Click Start All Programs Brother Brother Utilities 2 Select your machine 3 Select the operation you want to use Related Informati...

Страница 28: ...d click if using a touch based device swipe up from the bottom of the Start screen to bring up the Apps screen When the Apps screen appears tap or click Brother Utilities Windows 7 Click Start All Programs Brother Brother Utilities 2 Click the drop down list and then select your model name if not already selected Click Tools in the left navigation bar and then click Uninstall Follow the instructio...

Страница 29: ... Windows The actual screen may differ depending on the version of the application For Windows Go to your model s Downloads page at support brother com to download the latest application For Mac Download and install Brother iPrint Scan from the App Store If prompted install the driver and software necessary to use your machine Download the installer from your model s Downloads page at support broth...

Страница 30: ...to your model s Downloads page at support brother com 1 Using both hands use the finger holds on each side of the machine to lift the scanner cover 1 into the open position 1 2 Locate the correct port based on the cable you are using inside the machine as shown Carefully guide the cable through the cable channel and out the back of the machine 3 Gently close the scanner cover using the finger hold...

Страница 31: ...Home Paper Handling Paper Handling Load Paper Load Documents 24 ...

Страница 32: ...r Overview Load Paper in Paper Tray 1 Paper Tray 2 Load Paper in the Multi purpose Tray MP Tray Load Paper in the Manual Feed Slot Unprintable Area Paper Settings Acceptable Print Media Error and Maintenance Messages Paper Handling and Printing Problems 25 ...

Страница 33: ... Letter Plain paper and Recycled paper only Adjust the paper guides Landscape orientation 16K 195 x 270 mm A5 A6 Photo Photo L Photo 2L B6 JIS Index card Envelopes Adjust the paper guides Portrait orientation A3 Ledger B4 JIS Legal Folio Mexico Legal India Legal A3 Ledger B4 JIS Legal Folio Mexico Legal India Legal Plain paper and Recycled paper only Extend the tray using the green slider then adj...

Страница 34: ...95 x 270 mm A5 A6 Photo Photo L Photo 2L B6 JIS Index card Envelopes Long Paper 2 3 1 2 Adjust the MP tray paper guides Portrait orientation 1 MP tray is available only for MFC J3940DW 2 Width 88 9 297 mm Height 431 9 1200 mm 3 Load only one sheet of Long paper into the MP tray at a time To avoid damaging the paper DO NOT pull up the paper support 2 when loading Long paper 27 ...

Страница 35: ...l 16K 195 x 270 mm A5 A6 Photo Photo L Photo 2L B6 JIS Index card Envelopes Adjust the manual feed slot paper guides Portrait orientation 1 Manual Feed Slot is available only for MFC J3540DW 2 You can load only one sheet of paper into the manual feed slot at a time 2 Unfold the paper support flap 2 1 3 Change the paper size setting in the machine s menu if needed Related Information Load Paper 28 ...

Страница 36: ...y 1 Paper Tray 2 Load Paper in Paper Tray 1 Paper Tray 2 Load A4 Letter or Executive Size Paper in Paper Tray 1 Paper Tray 2 Load A3 Ledger or Legal Size Paper in Paper Tray 1 Paper Tray 2 Load Photo Paper in Paper Tray 1 Load Envelopes in Paper Tray 1 29 ...

Страница 37: ...ally feed paper from the appropriate tray if Auto Tray Select has been set in the printer driver Windows or on the machine MFC J3940DW You can use only plain paper in Tray 2 MFC J3940DW These instructions describe how to load paper in Tray 1 MFC J3940DW The steps for Tray 2 are very similar 1 If the paper support flap 1 is open close it and then close the paper support 2 2 1 2 Pull the paper tray ...

Страница 38: ...1 3 2 3 If you load Executive or B5 JIS size paper in Tray 1 lift the stopper 4 4 4 Fan the stack of paper well to avoid paper jams and misfeeds Always make sure the paper is not curled or wrinkled 31 ...

Страница 39: ... paper from the tray and combine it with the paper you are adding Always fan the stack of paper well to prevent the machine from feeding multiple pages 6 Make sure the paper length guide 1 touches the edges of the paper 1 7 Gently adjust the paper width guides 1 to fit the paper Make sure the paper guides touch the edges of the paper 1 8 Make sure the paper is flat in the tray and below the maximu...

Страница 40: ...ay into the machine forcefully or quickly Doing this may cause paper jams or paper feed problems 10 Pull out the paper support until it locks into place 11 Change the paper size setting in the machine s menu if needed Related Information Load Paper in Paper Tray 1 Paper Tray 2 Related Topics Change the Check Paper Setting Change the Paper Size and Paper Type 33 ...

Страница 41: ... Choose the Right Print Media 34 ...

Страница 42: ...your computer Doing this enables the machine to automatically feed paper from the appropriate tray if Auto Tray Select has been set in the printer driver Windows or on the machine MFC J3940DW You can use only plain paper in Tray 2 MFC J3940DW These instructions describe how to load paper in Tray 1 MFC J3940DW The steps for Tray 2 are very similar 1 If the paper support flap 1 is open close it and ...

Страница 43: ... to fit the paper size Make sure the triangular mark 3 on the paper width guide 1 and paper length guide 2 line up with the marks for the paper you are using 1 3 2 3 5 Fan the stack of paper well to avoid paper jams and misfeeds Always make sure the paper is not curled or wrinkled 36 ...

Страница 44: ... paper from the tray and combine it with the paper you are adding Always fan the stack of paper well to prevent the machine from feeding multiple pages 7 Make sure the paper length guide 1 touches the edges of the paper 1 8 Gently adjust the paper width guides 1 to fit the paper Make sure the paper guides touch the edges of the paper 1 9 Make sure the paper is flat in the tray and below the maximu...

Страница 45: ...quickly Doing this may cause paper jams or paper feed problems 11 Pull out the paper support 1 until it locks into place and then unfold the paper support flap 2 2 1 12 Change the paper size setting in the machine s menu if needed CAUTION Position the machine so the tray will not protrude past the edge of the table or desk where someone may bump into it The machine could fall and cause injury 38 ...

Страница 46: ... out of the tray Rest the tray on a flat surface Push the green slider to the left and then push in the front of the tray to collapse it until it locks into place Put the paper in the tray Related Information Load Paper in Paper Tray 1 Paper Tray 2 39 ...

Страница 47: ...f Auto Tray Select has been set in the printer driver Windows or on the machine MFC J3940DW 1 If the paper support flap 1 is open close it and then close the paper support 2 2 1 2 Pull the paper tray completely out of the machine as shown by the arrow 3 Do one of the following If you load Photo L 9 x 13 cm in the paper tray lift the Photo L stopper 1 If you load Photo 10 x 15 cm in the paper tray ...

Страница 48: ...T DO NOT push the paper tray into the machine forcefully or quickly Doing this may cause paper jams or paper feed problems 7 Pull out the paper support until it locks into place 8 Change the paper size setting in the machine s menu if needed Related Information Load Paper in Paper Tray 1 Paper Tray 2 Related Topics Change the Check Paper Setting Change the Paper Size and Paper Type Choose the Righ...

Страница 49: ...ur computer Doing this enables the machine to automatically feed paper from the appropriate tray if Auto Tray Select has been set in the printer driver Windows or on the machine MFC J3940DW Before loading envelopes in the tray press the corners and sides of the envelopes to make them as flat as possible 1 If the paper support flap 1 is open close it and then close the paper support 2 2 1 2 Pull th...

Страница 50: ...his may cause paper jams or paper feed problems 6 Pull out the paper support 1 until it locks into place and then unfold the paper support flap 2 2 1 7 Change the paper size setting in the machine s menu if needed Related Information Load Paper in Paper Tray 1 Paper Tray 2 Related Topics Paper Type and Paper Size for Each Operation Change the Check Paper Setting Change the Paper Size and Paper Typ...

Страница 51: ...er in the Multi purpose Tray MP Tray Load Paper in the Multi purpose Tray MP Tray Related Models MFC J3940DW Load Cut Sheet Paper Photo Paper or Envelopes in the Multi purpose Tray MP Tray Load Long Paper in the Multi purpose Tray MP Tray 44 ...

Страница 52: ... on the LCD allowing you to change the paper size and paper type When you load a different paper size in the tray you must change the Paper Size setting in the machine or the paper size setting on your computer Doing this enables the machine to automatically feed paper from the appropriate tray if Auto Tray Select has been set in the printer driver Windows or on the machine NOTE To prevent dust fr...

Страница 53: ...isfeeds Always make sure the paper is not curled or wrinkled 4 Gently load the paper in the MP tray with the printing surface face up Using A4 Letter Executive or B5 JIS Landscape orientation Using A3 Ledger B4 JIS Legal Folio Mexico Legal India Legal 16K 195 x 270 mm A5 A6 envelopes Photo Photo L Photo 2L B6 JIS or Index Card Portrait orientation 46 ...

Страница 54: ...opes with the printing surface face up and the flap on the left as shown in the illustration If you are having difficulty loading paper in the MP tray push the release lever 1 towards the back of the machine and then load the paper 1 47 ...

Страница 55: ... one of the following When using A4 or Letter or smaller size paper pull out the paper support until it locks into place When using paper larger than A4 Letter or envelopes pull out the paper support 1 until it locks into place and then unfold the paper support flap 2 2 1 7 Change the paper size setting in the machine s menu if needed Make sure printing has finished before you close the MP tray Re...

Страница 56: ...eck Paper setting is set to On and you set the paper in the MP tray a message appears on the LCD allowing you to change the paper size and paper type When you load a different paper size in the tray you must change the Paper Size setting in the machine or the paper size setting on your computer Doing this enables the machine to automatically feed paper from the appropriate tray if Auto Tray Select...

Страница 57: ...eet of paper in the MP tray with the printing surface face up Using both hands push one sheet of paper into the MP tray until the front edge touches the paper feed rollers If you are having difficulty loading paper in the MP tray push the release lever 1 towards the back of the machine and then load the paper 1 50 ...

Страница 58: ...locks into place and then unfold the paper support flap 2 2 1 When you feed Long paper into the MP tray the machine holds the printed page after printing so it does not fall When printing is complete remove the printed page and press OK 6 Change the paper size setting to User Defined Size and enter the actual size using the machine s touchscreen Make sure printing has finished before you close the...

Страница 59: ... Open the manual feed slot cover 2 Slide the manual feed slot paper guides to fit the width of the paper you are using 3 Load only one sheet of paper in the manual feed slot with the printing surface face up Using both hands push one sheet of paper into the manual feed slot until the front edge touches the paper feed rollers Let go of the paper when you feel the machine pull it The LCD displays Ma...

Страница 60: ...nvelopes Photo Photo L Photo 2L B6 JIS or Index Card Portrait orientation When using envelopes load the envelopes with the printing surface face up and the flap on the left as shown in the illustration When loading an envelope or a sheet of thick paper push the envelope into the manual feed slot until you feel the paper feed rollers grab it 53 ...

Страница 61: ...p 2 2 1 If the document does not fit on one sheet the LCD will prompt you to load another sheet of paper Place another sheet of paper in the manual feed slot and then press OK When you feed paper larger than A4 or Letter size into the manual feed slot the machine holds the printed page after printing so it does not fall When printing is complete remove the printed page and press OK Make sure print...

Страница 62: ...int in the shaded areas of cut sheet paper only when the Borderless print feature is available and turned on Cut Sheet Paper Envelopes Top 1 Left 2 Bottom 3 Right 4 Cut Sheet 3 mm 3 mm 3 mm 1 3 mm Envelopes 12 mm 3 mm 12 mm 3 mm The Borderless print feature is not available for envelopes and 2 sided printing Related Information Load Paper Related Topics Paper Handling and Printing Problems 1 MFC J...

Страница 63: ...Load Paper Paper Settings Paper Settings Change the Paper Size and Paper Type Change the Check Paper Setting Set a Default Tray Based on Your Task Change Paper Tray Priority Shrink Page Size of an Oversized Incoming Fax 56 ...

Страница 64: ...neral Setup 3 Press Paper Type 4 Press a or b to display the paper type options and then press the option you want MFC J3940DW Use plain paper only in Tray 2 5 Press Paper Size 6 Press a or b to display the paper size options and then press the option you want 7 Press The machine ejects paper with the printed surface face up onto the paper tray at the front of the machine When you use glossy paper...

Страница 65: ... the Paper Size and Paper Type settings The default setting is On 1 Press Settings All Settings General Setup 2 MFC J3940DW Press Tray Setting 3 Press a or b to display the Check Paper option and then press it 4 Press On or Off 5 Press Related Information Paper Settings Related Topics Load Photo Paper in Paper Tray 1 Load Envelopes in Paper Tray 1 Error and Maintenance Messages Load A4 Letter or E...

Страница 66: ... Some trays are not available depending on your model 1 Press Settings All Settings General Setup Tray Setting For printing in Copy mode press Tray Setting Copy Tray Select For printing received faxes press Tray Setting Fax Tray Select For printing photos press Tray Setting JPEG Print Media Tray Select 2 Press the tray option you want Auto Tray Select sets your machine to feed paper from the most ...

Страница 67: ...selected in the tray select settings the machine feeds paper from the most appropriate tray for the paper type and size according to the tray priority setting 1 Press Settings All Settings General Setup Tray Setting 2 Press the Tray Setting Copy Tray Setting Fax Tray Setting Print or Tray Setting JPEG Print Media option 3 Press Tray Priority 4 Press the option you want 5 Press Related Information ...

Страница 68: ... print on inkjet paper coated paper and glossy paper be sure to select the correct print media in the printer driver or in the application you use to print or the Paper Type setting on the machine When you print on photo paper load one extra sheet of the same photo paper in the paper tray When using photo paper remove each sheet at once to prevent smudging or paper jams Avoid touching the printed ...

Страница 69: ...s of paper Damaged curled wrinkled or irregularly shaped 1 1 1 2 mm or greater curl may cause jams to occur Extremely shiny or highly textured Paper that cannot be arranged uniformly when stacked Paper made with a short grain DO NOT use envelopes that Are loosely constructed Have windows Are embossed have raised writing on them Have clasps or staples Are pre printed on the inside Are self adhesive...

Страница 70: ...ity of the Paper Trays Load A4 Letter or Executive Size Paper in Paper Tray 1 Paper Tray 2 Load A3 Ledger or Legal Size Paper in Paper Tray 1 Paper Tray 2 Load Photo Paper in Paper Tray 1 Load Envelopes in Paper Tray 1 Load Cut Sheet Paper Photo Paper or Envelopes in the Multi purpose Tray MP Tray Load Long Paper in the Multi purpose Tray MP Tray Load Paper in the Manual Feed Slot 63 ...

Страница 71: ...m Yes Yes Yes India Legal 215 x 345 mm Yes Yes Yes Folio 215 9 x 330 2 mm Yes Yes Yes 16K 195 x 270 mm Yes Executive 184 1 x 266 7 mm Yes B4 JIS 257 x 364 mm Yes Yes B5 JIS 182 x 257 mm Yes B6 JIS 128 x 182 mm Yes A5 148 x 210 mm Yes Yes A6 105 x 148 mm Yes Yes Long Paper Width 88 9 297 mm Height 431 9 1200 mm Yes Cards Photo 10 x 15 cm Yes Yes Yes Photo L 9 x 13 cm Yes Photo 2L 13 x 18 cm Yes Yes...

Страница 72: ...ray MP tray 3 MFC J3940DW Landscape A4 Letter Executive B5 JIS Portrait A3 Ledger B4 JIS Legal Mexico Legal India Legal Folio A5 B6 JIS A6 Envelopes C5 Com 10 DL Monarch Photo 10 x 15 cm Photo L 9 x 13 cm Photo 2L 13 x 18 cm Index card 13 x 20 cm 16K 195 x 270 mm Plain Paper Recycled Paper 100 1 64 to 120 gsm 0 08 to 0 15 mm Inkjet Paper 20 Up to A4 Letter 5 Over A4 Letter 64 to 200 gsm 0 08 to 0 ...

Страница 73: ... x 270 mm Index Card 1 Up to 120 gsm Up to 0 15 mm Envelopes 1 80 to 95 gsm Up to 0 52 mm 1 When using plain paper 80 gsm 2 BP71 260 gsm paper is specially designed for Brother inkjet machines 3 We recommend using the MP tray for glossy paper Related Information Choose the Right Print Media 66 ...

Страница 74: ...Home Paper Handling Load Documents Load Documents Load Documents in the Automatic Document Feeder ADF Load Documents on the Scanner Glass Unscannable Area 67 ...

Страница 75: ... 900 mm when using the long paper function IMPORTANT DO NOT pull on the document while it is feeding DO NOT use paper that is curled wrinkled folded ripped stapled paper clipped pasted or taped DO NOT use cardboard newspaper or fabric Make sure documents with correction fluid or written in ink are completely dry MFC J3940DW Your 2 sided documents can be faxed copied or scanned up to A3 size using ...

Страница 76: ...ment support 1 and then remove the document 1 IMPORTANT DO NOT leave any documents on the scanner glass If you do this the ADF may jam Related Information Load Documents Related Topics Error and Maintenance Messages Telephone and Fax Problems Other Problems Copy a Document 69 ...

Страница 77: ...ht Up to 2 kg To use the scanner glass the ADF must be empty 1 Lift the document cover 2 Place the document face down in the upper left corner of the scanner glass as shown in the illustration 3 Close the document cover IMPORTANT If you are scanning a book or thick document DO NOT forcefully close or press on the document cover Related Information Load Documents Related Topics Telephone and Fax Pr...

Страница 78: ...epends on the settings in the application you are using The figures below show the typical unscannable measurements Usage Document Size Top 1 Bottom 3 Left 2 Right 4 Fax A3 3 mm 4 5 mm A4 3 mm Ledger 3 7 mm Letter 4 mm Legal Copy All paper sizes 3 mm Scan 1 mm 1 mm Related Information Load Documents 71 ...

Страница 79: ...Home Print Print Print from Your Computer Windows Print from Your Computer Mac Print Using Brother iPrint Scan Windows Mac Print Data Directly from a USB Flash Drive 72 ...

Страница 80: ...of Paper N in 1 Windows Print as a Poster Windows Print on Both Sides of the Paper Automatically Automatic 2 sided Printing Windows Print as a Booklet Automatically Windows Print a Colour Document in Greyscale Windows Print a Long Paper Windows Prevent Smudged Printouts and Paper Jams Windows Use a Preset Print Profile Windows Change the Default Print Settings Windows Print Settings Windows 73 ...

Страница 81: ... type of paper you are using IMPORTANT To get the best print quality for the settings you have selected always set the Media Type option to match the type of paper you load 6 Click the Paper Size drop down list and then select your paper size 7 Select the Borderless check box if needed 8 For Colour Greyscale select Colour 9 In the Orientation field select the Portrait or Landscape option to set th...

Страница 82: ... paper you load 6 Click the Paper Size drop down list and then select your paper size 7 For Colour Greyscale select the Colour or Greyscale option 8 In the Orientation field select the Portrait or Landscape option to set the orientation of your printout If your application contains a similar setting we recommend that you set the orientation using the application 9 Type the number of copies 1 999 y...

Страница 83: ... was sent to the print queue in error you may have to delete it to allow subsequent jobs to print 1 Double click the printer icon in the task tray 2 Select the print job you want to cancel 3 Click the Document menu 4 Select Cancel 5 Click Yes Related Information Print from Your Computer Windows Related Topics Monitor Machine Status from Your Computer Windows 76 ...

Страница 84: ...tion field select the Portrait or Landscape option to set the orientation of your printout If your application contains a similar setting we recommend that you set the orientation using the application 5 Click the Multiple Page drop down list and then select the 2 in 1 4 in 1 9 in 1 or 16 in 1 option 6 Click the Page Order drop down list and then select your page order 7 Click the Border Line drop...

Страница 85: ...r where XXX XXXX is the name of your model and then click the printing properties or preferences button The printer driver window appears 3 Click the Basic tab 4 Click the Multiple Page drop down list and then select the 1 in 2x2 Pages or 1 in 3x3 Pages option 5 Change other printer settings if needed 6 Click OK 7 Complete your print operation Related Information Print from Your Computer Windows R...

Страница 86: ...X XXXX is the name of your model and then click the printing properties or preferences button The printer driver window appears 3 Click the Basic tab 4 In the Orientation field select the Portrait or Landscape option to set the orientation of your printout If your application contains a similar setting we recommend that you set the orientation using the application 5 Click the 2 sided Booklet drop...

Страница 87: ...dge Right Short Edge Left 8 Select the Binding Offset check box to specify the offset for binding in inches or millimetres 9 Click OK to return to the printer driver window 10 Change other printer settings if needed The Borderless feature is not available when using this option 11 Click OK again and then complete your print operation 80 ...

Страница 88: ...Related Information Print from Your Computer Windows Related Topics Print Settings Windows Print as a Booklet Automatically Windows 81 ...

Страница 89: ...inkle 1 Select the print command in your application 2 Select Brother XXX XXXX Printer where XXX XXXX is the name of your model and then click the printing properties or preferences button The printer driver window appears 3 Click the Basic tab 4 In the Orientation field select the Portrait or Landscape option to set the orientation of your printout If your application contains a similar setting w...

Страница 90: ... having to change the order of the printed pages You can specify the number of sheets in each smaller booklet set from 1 15 This option can be helpful when folding a printed booklet that has a large number of pages 9 Select the Binding Offset check box to specify the offset for binding in inches or millimetres 10 Click OK to return to the printer driver window 11 Change other printer settings if n...

Страница 91: ...rints your document in 256 levels of greyscale 1 Select the print command in your application 2 Select Brother XXX XXXX Printer where XXX XXXX is the name of your model and then click the printing properties or preferences button The printer driver window appears 3 Click the Basic tab 4 For Colour Greyscale select Greyscale 5 Change other printer settings if needed 6 Click OK 7 Complete your print...

Страница 92: ... the best print quality for the settings you have selected always set the Media Type option to match the type of paper you load 6 Click the Paper Size drop down list select User Defined Enter the width height and other information in the User Defined Size window and then click OK 7 For Colour Greyscale select the Colour or Greyscale option 8 In the Orientation field select the Portrait option If y...

Страница 93: ...option on the left side of the screen 6 Select one of the following options Media Type Option Description Plain Paper 2 sided Printing or Simplex Printing Off On Select Off to print at normal speed using a standard amount of ink Select On to print at a slower speed using less ink Printouts may be lighter than they appear in Print Preview Glossy Paper Off On Select Off to print at normal speed usin...

Страница 94: ...he printing properties or preferences button The printer driver window appears 3 Click the Print Profiles tab 4 Select your profile from the print profile list The profile settings are shown on the left side of the printer driver window 5 Do one of the following If the settings are correct for your print job click OK To change the settings go back to the Basic or Advanced tab change settings and t...

Страница 95: ...Related Information Print from Your Computer Windows Create or Delete Your Print Profile Windows Related Topics Print Settings Windows 88 ...

Страница 96: ...t profile a Click the Basic tab and the Advanced tab and configure the print settings you want for the new Print Profile b Click the Print Profiles tab c Click Add Profile The Add Profile dialog box appears d Type the new profile name in the Name field e Click the icon you want to use to represent this profile from the icon list f Click OK The new Print Profile name is added to the list in the Pri...

Страница 97: ...ows System Control Panel In the Hardware and Sound group click View devices and printers For Windows Server 2012 Move your mouse to the lower right corner of your desktop When the menu bar appears click Settings and then click Control Panel In the Hardware group click View devices and printers For Windows Server 2012 R2 Click Control Panel on the Start screen In the Hardware group click View devic...

Страница 98: ...rint results the machine automatically adjusts its print settings according to the selected media type 2 Print Quality Select the print quality you want Because print quality and speed are related the higher the quality the longer it will take to print the document 3 Paper Size Select the paper size you want to use You can either choose from standard paper sizes or create a custom paper size 91 ...

Страница 99: ... When this option is selected one complete copy of your document will print and then reprint according to the number of copies you choose If this option is not selected then each page will print according to the number of copies chosen before the next page of the document is printed Reverse Order Select this option to print your document in reverse order The last page of your document will be prin...

Страница 100: ...e options to enlarge or reduce the size of the pages in your document Fit to Paper Size Select this option to enlarge or reduce the document pages to fit a specified paper size When you select this option select the paper size you want from the drop down list Free 25 400 Select this option to enlarge or reduce the document pages manually When you select this option type a value into the field 3 Mi...

Страница 101: ...n if you have problems with smudged printouts or paper jams Retrieve Printer s Colour Data Select this option to optimise the print quality using the machine s factory settings which are set specifically for your Brother machine Use this option when you have replaced the machine or changed the machine s network address Print Archive Select this option to save the print data as a PDF file to your c...

Страница 102: ...Home Print Print from Your Computer Mac Print from Your Computer Mac Print Using AirPrint macOS 95 ...

Страница 103: ... Using Brother iPrint Scan Windows Mac Print on Both Sides of the Paper Automatically Using Brother iPrint Scan Automatic 2 sided Printing Windows Mac Print More Than One Page on a Single Sheet of Paper Using Brother iPrint Scan N in 1 Windows Mac Print a Colour Document in Greyscale Using Brother iPrint Scan Windows Mac 96 ...

Страница 104: ...aper in the paper tray 2 Start Brother iPrint Scan Windows Launch Brother iPrint Scan Mac In the Finder menu bar click Go Applications and then double click the iPrint Scan icon The Brother iPrint Scan screen appears 3 If your Brother machine is not selected click the Select your Machine button and then select your model name from the list Click OK 4 Click Print 5 Do one of the following Windows C...

Страница 105: ... with many pages you can also select the pages you want to print 7 Change other printer settings if needed 8 Click Print IMPORTANT For photo printing To get the best print quality for the settings you have selected always set the Media Type option to match the type of paper you load Related Information Print Using Brother iPrint Scan Windows Mac 98 ...

Страница 106: ...nt Scan Mac In the Finder menu bar click Go Applications and then double click the iPrint Scan icon The Brother iPrint Scan screen appears 2 If your Brother machine is not selected click the Select your Machine button and then select your model name from the list Click OK 3 Click Print 4 Do one of the following Windows Click Document Mac Click PDF 5 Select the file you want to print and then do on...

Страница 107: ...Option Description On Flip on short edge 7 Change other printer settings if needed 8 Click Print Related Information Print Using Brother iPrint Scan Windows Mac 100 ...

Страница 108: ...chine button and then select your model name from the list Click OK 3 Click Print 4 Do one of the following Windows Click Document Mac Click PDF 5 Select the file you want to print and then do one of the following Windows Click Next Mac Click Open and then click Next if prompted When printing documents with many pages you can also select the pages you want to print 6 Click the Layout drop down lis...

Страница 109: ...click the iPrint Scan icon The Brother iPrint Scan screen appears 2 If your Brother machine is not selected click the Select your Machine button and then select your model name from the list Click OK 3 Click Print 4 Do one of the following Windows Click Photo or Document Mac Click Photo or PDF 5 Select the file you want to print and then do one of the following Windows Click Next Mac Click Open an...

Страница 110: ...Home Print Print Data Directly from a USB Flash Drive Print Data Directly from a USB Flash Drive Compatible USB Flash Drives Print Photos Directly from a USB Flash Drive 103 ...

Страница 111: ...e USB mass storage standard Other USB devices are not supported Compatible Media USB Flash Drive Compatible USB Flash Drives USB Class USB Mass Storage Class USB Mass Storage Sub Class SCSI or SFF 8070i Transfer protocol Bulk transfer Only Format 1 FAT12 FAT16 FAT32 exFAT Sector size Max 4096 Byte Encryption Encrypted devices are not supported 1 NTFS format is not supported Related Information Pri...

Страница 112: ...a USB Flash Drive Print Photos Directly from a USB Flash Drive Even if your machine is not connected to your computer you can print photos directly from a USB Flash memory drive Important Information about Photo Printing Print Photos from a USB Flash Drive on the Brother Machine 105 ...

Страница 113: ...F and so on will not be recognised Direct photo printing must be performed separately from photo printing operations using the computer Simultaneous operation is not available The machine can read up to 999 files 1 on a USB flash drive Be aware of the following When printing an index sheet or image the machine will print all the valid images even if one or more images have been corrupted Corrupted...

Страница 114: ... Machine Print Photos from a USB Flash Drive on the Brother Machine Preview and Print Photos from a USB Flash Drive Print a Photo Index Sheet Thumbnails from a USB Flash Drive Print Photos by Image Number Print Photos with Auto Cropping Print Borderless Photos from a USB Flash Drive Print the Date from Your Photo s Data Print Settings for Photos 107 ...

Страница 115: ...y the photo you want to print and then press it To print all photos press Print All and then press Yes to confirm 4 Enter the number of copies in one of the following ways Press or on the touchscreen Press to display the keyboard on the touchscreen and then enter the number of copies using the touchscreen keyboard Press OK Enter the number of copies using the dial pad 5 Press OK 6 Repeat the last ...

Страница 116: ...t your digital camera or computer has used to identify the pictures Only file names that are 20 characters or less will be printed correctly on the index sheet File names cannot be printed correctly if they contain non alphanumeric characters but non alphanumeric characters do not affect photo print settings 1 Insert a USB flash drive in the USB slot 2 Press JPEG Print Index Print Print Index Shee...

Страница 117: ...ma or a hyphen For example enter 1 3 6 to print images No 1 No 3 and No 6 Print a range of images using a hyphen For example enter 1 5 to print images No 1 to No 5 Enter up to 12 characters including commas and hyphens for the image numbers you want to print 4 Enter the number of copies in one of the following ways Press or on the touchscreen Press to display the keyboard on the touchscreen and th...

Страница 118: ...s On To print the entire image change this setting to Off If you set the Cropping setting to Off set the Borderless setting to Off also Cropping On Cropping Off 1 Insert a USB flash drive in the USB slot 2 Press JPEG Print Select Files 3 Press d or c to display each photo When the photo you want appears press it and then press OK 4 Press OK 5 Press Print Settings Cropping 6 Press On or Off 7 When ...

Страница 119: ...pands the printable area to the edges of the paper Printing time will be slower 1 Insert a USB flash drive in the USB slot 2 Press JPEG Print Select Files 3 Press d or c to display each photo When the photo you want appears press it and then press OK 4 Press OK 5 Press Print Settings Borderless 6 Press On or Off 7 When finished press or OK 8 Press Start Related Information Print Photos from a USB ...

Страница 120: ... s information The date will be printed in the lower right corner To use this setting the photo data must include the date 1 Insert a USB flash drive in the USB slot 2 Press JPEG Print Select Files 3 Press d or c to display each photo When the photo you want appears press it and then press OK 4 Press OK 5 Press Print Settings Date Print 6 Press On or Off 7 When finished press or OK 8 Press Start R...

Страница 121: ...Select the print layout Brightness Adjust the brightness Contrast Adjust the contrast Increasing the contrast will make an image look sharper and more vivid Cropping Crop the image around the margin to fit the paper size or print size Turn this feature off when you want to print whole images or prevent unwanted cropping Borderless Expand the printable area to fit the edges of the paper Date Print ...

Страница 122: ...an Scan Scan Using the Scan Button on Your Machine Scan Using Brother iPrint Scan Windows Mac Scan from Your Computer Windows Scan from Your Computer Mac Configure Scan Settings Using Web Based Management 115 ...

Страница 123: ...der as a PDF File Save Scanned Data to a USB Flash Drive Scan Multiple Business Cards and Photos Auto Crop Scan to an Editable Text File Using OCR Save Scanned Data as an Email Attachment Send Scanned Data to an Email Recipient Scan to FTP Scan to Network Windows Web Services for Scanning on Your Network Windows 7 Windows 8 1 and Windows 10 Change Scan Settings Using Brother iPrint Scan 116 ...

Страница 124: ... When scanning a multi page A4 or letter size document position the short edge on top for portrait documents and position the long edge on top for landscape documents Orientation of the document Scan result Long edge first ADF Scanner glass Short edge first ADF Scanner glass Related Information Scan Using the Scan Button on Your Machine 117 ...

Страница 125: ... press OK 4 To change the settings press Options To use Options you must connect a computer with Brother iPrint Scan installed to the machine 5 Press Scan Settings Set at Device 6 Select the scan settings you want to change and then press OK Option Description 2 sided Scan MFC J3940DW Select the 2 sided scan mode Colour Setting Select the colour format for your document Resolution Select the scan ...

Страница 126: ... if you want to make this a One Touch Shortcut Follow the LCD instructions 7 Press Start The machine starts scanning If using the machine s scanner glass follow the LCD instructions to complete the scanning job Related Information Scan Using the Scan Button on Your Machine 119 ...

Страница 127: ...for the computer and then press OK 4 To change the settings press Options To use Options you must connect a computer with Brother iPrint Scan installed to the machine 5 Press Scan Settings Set at Device 6 Select the scan settings you want to change and then press OK Option Description 2 sided Scan MFC J3940DW Select the 2 sided scan mode Colour Setting Select the colour format for your document Re...

Страница 128: ... if you want to make this a One Touch Shortcut Follow the LCD instructions 7 Press Start The machine starts scanning If using the machine s scanner glass follow the LCD instructions to complete the scanning job Related Information Scan Using the Scan Button on Your Machine 121 ...

Страница 129: ... mode Colour Setting Select the colour format for your document Resolution Select the scan resolution for your document File Type Select the file format for your document Document Size Select your document size Brightness Select the brightness level Contrast Select the contrast level File Name Rename the file File Name Style Select the order in which the date counter number and other items appear ...

Страница 130: ... the scanner glass set the next page and then press Continue If there are no more pages to scan press Finish After you finish scanning make sure you choose Finish before removing the USB flash drive from the machine IMPORTANT The LCD displays a message while reading the data DO NOT unplug the power cord or remove the USB flash drive from the machine while it is reading the data You could lose your...

Страница 131: ...devices that use the USB mass storage standard Other USB devices are not supported Compatible Media USB Flash Drive Compatible USB Flash Drives USB Class USB Mass Storage Class USB Mass Storage Sub Class SCSI or SFF 8070i Transfer protocol Bulk transfer Only Format 1 FAT12 FAT16 FAT32 exFAT Sector size Max 4096 Byte Encryption Encrypted devices are not supported 1 NTFS format is not supported Rela...

Страница 132: ...ss as shown in the illustration You must place the documents at least 10 mm away from each other Auto Crop adjusts the skew of the document on the scanner glass however if your document is skewed more than 45 degrees at less than 300 x 300 dpi or 10 degrees at 600 x 600 dpi this feature will not work The ADF must be empty to use Auto Crop The Auto Crop feature is available for a maximum of 32 docu...

Страница 133: ...ta and then select the computer name If the LCD message prompts you to enter a PIN use the LCD to enter the four digit PIN for the computer and then press OK 4 To change the settings press Options To use Options you must connect a computer with Brother iPrint Scan installed to the machine 5 Press Scan Settings Set at Device 6 Select the scan settings you want to change and then press OK Option Des...

Страница 134: ...shortcut press Save as Shortcut You will be asked if you want to make this a One Touch Shortcut Follow the LCD instructions 7 Press Start The machine starts scanning If using the machine s scanner glass follow the LCD instructions to complete the scanning job Related Information Scan Using the Scan Button on Your Machine 127 ...

Страница 135: ...tach the scanned file to an email message 1 Load your document 2 Press Scan to PC to E mail 3 If the machine is connected over the network press a or b to display the computer where you want to send data and then select the computer name If the LCD message prompts you to enter a PIN use the LCD to enter the four digit PIN for the computer and then press OK 4 To change the settings press Options To...

Страница 136: ...round Colour Change the amount of background colour that is removed To save the settings as a shortcut press Save as Shortcut You will be asked if you want to make this a One Touch Shortcut Follow the LCD instructions 7 Press Start The machine scans the document and saves it as a file attachment It then launches your email application and opens a new blank email message with the scanned file attac...

Страница 137: ...rver 3 Do one of the following to enter the destination email address To enter the email address manually press Manual and then enter the email address using the character buttons on the LCD When finished press OK If the email address is stored in the machine s address book press Address Book and then select the email address Press OK 4 Confirm the email address and then press Next 5 To change the...

Страница 138: ... if you want to make this a One Touch Shortcut Follow the LCD instructions 7 Press Start The machine starts scanning If using the machine s scanner glass follow the LCD instructions to complete the scanning job Related Information Scan Using the Scan Button on Your Machine 131 ...

Страница 139: ...can to FTP Scan documents directly to an FTP server when you need to share the scanned information For added convenience configure different profiles to save your favourite Scan to FTP destinations Set up a Scan to FTP Profile Upload Scanned Data to an FTP Server 132 ...

Страница 140: ...r Option Description Profile Name Type a name for this server profile up to 15 alphanumeric characters The machine will display this name on the LCD Host Address Type the Host Address for example ftp example com up to 64 characters or the IP address for example 192 23 56 189 Port Number Change the Port Number setting used to access the FTP server The default for this setting is port 21 In most cas...

Страница 141: ...ct the sensitivity level for detecting blank pages in the scanned data The higher the sensitivity the easier it is for the machine to detect blank pages 2 sided Scan MFC J3940DW Select Long Edge or Short Edge to scan both sides of the document depending on the layout of your original Remove Background Colour Change the amount of background colour that is removed Margin Settings Adjust your documen...

Страница 142: ...Based Management are listed Select the profile you want If the profile is not complete for example if the logon account name and password are missing or if the quality or file type is not specified you will be prompted to enter any missing information 4 Press Start The machine starts scanning If you are using the scanner glass follow the Touchscreen instructions to complete the scanning job Relate...

Страница 143: ...ows Scan to Network Windows Scan documents directly to a CIFS server on your local network For added convenience you can configure different profiles to save your favourite Scan to Network destinations Set up a Scan to Network Profile Upload Scanned Data to a CIFS Server 136 ...

Страница 144: ...llowing characters or may cause a sending error Option Description Profile Name Type a name for this server profile up to 15 alphanumeric characters The machine will display this name on the LCD Network Folder Path Type the path to the folder on the CIFS server where you want to send your scanned data File Name Select a file name from the preset names provided or from user defined names You can se...

Страница 145: ...to the folder specified in the Network Folder Path field If the user name is part of a domain type the user name in one of the following styles user domain domain user Password Type the password up to 32 characters associated with the user name you entered in the Username field Type the password again in the Retype password field Kerberos Server Address Type the Kerberos Server Address for example...

Страница 146: ...b Based Management are listed Select the profile you want If the profile is not complete for example if the logon account name and password are missing or if the quality or file type is not specified you will be prompted to enter any missing information 4 Press Start The machine starts scanning If you are using the scanner glass follow the Touchscreen instructions to complete the scanning job Rela...

Страница 147: ...and Windows 10 The Web Services protocol enables Windows 7 Windows 8 1 and Windows 10 users to scan using a Brother machine on the network You must install the driver via Web Services Use Web Services to Install Drivers Used for Scanning Windows 7 Windows 8 1 and Windows 10 Scan Using Web Services from Your Machine Windows 7 Windows 8 1 and Windows 10 Configure Scan Settings for Web Services 140 ...

Страница 148: ...rner of your desktop When the menu bar appears click Settings Change PC settings PC and devices Devices Add a device The machine s Web Services Name appears Windows 7 Click Start Control Panel Network and Internet View network computers and devices The machine s Web Services Name appears with the printer icon Right click the machine you want to install The Web Services Name for the Brother machine...

Страница 149: ... the messages displayed on the LCD may be replaced with spaces if the language settings of your OS and your Brother machine are different If the LCD displays an insufficient memory error message choose a smaller size in the Paper size setting or a lower resolution in the Resolution DPI setting 1 Load your document 2 Press Scan WS Scan 3 Press a or b to select the type of scan you want and then pre...

Страница 150: ... Devices and Printers 2 Right click the machine icon and then select Scan profiles The Scan Profiles dialog box appears 3 Select the scan profile you want to use 4 Make sure the scanner selected in the Scanner list is a machine that supports Web Services for scanning and then click the Set as Default button 5 Click Edit The Edit Default Profile dialog box appears 6 Select the Source Paper size Col...

Страница 151: ...ick Go Applications and then double click the iPrint Scan icon The Brother iPrint Scan screen appears 2 If your Brother machine is not selected click the Select your Machine button and then select your model name from the list Click OK 3 Click the Machine Scan Settings button and then follow the on screen instructions to change the scan settings such as document size colour and resolution Related ...

Страница 152: ... Finder menu bar click Go Applications and then double click the iPrint Scan icon The Brother iPrint Scan screen appears 2 If your Brother machine is not selected click the Select your Machine button and then select your model name from the list Click OK 3 Click the Scan icon and then follow the on screen instructions to scan your documents Related Information Scan 145 ...

Страница 153: ...There are several ways you can use your computer to scan photos and documents on your machine Use the software applications we provide or use your favourite scanning application Scan Using Nuance PaperPort 14SE or Other Windows Applications Scan Using Windows Fax and Scan 146 ...

Страница 154: ...teps will be similar PaperPort 14SE supports both TWAIN and WIA drivers the TWAIN driver recommended is used in these steps Depending on the model of your machine Nuance PaperPort 14SE may not be included If it is not included you can use other software applications that support scanning 1 Load your document 2 Start PaperPort 14SE Do one of the following Windows 10 Click Nuance PaperPort 14 PaperP...

Страница 155: ...oth sides of the document MFC J3940DW Automatic 2 sided scan is available only when using the ADF You cannot use PreScan to preview an image 10 Click PreScan to preview your image and crop unwanted portions before scanning 11 Click Start The machine starts scanning Related Information Scan from Your Computer Windows TWAIN Driver Settings Windows 148 ...

Страница 156: ...or scanning text documents 300 x 300 dpi 24bit Colour 2 Resolution Select a scanning resolution from the Resolution drop down list Higher resolutions take more memory and transfer time but produce a finer scanned image 3 Color Setting Select from a range of scan colour depths Black White Use for text or line art images Grey Error Diffusion Use for photographic images or graphics Error Diffusion is...

Страница 157: ...ocument Correction Auto Deskew Set the machine to correct document skewing automatically as the pages are scanned from the scanner glass Margin Settings Adjust your document s margins Rotate Image Rotate the scanned image Edge Fill Fill in the edges on four sides of the scanned image using the selected colour and range Skip Blank Page Remove the document s blank pages from the scanning results Ima...

Страница 158: ...make them easier to read B W Inversion Invert black and white in the monochrome image Feed Control Layout Select the layout Continuous Scan Select this option to scan multiple pages After a page is scanned select whether to continue scanning or finish Related Information Scan Using Nuance PaperPort 14SE or Other Windows Applications 151 ...

Страница 159: ...d the flatbed 1 Load your document 2 Launch Windows Fax and Scan 3 Click File New Scan 4 Select the scanner you want to use 5 Click OK The New Scan dialog box appears 6 Adjust the settings in the dialog box if needed The scanner resolution can be set to a maximum of 1200 dpi If you want to scan at higher resolutions use the Scanner Utility software from Brother Utilities If your machine supports 2...

Страница 160: ...Related Information Scan from Your Computer Windows WIA Driver Settings Windows 153 ...

Страница 161: ...e or Feeder Scan both sides option from the Source drop down list Colour format Select a scan colour format from the Colour format drop down list File type Select a file format from the File type drop down list Resolution DPI Set a scanning resolution in the Resolution DPI field Higher resolutions take more memory and transfer time but produce a finer scanned image Brightness Set the Brightness le...

Страница 162: ...el Contrast Increase or decrease the Contrast level by moving the slider to the right or left An increase emphasises dark and light areas of the image while a decrease reveals more details in grey areas You can also type a value in the field to set the contrast level Related Information Scan Using Windows Fax and Scan 155 ...

Страница 163: ...Home Scan Scan from Your Computer Mac Scan from Your Computer Mac Scan Using AirPrint macOS 156 ...

Страница 164: ...Configure Scan Settings Using Web Based Management Configure Scan Settings Using Web Based Management Set the Scan File Name Using Web Based Management Set the Scan Job Email Report Using Web Based Management 157 ...

Страница 165: ...navigation menu and then click Scan Scan File Name Start from if the navigation menu is not shown on the left side of the screen 5 Select the File Name Style from the drop down list 6 If you selected the option to include the date in File Name Style field select the Date format from the drop down list 7 In the Time field select On to include the time information in the file name 8 In the Counter f...

Страница 166: ...ress For example https 192 168 1 2 3 If required type the password in the Login field and then click Login The default password to manage this machine s settings is located on the back of the machine and marked Pwd 4 Go to the navigation menu and then click Scan Scan Job e mail report Start from if the navigation menu is not shown on the left side of the screen 5 In the Administrator Address field...

Страница 167: ... Copy Copy a Document Enlarge or Reduce Copied Images Sort Copies Make Page Layout Copies N in 1 or Poster Copy on Both Sides of the Paper 2 sided Copy Copy an ID Card Use the A3 Copy Shortcuts Copy Settings 160 ...

Страница 168: ...board on the touchscreen and then enter the number of copies using the touchscreen keyboard Press OK Enter the number of copies using the dial pad Options Press Options to change the copy settings for the next copy only When you have finished changing settings press OK ID To make an ID card copy with the 2in1 ID Vertical layout select the ID checkbox Current setting indications Press the area indi...

Страница 169: ...To interrupt copying press Related Information Copy Related Topics Load Documents in the Automatic Document Feeder ADF Load Documents on the Scanner Glass Copy Settings 162 ...

Страница 170: ...o you want to use If you selected the Custom 25 400 option press backspace to erase the displayed percentage or press d to move the cursor and then enter an enlargement or reduction ratio from 25 to 400 Press OK If you selected 100 or the Fit to Page option go to the next step 7 Read and confirm the displayed list of options you have selected and then press OK 8 When you have finished changing set...

Страница 171: ...nter the number of copies using the dial pad 4 Press Options Stack Sort Sort 5 Read and confirm the displayed list of settings you have selected and then press OK 6 When you have finished changing settings press Mono Start or Colour Start If you placed the document in the ADF the machine scans the document and starts printing 7 If you are using the scanner glass repeat the following steps for each...

Страница 172: ... or Ledger You can make only one Poster copy at a time The 1 to 2 feature copies one A3 or Ledger size paper onto two A4 or Letter size papers You can make only one 1 to 2 copy at a time 1 Load your document 2 Press Copy 3 Enter the number of copies in one of the following ways Press or on the touchscreen Press to display the keyboard on the touchscreen and then enter the number of copies using th...

Страница 173: ...n1 ID Horizontal Using the scanner glass 4in1 Portrait 4in1 Landscape 1to2 Using the scanner glass Poster 2x1 Using the scanner glass Poster 2x2 Using the scanner glass Poster 3x3 Using the scanner glass 6 Read and confirm the displayed list of settings you have selected and then press OK 166 ...

Страница 174: ...aking a poster or 1 to 2 copy the machine scans the pages and starts printing 8 If you are using the scanner glass repeat the following steps for each page of the document Place the next page on the scanner glass and then press Continue to scan the page After scanning all the pages press Finish Related Information Copy 167 ...

Страница 175: ...W You can copy 2 sided documents automatically up to A3 size using the ADF MFC J3540DW When you manually make 2 sided copies from a 2 sided document use the scanner glass You can use only A4 Letter A5 A3 Ledger Legal Folio Mexico Legal or India Legal size plain paper Portrait 1 sided to 2 sided Long Edge Flip 1 sided to 2 sided Short Edge Flip 2 sided to 2 sided 1 1 2 1 1 2 2 sided to 1 sided Long...

Страница 176: ...make 2 sided copies of a 2 sided document manually press 2 sided 2 sided Use the scanner glass to make 2 sided copies of a 2 sided document manually MFC J3940DW To make 1 sided copies from a 2 sided document follow these steps a To change the layout options press Layout and then press Long Edge Flip or Short Edge Flip b Press a or b to display the 2 sided 1 sided option and then press it Load your...

Страница 177: ... experience smudged printouts or paper jams press Ink Print Options Reduce Smudging and then change settings Related Information Copy Related Topics Change the Print Options to Improve Your Print Results 170 ...

Страница 178: ...l a b c d a a b c d a a 3 mm or greater top left b 145 mm c 2 in 1 ID Vertical 207 mm 2 in 1 ID Horizontal 102 mm d Scannable area 2 Press d or c to display 2 in 1 ID Copy and then press it You can also press Copy ID for the 2in1 ID Vertical setting 3 Enter the number of copies in one of the following ways Press or on the touchscreen Press to display the keyboard on the touchscreen and then enter ...

Страница 179: ...6 After the machine has scanned the first side turn over the identification card and press Continue to scan the other side Related Information Copy 172 ...

Страница 180: ... If information appears on the touchscreen read it and then press OK to confirm 4 Press d or c to display options and then press the option you want Option Description A3 2in1 A3 A4 A3 A3 A4 A4 Note L A4 Note P A4 Grid A4 Blank A4 Centre 5 Enter the number of copies in one of the following ways Press or on the touchscreen Press to display the keyboard on the touchscreen and then enter the number o...

Страница 181: ...art 9 If you are using the scanner glass when choosing the A3 2in1 option repeat the following steps for each page of the document Place the next page on the scanner glass and then press Continue to scan the page After scanning all the pages press Finish Related Information Copy Related Topics Touchscreen LCD Overview 174 ...

Страница 182: ... size you must change the Paper Size setting Enlarge Reduce 100 Fit to Page Adjusts the copy size to fit on the paper size you have set Enlarge Select an enlargement ratio for the next copy Reduce Select a reduction ratio for the next copy Custom 25 400 Enter an enlargement or reduction ratio Density Increase the density to make the text darker Decrease the density to make the text lighter Remove ...

Страница 183: ... Settings Book Copy Corrects dark borders and skew when copying from the scanner glass Watermark Copy Places text in your document as a watermark Set New Default Saves the copy settings that you use most often by setting them as the default settings Factory Reset Restores any changed copy settings to the factory settings You can save the current settings by pressing Save as Shortcut Related Inform...

Страница 184: ...Home Fax Fax Send a Fax Receive a Fax Voice Operations and Fax Numbers Telephone Services and External Devices Fax Reports PC FAX 177 ...

Страница 185: ... ADF Send a Fax Manually Send a Fax at the End of a Conversation Send the Same Fax to More than One Recipient Broadcasting Send a Fax in Real Time Send a Fax at a Specified Time Delayed Fax Change the Fax Auto Redial Setting Cancel a Fax in Progress Check and Cancel a Pending Fax Fax Options 178 ...

Страница 186: ... History If you select Outgoing Call or Caller ID History select the number you want and then press Apply Address Book Select a number from the Address Book Press Address Book Do one of the following Select the number you want and then press Apply Press and then enter the first letter of the name and press OK Press the name you want to dial If the name has two numbers press the number you want Pre...

Страница 187: ...touchscreen asks if you want to send a colour fax Press Yes Colour fax to confirm The machine starts dialling and sending the document 6 When the touchscreen displays Next page do one of the following Press No when finished scanning pages The machine starts sending the document Press Yes to scan another page Place the next page on the scanner glass and then press OK The machine starts scanning the...

Страница 188: ...he layout of your document 1 Load your document in the ADF 2 Press Fax If Fax Preview is set to On press Fax Sending Faxes 3 Press Options 2 sided Fax 4 Do one of the following If your document is flipped on the Long edge press the 2 sided Scan Long Edge option If your document is flipped on the Short edge press the 2 sided Scan Short Edge option 5 Press OK 6 Enter the fax number 7 Press Fax Start...

Страница 189: ...tones while sending a fax 1 Load your document 2 Press Fax If Fax Preview is set to On press Fax Sending Faxes 3 Press Hook and listen for a dial tone 4 Enter the fax number 5 When you hear fax tones press Fax Start If using the scanner glass press Send When you set the Fax Mode option to Advanced Mode Related Information Send a Fax 182 ...

Страница 190: ...1 Ask the other party to wait for fax tones beeps and to press the Start key before hanging up 2 Load your document 3 Press to display the Fax Start button 4 Press Fax Start If using the scanner glass press Send When you set the Fax Mode option to Advanced Mode 5 Replace the handset of the external telephone Related Information Send a Fax Set the Fax Logic Sending and Receiving Sequence 183 ...

Страница 191: ... If you are a receiver press Fax Start to receive a fax If you set to Advanced Mode No matter you are a caller or receiver you can select you will send or receive a fax manually When you press Fax Start the machine will ask you Send Receive If you want to send a fax press Send If you want to receive a fax press Receive Even if you set either Easy Mode or Advanced Mode and if there is a document in...

Страница 192: ...broadcast in the following ways Press Add Number and enter a fax number using the dial pad Press OK To broadcast using an email address press enter the email address and press OK Press Add from Address book Press a or b to display the numbers you want to add to the broadcast Select the check boxes of the numbers you want to add When finished press OK Press Search in Address book Press the first le...

Страница 193: ...Related Topics Set up Broadcasting Groups Enter Text on Your Brother Machine 186 ...

Страница 194: ...dcast job 1 Press to return to the Home screen 2 Press 3 Do one of the following To cancel the entire broadcast press Entire Broadcast Press Yes to confirm or press No to exit without cancelling To cancel the current number being dialled press the name or number on the touchscreen Press Yes to confirm or press No to exit without cancelling To exit without cancelling press Related Information Send ...

Страница 195: ...om its memory turn on Real Time TX If you are sending a colour fax or if the machine s memory is full and you are sending a monochrome fax from the ADF the machine sends the document in real time even if Real Time TX is set to Off In Real Time Transmission the automatic redial feature does not work when using the scanner glass 1 Load your document 2 Press Fax If Fax Preview is set to On press Fax ...

Страница 196: ...s On 6 Press Set Time 7 Enter the time you want the fax to be sent using the touchscreen Press OK The number of pages you can scan into the memory depends on the amount and type of data 8 Press OK 9 Enter the fax number 10 Press Fax Start If you are using the scanner glass go to the next step 11 When the touchscreen displays Next page do one of the following Press No when finished scanning pages P...

Страница 197: ...y when you are sending a fax automatically and the Fax Auto Redial is set to On the machine redials up to three times at five minute intervals The default setting for Fax Auto Redial is On 1 Press Settings All Settings Initial Setup Fax Auto Redial 2 Press On or Off 3 Press Related Information Send a Fax 190 ...

Страница 198: ... 1 Press to return to the Home screen 2 Press to cancel a fax that is already in progress 3 When you press while the machine is dialling or sending the touchscreen displays Cancel Job Press Yes Related Information Send a Fax Related Topics Telephone and Fax Problems 191 ...

Страница 199: ...No Jobs Waiting You can cancel a fax job before it is sent 1 Press Settings All Settings Fax Remaining Jobs 2 Do the following for each fax job you want to check or cancel a Press a or b to scroll through the waiting jobs If needed press the job you want to cancel b Press OK c Press Yes to confirm or press No to exit without cancelling 3 When finished press Related Information Send a Fax Related T...

Страница 200: ...and the machine sends them immediately Use the ADF to send colour faxes with multiple pages You cannot send a colour fax when Preview is set to On Delayed Fax monochrome only Set the time of day the delayed faxes will be sent Batch TX monochrome only Economise by sending all delayed faxes scheduled for the same time and fax number as one fax to save transmission time Real Time TX Send a fax immedi...

Страница 201: ...ve a Fax Receive Mode Settings Set Fax Detect Fax Preview Shrink Page Size of an Oversized Incoming Fax Set the Fax Receive Stamp Receive a Fax at the End of a Telephone Conversation Memory Receive Options Remote Fax Retrieval 194 ...

Страница 202: ...Home Fax Receive a Fax Receive Mode Settings Receive Mode Settings Receive Modes Overview Choose the Correct Receive Mode Set the Number of Rings Before the Machine Answers Ring Delay 195 ...

Страница 203: ... waiting for you answer the phone If your machine is connecting an external answering phone device you could set the ringing time through four to six times to answer the call 1 External TAD The external answering machine TAD automatically answers every call Voice messages are stored on the external TAD Fax messages are printed Use this mode if you have connected an external answering machine to yo...

Страница 204: ...as below Operation Display Factory Setting Ring Delay Fax Auto Ring Delay four times Fax detection On Fax Tel Ring Delay four times External TAD Manual 1 Press Settings All Settings Fax Setup Receive Receive Mode 2 Press a or b to display the Fax Auto Fax Tel External TAD or Manual option and then press the option you want 3 Press Related Information Receive Mode Settings Related Topics Connect an...

Страница 205: ...re it answers in Fax Auto and Fax Tel modes If you have external or extension telephones on the same line as the machine select the maximum number of rings 1 Press Settings All Settings Fax Setup Receive Ring Delay 2 Press the number of times you want the line to ring before the machine answers If you select 0 the machine answers immediately and the line will not ring at all available only for som...

Страница 206: ...Receive to receive the fax If you answered at an extension or external telephone press 51 If Fax Detect is set to On but your machine does not connect a fax call when you lift an extension or external telephone handset press the remote activation code 51 If you send faxes from a computer on the same telephone line and the machine intercepts them set Fax Detect to Off 1 Press Settings All Settings ...

Страница 207: ...Home Fax Receive a Fax Fax Preview Fax Preview Use the Fax Preview feature to view received faxes on the LCD Set Fax Preview to On Preview New Faxes 200 ...

Страница 208: ... on the Fax Preview screen will not display the received date and time 1 Press Settings 2 Press Fax Preview 3 Press On or Off The touchscreen displays a message saying future received faxes will not be printed 4 Press Yes 5 Press If faxes are stored in the memory when you change Fax Preview to Off do one of the following If you do not want to print the stored faxes press Continue Press Yes to conf...

Страница 209: ...ppears next to new faxes Press the fax you want If you want to print or delete all the faxes in the list press Print Delete Do one of the following Press Print All New Faxes to print all faxes you have not yet viewed Press Print All Old Faxes to print all faxes you have viewed Press Delete All New Faxes to delete all faxes you have not yet viewed Press Delete All Old Faxes to delete all faxes you ...

Страница 210: ...ine s memory press No If the fax has multiple pages do one of the following Press Print All Pages to print the whole message A touchscreen message asks if you want to delete the fax from the machine s memory To delete the fax press Yes To keep the fax in the machine s memory press No Press Print Displayed Only to print only the displayed page Press Print From Displayed to print from the displayed ...

Страница 211: ...r machine reduces any oversized incoming fax page to fit on your paper The machine calculates the reduction ratio using the page size of the fax and your Paper Size setting 1 Press Settings All Settings Fax Setup Receive Auto Reduction 2 Press On or Off 3 Press Related Information Receive a Fax Related Topics Paper Settings Paper Handling and Printing Problems 204 ...

Страница 212: ...e date and time of receipt at the top of each incoming fax page Make sure you have set the current date and time on the machine This feature is available only for monochrome faxes 1 Press Settings All Settings Fax Setup Receive Fax Rx Stamp 2 Press On or Off 3 Press Related Information Receive a Fax 205 ...

Страница 213: ... the conversation the other party can send you a fax before you both hang up Your machine s ADF must be empty 1 Ask the other party to load the fax and to press the Start or Send key 2 Press to display the Fax Start button 3 When you hear CNG tones slow repeated beeps press Fax Start 4 Press Receive to receive the fax When you set the Fax Mode option to Advanced Mode 5 Replace the external handset...

Страница 214: ...nd a fax If you are a receiver press Fax Start to receive a fax If you set to Advanced Mode No matter you are a caller or receiver you can select you will send or receive a fax manually When you press Fax Start the machine will ask you Send Receive If you want to send a fax press Send If you want to receive a fax press Receive Even if you set either Easy Mode or Advanced Mode and if there is a doc...

Страница 215: ... at a time Memory Receive can be set to Fax Forwarding Fax Storage PC Fax Receive Off This feature is available only for monochrome faxes Forward Incoming Faxes to Another Machine Store Incoming Faxes in the Machine s Memory Use PC Fax Receive to Transfer Received Faxes to Your Computer Windows only Change Memory Receive Options Turn Off Memory Receive Print a Fax Stored in the Machine s Memory 20...

Страница 216: ... forwarding fax number up to 20 digits using the dial pad Press OK To forward a fax to an email address press enter the email address and then press OK 4 Press Backup Print On or Backup Print Off If you select Backup Print On the machine prints received faxes at your machine so you will have a copy When Fax Preview is turned on a backup copy of received faxes will not be printed If you receive a c...

Страница 217: ...ges from your fax machine when you are at another location using the Remote Retrieval commands Your machine prints a backup copy of each stored fax This feature is available only for monochrome faxes 1 Press Settings All Settings Fax Setup Receive Memory Receive 2 Press Fax Storage 3 Press Related Information Memory Receive Options Related Topics Forward Faxes Remotely Print a Fax Stored in the Ma...

Страница 218: ...X Receiving software running on your computer Even if your computer is turned off your machine will receive and store faxes in its memory When you start your computer and the PC FAX Receiving software runs your machine transfers faxes to your computer automatically 1 Press Settings All Settings Fax Setup Receive PC Fax Receive 2 Press On The touchscreen displays the message Run the PC Fax Receive ...

Страница 219: ...lays Print all faxes If you press Yes faxes in the memory will be printed before the setting changes If you press No faxes in the memory will not be printed and the setting will be unchanged If received faxes are left in the machine s memory when you change to PC Fax Receive from another option Fax Forward or Fax Storage press USB or the name of the computer if you are on a network and then press ...

Страница 220: ...nsfer incoming faxes 1 Press Settings All Settings Fax Setup Receive Memory Receive 2 Press Off The touchscreen displays Print all faxes or Erase all documents if received faxes are in your machine s memory 3 Press Related Information Memory Receive Options Related Topics Change Memory Receive Options Error and Maintenance Messages Telephone and Fax Problems 213 ...

Страница 221: ... erased from the machine s memory If you select Fax Storage you can print all faxes from the memory 1 Press Settings All Settings Fax Print Document You can also print the faxes from the memory by pressing Stored Faxes on the touchscreen 2 Press Yes Related Information Memory Receive Options Related Topics Store Incoming Faxes in the Machine s Memory Error and Maintenance Messages Telephone and Fa...

Страница 222: ...eval to call your machine from any touch tone telephone or fax machine and use a remote access code and remote commands to retrieve fax messages Set a Remote Access Code Use Your Remote Access Code Remote Retrieval Commands Forward Faxes Remotely Change the Fax Forwarding Number 215 ...

Страница 223: ...e digit code using the numbers 0 through 9 or using the dial pad The preset cannot be changed Press OK DO NOT use the same code used for your Remote Activation Code 51 or Remote Deactivation Code 51 To delete your code press and hold to restore the inactive setting and then press OK 3 Press Related Information Remote Fax Retrieval Related Topics Use Your Remote Access Code Operation from External ...

Страница 224: ...other machine signals if it has received faxes One long beep the machine received at least one fax No beeps the machine has not received a fax 4 When the machine gives two short beeps enter a command The machine will hang up if you wait longer than 30 seconds to enter a command The machine will beep three times if you enter an invalid command 5 When finished press 9 and then press 0 to deactivate ...

Страница 225: ...ample a Fax Forwarding number has not been registered You can register your Fax Forwarding number by entering 4 After you register the number Fax Forwarding will work 4 Fax Forwarding number 6 Fax Storage 96 Retrieve a fax 2 Retrieve all faxes Enter the fax number of a remote fax machine to receive stored fax messages 3 Erase faxes from memory If you hear one long beep fax messages have been erase...

Страница 226: ...ssages 3 When you hear two short beeps press 9 6 2 4 Wait for the long beep and then use the dial pad to enter the fax number up to 20 digits of the remote fax machine where you want your fax messages sent followed by You cannot use and as dial numbers but you can press to insert a pause in the fax number 5 Hang up after you hear one long beep Your Brother machine will forward any incoming faxes t...

Страница 227: ... When you hear two short beeps press 9 5 4 4 Wait for the long beep enter the new number up to 20 digits of the remote fax machine you want your fax messages forwarded to using the dial pad then enter You cannot use and as dial numbers but you can press to insert a pause in the fax number 5 Press 9 0 to stop Remote Access when finished 6 Hang up after you hear one long beep Related Information Rem...

Страница 228: ...Home Fax Voice Operations and Fax Numbers Voice Operations and Fax Numbers Voice Operations Store Fax Numbers Set up Broadcasting Groups 221 ...

Страница 229: ...Home Fax Voice Operations and Fax Numbers Voice Operations Voice Operations Send Tone Signals Pick up a Voice Call in Fax Tel Receive Mode 222 ...

Страница 230: ...g follow these steps If you have a Touch Tone service you will not need this feature to send tone signals 1 Press Fax If Fax Preview is set to On press Fax Sending Faxes 2 Press Hook 3 Press using the dial pad Any digits dialled after this will send tone signals When you are finished with the call the machine will return to the Pulse dialling service Related Information Voice Operations 223 ...

Страница 231: ... ringing to alert you to pick up a voice call If you are at the machine lift the external telephone s handset and then press Pickup button to answer If you are at an extension telephone lift the handset during the F T Ring and then press 51 between the pseudo double rings If no one is on the line or if someone wants to send you a fax send the call back to the machine by pressing 51 Related Informa...

Страница 232: ...and Fax Numbers Store Fax Numbers Store Fax Numbers Store Address Book Numbers Save Outgoing Call Numbers to the Address Book Save Caller ID History Numbers to the Address Book Change or Delete Address Book Names or Numbers 225 ...

Страница 233: ...f the pause Be sure to include the area code when entering a fax or telephone number Depending on the country the Caller ID names and history may not be displayed correctly if the area code is not registered with the fax or telephone number To store an email address to use with Internet Fax or Scan to E mail server press and enter the email address and then press OK e To store the second fax or te...

Страница 234: ...and then press it 3 Press Edit Add to Address Book Name To delete the number from the Outgoing Call history list press Edit Delete Press Yes to confirm 4 Enter the name up to 16 characters using the touchscreen Press OK 5 To store the second fax or telephone number press Address 2 Enter the second fax or telephone number up to 20 digits using the touchscreen Press OK 6 Press OK to confirm the fax ...

Страница 235: ...lay the name or number you want to store and then press it 3 Press Edit Add to Address Book Name To delete the number from the Caller ID History list press Edit Delete Press Yes to confirm 4 Enter the name up to 16 characters using the touchscreen Press OK 5 To store the second fax or telephone number press Address 2 Enter the second fax or telephone number up to 20 digits using the touchscreen Pr...

Страница 236: ...fax or telephone number press Address 1 Enter the new fax or telephone number up to 20 digits using the touchscreen Press OK To change the second fax or telephone number press Address 2 Enter the new fax or telephone number up to 20 digits using the touchscreen Press OK Press OK to finish To change a character press d or c to position the cursor to highlight the character you want to change and th...

Страница 237: ...dress Book 2 Do the following steps a Press Edit Setup Groups Name b Enter the Group name up to 16 characters using the touchscreen Press OK c Press Add Delete d Add Address Book numbers to the Group by pressing them to display a checkmark Press OK e Read and confirm the displayed list of names and numbers you have selected and then press OK to save your Group To store another Group for broadcasti...

Страница 238: ...lay the Group you want to change and then press it 3 Press Name 4 Enter the new Group name up to 16 characters using the touchscreen Press OK To change a character press d or c to position the cursor to highlight the incorrect character and then press Enter the new character 5 Press OK 6 Press Related Information Set up Broadcasting Groups Related Topics Enter Text on Your Brother Machine 231 ...

Страница 239: ...oadcasting Groups Delete a Broadcasting Group Delete a Broadcasting Group 1 Press Fax Address Book Edit Delete 2 Press a or b to display the Group you want to delete and then press it 3 Press OK 4 Press Related Information Set up Broadcasting Groups 232 ...

Страница 240: ...and then press it 3 Press a or b to display Add Delete and then press it 4 Press a or b to display the number you want to add or delete 5 Do the following for each number you want to change To add a number to the Group press the check box of the number to add a check mark To delete a number from the Group press the check box of the number to remove the check mark 6 Press OK 7 Press OK 8 Press Rela...

Страница 241: ...and External Devices Telephone Services and External Devices Phone Line Services Caller ID Voice Over Internet Protocol VoIP Telephone Line Interference External TAD Telephone Answering Device External and Extension Telephones 234 ...

Страница 242: ...ng Caller ID answering services alarm systems or other custom features on one phone line may create problems with the operation of your machine Do you have Voice Mail If you have Voice Mail on the telephone line that you will install your new machine on there is a strong possibility that Voice Mail and the machine will conflict with each other while receiving incoming calls Related Information Tel...

Страница 243: ...evice Due to the switchboard problems or line problems of local telephone companies the feature may not work in some areas Advantages of Caller ID For Business All businesses profit from a quicker response to customer calls At Home Residential customers can protect themselves from unwanted calls Caller ID feature The Caller ID feature of this machine lets you use the Caller ID subscriber service o...

Страница 244: ... Error and Maintenance Messages 237 ...

Страница 245: ...ne Services and External Devices Caller ID Set the Caller ID Type Set the Caller ID Type 1 Press Settings All Settings Fax Miscellaneous Caller ID Type 2 Press Auto FSK or DTMF 3 Press Related Information Caller ID 238 ...

Страница 246: ...splitter or other such device If you have questions about how to connect your machine to the VoIP system please contact your VoIP provider After you have connected your machine to the VoIP system check for a dial tone Lift the external telephone s handset and listen for a dial tone If there is no dial tone please contact your VoIP provider If you are having problems sending or receiving faxes over...

Страница 247: ...thin two rings we recommend setting it to two rings This is because your machine cannot hear the CNG tones until the external TAD has picked up the call The sending machine will send CNG tones for only eight to ten seconds longer We do not recommend using the toll saver feature on your external TAD if it needs more than four rings to activate it 1 1 1 TAD LINE EXT IMPORTANT DO NOT connect a TAD el...

Страница 248: ...rings allowed For more information contact your telephone provider The machine s Ring Delay setting does not apply 2 Record the outgoing message on your external TAD 3 Set the TAD to answer calls 4 Set the Receive Mode on your machine to External TAD Related Information External TAD Telephone Answering Device Related Topics Choose the Correct Receive Mode Telephone and Fax Problems 241 ...

Страница 249: ... beginning your OGM with an initial five second silence because the machine cannot hear fax tones over a loud voice You may try leaving out this pause but if your machine has trouble receiving faxes then you should re record the OGM to include it 2 Limit your speaking to 20 seconds 3 End your 20 second message by giving your Remote Activation Code for people sending manual faxes For example After ...

Страница 250: ...the last line on the system This prevents the machine being activated each time the system receives telephone calls If all incoming calls will be answered by a switchboard operator we recommend setting the Receive Mode to Manual We cannot guarantee that your machine will operate correctly under all circumstances when connected to a PBX Any difficulties with sending or receiving faxes should be rep...

Страница 251: ...ne Services and External Devices External and Extension Telephones External and Extension Telephones Connect an External or Extension Telephone Operation from External and Extension Telephones Use the Remote Codes 244 ...

Страница 252: ... Connect an External or Extension Telephone Connect an External or Extension Telephone You can connect a separate telephone to your machine as shown in the diagram below 1 2 1 Extension telephone 2 External telephone LINE EXT Related Information External and Extension Telephones 245 ...

Страница 253: ...e machine answers a voice call and pseudo double rings for you to take over you can take the call at an extension telephone by pressing the Remote Deactivation Code 51 If you answer a call and no one is on the line You should assume that you re receiving a manual fax Press 51 and wait for the chirp or until the LCD shows Receiving and then hang up You can also use the Fax Detect feature to make yo...

Страница 254: ...en selecting the option to receive When you set the Fax Mode option to Advanced Mode Remote Deactivation Code If you receive a voice call and the machine is in F T mode it will start to sound the F T ring pseudo double ring after the initial Ring Delay If you pick up the call on an extension telephone you can turn the F T ring off by pressing 51 make sure you press this between the rings If the ma...

Страница 255: ... changing the three digit remote codes using the numbers 0 9 1 Press Settings All Settings Fax Setup Receive Remote Codes 2 Do one of the following To change the Remote Activation Code press Act Code Enter the new code and then press OK To change the Remote Deactivation Code press Deact Code Enter the new code and then press OK If you do not want to change the Codes go to the next step To turn the...

Страница 256: ...Home Fax Fax Reports Fax Reports Set the Transmission Verification Report s Style Set the Fax Journal s Interval Period Print Reports 249 ...

Страница 257: ...t page appears on the report Error only Prints a report if your fax is unsuccessful due to a transmission error Error only Image Prints a report if your fax is unsuccessful due to a transmission error A portion of the fax s first page appears on the report Off The report will not be printed 1 Press Settings All Settings Fax Report Setting XMIT Report 2 Press the option you want If you select On Im...

Страница 258: ...elected has passed the machine will print the Journal early and then erase all fax jobs from the memory If you want an extra report before it is due to print you can print it without erasing the jobs Every 50 Faxes The machine will print the Journal when the machine has stored 50 fax jobs 4 If you selected 6 12 24 hours 2 or 7 days press Time and enter the time of day using the touchscreen Press O...

Страница 259: ...Home Fax PC FAX PC FAX PC FAX for Windows PC FAX for Mac Sending only 252 ...

Страница 260: ...Home Fax PC FAX PC FAX for Windows PC FAX for Windows PC FAX Overview Windows Send a Fax Using PC FAX Windows Receive Faxes on Your Computer Windows 253 ...

Страница 261: ...PC FAX Overview Windows PC FAX Overview Windows Reduce paper consumption and save time by using the Brother PC FAX software to send faxes directly from your computer Configure PC FAX Windows Configure your PC Fax Address Book Windows 254 ...

Страница 262: ...log box appears 3 Do one of the following Click the User Information tab and then type your user information in the fields Each Microsoft account can have its own customised User Information screen for custom fax headers and cover pages Click the Sending tab and then type the number needed to access an outside line if needed in the Outside line access field Select the Include header check box to i...

Страница 263: ... and groups to personalise your Address Book Add a Member to your PC FAX Address Book Windows Create a Group in your PC FAX Address Book Windows Edit Member or Group Information in your PC FAX Address Book Windows Delete a Member or Group in your PC FAX Address Book Windows Export your PC FAX Address Book Windows Import Information to your PC FAX Address Book Windows 256 ...

Страница 264: ...a fax using the Brother PC Fax software 1 Launch Brother Utilities and then click the drop down list and select your model name if not already selected 2 Click PC FAX in the left navigation bar and then click Address Book Send The Address Book dialog box appears 3 Click The Address Book Member Setup dialog box appears 4 Type the member s information in the corresponding fields Only the Name field ...

Страница 265: ... your model name if not already selected 2 Click PC FAX in the left navigation bar and then click Address Book Send The Address Book dialog box appears 3 Click The Address Book Group Setup dialog box appears 4 Type the name of the new group in the Group Name field 5 In the Available Names field select each name you want to include in the group and then click Add Members added to the group appear i...

Страница 266: ...ress Book Windows 1 Launch Brother Utilities and then click the drop down list and select your model name if not already selected 2 Click PC FAX in the left navigation bar and then click Address Book Send The Address Book dialog box appears 3 Select the member or group you want to edit 4 Click Properties 5 Change the member or group information 6 Click OK Related Information Configure your PC Fax ...

Страница 267: ...ok Windows 1 Launch Brother Utilities and then click the drop down list and select your model name if not already selected 2 Click PC FAX in the left navigation bar and then click Address Book Send The Address Book dialog box appears 3 Select the member or group you want to delete 4 Click Delete 5 When the confirmation dialog box appears click OK Related Information Configure your PC Fax Address B...

Страница 268: ...The Address Book dialog box appears 3 Click File Export 4 Select one of the following Text The Select Items dialog box appears Go to the next step vCard You must select the member you want to export from your address book before selecting this option Browse to the folder where you want to save the vCard type the vCard name in the File name field and then click Save 5 In the Available Items field s...

Страница 269: ...Related Information Configure your PC Fax Address Book Windows 262 ...

Страница 270: ...ess Book Send The Address Book dialog box appears 3 Click File Import 4 Select one of the following Text The Select Items dialog box appears Go to step 5 vCard Go to step 8 5 In the Available Items field select the data you want to import and then click Add You must select and add fields from the Available Items list in the same order they are listed in the import text file 6 If you are importing ...

Страница 271: ...bers on the dial pad to type the number and then click Add Send Address If you select the Dial Restriction check box a confirmation dialog box will appear for you to re type the fax number using the keyboard This feature helps to prevent transmissions to the wrong destination Click the Address Book button and then select a member or group from the Address Book If you make a mistake click All Clear...

Страница 272: ...eceive Faxes on Your Computer Windows Receive Faxes on Your Computer Windows Use the Brother PC FAX software to receive faxes on your computer screen them and print only those faxes you want Receive Faxes Using PC FAX Receive Windows 265 ...

Страница 273: ...you turn off your computer your machine will continue to receive and store faxes in your machine s memory The machine s LCD will display the number of stored faxes received When you start this application the software will transfer all received faxes to your computer at once You can enable the Backup Print option if you want the machine to print a copy of the fax before the fax is sent to your com...

Страница 274: ...automatically and can transfer any faxes upon computer startup 1 Launch Brother Utilities and then click the drop down list and select your model name if not already selected 2 Click PC FAX in the left navigation bar and then click Receive 3 Confirm the message and click Yes The PC FAX Receive window appears The PC FAX Receive icon also appears in your computer task tray Related Information Receiv...

Страница 275: ...s as needed Preferences Configure to start PC FAX Receive automatically when you start Windows Save Configure the path to save PC FAX files and select the received document format Upload to Configure the path to the server and select the option to upload automatically or manually available only for Administrators Device Select the machine where you want to receive PC FAX files Lock available only ...

Страница 276: ...Receive icon in your computer task tray The PC FAX Receive window appears 2 Click Settings 3 Click Device Add 4 Select the appropriate connection method Select your machine from the automatic search results below A list of connected machines appears Select the machine you want Click OK Specify your machine by IP address Type the machine s IP address in the IP Address field and then click OK 5 To c...

Страница 277: ...nread messages Receiving messages Messages received Unread messages 1 Double click the PC FAX Receive icon in your computer task tray The PC FAX Receive window appears 2 Click any faxes in the list to view them 3 When finished close the window Even after closing the window PC FAX Receive is active and the PC FAX Receive icon will remain in your computer task tray To close PC FAX Receive click the ...

Страница 278: ...Related Information Receive Faxes Using PC FAX Receive Windows 271 ...

Страница 279: ...Home Fax PC FAX PC FAX for Mac Sending only PC FAX for Mac Sending only Send a Fax Using AirPrint macOS 272 ...

Страница 280: ...Home Network Network Supported Basic Network Features Configure Network Settings Wireless Network Settings Network Features 273 ...

Страница 281: ...r Yes No No Driver Deployment Wizard Yes Yes No 1 The default password to manage this machine s settings is located on the back of the machine and marked Pwd We recommend immediately changing the default password to protect your machine from unauthorised access When connecting your machine to an outside network such as the Internet make sure your network environment is protected by a separate fire...

Страница 282: ...Home Network Configure Network Settings Configure Network Settings Configure Network Settings Using the Control Panel Change Machine Settings Using Web Based Management 275 ...

Страница 283: ...trol panel see Related Information Settings Tables You can also use management utilities such as Web Based Management to configure and change your Brother machine s network settings 1 Press Settings Network 2 Press a or b to display the network option and then press it Repeat this step until you access the menu you want to configure and then follow the touchscreen LCD instructions Related Informat...

Страница 284: ...Home Network Wireless Network Settings Wireless Network Settings Use the Wireless Network Use Wi Fi Direct Enable Disable Wireless LAN Print the WLAN Report 277 ...

Страница 285: ...k Using the Setup Wizard from Your Mobile Device Configure Your Machine for a Wireless Network Using the Machine s Control Panel Setup Wizard Configure Your Machine for a Wireless Network Using the One Push Method of Wi Fi Protected Setup WPS Configure Your Machine for a Wireless Network Using the PIN Method of Wi Fi Protected Setup WPS Configure Your Machine for a Wireless Network When the SSID i...

Страница 286: ...orted models only or USB for the fastest throughput speed Although your machine can be used in both a wired and wireless network supported models only only one connection method can be used at a time However a wireless network connection and Wi Fi Direct connection or a wired network connection supported models only and Wi Fi Direct connection can be used at the same time If there is a signal in t...

Страница 287: ...indows Download the installer from your model s Downloads page at support brother com Mac a Download the installer from your model s Downloads page at support brother com b Start the installer and then double click the Start Here Mac icon 2 Follow the on screen instructions 3 Select Wireless Network Connection Wi Fi and then click Next 4 Follow the on screen instructions You have completed the wir...

Страница 288: ...our Mobile Device 1 Do one of the following Android devices Go to support brother com to download Brother Mobile Connect All iOS or iPadOS supported devices including iPhone iPad and iPod touch Download and install Brother Mobile Connect from the App Store 2 Start Brother Mobile Connect and then follow the on screen instructions to connect your mobile device to your Brother machine Related Informa...

Страница 289: ...ess setup How can I find this information Check the documentation provided with your wireless access point router The initial SSID could be the manufacturer s name or the model name If you do not know the security information consult the router manufacturer your system administrator or your Internet provider 2 Press Settings Network WLAN Wi Fi Find Wi Fi Network 3 When Enable WLAN appears press Ye...

Страница 290: ...Related Information Use the Wireless Network 283 ...

Страница 291: ...1 Press Settings Network WLAN Wi Fi WPS Push Button 2 When Enable WLAN appears press Yes The wireless setup wizard starts To cancel press No 3 When the touchscreen instructs you to start WPS press the WPS button on your wireless access point router Then press OK on your machine Your machine automatically tries to connect to your wireless network If your wireless device is connected successfully th...

Страница 292: ... 1 Type B Connection when another device 2 such as a computer is used as the Registrar 1 2 1 Press Settings Network WLAN Wi Fi WPS PIN Code 2 When Enable WLAN appears press Yes The wireless setup wizard starts To cancel press No 3 The LCD displays an eight digit PIN and the machine starts searching for a wireless LAN access point router 4 Using a computer connected to the network in your browser s...

Страница 293: ...twork in advance For more information see the instructions supplied with your wireless LAN access point router If you use Windows 7 Windows 8 1 or Windows 10 as a Registrar you can install the printer driver after the wireless configuration by following the on screen instructions To install the driver and software necessary to use your machine go to your model s Downloads page at support brother c...

Страница 294: ...ey used as the first WEP key Your Brother machine supports the use of the first WEP key only 2 Press Settings Network WLAN Wi Fi Find Wi Fi Network 3 When Enable WLAN appears press Yes The wireless setup wizard starts To cancel press No 4 The machine searches for your network and displays a list of available SSIDs Press a or b to display the New SSID option and then press it 5 Press OK 6 Enter the...

Страница 295: ...ice you have selected If your wireless device is connected successfully the LCD displays Connected You have completed the wireless network setup To install the drivers and software necessary to use your machine go to your model s Downloads page at support brother com Related Information Use the Wireless Network Related Topics If You Are Having Difficulty with Your Machine s Network Enter Text on Y...

Страница 296: ...LS CHAP AES TKIP EAP TTLS MS CHAP AES TKIP EAP TTLS MS CHAPv2 AES TKIP EAP TTLS PAP AES TKIP EAP TLS AES TKIP For example Network Name SSID HELLO Authentication Method Encryption Mode User ID Password EAP FAST MS CHAPv2 AES Brother 12345678 If you configure your machine using EAP TLS authentication you must install the client certificate issued by a CA before you start configuration Contact your n...

Страница 297: ...erver ID user ID and password if required and then press OK for each option For other selections enter the user ID and Password and then press OK for each option If you have not imported a CA certificate into your machine the machine displays No Verification If you selected the EAP TLS option select the encryption type TKIP AES or AES The machine will display a list of available Client Certificate...

Страница 298: ...Settings Use Wi Fi Direct Use Wi Fi Direct Wi Fi Direct Overview Configure Your Wi Fi Direct Network Using the Push Button Method Configure a Wi Fi Direct Network Manually If You Are Having Difficulty with Your Machine s Network 291 ...

Страница 299: ...ing a wireless router access point 1 2 1 Mobile device 2 Your Brother machine You can use Wi Fi Direct with either the wired or wireless network connection at the same time The Wi Fi Direct supported device can become a Group Owner When configuring the Wi Fi Direct network the Group Owner serves as an access point Related Information Use Wi Fi Direct Related Topics Configure Your Wi Fi Direct Netw...

Страница 300: ... 4 When the Activate Wi Fi Direct on other device Then Press OK message appears turn your mobile device s Wi Fi Direct function on for more information see your mobile device s user s guide Press OK on your Brother machine 5 Do one of the following If your mobile device displays a list of machines with Wi Fi Direct enabled select your Brother machine If your Brother machine displays a list of mobi...

Страница 301: ... Network Wi Fi Direct Manual 2 The machine will display the SSID Network Name and Password Network Key Go to your mobile device s wireless network settings screen select the SSID and then enter the password When your mobile device connects successfully the machine displays Connected Related Information Use Wi Fi Direct Related Topics Wi Fi Direct Overview Configure Your Wi Fi Direct Network Using ...

Страница 302: ...able Disable Wireless LAN Enable Disable Wireless LAN 1 Press Settings Network Network I F 2 Do one of the following To enable Wi Fi select WLAN Wi Fi To disable Wi Fi select Wired LAN 3 Press Related Information Wireless Network Settings 295 ...

Страница 303: ...port Yes The machine will print the WLAN Report If the WLAN Report does not print check your machine for errors If there are no visible errors wait for one minute and then try to print the report again Related Information Wireless Network Settings Wireless LAN Report Error Codes Related Topics Configure IEEE 802 1x Authentication for a Wired or a Wireless Network Using Web Based Management Web Bro...

Страница 304: ...on Restart your wireless router access point If you cannot find the Network Name SSID and security information see the documentation provided with your wireless router access point or contact the router manufacturer your system administrator or Internet service provider TS 03 The wireless enterprise network and security settings you entered may be incorrect Check the following points and try to se...

Страница 305: ... access point and the machine If your wireless router access point s Stealth Mode is on you may need to disable it to connect to the wireless network If you cannot find the Network Name SSID and security information see the documentation provided with your wireless router access point or contact the router manufacturer your system administrator or Internet service provider TS 07 The machine cannot...

Страница 306: ...ty settings If the WLAN access point router is set to not broadcast the SSID the SSID will not automatically be detected You will have to manually enter the SSID name The Network key may also be described as the Password Security Key or Encryption Key If you do not know the SSID and wireless security settings of your WLAN access point router or how to change the configuration see the documentation...

Страница 307: ...etwork Features Network Features Print the Network Configuration Report Fax Using the Internet I Fax Synchronize Time with the SNTP Server Using Web Based Management Reset the Network Settings to Factory Default 300 ...

Страница 308: ...or one minute and try printing it again You can find your machine s settings such as the IP address subnet mask node name and MAC Address on the report for example IP address 192 168 0 5 Subnet mask 255 255 255 0 Node name BRN000ca0000499 MAC Address 00 0c a0 00 04 99 1 Press Settings All Settings Print Reports Network Configuration Yes The machine prints the current Network Configuration Report R...

Страница 309: ...s to and from your Brother machine your computer s email application must support Multipurpose Internet Mail Extensions MIME 1 2 3 4 5 6 1 Fax Sender 2 Telephone line 3 Your Brother Machine Receiver Sender 4 The Internet 5 A computer receives a forwarded email 6 A fax machine receives a forwarded fax I Fax supports sending and receiving documents in Letter or A4 format and in monochrome only If yo...

Страница 310: ...he circuit such as the Internet is may cause the system to take a longer time than usual to send an error mail When sending confidential documents we recommend using standard phone lines instead of the Internet due to its low level of security If the receiver s mail system is not MIME compatible you cannot use I Fax to send documents If possible find out in advance and note that some servers will ...

Страница 311: ...in field and then click Login The default password to manage this machine s settings is located on the back of the machine and marked Pwd 4 Go to the navigation menu and then click Network Network Protocol Start from if the navigation menu is not shown on the left side of the screen 5 In the POP3 IMAP4 SMTP Client field click Advanced Settings and configure the settings as needed If you are unsure...

Страница 312: ... is the machine s IP address For example https 192 168 1 2 3 If required type the password in the Login field and then click Login The default password to manage this machine s settings is located on the back of the machine and marked Pwd 4 Go to the navigation menu and then click Fax E mail Send Start from if the navigation menu is not shown on the left side of the screen 5 Configure the settings...

Страница 313: ...e https machine s IP address in your browser s address bar where machine s IP address is the machine s IP address For example https 192 168 1 2 3 If required type the password in the Login field and then click Login The default password to manage this machine s settings is located on the back of the machine and marked Pwd 4 Go to the navigation menu and then click Fax E mail Receive Start from if ...

Страница 314: ...eceiving data the received data will be held in the machine s memory This data will be printed automatically after paper is re inserted into the machine If the received mail is not in a plain text format or an attached file is not in the TIFF format the error message ATTACHED FILE FORMAT NOT SUPPORTED will be printed If the received mail is too large the error message E MAIL FILE TOO LARGE will be...

Страница 315: ...ceives an I Fax document the document is attached to an email message that notifies you in its Subject line that your email server has received an I Fax You can either wait for your Brother machine to poll the email server or you can manually poll the email server to receive the incoming data Related Information Configure Your Brother Machine for Email or I Fax Related Topics Receive an I Fax Auto...

Страница 316: ...to On press Fax and then press Sending Faxes 3 To change the fax sending settings press Options 4 Press a or b to scroll through the fax settings When the setting you want is displayed press it and choose your preference When you have finished changing settings press OK 5 Do one of the following Press and then enter the email address Press Address Book choose the email address of your recipient an...

Страница 317: ... the Server Manually 1 Press Settings All Settings Network E mail IFAX Manual Receive Yes 2 The LCD will display Receiving and your machine will print the data from the email server Related Information Fax Using the Internet I Fax Related Topics Forward Received Email and Fax Messages 310 ...

Страница 318: ...ax Using the Internet I Fax I Fax Options I Fax Options Forward Received Email and Fax Messages Set Up Relay Broadcast on Your Brother Machine Internet Fax I Fax Verification Mail Configure Your Brother Machine for Email or I Fax 311 ...

Страница 319: ...hine s IP address is the machine s IP address For example https 192 168 1 2 3 If required type the password in the Login field and then click Login The default password to manage this machine s settings is located on the back of the machine and marked Pwd 4 Go to the navigation menu and then click Fax Remote Fax Options Start from if the navigation menu is not shown on the left side of the screen ...

Страница 320: ... fee 1 3 2 5 4 1 Internet available fax machine 2 The Internet 3 Your Brother Machine 4 Telephone line 5 Fax machine 1 Start your web browser 2 Type https machine s IP address in your browser s address bar where machine s IP address is the machine s IP address For example https 192 168 1 2 3 If required type the password in the Login field and then click Login The default password to manage this m...

Страница 321: ...of the name after the sign on the machine Use care in selecting a trusted domain any user on a trusted domain will be able to send a relay broadcast You can register up to five domain names Relay Broadcast Report Specify whether or not you want a report to print after the machine completes the relay broadcast 6 When finished click Submit Related Information I Fax Options Relay Broadcast from Your ...

Страница 322: ...brother co uk and you want your machine to send the document using a conventional telephone line 1 Load your document 2 Do one of the following If Fax Preview is set to Off press Fax If Fax Preview is set to On press Fax and then press Sending Faxes 3 Press Options Broadcasting Add Number 4 You can add email addresses to the broadcast in the following ways Press Add Number and press enter the emai...

Страница 323: ...Related Information Set Up Relay Broadcast on Your Brother Machine 316 ...

Страница 324: ...TP Client and SMTP Server check boxes Click Submit and then restart your machine If you are sending an email to a conventional fax machine the method of entering the fax machine s fax number will vary depending on the mail application you are using 1 In your email application create a new mail message and type the email address of the relay machine and fax number of the first fax machine in the TO...

Страница 325: ...eived and processed Verification Mail for receiving allows you to transmit a default report back to the sending station after successfully receiving and processing an I Fax or email To use this feature set the Notification options in the Setup Mail RX and Setup Mail TX options of your machine s control panel menu Related Information I Fax Options Enable Send Notifications for TX Verification Mail ...

Страница 326: ...ail 1 Press Settings All Settings Network E mail IFAX Setup Mail TX Notification 2 When switched to On an additional field of information is sent with the image data This field is named MDN Message Disposition Notification The receiver must support the MDN field to be able to send a notification report otherwise the request will be ignored 3 Press Related Information Internet Fax I Fax Verificatio...

Страница 327: ...r Example SUCCESS Received From Mail Address Receive Notification MDN When Receive Notification is MDN a report to indicate successful reception and processing is sent back to the sender if the originating station sent a request confirmation to the MDN field Receive Notification Off When Receive Notification is Off all forms of receive notification are disabled and no message is sent back to the s...

Страница 328: ... error message back to the Brother machine and the error message will be printed If there is an error while receiving an I Fax an error message will be printed for example The message being sent to the machine was not in a TIFF format To receive the error mail and have it print on your machine in Setup Mail RX switch the Header option to All or to Subject From To Related Information Internet Fax I...

Страница 329: ...P is used to synchronize the time used by the machine for authentication with the SNTP time server This is not the time displayed on the machine s LCD You can automatically or manually synchronize the machine s time with the Coordinated Universal Time UTC provided by the SNTP time server Configure Date and Time Using Web Based Management Configure the SNTP Protocol Using Web Based Management 322 ...

Страница 330: ... field and then click Login The default password to manage this machine s settings is located on the back of the machine and marked Pwd 4 Go to the navigation menu and then click Administrator Date Time Start from if the navigation menu is not shown on the left side of the screen 5 Verify the Time Zone settings Select the time difference between your location and UTC from the Time Zone drop down l...

Страница 331: ... check box click Advanced Settings 9 Configure the settings Option Description Status Displays whether the SNTP protocol is enabled or disabled Synchronization Status Confirm the latest synchronization status SNTP Server Method Select AUTO or STATIC AUTO If you have a DHCP server in your network the SNTP server will obtain the address from that server automatically STATIC Type the address you want...

Страница 332: ...s the password and IP address This feature restores all wired supported models only and wireless network settings to the factory settings You can also reset the print server to its factory settings using Web Based Management 1 Press Settings All Settings Network Network Reset 2 The reset confirmation message is displayed Press OK for two seconds The machine will restart Related Information Network...

Страница 333: ...g Network Security Features Configure Certificates for Device Security Use SSL TLS Use SNMPv3 Use IPsec Use IEEE 802 1x Authentication for a Wired or a Wireless Network Use Secure Function Lock 3 0 Send or Receive an Email Securely 326 ...

Страница 334: ...ble today These network features can be integrated into your overall network security plan to help protect your data and prevent unauthorised access to the machine We recommend disabling the FTP and TFTP protocols Accessing the machine using these protocols is not secure However note that if you disable FTP the Scan to FTP feature will be disabled Related Information Security 327 ...

Страница 335: ... TLS You must use Web Based Management to configure a certificate Supported Security Certificate Features Step by Step Guide for Creating and Installing a Certificate Create a Self signed Certificate Create CSR and Install a Certificate from a Certificate Authority CA Import and Export the Certificate and Private Key Import and Export a CA Certificate Manage Multiple Certificates 328 ...

Страница 336: ...ting or installing a different certificate from a CA Certificate from a Certificate Authority CA There are two methods for installing a certificate from a CA If you already have a certificate from a CA or if you want to use a certificate from an external trusted CA When using a Certificate Signing Request CSR from this print server When importing a certificate and a private key Certificate Authori...

Страница 337: ...e from a Certificate Authority CA Option 1 Self Signed Certificate 1 Create a self signed certificate using Web Based Management 2 Install the self signed certificate on your computer Option 2 Certificate from a CA 1 Create a Certificate Signing Request CSR using Web Based Management 2 Install the certificate issued by the CA on your Brother machine using Web Based Management 3 Install the certifi...

Страница 338: ...e back of the machine and marked Pwd 4 Go to the navigation menu and then click Network Security Certificate Start from if the navigation menu is not shown on the left side of the screen 5 Click Create Self Signed Certificate 6 Enter a Common Name and a Valid Date The length of the Common Name is less than 64 bytes Enter an identifier such as an IP address node name or domain name to use when acce...

Страница 339: ... certificate from an external trusted CA you can store the certificate and private key on the machine and manage them by importing and exporting If you do not have a certificate from an external trusted CA create a Certificate Signing Request CSR send it to a CA for authentication and install the returned certificate on your machine Create a Certificate Signing Request CSR Install a Certificate on...

Страница 340: ...etwork Security Certificate Start from if the navigation menu is not shown on the left side of the screen 5 Click Create CSR 6 Type a Common Name required and add other information about your Organization optional Your company details are required so that a CA can confirm your identity and verify it to the outside world The length of the Common Name must be less than 64 bytes Enter an identifier s...

Страница 341: ...mmend using the Web Server for the certificate template to securely create the Client Certificate If you are creating a Client Certificate for an IEEE 802 1x environment with EAP TLS authentication we recommend using User for the certificate template Related Information Create CSR and Install a Certificate from a Certificate Authority CA Related Topics Access Web Based Management 334 ...

Страница 342: ...u can type another name such as SharedPrinter instead of the IP address For example https SharedPrinter If you enable a NetBIOS name you can also use the node name For example https brnxxxxxxxxxxxx The NetBIOS name can be found in the Network Configuration Report 3 If required type the password in the Login field and then click Login The default password to manage this machine s settings is locate...

Страница 343: ...Export the Certificate and Private Key Import and Export the Certificate and Private Key Store the certificate and private key on your machine and manage them by importing and exporting them Import a Certificate and Private Key Export the Certificate and Private Key 336 ...

Страница 344: ...the node name For example https brnxxxxxxxxxxxx The NetBIOS name can be found in the Network Configuration Report 3 If required type the password in the Login field and then click Login The default password to manage this machine s settings is located on the back of the machine and marked Pwd 4 Go to the navigation menu and then click Network Security Certificate Start from if the navigation menu ...

Страница 345: ...can be found in the Network Configuration Report 3 If required type the password in the Login field and then click Login The default password to manage this machine s settings is located on the back of the machine and marked Pwd 4 Go to the navigation menu and then click Network Security Certificate Start from if the navigation menu is not shown on the left side of the screen 5 Click Export shown ...

Страница 346: ...Certificates for Device Security Import and Export a CA Certificate Import and Export a CA Certificate You can import export and store CA certificates on your Brother machine Import a CA Certificate Export a CA Certificate 339 ...

Страница 347: ...er If you enable a NetBIOS name you can also use the node name For example https brnxxxxxxxxxxxx The NetBIOS name can be found in the Network Configuration Report 3 If required type the password in the Login field and then click Login The default password to manage this machine s settings is located on the back of the machine and marked Pwd 4 Go to the navigation menu and then click Network Securi...

Страница 348: ...n also use the node name For example https brnxxxxxxxxxxxx The NetBIOS name can be found in the Network Configuration Report 3 If required type the password in the Login field and then click Login The default password to manage this machine s settings is located on the back of the machine and marked Pwd 4 Go to the navigation menu and then click Network Security CA Certificate Start from if the na...

Страница 349: ... or Certificate Issued by a CA 5 CA Certificate 6 We recommend storing fewer certificates than allowed reserving an empty spot in case of certificate expiration When a certificate expires import a new certificate into the reserved spot and then delete the expired certificate This ensures that you avoid configuration failure When you use HTTPS IPPS or IEEE 802 1x you must select which certificate y...

Страница 350: ...ome Security Use SSL TLS Use SSL TLS Introduction to SSL TLS Manage Your Network Machine Securely Using SSL TLS Print Documents Securely Using SSL TLS Send or Receive an Email Securely Using SSL TLS 343 ...

Страница 351: ...ocal or wide area network LAN or WAN It works by encrypting data such as a print job sent over a network so anyone trying to capture it will not be able to read it SSL TLS can be configured on both wired and wireless networks and will work with other forms of security such as WPA keys and firewalls Related Information Use SSL TLS Brief History of SSL TLS Benefits of Using SSL TLS 344 ...

Страница 352: ...e little padlock icon in the web browser you are using SSL SSL grew to work with additional applications such as Telnet printer and FTP software in order to become a universal solution for online security Its original design intentions are still being used today by many online retailers and banks to secure sensitive data such as credit card numbers customer records etc SSL TLS uses extremely high ...

Страница 353: ...o the machine SSL s key selling point is that it can be used to print confidential data securely For example an HR department in a large company may be printing wage slips on a regular basis Without encryption the data contained on these wages slips can be read by other network users However with SSL TLS anyone trying to capture the data will see a confusing page of code and not the actual wage sl...

Страница 354: ...Manage Your Network Machine Securely Using SSL TLS Configure a Certificate for SSL TLS and Available Protocols Access Web Based Management Using SSL TLS Install the Self signed Certificate for Windows users with Administrator Rights Configure Certificates for Device Security 347 ...

Страница 355: ...aredPrinter If you enable a NetBIOS name you can also use the node name For example https brnxxxxxxxxxxxx The NetBIOS name can be found in the Network Configuration Report 3 If required type the password in the Login field and then click Login The default password to manage this machine s settings is located on the back of the machine and marked Pwd 4 Go to the navigation menu and then click Netwo...

Страница 356: ... HTTPS protocol settings using the Web Based Management screen 1 Start your web browser 2 Type https machine s IP address in your browser s address bar where machine s IP address is the machine s IP address For example https 192 168 1 2 3 If required type the password in the Login field and then click Login The default password to manage this machine s settings is located on the back of the machin...

Страница 357: ...er and then right click the Internet Explorer icon that appears on the taskbar Windows 7 and Windows Server 2008 Click Start All Programs 2 Right click Internet Explorer and then click Run as administrator If the More option appears click More If the User Account Control screen appears click Yes 3 Type https machine s IP address in your browser s address bar to access your machine where machine s ...

Страница 358: ...11 Click Next 12 Click Finish 13 Click Yes if the fingerprint thumbprint is correct 14 Click OK Related Information Manage Your Network Machine Securely Using SSL TLS 351 ...

Страница 359: ...SL TLS Print Documents Securely Using SSL TLS Print Documents Securely Using SSL TLS Print Documents Using SSL TLS Configure a Certificate for SSL TLS and Available Protocols Configure Certificates for Device Security 352 ...

Страница 360: ... field and then click Login The default password to manage this machine s settings is located on the back of the machine and marked Pwd 4 Go to the navigation menu and then click Network Network Protocol Start from if the navigation menu is not shown on the left side of the screen 5 Make sure the IPP check box is selected If the IPP check box is not selected select the IPP check box and then click...

Страница 361: ...Home Security Use SNMPv3 Use SNMPv3 Manage Your Network Machine Securely Using SNMPv3 354 ...

Страница 362: ...erver uses version 1 and version 2c of the SNMP protocol You can use all Brother applications in this mode However it is not secure since it will not authenticate the user and data will not be encrypted SNMPv3 read write access and v1 v2c read only access The print server uses the read write access of version 3 and the read only access of version 1 and version 2c of the SNMP protocol When you use ...

Страница 363: ...Related Topics Access Web Based Management 356 ...

Страница 364: ...rity Use IPsec Use IPsec Introduction to IPsec Configure IPsec Using Web Based Management Configure an IPsec Address Template Using Web Based Management Configure an IPsec Template Using Web Based Management 357 ...

Страница 365: ...n the devices start communicating using IPsec keys are exchanged using Internet Key Exchange IKE first and then the encrypted data is transmitted using the keys In addition IPsec has two operation modes the Transport mode and Tunnel mode The Transport mode is used mainly for communication between devices and the Tunnel mode is used in environments such as a Virtual Private Network VPN For IPsec tr...

Страница 366: ...e mode the processing speed is faster than Main mode but the security is lower All Non IPsec Traffic Select the action to be taken for non IPsec packets When using Web Services you must select Allow for All Non IPsec Traffic If you select Drop Web Services cannot be used Broadcast Multicast Bypass Select Enabled or Disabled Protocol Bypass Select the check box for the option or options you want Ru...

Страница 367: ... Configure Certificates for Device Security 360 ...

Страница 368: ...ress IP Address Specify the IP address Select ALL IPv4 Address ALL IPv6 Address ALL Link Local IPv6 or Custom from the drop down list If you select Custom from the drop down list type the IP address IPv4 or IPv6 in the text box IP Address Range Type the starting and ending IP addresses for the IP address range in the text boxes If the starting and ending IP addresses are not standardised to IPv4 o...

Страница 369: ...net mask 255 255 255 0 for 192 168 1 1 the addresses 192 168 1 xxx are valid 8 Click Submit When you change the settings for the template currently in use restart your machine to active the configuration Related Information Use IPsec Related Topics Access Web Based Management 362 ...

Страница 370: ...gation menu is not shown on the left side of the screen 5 Click the Delete button to delete an IPsec Template When an IPsec Template is in use it cannot be deleted 6 Click IPsec Template that you want to create The IPsec Template screen appears The configuration fields differ based on the Use Prefixed Template and Internet Key Exchange IKE you select 7 In the Template Name field type a name for th...

Страница 371: ...formation that was generated using a random number and the secret key Select Group1 Group2 Group5 or Group14 Encryption Select DES 3DES AES CBC 128 or AES CBC 256 Hash Select MD5 SHA1 SHA256 SHA384 or SHA512 SA Lifetime Specify the IKE SA lifetime Type the time seconds and number of kilobytes KByte Encapsulating Security Protocol Select ESP AH or AH ESP ESP is a protocol for carrying out encrypted...

Страница 372: ...not used to derive other keys Therefore even if a key is compromised the damage will be limited only to the messages that were encrypted using that key Select Enabled or Disabled Authentication Method Select the authentication method Select Pre Shared Key or Certificates Pre Shared Key When encrypting communication the encryption key is exchanged and shared beforehand using another channel If you ...

Страница 373: ...etwork The Diffie Hellman key exchange method uses a discrete logarithm problem not the secret key to send and receive open information that was generated using a random number and the secret key Select Group1 Group2 Group5 or Group14 Encryption Select DES 3DES AES CBC 128 or AES CBC 256 Hash Select MD5 SHA1 SHA256 SHA384 or SHA512 SA Lifetime Specify the IKE SA lifetime Type the time seconds and ...

Страница 374: ...v2 EAP is an authentication protocol that is an extension of PPP By using EAP with IEEE802 1x a different key is used for user authentication during each session The following settings are necessary only when EAP MD5 or EAP MS CHAPv2 is selected in Authentication Method Mode Select Server Mode or Client Mode Certificate Select the certificate User Name Type the user name up to 32 characters Passwo...

Страница 375: ...n You can select only the certificates that were created using the Certificate page of Web Based Management s Security configuration screen Related Information Configure an IPsec Template Using Web Based Management 368 ...

Страница 376: ...ngth of the specified authentication key is different than the selected hash algorithm an error will occur MD5 128 bits 16 bytes SHA1 160 bits 20 bytes SHA256 256 bits 32 bytes SHA384 384 bits 48 bytes SHA512 512 bits 64 bytes When you specify the key in ASCII Code enclose the characters in double quotation marks Code key ESP Type the In Out values These settings are necessary when Custom is selec...

Страница 377: ...the sender and manipulation of the data Unlike ESP the communicated contents are not encrypted and the data is sent and received as plain text Encryption Select DES 3DES AES CBC 128 or AES CBC 256 Hash Select None MD5 SHA1 SHA256 SHA384 or SHA512 None can be selected only when ESP is selected in Protocol SA Lifetime Specify the IKE SA lifetime Type the time seconds and number of kilobytes KByte En...

Страница 378: ...ireless Network Use IEEE 802 1x Authentication for a Wired or a Wireless Network What Is IEEE 802 1x Authentication Configure IEEE 802 1x Authentication for a Wired or a Wireless Network Using Web Based Management Web Browser IEEE 802 1x Authentication Methods 371 ...

Страница 379: ...nd wireless networks that limits access from unauthorised network devices Your Brother machine supplicant sends an authentication request to a RADIUS server Authentication server through your access point or hub After your request has been verified by the RADIUS server your machine can access the network Related Information Use IEEE 802 1x Authentication for a Wired or a Wireless Network 372 ...

Страница 380: ...802 1x authentication using Wireless setup wizard from the control panel Wireless network 1 Start your web browser 2 Type https machine s IP address in your browser s address bar where machine s IP address is the machine s IP address For example https 192 168 1 2 If you are using a Domain Name System or enable a NetBIOS name you can type another name such as SharedPrinter instead of the IP address...

Страница 381: ...e CA Cert ServerID The verification method to check the common name 1 value of the server certificate in addition to the CA reliability of the server certificate 7 When finished with configuration click Submit For wired networks After configuring connect your machine to the IEEE 802 1x supported network After a few minutes print the Network Configuration Report to check the Wired IEEE 802 1x statu...

Страница 382: ...creates an encrypted Secure Sockets Layer SSL Transport Layer Security TLS tunnel between a client and an authentication server for sending a user ID and password PEAP provides mutual authentication between the server and the client The Brother machine supports the following inner authentications PEAP MS CHAPv2 PEAP GTC EAP TTLS Extensible Authentication Protocol Tunneled Transport Layer Security ...

Страница 383: ...estricting the functions available on your machine Before Using Secure Function Lock 3 0 Configure Secure Function Lock 3 0 Using Web Based Management Scan Using Secure Function Lock 3 0 Configure Public Mode for Secure Function Lock 3 0 Additional Secure Function Lock 3 0 Features Register an External IC Card Reader 376 ...

Страница 384: ...ttings using Web Based Management Print Print includes print jobs sent via AirPrint Brother iPrint Scan and Brother Mobile Connect If you register users logon names in advance the users will not need to enter their passwords when they use the print function Copy Scan Scan includes scan jobs sent via Brother iPrint Scan and Brother Mobile Connect Fax supported models only Send Receive Media Print f...

Страница 385: ...screen 5 Select Secure Function Lock 6 Click Submit 7 Click the Restricted Functions menu 8 In the User List Restricted Functions field type a group name or user name 9 In the Print and the other columns select a check box to allow or clear a check box to restrict the function listed 10 To configure the maximum page count select the On check box in the Page Limits column and then type the maximum ...

Страница 386: ...ve the Scan check box selected will be able to scan Using the Scan feature for restricted users To scan using the machine s control panel Restricted users must enter their passwords on the machine s control panel to access Scan mode To scan from a computer Restricted users must enter their passwords on the machine s control panel before scanning from their computers If the password is not entered ...

Страница 387: ...here machine s IP address is the machine s IP address For example https 192 168 1 2 3 If required type the password in the Login field and then click Login The default password to manage this machine s settings is located on the back of the machine and marked Pwd 4 Go to the navigation menu and then click Administrator Restriction Management or User Restriction Function Start from if the navigatio...

Страница 388: ...nter Export to CSV file Click Export to CSV file to export the current and last page counter including User List Restricted Functions information as a CSV file Last Counter Record Click Last Counter Record if you want the machine to retain the page count after the counter has been reset Counter Auto Reset Click Counter Auto Reset to configure the time interval you want between page counter reset C...

Страница 389: ...192 168 1 2 3 If required type the password in the Login field and then click Login The default password to manage this machine s settings is located on the back of the machine and marked Pwd 4 Go to the navigation menu and then click Administrator External Card Reader Start from if the navigation menu is not shown on the left side of the screen 5 Enter the necessary information and then click Sub...

Страница 390: ...d or Receive an Email Securely Send or Receive an Email Securely Configure Email Sending or Receiving Using Web Based Management Send an Email with User Authentication Send or Receive an Email Securely Using SSL TLS 383 ...

Страница 391: ...ne and marked Pwd 4 Go to the navigation menu and then click Network Network Protocol Start from if the navigation menu is not shown on the left side of the screen 5 In the POP3 IMAP4 SMTP Client field click Advanced Settings and make sure the status of POP3 IMAP4 SMTP Client is Enabled 6 Configure the POP3 IMAP4 SMTP Client settings Confirm that the email settings are correct after configuration ...

Страница 392: ...tion email reports and I Fax We recommend using Web Based Management to configure the SMTP authentication Email Server Settings You must configure your machine s SMTP authentication method to match the method used by your email server For details about your email server settings contact your network administrator or Internet Service Provider ISP To enable SMTP server authentication in the Web Base...

Страница 393: ... ISP to confirm if importing a CA certificate is necessary If you do not need to verify the server certificate clear the Verify Server Certificate check box Port Number If you select SSL or TLS the Port value will be changed to match the protocol To change the port number manually type the port number after you select SSL TLS settings You must configure your machine s communication method to match...

Страница 394: ...Home Administrator Administrator Network Features Security Features Brother Management Tools 387 ...

Страница 395: ...Administrator Network Features Network Features Change Machine Settings Using Web Based Management Print the Network Configuration Report Synchronize Time with the SNTP Server Using Web Based Management 388 ...

Страница 396: ...hine uses some of the latest network security and encryption protocols These network features can be integrated into your overall network security plan to help protect your data and prevent unauthorised access to the machine Network Security User Authentication 389 ...

Страница 397: ...urity Features Network Security Network Security Disable Unnecessary Protocols Configure Certificates for Device Security Use SSL TLS Use SNMPv3 Use IPsec Use IEEE 802 1x Authentication for a Wired or a Wireless Network 390 ...

Страница 398: ...ord in the Login field and then click Login The default password to manage this machine s settings is located on the back of the machine and marked Pwd 4 Go to the navigation menu and then click Network Network Protocol Start from if the navigation menu is not shown on the left side of the screen 5 Clear any unnecessary protocol check boxes to disable them 6 Click Submit 7 Restart your Brother mac...

Страница 399: ...Home Administrator Security Features User Authentication User Authentication Use Secure Function Lock 3 0 392 ...

Страница 400: ... Tools Brother Management Tools Use one of Brother s management tools to configure your Brother machine s network settings Go to your model s Downloads page at support brother com to download the tools Related Information Administrator 393 ...

Страница 401: ...Home Mobile Connect Mobile Connect AirPrint Mopria Print Service Brother Mobile Connect Print with Near Field Communication NFC WeChat Print 394 ...

Страница 402: ...Home Mobile Connect AirPrint AirPrint AirPrint Overview Before Using AirPrint macOS Print Using AirPrint Scan Using AirPrint macOS Send a Fax Using AirPrint macOS 395 ...

Страница 403: ...the need to install a driver AirPrint also lets you send faxes directly from your Mac computer without printing them and lets you scan documents to your Mac computer For more information visit Apple s website Use of the Works with Apple badge means that an accessory has been designed to work specifically with the technology identified in the badge and has been certified by the developer to meet Ap...

Страница 404: ...our machine to the printer list on your Mac computer 1 Select System Preferences from the Apple menu 2 Click Printers Scanners 3 Click the icon below the Printers pane on the left The Add screen appears 4 Select your machine and then select AirPrint from the Use pop up menu 5 Click Add Related Information AirPrint 397 ...

Страница 405: ...Home Mobile Connect AirPrint Print Using AirPrint Print Using AirPrint Print from iPad iPhone or iPod touch Print Using AirPrint macOS 398 ...

Страница 406: ...e paper tray and change the paper settings for the paper tray on your machine 2 Use Safari to open the page that you want to print 3 Tap or 4 Tap Print 5 Make sure your machine is selected 6 If a different machine or no printer is selected tap Printer A list of available machines appears 7 Tap your machine s name in the list 8 Select the options you want such as the number of pages to print and 2 ...

Страница 407: ... the paper tray and change the paper settings for the paper tray on your machine 2 On your Mac computer use Safari to open the page that you want to print 3 Click the File menu and then select Print 4 Make sure your machine is selected If a different machine or no printer is selected click the Printer pop up menu and then select your machine 5 Select the desired options such as the number of pages...

Страница 408: ...e Scanner screen appears 6 If you place the document in the ADF select Use Document Feeder check box and then select the size of your document from the scan size setting pop up menu 7 Select the destination folder or destination application from the destination setting pop up menu 8 Click Show Details to change the scanning settings if needed You can crop the image manually by dragging the mouse p...

Страница 409: ...unction Lock feature Sending faxes via AirPrint is not available if Fax Tx for each user is restricted 1 Make sure your machine is turned on 2 On your Mac computer open the file that you want to send as a fax 3 Click the File menu and then select Print 4 Click the Printer pop up menu and then select Brother XXX XXXX Fax where XXX XXXX is the name of your model 5 Type the fax recipient information ...

Страница 410: ...loped by the Mopria Alliance With this service you can connect to the same network as your machine and print without additional setup 1 3 2 1 Android Mobile Device 2 Wi Fi Connection 3 Your Machine Mopria Print Service must be downloaded from a search engine and installed on your Android device Related Information Mobile Connect 403 ...

Страница 411: ...tures directly from your Android device Go to your model s Downloads page at support brother com to download Brother Mobile Connect For all iOS or iPadOS supported devices including iPhone iPad and iPod touch Brother Mobile Connect allows you to use your Brother machine s features directly from your iOS or iPadOS device Download and install Brother Mobile Connect from the App Store Related Informa...

Страница 412: ...reless connections between two devices that are close to each other If your Android device is NFC enabled you can print data photos PDF files and text files from the device by touching it to the NFC symbol on the machine s control panel You must download and install Brother Mobile Connect to your Android device to use this feature Related Information Mobile Connect Related Topics Control Panel Ove...

Страница 413: ...eement EULA will appear on the LCD Read the information and then press OK 2 Press a or b to display the Online Functions option and then press it If this function is locked contact your Network Administrator for access If information regarding Online Functions appears read it and then press OK 3 Press Enable Follow the on screen instructions Online Functions are enabled 4 Press a or b to display t...

Страница 414: ...rk uses a proxy server the following proxy server information must be configured on the machine Proxy server address Port number User Name Password 1 Press Settings All Settings Network Web Connect Settings Proxy Settings Proxy Connection 2 Press On 3 Press the option that you want to set and then enter the proxy server information Press OK 4 Press Related Information WeChat Print 407 ...

Страница 415: ...are always enabled in whichever browser you use 1 Start your web browser 2 Type https machine s IP address in your browser s address bar where machine s IP address is the machine s IP address For example https 192 168 1 2 3 If required type the password in the Login field and then click Login The default password to manage this machine s settings is located on the back of the machine and marked Pw...

Страница 416: ... Scanner Cover and the Jam Clear Cover are fully closed Paper is inserted correctly in the paper tray The interface cables are securely connected to the machine and the computer or the wireless connection is set up on both the machine and your computer For network models The access point for wireless router or hub is turned on and its link indicator is blinking The machine s LCD is displaying mess...

Страница 417: ...e is set to Plain Paper and you selected Greyscale in the printer driver you can use the machine as a monochrome printer Copying If the paper type is set to Plain Paper you can make copies in monochrome Faxing If the paper type is set to Plain Paper the machine will receive and print the faxes in monochrome Replace the ink cartridges See Related Information Replace the Ink Cartridges Although the ...

Страница 418: ...then try to configure the Wi Fi Direct settings again Connection Failed The Brother machine and your mobile device cannot communicate during the Wi Fi Direct network configuration Move the mobile device closer to your Brother machine Move your Brother machine and the mobile device to an obstruction free area If you are using the PIN Method of WPS make sure you have entered the correct PIN Cover is...

Страница 419: ...For example frequently powering the machine on and off will cause numerous cleaning cycles since the machine automatically cleans upon power up The use of non Brother ink may cause frequent cleanings because non Brother ink could cause poor print quality which is resolved by cleaning The more cleaning the machine requires the faster these boxes will fill up Repairs resulting from the use of non Br...

Страница 420: ...w Temperature The room temperature is too low After warming the room allow the machine to warm up to room temperature Try again when the machine has warmed up Media is Full The USB flash drive you are using does not have enough free space to scan the document Delete unused files from your USB flash drive to free some space and then try again No Caller ID There is no incoming call history You did n...

Страница 421: ...Response The connected USB device is unresponsive Unplug the device from the USB direct interface No Response Busy The number you dialled does not answer or is busy Verify the number and try again Out of Fax Memory The fax memory is full Do one of the following Clear the data from the memory To gain extra memory you can turn off Memory Receive See Related Information Turn Off Memory Receive Print ...

Страница 422: ...n follow the LCD instructions See Related Information Load Paper Paper dust has accumulated on the surface of the paper pick up rollers Clean the paper pick up rollers See Related Information Clean the Paper Pick up Rollers for Paper Tray 1 or Clean the Paper Pick up Rollers for Paper Tray 2 Repetitive Paper Jams A foreign object such as a paper clip or a piece of ripped paper is in the machine Re...

Страница 423: ...ce Turn the machine off and then on again Unusable Device Please disconnect USB device A USB device or USB flash drive that is not supported has been connected to the USB direct interface Unplug the device from the USB direct interface Wrong Tray Settings The machine s paper size settings and tray select settings do not match the size of paper in the tray you are using Follow the instructions on t...

Страница 424: ... Load Paper in the Multi purpose Tray MP Tray Paper is Jammed in the Front of the Machine Change the Paper Size and Paper Type 417 ...

Страница 425: ... You can also transfer the Fax Journal report to see if there are any faxes you must transfer See Related Information Transfer the Fax Journal Report to Another Fax Machine Related Information Error and Maintenance Messages Transfer Faxes to Another Fax Machine Transfer Faxes to Your Computer Transfer the Fax Journal Report to Another Fax Machine Related Topics Use PC Fax Receive to Transfer Recei...

Страница 426: ...Fax Transfer mode 1 Press to clear the error temporarily 2 Press Settings All Settings Service Data Transfer Fax Transfer 3 Do one of the following If the touchscreen displays No Data there are no faxes left in the machine s memory Press Close and then press Enter the fax number where faxes will be forwarded 4 Press Fax Start Related Information Transfer Your Faxes or Fax Journal Report Related To...

Страница 427: ...the left navigation bar and then click Receive 5 Read and confirm the instructions on your computer Faxes in the machine s memory will be sent to your computer automatically When faxes in the machine s memory are not sent to your computer Make sure you have set PC Fax Receive on the machine If faxes are in the machine s memory when you set up PC Fax Receive the touchscreen prompts you to transfer ...

Страница 428: ...other Fax Machine If you have not set up your Station ID you cannot enter fax transfer mode 1 Press to clear the error temporarily 2 Press Settings All Settings Service Data Transfer Report Transfer 3 Enter the fax number where the Fax Journal report will be forwarded 4 Press Fax Start Related Information Transfer Your Faxes or Fax Journal Report Related Topics Set Your Station ID 421 ...

Страница 429: ...nt Jams Document Jams Document is Jammed in the Top of the ADF Unit Document is Jammed in the Bottom of the ADF Unit Document is Jammed inside the ADF Unit Remove Paper Scraps Jammed in the ADF Error and Maintenance Messages 422 ...

Страница 430: ... of the ADF Unit 1 Remove any paper from the ADF that is not jammed 2 Open the ADF cover 3 Remove the jammed document by pulling it upwards 4 Close the ADF cover 5 Press IMPORTANT To avoid future document jams close the ADF cover correctly by pressing it down in the centre Related Information Document Jams 423 ...

Страница 431: ...is Jammed in the Bottom of the ADF Unit Document is Jammed in the Bottom of the ADF Unit 1 Remove any paper from the ADF that is not jammed 2 Lift the ADF document support and remove the jammed paper 3 Press Related Information Document Jams 424 ...

Страница 432: ...d inside the ADF Unit Document is Jammed inside the ADF Unit 1 Remove any paper from the ADF that is not jammed 2 Lift the document cover 3 Pull the jammed document out to the right 4 Close the document cover 5 Press Related Information Document Jams 425 ...

Страница 433: ...Jammed in the ADF Remove Paper Scraps Jammed in the ADF 1 Lift the document cover 2 Insert a piece of stiff paper such as cardstock into the ADF to push any small paper scraps through 3 Close the document cover 4 Press Related Information Document Jams 426 ...

Страница 434: ... Jam Printer Jam or Paper Jam Locate and remove the jammed paper Paper is Jammed in the Front of the Machine Paper is Jammed in the Back of the Machine Remove Paper Scraps Error and Maintenance Messages Paper Handling and Printing Problems 427 ...

Страница 435: ...Jam Front Manual Feed Slot Repeat Jam Front Manual Feed 1 Unplug the machine from the electrical socket 2 If the paper is loaded in the MP tray remove the paper MFC J3940DW 3 Pull Tray 1 1 completely out of the machine as shown by the arrow 1 If your LCD displays repeat paper jam messages for example Repeat Jam Front Rear lift the paper support 1 and then pull it at an angle completely out of the ...

Страница 436: ... and remove the jammed paper b Make sure you look carefully inside 1 for any scraps of paper 1 When finished continue with the next step 5 Using both hands use the finger holds on each side of the machine to lift the scanner cover 1 into the open position 1 6 Slowly pull the jammed paper 1 out of the machine 1 429 ...

Страница 437: ...then reconnect the power cord Open the scanner cover again and then hold down until the print head moves to the centre Then unplug the machine from the power source and remove the paper If the paper is jammed under the print head unplug the machine from the power source and then move the print head and remove the paper If ink gets on your skin or clothing immediately wash it off with soap or deter...

Страница 438: ...or Repeat Jam Front MP Tray make sure you look carefully inside the MP tray for jammed paper Push the release lever 1 towards the back of the machine and then slowly pull the jammed paper out of the MP tray 1 10 If your LCD displays Jam Front Manual Feed Slot or Repeat Jam Front Manual Feed make sure you look carefully inside the manual feed slot for jammed paper and slowly pull it out of the mach...

Страница 439: ...pport into the channels 12 Slowly push Tray 1 completely into the machine 13 Reconnect the power cord If there is a repeat paper jam a small piece of paper may be stuck in the machine See Related Information Remove Paper Scraps Related Information Printer Jam or Paper Jam Related Topics Transfer Your Faxes or Fax Journal Report Error and Maintenance Messages Remove Paper Scraps 432 ...

Страница 440: ...ine from the electrical socket 2 If the paper is loaded in the MP tray remove the paper MFC J3940DW 3 Pull Tray 1 1 completely out of the machine as shown by the arrow 1 MFC J3940DW If your LCD displays Jam Tray2 or Repeat Jam Tray2 also pull Tray 2 2 completely out of the machine as shown by the arrow 2 When finished continue with the next step 4 If your LCD displays Jam Rear Repeat Jam Rear Jam ...

Страница 441: ... machine and then slowly pull the jammed paper out of the MP tray 1 6 If your LCD displays Jam Manual Feed Slot or Repeat Jam Manual Feed Slot slowly pull the jammed paper out of the manual feed slot 7 Using both hands use the finger holds on each side of the machine to lift the scanner cover 1 into the open position 1 8 Slowly pull the jammed paper 1 out of the machine 434 ...

Страница 442: ...ration you cannot move the print head Close the scanner cover and then reconnect the power cord Open the scanner cover again and then hold down until the print head moves to the centre Then unplug the machine from the power source and remove the paper If the paper is jammed under the print head unplug the machine from the power source and then move the print head and remove the paper If ink gets o...

Страница 443: ...DW 11 Reconnect the power cord If there is a repeat paper jam a small piece of paper may be stuck in the machine See Related Information Remove Paper Scraps Related Information Printer Jam or Paper Jam Related Topics Transfer Your Faxes or Fax Journal Report Remove Paper Scraps 436 ...

Страница 444: ...lot If you do not have the Maintenance Sheet use one sheet of thick A4 or Letter size paper such as glossy paper 4 MFC J3940DW Follow the instructions on the LCD to locate and remove the jammed paper During the procedure you must insert the Maintenance Sheet included with your machine into the machine in Landscape orientation through the opening as shown until you feel it grab the paper If you do ...

Страница 445: ...oblem with your machine check the following topics You can correct most problems yourself If you need additional help go to your model s FAQs Troubleshooting page at support brother com Using non Brother supplies may affect the print quality hardware performance and machine reliability Paper Handling and Printing Problems Telephone and Fax Problems Other Problems Network Problems AirPrint Problems...

Страница 446: ...e what s printing If printer driver options appear select your printer driver Click Printer in the menu bar and make sure Use Printer Offline is not selected Windows Server 2012 R2 Click Control Panel on the Start screen In the Hardware group click View devices and printers Right click the Brother XXX XXXX Printer where XXX XXXX is the name of your model Click See what s printing If printer driver...

Страница 447: ...m Preferences Printers Scanners The headers or footers appear when the document is displayed on the screen but do not appear when the document is printed There is an unprintable area on the top and bottom of the page Adjust the top and bottom margins in your document to allow for this See Related Information Unprintable Area Cannot perform Page Layout printing Windows Check that the paper size set...

Страница 448: ...orrect the Paper Feed to Clear Vertical Lines Make sure you are using Brother Original ink Try using the recommended types of paper See Related Information Acceptable Print Media To prolong print head life provide the best ink cartridge economy and maintain print quality we do not recommend frequently unplugging the machine and or leaving the machine unplugged for extended periods of time We recom...

Страница 449: ...Size and Paper Type If you use glossy photo paper make sure the paper type setting is correct Stains appear on the reverse side or at the bottom of the page Make sure the printer platen is not dirty with ink See Related Information Clean the Machine s Printer Platen Make sure you are using Brother Original ink Make sure you are using the paper support flap See Related Information Load Paper Make s...

Страница 450: ...Printer Jam or Paper Jam Make sure the paper guides are set to the correct paper size Use the jam prevention settings For copying See Related Information Change the Print Options to Improve Your Print Results For printing See Related Information Prevent Smudged Printouts and Paper Jams Windows Paper jam reoccurs If there is a repeat paper jam a small piece of paper may be stuck in the machine Make...

Страница 451: ...ble Print Media Clean the Print Head from Your Brother Machine Clean the Print Head Using Web Based Management Clean the Print Head from Your Computer Windows Check the Print Alignment from Your Brother Machine Load Paper Clean the Machine s Printer Platen Clean the Paper Feed Rollers Clean the Paper Pick up Rollers for Paper Tray 1 Clean the Paper Pick up Rollers for Paper Tray 2 Printer Jam or P...

Страница 452: ... for your setup See Related Information Choose the Correct Receive Mode Check for a dial tone If possible call your machine to hear it answer If there is still no answer check that the telephone line cord is plugged into the telephone wall socket and the LINE socket of the machine Make sure your machine has a dial tone by pressing the Hook button in Fax mode If there is no ringing when you call yo...

Страница 453: ...xternal TAD mode In External TAD mode your Brother machine will automatically receive incoming faxes and voice callers will be able to leave a message on your answering machine If your Brother machine shares a line with other telephones and you want it to automatically answer all incoming faxes you should select the Fax Tel mode In Fax Tel mode your Brother machine will automatically receive faxes...

Страница 454: ...es Difficulties Suggestions Cannot send a fax Check all line cord connections Make sure the telephone line cord is plugged into the telephone wall socket and the LINE socket of the machine Make sure your machine has a dial tone by pressing the Hook button in Fax mode If you subscribe to DSL or VoIP services contact your service provider for connection instructions If you are using a VoIP system tr...

Страница 455: ...r documents and transparencies Select the correct document size option according to the size of your document Vertical black lines when sending Black vertical lines on faxes you send are typically caused by dirt or correction fluid on the glass strip Clean the glass strip See Related Information Clean the Scanner Related Information If You Are Having Difficulty with Your Machine Set Dial Tone Dete...

Страница 456: ... Fax Problems Set Dial Tone Detection Set Dial Tone Detection Setting the Dial Tone to Detection will shorten the Dial Tone detect pause 1 Press Settings All Settings Initial Setup Dial Tone 2 Press Detection or No Detection 3 Press Related Information Telephone and Fax Problems 449 ...

Страница 457: ...de ECM except for colour fax sending Unless interference is a recurring problem on your telephone line you may prefer to use it only when needed To improve compatibility with most VoIP services Brother recommends changing the compatibility setting to Basic for VoIP Normal sets the modem speed at 14 400 bps High sets the modem speed at 33 600 bps 3 Press VoIP Voice over IP is a type of phone system...

Страница 458: ...ee Related Information Load Documents on the Scanner Glass Fit to Page does not work correctly Make sure the document is not skewed on the scanner glass Reposition the document and try again The machine may not detect the document size correctly for some documents such as dark colour documents and transparencies Therefore Fit to Page may not work Select an enlargement or reduction ratio other than...

Страница 459: ...otos from a USB Flash Drive See Related Information Print Photos with Auto Cropping Software Difficulties Difficulties Suggestions Cannot print Uninstall the drivers Windows and the Brother software and reinstall the latest version of both The device is busy appears on the computer screen Make sure there is no error message on the machine s display Related Information If You Are Having Difficulty ...

Страница 460: ... Having Difficulty with Your Machine Network Problems Network Problems Use the Network Connection Repair Tool Windows Check Your Machine s Network Settings If You Are Having Difficulty with Your Machine s Network Troubleshooting 453 ...

Страница 461: ...ool 3 Follow the on screen instructions 4 Check the diagnosis by printing the Network Configuration Report The Network Connection Repair Tool will start automatically if you select the Enable Connection Repair Tool option in the Status Monitor Right click the Status Monitor screen and then click Other Settings Enable Connection Repair Tool This is not recommended when your network administrator ha...

Страница 462: ...u Are Having Difficulty with Your Machine Network Problems Check Your Machine s Network Settings Check Your Machine s Network Settings Print the Network Configuration Report Change Machine Settings Using Web Based Management 455 ...

Страница 463: ...del number of the wireless LAN access point router may be used as the default security settings Consult with the access point router manufacturer your Internet provider or network administrator Wireless Your Brother machine s MAC address is not allowed Confirm that the Brother machine s MAC Address is allowed in the filter You can find the MAC Address on your Brother machine s control panel Wirele...

Страница 464: ... feature does not work Windows Configure the third party Security Firewall Software to allow Network scanning To add port 54925 for Network scanning type the information below In Name Type any description for example Brother NetScan In Port number Type 54925 Type 137 Type 161 In Protocol UDP is selected See the instruction manual that came with your third party Security Firewall Software or contac...

Страница 465: ...ter s print queue delete it Otherwise double click the printer icon in the following folder and cancel all documents Windows 10 Windows Server 2016 and Windows Server 2019 Click Windows System Control Panel In the Hardware and Sound group click View devices and printers Windows 8 1 Move your mouse to the lower right corner of your desktop When the menu bar appears click Settings Control Panel In t...

Страница 466: ...r Brother machine is working correctly and connected to the same network as your computer Unsuccessful Your Brother machine is not connected to the same network as your computer Windows Ask your administrator about the IP address and the subnet mask and then use the Network Connection Repair Tool Mac Confirm that the IP address and the Subnet Mask are set correctly Wired Wireless Check that your B...

Страница 467: ...er key on your keyboard 3 Confirm the values for the IPv4 address and subnet mask 4 Type exit and then press the Enter key on your keyboard Configure the IP Address on your computer Mac 1 Select System Preferences from the Apple Menu 2 Click Network Advanced TCP IP 3 Confirm the values for the IPv4 address and subnet mask Configure the IP Address on your Brother machine Print the Network Configura...

Страница 468: ...ork settings Move the mobile device closer to the wireless access point router or to your machine I cannot print Make sure your machine is turned on Confirm the network settings I am trying to print a multiple page document from an iOS device but ONLY the first page is printing Make sure you are running the latest OS version Related Information If You Are Having Difficulty with Your Machine Relate...

Страница 469: ...al No Check your machine s serial number Firmware Version Check your machine s firmware version Firmware Update Update your machine to the latest firmware The machine prompts you for a password 1 Firmware Auto Check View firmware information on the Home screen Page Counter Check the total number of pages the machine has printed 1 The default password to manage this machine s settings is located on...

Страница 470: ...set option you want to use 3 Press OK for two seconds to reboot the machine 4 Wait until the machine restarts and the Power LED indicator lights up before disconnecting the machine from the power source Related Information Troubleshooting Reset Functions Overview Related Topics Transfer Your Faxes or Fax Journal Report 463 ...

Страница 471: ...ok and Setup Groups Programmed fax jobs in the memory Delayed Fax and Delayed Batch Transmission Station ID Name and Number Memory Receive Options Fax Forwarding Report Transmission Verification Report Address Book and Fax Journal History Caller ID History and Outgoing Call Faxes in memory 4 All Settings Use this reset function to reset all of the machine s settings to the settings originally set ...

Страница 472: ...tine Maintenance Replace the Ink Cartridges Clean Your Brother Machine Check Your Brother Machine Correct the Paper Feed to Clear Vertical Lines Change the Print Options to Improve Your Print Results Pack and Ship Your Machine 465 ...

Страница 473: ...tely If left as is it may cause redness or mild inflammation of the eye In case of any abnormality consult with your doctor IMPORTANT Brother strongly recommends that you do not refill the ink cartridges provided with your machine We also strongly recommend that you continue to use only Brother Original replacement ink cartridges Use or attempted use of potentially incompatible ink and or cartridg...

Страница 474: ...ridge in the direction of the arrow on the label Each colour has its own correct position 5 Gently push the area marked PUSH until the ink cartridge locks into place and then close the ink cartridge cover The machine resets the ink dot counter If the machine does not detect the ink cartridge after you install it check that the ink cartridge is installed correctly Remove the ink cartridge and reins...

Страница 475: ...the ink may stain your skin If you mix the colors by installing an ink cartridge in the wrong position clean the print head several times after correcting the ink cartridge installation Use unopened ink cartridges by the expiration date written on the ink cartridge package DO NOT dismantle or tamper with the ink cartridge this can cause the ink to leak out of the ink cartridge Related Information ...

Страница 476: ...Clean the Print Head from Your Computer Windows Automatically Detect and Improve the Condition of Print Head Nozzles Clean the Scanner Clean the Machine s LCD Clean the Outside of the Machine Clean the Machine s Printer Platen Clean the Paper Feed Rollers Clean the Base Pad Clean the Paper Pick up Rollers for Paper Tray 1 Clean the Paper Pick up Rollers for Paper Tray 2 469 ...

Страница 477: ...nk Print Head Cleaning 2 Press Start The machine cleans the print head NOTE If you clean the print head several times and the print has not improved try the Special cleaning method The Special cleaning method uses the most power in cleaning the print head but also consumes the most ink 1 Press Ink Print Head Cleaning 2 Press for five seconds The machine starts cleaning The Special cleaning method ...

Страница 478: ...of the machine and marked Pwd 4 Go to the navigation menu and then click General Print Head Cleaning Start from if the navigation menu is not shown on the left side of the screen 5 If you have print quality problems try cleaning the print head several times If the print quality does not improve use the Special option The Special option uses the most power in cleaning the print head but also consum...

Страница 479: ...mouse to the lower right corner of your desktop When the menu bar appears click Settings and then click Control Panel In the Hardware group click View devices and printers For Windows 7 and Windows Server 2008 R2 Click Start Devices and Printers For Windows Server 2008 Click Start Control Panel Hardware and Sound Printers 2 Right click the Brother XXX XXXX Printer icon where XXX XXXX is the name o...

Страница 480: ...olours and text appear or if text is missing on your printouts the print head nozzles may be clogged When this setting is On the machine automatically detects the condition of the print head nozzles and cleans the print head when needed The default setting is On Cleaning the print head consumes ink 1 Press Ink Print Quality Auto Check 2 Press On or Off 3 Press Related Information Clean Your Brothe...

Страница 481: ...Clean the scanner glass 2 and the white plastic 3 with a soft lint free cloth moistened with water 2 1 3 3 In the ADF unit clean the white bar 1 and the glass strip 2 with a lint free cloth moistened with water 1 2 4 MFC J3940DW Open the scanner glass cover 1 and clean the white bar 2 and the glass strip 3 with a soft lint free cloth moistened with water 2 1 3 474 ...

Страница 482: ...est make a copy after each cleaning attempt When there is a spot of dirt or correction fluid on the glass strip the printed sample shows a vertical line After the glass strip is cleaned the vertical line is gone Related Information Clean Your Brother Machine Related Topics Telephone and Fax Problems Other Problems 475 ...

Страница 483: ...Machine s LCD IMPORTANT DO NOT use liquid cleaners including ethanol 1 Press and hold down to turn off the machine The LCD displays Shutting Down for a few seconds before the power goes off 2 Clean the LCD with a dry soft lint free cloth Related Information Clean Your Brother Machine 476 ...

Страница 484: ...anel It may crack the panel 1 If the paper support flap is open close it and then close the paper support 2 Pull the paper trays 1 completely out of the machine as shown by the arrow Tray 1 1 Tray 2 MFC J3940DW 1 3 Lift the paper support 1 and then pull it at an angle completely out of the machine as shown by the arrow 1 4 Wipe the outside of the machine with a dry lint free cloth to remove dust 5...

Страница 485: ...dry lint free cloth to remove dust 7 Place the paper support firmly back in the machine Make sure you fit the paper support into the channels 8 Slowly push the paper tray completely into the machine Related Information Clean Your Brother Machine 478 ...

Страница 486: ...s on each side of the machine to lift the scanner cover into the open position 2 Clean the machine s printer platen 1 and the area around it wiping off scattered ink with a dry soft lint free cloth 1 2 IMPORTANT DO NOT bend or apply too much pressure on the nine tabs 2 They could be damaged 3 Gently close the scanner cover using the finger holds on each side 4 Reconnect the power cord Related Info...

Страница 487: ...aper support 1 and then pull it at an angle completely out of the machine as shown by the arrow 1 5 Clean the front side of the Paper Feed Rollers 1 with a soft lint free cloth moistened with water using a side to side motion After cleaning wipe the rollers with a dry soft lint free cloth to remove all moisture 1 6 Lift the flap 2 and then clean the back side of the Paper Feed Rollers 1 with a sof...

Страница 488: ...9 Reconnect the power cord Do not use the machine again until the rollers are dry Using the machine before the rollers are dry may cause paper feed problems Related Information Clean Your Brother Machine Related Topics Paper Handling and Printing Problems 481 ...

Страница 489: ... is open close it and then close the paper support 2 Pull the paper trays 1 completely out of the machine as shown by the arrow Tray 1 1 Tray 2 MFC J3940DW 1 3 Clean the Base Pad 1 with a soft lint free cloth moistened with water After cleaning wipe the pad with a dry soft lint free cloth to remove any moisture 1 4 Slowly push the paper tray completely into the machine Related Information Clean Yo...

Страница 490: ...r tray 1 completely out of the machine as shown by the arrow 1 4 Lift the paper support 1 and then pull it at an angle completely out of the machine as shown by the arrow 1 5 Clean the Paper Pick up Rollers 1 with a soft lint free cloth moistened with water Slowly turn the rollers so that the whole surface is cleaned After cleaning wipe the rollers with a dry soft lint free cloth to remove all moi...

Страница 491: ...Related Information Clean Your Brother Machine Related Topics Error and Maintenance Messages Paper Handling and Printing Problems 484 ...

Страница 492: ...y 2 1 completely out of the machine as shown by the arrow 1 4 Clean the paper pick up rollers for Tray 2 1 with a soft lint free cloth moistened with water Slowly turn the rollers so that the whole surface is cleaned After cleaning wipe the rollers with a dry soft lint free cloth to remove all moisture 1 5 Slowly push Tray 2 completely into the machine 6 Reconnect the power cord Related Informatio...

Страница 493: ...e Check Your Brother Machine Check the Print Quality Check the Print Alignment from Your Brother Machine Check the Ink Volume Page Gauge Monitor Machine Status from Your Computer Windows Monitor Machine Status Using Brother iPrint Scan Windows Mac 486 ...

Страница 494: ...press Yes OK Poor 5 When the LCD message prompts you to check the print quality of each colour press the number of the pattern 1 4 that most closely matches the printing result 6 Do one of the following If print head cleaning is needed press Start to start the cleaning procedure If print head cleaning is not needed the menu screen reappears on the touchscreen Press 7 After the cleaning procedure i...

Страница 495: ...ead nozzle is cleaned the lines are gone Related Information Check Your Brother Machine Related Topics Paper Handling and Printing Problems Clean the Print Head from Your Brother Machine Check the Print Alignment from Your Brother Machine Correct the Paper Feed to Clear Vertical Lines 488 ...

Страница 496: ...Press Auto or Manual If you select the Auto mode the print alignment is automatically adjusted by scanning the check sheet If you select the Manual mode you need to input information printed on the check sheet manually 5 Select the paper size to print the check sheet on If you selected the Manual mode select either Basic alignment or Advanced alignment in the following step 6 Load specified size p...

Страница 497: ...nk level is low The ink cartridge needs to be replaced There is a problem with the ink cartridge To check or print the ink cartridge model numbers press Back to return to the Ink menu screen Press Ink Cartridge Model and follow the instructions on the touchscreen 2 Press You can also check the ink volume from your computer For detailed information about the measuring methods used for the approxima...

Страница 498: ... your model name if not already selected Click Tools in the left navigation bar and then click Status Monitor The actual screen may differ from the screen shown above Troubleshooting Click the Troubleshooting button to access the troubleshooting website Remaining Page Settings Click the Remaining Page Settings button to change the display settings for the approximate page yield Looking for replace...

Страница 499: ... Related Information Check Your Brother Machine Status Monitor Indicators and What They Mean Windows Turn Off the Show Status Monitor Feature Windows Turn Off the Status Monitor Windows Related Topics Cancel a Print Job Windows Check the Ink Volume Page Gauge 492 ...

Страница 500: ...dicators and What They Mean Windows When you start up your computer the Brother Status Monitor icon appears on the task tray A green icon indicates the normal stand by condition A yellow icon indicates a warning A red icon indicates an error has occurred A grey icon indicates the machine is offline Related Information Monitor Machine Status from Your Computer Windows 493 ...

Страница 501: ...ting is Only when printing from this PC To turn it off follow these steps 1 Right click the Brother Status Monitor icon or window select the Status Monitor Settings option and then click Options The Options window appears 2 Click the Show Status Monitor tab and then select Off for Status Monitor Display Options 3 Click OK Even if the Show Status Monitor feature is turned off you can check the mach...

Страница 502: ... Status from Your Computer Windows Turn Off the Status Monitor Windows Turn Off the Status Monitor Windows 1 Right click the Brother Status Monitor icon or window and then select Exit 2 Click OK Related Information Monitor Machine Status from Your Computer Windows 495 ...

Страница 503: ...rother iPrint Scan Mac In the Finder menu bar click Go Applications and then double click the iPrint Scan icon The Brother iPrint Scan screen appears 2 If your Brother machine is not selected click the Select your Machine button and then select your model name from the list Click OK Status icons Icon Description A green icon indicates the normal stand by condition A yellow icon indicates a warning...

Страница 504: ...ith the ink cartridge The actual screen may differ depending on the version of the application The remaining ink amount is approximate and may differ from the actual amount of remaining ink You can also check the remaining ink amount using Web Based Management Related Information Check Your Brother Machine 497 ...

Страница 505: ...confirmation message if a print quality check has been completed appears on the LCD 4 Press Auto or Manual If you select the Auto mode the paper feed is automatically adjusted by scanning the check sheet If you select the Manual mode you need to input information printed on the check sheet manually 5 Select the paper size to print the check sheet on 6 Load specified size paper in the tray and then...

Страница 506: ... the printer driver or in the application you use to print 1 Press Ink Print Options 2 Press one of the following options Option Description Reduce Smudging Select this option according to your paper type and whether you are using 1 sided or 2 sided printing if you have problems with smudged printouts or paper jams Reduce Uneven Lines Select this option according to your paper size if you have pro...

Страница 507: ...oises have stopped Not allowing the machine to finish this parking process may lead to print problems and possible damage to the print head 1 Unplug the machine from the electrical socket 2 Using both hands use the finger holds on each side of the machine to lift the scanner cover into the open position Then unplug the machine from the telephone wall socket and take the telephone line cord out of ...

Страница 508: ...If you are not able to find the orange protective part ship the machine without it DO NOT leave the ink cartridges in the machine during shipping 9 Close the ink cartridge cover 10 Wrap the machine in the bag 11 Pack the machine in the original carton with the original packing material as shown below Do not pack the used ink cartridge in the carton 501 ...

Страница 509: ...1 1 2 3 4 5 4 12 Close the carton and tape it shut Related Information Routine Maintenance Related Topics Replace the Ink Cartridges 502 ...

Страница 510: ...ine Settings Machine Settings Customise settings and features to make your machine a more efficient work tool Change Machine Settings from the Control Panel Change Machine Settings Using Web Based Management 503 ...

Страница 511: ...ine Settings from the Control Panel Change Machine Settings from the Control Panel In the Event of Power Failure Memory Storage General Settings Save Your Favourite Settings as a Shortcut Print Reports Settings and Features Tables 504 ...

Страница 512: ... menu settings are stored permanently and will not be lost Temporary settings for example Contrast and Overseas Mode are lost The date and time and programmed fax timer jobs for example Delayed Fax are retained for approximately 24 hours Other fax jobs in the machine s memory will not be lost Related Information Change Machine Settings from the Control Panel 505 ...

Страница 513: ...er Off Automatically Set the Date and Time Set the Time Zone Adjust the LCD Backlight Brightness Change How Long the LCD Backlight Stays On Set Your Station ID Set Tone or Pulse Dialling Mode Set a Prefix Dial Before Every Fax Number Prevent Dialling a Wrong Number Dial Restriction Reduce Printing Noise Change the Language Displayed on the LCD Change the Keyboard Setting 506 ...

Страница 514: ...eral Setup Volume 2 Press one of the following options Option Description Ring Adjust the ring volume Beep Adjust the volume when you press a button make a mistake or after you send or receive a fax Speaker Adjust the speaker volume 3 Press a or b to display the Off Low Med or High option and then press the option you want 4 Press Related Information General Settings 507 ...

Страница 515: ...fax Use these instructions to set a time delay countdown before the machine enters Sleep Mode The timer will restart if any operation is carried out on the machine such as receiving a fax or a print job The factory setting is three minutes 1 Press Settings All Settings General Setup Sleep Time 2 Enter the number of minutes 1 60 you want to set on the touchscreen and then press OK 3 Press When the ...

Страница 516: ...n on the machine after the Auto Power Off feature has turned it Off press The machine does not power off automatically when The machine is connected to a telephone line The machine is connected to a wired network The machine is connected to a wireless network WLAN Wi Fi is selected in the Network I F setting 1 Press Settings All Settings General Setup Auto Power Off 2 Press a or b to display the O...

Страница 517: ...Station ID 1 Press Settings 2 Press Date Time 3 Press Date 4 Enter the last two digits of the year on the touchscreen and then press OK 5 Enter two digits for the month on the touchscreen and then press OK 6 Enter two digits for the day on the touchscreen and then press OK 7 Press Time 8 Enter the time in 24 hour format using the touchscreen Press OK For example enter 19 45 for 7 45 PM 9 Press Rel...

Страница 518: ...m the Control Panel General Settings Set the Time Zone Set the Time Zone Set the time zone for your location on the machine 1 Press Settings 2 Press Date Time Time Zone 3 Enter your time zone 4 Press OK 5 Press Related Information General Settings 511 ...

Страница 519: ...LCD Backlight Brightness Adjust the LCD Backlight Brightness If you are having difficulty reading the LCD changing the brightness setting may help 1 Press Settings All Settings General Setup LCD Settings Backlight 2 Press the Light Med or Dark option 3 Press Related Information General Settings 512 ...

Страница 520: ...ays On Change How Long the LCD Backlight Stays On Set how long the LCD backlight stays on 1 Press Settings All Settings General Setup LCD Settings Dim Timer 2 Press a or b to display the 10 Secs 30 Secs 1 Min 2 Mins 3 Mins or 5 Mins option and then press the option you want 3 Press Related Information General Settings 513 ...

Страница 521: ...ter your name up to 20 characters using the touchscreen and then press OK Press to cycle between letters numbers and special symbols The available characters may differ depending on your country If you entered an incorrect character and want to change it press d or c to move the cursor to it Press and then enter the correct character To enter a space press Space 6 Press Related Information General...

Страница 522: ...Mode Your machine is set for a Tone dialling service If you have a Pulse dialling rotary service you must change the dialling mode This feature is not available in some countries 1 Press Settings All Settings Initial Setup Tone Pulse 2 Press Tone or Pulse 3 Press Related Information General Settings Related Topics Telephone and Fax Problems 515 ...

Страница 523: ... symbols If your telephone system requires a time break recall hookflash press on the LCD If pulse dialing mode is on and are not available to use 1 Press Settings All Settings Initial Setup Dial Prefix 2 Press On or Off You can turn off the prefix number by pressing Off The prefix number will remain off until you press On 3 Press Dial Prefix 4 Enter the prefix number up to 5 digits using the touc...

Страница 524: ...ecognised as dial pad input and will not be restricted Shortcuts 3 Press one of the following options Option Description Enter Twice The machine will prompt you to re enter the number If you re enter the same number correctly the machine will start dialling If you re enter the wrong number the touchscreen will show an error message On The machine will restrict all fax sending and outbound calls fo...

Страница 525: ...rinting noise When Quiet Mode is turned on the print speed becomes slower The factory setting is Off When the Quiet Mode setting is turned on appears on the Home screen 1 Press Settings All Settings General Setup Quiet Mode 2 Press On or Off 3 Press Related Information General Settings Related Topics Touchscreen LCD Overview Paper Handling and Printing Problems 518 ...

Страница 526: ...nge the Language Displayed on the LCD Change the Language Displayed on the LCD Change the LCD language if needed This feature is not available in some countries 1 Press Settings All Settings Initial Setup Local Language 2 Press your language 3 Press Related Information General Settings 519 ...

Страница 527: ...ol Panel General Settings Change the Keyboard Setting Change the Keyboard Setting You can choose the type of keyboard for the LCD 1 Press Settings All Settings General Setup Keyboard Settings 2 Press QWERTY or ABC 3 Press Related Information General Settings 520 ...

Страница 528: ...ttings Change Machine Settings from the Control Panel Save Your Favourite Settings as a Shortcut Save Your Favourite Settings as a Shortcut Add Shortcuts Change or Delete Shortcuts Assign a Shortcut to an IC Card 521 ...

Страница 529: ...ess a tab from 1 to 3 3 Press where you have not added a Shortcut 4 Press Copy 5 Press Options 6 Press a or b to display the available settings and then press the setting you want to change 7 Press a or b to display the available options for the setting and then press the option you want Repeat the previous and this steps until you have selected all the settings for this Shortcut When finished pre...

Страница 530: ...e the Shortcut press Delete To edit the name of the Shortcut press Rename and follow the LCD menus 5 Press Options 6 Press a or b to display the available settings and then press the setting you want to change 7 Change the settings for the Shortcut you selected Press OK 8 Press OK when you have finished changing the settings 9 Press OK to confirm When changing Fax or Scan Shortcuts you will be ask...

Страница 531: ...ttings Change Machine Settings from the Control Panel Save Your Favourite Settings as a Shortcut Assign a Shortcut to an IC Card Assign a Shortcut to an IC Card Assign a Shortcut to an IC Card with IC Card Reader 524 ...

Страница 532: ...s address bar where machine s IP address is the machine s IP address For example https 192 168 1 2 3 If required type the password in the Login field and then click Login The default password to manage this machine s settings is located on the back of the machine and marked Pwd 4 Go to the navigation menu and then click Administrator External Card Reader Start from if the navigation menu is not sh...

Страница 533: ...Related Topics Access Web Based Management 526 ...

Страница 534: ...Home Machine Settings Change Machine Settings from the Control Panel Print Reports Print Reports Reports Print a Report Fax Reports Telephone and Fax Problems 527 ...

Страница 535: ...rints a list of information about your last 200 incoming and outgoing faxes TX means Transmit RX means Receive User Settings The User Settings report prints a list of your current settings Network Configuration network models The Network Configuration report prints a list of your current network settings WLAN Report wireless models The WLAN Report prints the wireless LAN connectivity diagnosis Cal...

Страница 536: ...rol Panel Print Reports Print a Report Print a Report 1 Press Settings All Settings Print Reports 2 Press a or b to display the report options and then press the option you want 3 Press Yes 4 Press Related Information Print Reports Related Topics Caller ID 529 ...

Страница 537: ...hange Machine Settings from the Control Panel Settings and Features Tables Settings and Features Tables Settings Tables 2 7 67 5 mm 3 5 87 6 mm Touchscreen models Features Tables 2 7 67 5 mm 3 5 87 6 mm Touchscreen models 530 ...

Страница 538: ...ting menus Wi Fi Direct Access the Wi Fi Direct setting menus Network I F Select the network connection type Tray Setting Access the tray setting menus Fax Preview View received faxes on the LCD Receive Mode Select the Receive Mode that best suits your needs All Settings Configure the detailed settings General Setup All Settings General Setup Level 3 Level 4 Level 5 Descriptions Maintenance Improv...

Страница 539: ...e paper tray 2 MP Tray Paper Type Set the type of paper in the MP tray Paper Size Set the size of paper in the MP tray Tray Setting Copy Tray Select Select the tray to be used for copying Tray Priority Change the tray priority for copying Tray Setting Fax Tray Select Select the tray to be used for faxing Tray Priority Change the tray priority for faxing Tray Setting Print Tray Priority Change the ...

Страница 540: ...t Settings All Settings Shortcut Settings Level 3 Level 4 Descriptions Select a shortcut button Rename Change the shortcut name Edit Change the shortcut settings Delete Delete the shortcut Register Card NFC Assign a Shortcut to an IC card Delete Card NFC Remove a Shortcut from an IC card Fax All Settings Fax Level 3 Level 4 Level 5 Descriptions Setup Receive Ring Delay Set the number of rings befo...

Страница 541: ...al Pad Restrict dialling when using the dial pad Address Book Restrict the dialling when using the Address Book Shortcuts Restrict the dialling when using a Shortcut Remaining Jobs Check which scheduled jobs are in the machine s memory and cancel selected jobs Miscellaneous Caller ID Type Switch the mode if Caller ID cannot be displayed normally Fax Mode Select the transmission process when sendin...

Страница 542: ... IP address of the primary or secondary WINS server DNS Server Specify the IP address of the primary or secondary DNS server APIPA Set the machine to allocate the IP address from the link local address range automatically IPv6 Turn the IPv6 protocol on or off WPS Push Button Configure your wireless network settings using the one button push method WPS PIN Code Configure your wireless network setti...

Страница 543: ... always indicates a strong signal I F Enable Turn the Wi Fi Direct connection on or off NFC MFC J3940DW Turn the NFC function on or off E mail IFAX Mail Address Enter the email address Up to 60 characters Setup Server SMTP Server Enter the SMTP server name and address Port Enter the SMTP port number Auth for SMTP Select the Security method for email notification SSL TLS Send or receive an email vi...

Страница 544: ...ls Notification Receive notification messages Setup Mail TX Sender Subject View the subject Size Limit Size Limit Limit the size of email documents Maximum Size MB Notification Send notification messages Setup Relay Relay Broadcast Relay a document to another fax machine Relay Domain Register the Domain name Relay Report Print the relay Broadcast Report Manual Receive Manually check the POP3 or IM...

Страница 545: ...nformation of the last 30 received faxes and telephone calls Machine Info All Settings Machine Info Level 3 Level 4 Descriptions Serial No Check your machine s serial number Firmware Version Main Version Check your machine s firmware version Security Version Firmware Update Update your machine to the latest firmware Firmware Auto Check View firmware information on the Home screen Page Counter Chec...

Страница 546: ... regularly experience fax transmission errors select Basic for VoIP Reset Machine Reset Restore all the machine s settings that you have changed such as Date and Time Network Restore all network settings back to the factory settings Address Book Fax Erase all stored phone numbers and fax settings All Settings Restore all the machine s settings back to the factory settings Local Language Available ...

Страница 547: ...swered and then press Fax Start Address Book Search Search within the Address Book Edit Store Address Book numbers set up Group numbers for Broadcasting and change and delete Address Book numbers Apply Start sending a fax using the Address Book Call History Redial Redial the last number you dialled Outgoing Call Apply Select a number from the Outgoing Call history and then send a fax to it add it ...

Страница 548: ...end a fax to it add it to the Address Book or delete it Address Book Search Search within the Address Book Edit Store Address Book numbers set up Group numbers for Broadcasting and change and delete Address Book numbers Set New Default Save your settings as the default Factory Reset Restore all settings back to the factory settings Save as Shortcut Save the current settings as a shortcut When Fax ...

Страница 549: ...atch TX Combine delayed faxes to the same fax number at the same time of day into one transmission Real Time TX Send a fax without using the memory Overseas Mode Set to On if you have difficulty sending faxes overseas Call History Redial Redial the last number you dialled Outgoing Call Select a number from the Outgoing Call history and then send a fax to it add it to the Address Book or delete it ...

Страница 550: ...aller ID History Apply Select a number from the Caller ID History and then send a fax to it add it to the Address Book or delete it Edit Copy Level 3 Level 4 Level 5 Descriptions Save as Shortcut Save the current settings as a shortcut ID Make an ID card copy Options Quality Select the Copy resolution for your document type Document Size Select the document size option you want Tray Select MFC J39...

Страница 551: ... settings back to the factory settings Scan Level 3 Level 4 Level 5 Level 6 Descriptions to Media When a USB Flash drive is inserted Other Scan to Actions Scan documents and save them directly to a USB flash drive without using a computer Options Save as Shortcut to PC to File Other Scan to Actions Scan documents and save them to a folder on your computer Select USB or PC Options Save as Shortcut ...

Страница 552: ...ther Scan to Actions Scan documents directly to an FTP server Select Profile name Options Save as Shortcut to Network Other Scan to Actions Scan documents directly to a CIFS server on your local network Select Profile name Options Save as Shortcut WS Scan Appears when you install a Web Services Scanner which is displayed in your computer s Network explorer Other Scan to Actions Scan data using the...

Страница 553: ...r your document type Document Size Select the document size option you want Tray Select MFC J3940DW Set the machine to automatically select the tray that contains the most appropriate paper Paper Type View the available paper type Paper Size Set the size of paper in the paper tray Density Adjust the density Auto Deskew Set the machine to correct a skewed copy 2 in 1 ID Copy Level 1 Descriptions 2 ...

Страница 554: ... scanned data via FTP This list appears when each Shortcut icon is pressed for 2 seconds Rename Change the shortcut name Edit Change the shortcut settings Delete Delete the shortcut Register Card NFC Assign a Shortcut to an IC card Delete Card NFC Remove a Shortcut from an IC card Edit Delete Select shortcut button Rename Change the shortcut name Edit Change the shortcut settings Delete Delete the...

Страница 555: ...e Check View your ink cartridge information Print Quality Auto Check Automatically detects the Print Head condition and cleans the Print Head when needed Wi Fi Setup Level 2 Descriptions Find Wi Fi Network Configure your wireless network settings manually WPS Push Button Configure your wireless network settings using the one button push method When you have put a USB Flash drive in the USB slot Le...

Страница 556: ... utility that uses a standard web browser to manage your machine using the Hyper Text Transfer Protocol HTTP or Hyper Text Transfer Protocol over Secure Socket Layer HTTPS What is Web Based Management Access Web Based Management Set or Change a Login Password for Web Based Management Set Up Your Machine s Address Book Using Web Based Management 549 ...

Страница 557: ...TTPS We recommend Microsoft Internet Explorer 11 Microsoft Edge for Windows Safari 13 for Mac Google Chrome for Android 4 x or later and Google Chrome Safari for iOS 10 x or later Make sure that JavaScript and Cookies are always enabled in whichever browser you use You must use the TCP IP protocol on your network and have a valid IP address programmed into the print server and your computer The ac...

Страница 558: ...ecure HTTPS connection When you use HTTPS for Web Based Management configuration your browser will display a warning dialog box To avoid displaying the warning dialog box you can install a self signed certificate to use SSL TLS communication For more detailed information see Related Information Start from Your Web Browser Start from Brother iPrint Scan Windows Mac Start from Brother Utilities Wind...

Страница 559: ... Click Tools in the left navigation bar and then click Machine Settings Web Based Management appears 3 If required type the password in the Login field and then click Login 4 If you want to pin the navigation menu on the left side of the screen click and then click You can now change the machine settings If you change the protocol settings you must restart the machine after clicking Submit to acti...

Страница 560: ...Change Machine Settings Using Web Based Management Related Topics Print the Network Configuration Report Create a Self signed Certificate Install the Self signed Certificate for Windows users with Administrator Rights 553 ...

Страница 561: ... a NetBIOS name you can also use the node name For example https brnxxxxxxxxxxxx The NetBIOS name can be found in the Network Configuration Report 3 Do one of the following If you have previously set your own password type it and then click Login If you have not previously set your own password type the default login password and then click Login 4 Go to the navigation menu and then click Administ...

Страница 562: ...stem or enable a NetBIOS name you can type another name such as SharedPrinter instead of the IP address For example https SharedPrinter If you enable a NetBIOS name you can also use the node name For example https brnxxxxxxxxxxxx The NetBIOS name can be found in the Network Configuration Report 3 If required type the password in the Login field and then click Login The default password to manage t...

Страница 563: ...Home Appendix Appendix Specifications Supply Specifications To create a better environment Brother Help and Customer Support 556 ...

Страница 564: ...cifications Printer Type Inkjet Print Head Mono Piezo with 420 nozzles x 1 Colour Piezo with 420 nozzles x 3 Memory Capacity 256 MB LCD liquid crystal display 1 MFC J3540DW 2 7 in 67 5 mm TFT Colour Touchscreen LCD MFC J3940DW 3 5 in 87 6 mm TFT Colour Touchscreen LCD Power Source AC 220 to 240 V 50 60 Hz Power Consumption 2 MFC J3540DW Copying 3 Approx 29 W Ready 4 Approx 5 W Sleep 4 Approx 0 9 W...

Страница 565: ...0DW 23 4 kg Noise Level Sound Pressure 6 Operating Printing 50 0 dB A Approx Copying using the scanner glass 51 5 dB A Approx Temperature Operating 10 to 35 C Best Print Quality 20 to 33 C Humidity Operating 20 to 80 without condensation Best Print Quality 20 to 80 without condensation Automatic Document Feeder ADF Up to 50 pages 558 ...

Страница 566: ... Paper Type 1 Plain Paper Inkjet Paper coated paper Glossy Paper Recycled Paper Paper Size Landscape A4 Letter Executive B5 JIS Portrait A3 Ledger B4 JIS Legal Mexico Legal India Legal Folio A5 B6 JIS A6 Envelopes C5 Com 10 DL Monarch Photo 10 x 15 cm Photo L 9 x 13 cm Photo 2L 13 x 18 cm Index card 13 x 20 cm 16K 195 x 270 mm Maximum Paper Capacity Up to 250 sheets of 80 gsm plain paper Paper Tra...

Страница 567: ...sm Plain Paper face up print delivery to the output paper tray Over A4 Letter size paper Up to 50 sheets of 80 gsm Plain Paper face up print delivery to the output paper tray 1 For glossy paper remove any printed pages from the output paper tray immediately to avoid smudging 2 We recommend using the MP tray for glossy paper Fax Specifications Compatibility ITU T Super Group 3 Modem Speed Automatic...

Страница 568: ...C J3940DW Paper Type Plain Paper Recycled Paper Paper Size A3 Ledger Legal Mexico Legal India Legal Folio A4 A5 Letter 1 When copying on A3 size paper USB Flash Drive Specifications Compatible Media USB Flash drive 1 JPEG Print Resolution Up to 1200 x 4800 dpi Paper Type Plain Paper Inkjet Paper coated paper Glossy Paper Recycled Paper Paper Size A4 Letter A3 Ledger Photo 10 x 15 cm Photo 2L 13 x ...

Страница 569: ... 2 297 mm Borderless A4 Letter A3 Ledger A6 Photo 10 x 15 cm Photo L 9 x 13 cm Photo 2L 13 x 18 cm Index card 13 x 20 cm Automatic 2 sided Paper Type Plain Paper Recycled Paper Paper Size A3 Ledger B4 JIS Legal Mexico Legal India Legal Folio A4 A5 Letter Executive B5 JIS B6 JIS 16K 195 x 270 mm Print Speed See your model s page on your local Brother website 1 When printing on A3 size paper 2 When ...

Страница 570: ...tware Functions Computer Platform Operating System Version PC Interface Processor Hard Disk Space to Install 1 USB 2 Wired LAN WLAN Wi Fi For Drivers For Applications Including Drivers Wind ows Oper ating Syste m Windows 7 SP1 3 4 5 Windows 8 1 3 4 Printing PC Fax 6 Scanning 32 bit x86 or 64 bit x64 processor 650 MB 1 3 GB Windows 10 Home 3 4 Windows 10 Pro 3 4 Windows 10 Education 3 4 Windows 10 ...

Страница 571: ...ndows 10 Education and Windows 10 Enterprise 5 Windows 7 SP1 Windows Server 2008 Windows Server 2008 R2 supported by Extend Security Updates until Jan 10 2023 6 PC Fax supports black and white only 7 Mac OS Disclaimer AirPrint capable Printing or scanning via macOS requires the use of AirPrint Mac drivers are not provided for this machine 8 AirPrint only For the latest driver updates go to your mo...

Страница 572: ...appen once After this process is complete the cartridges provided with your machine will have a lower yield than the replacement cartridges With all following ink cartridges you can print the specified number of pages Replacement Supplies Black LC492XLBK Yellow LC492XLY Cyan LC492XLC Magenta LC492XLM Black Approximately 3000 pages 1 Yellow Cyan and Magenta Approximately 1500 pages 1 1 All replacem...

Страница 573: ... follow and carry on relevant local regulations properly 3 When the machine need replacing parts for the maintenance and repair please discard used circuit boards used electrical parts and products as disposed electrical materials 4 The power consumption is 0 W after you turn off the machine and unplug it from the AC outlet 5 Some parts in the machine can be used on the same series model machines ...

Страница 574: ...tional assistance call the call center in mainland China To seach Frequently asked questions FAQs ASCs Driver Manuals etc please visit our service website support brother com To search where to purchase consumables please visit the official website of BROTHER CHINA LTD www brother cn Related Information Appendix 567 ...

Страница 575: ...CHN ENG Version 0 ...

Отзывы: