background image


G

#$#6%7$$

.    /


!

 !"

 !"# $" % &#" '!$'"!()! $"!()! %!*( !(*($*!(+,$(*(!)! &-!

 $ %!*( !(.

/
 !"$ !"#"!0#+ *" $(!&!&'!(1%!"!()- %!*( !(.


SS+   T9,$)$FU    


##  #

$ % # 

# &

  ##

#'# &

 % #!((


Содержание hl 1650 - B/W Laser Printer

Страница 1: ... ...

Страница 2: ... 0 1 23 4 23 45 1 6 6 6 78 9 0 ...

Страница 3: ... 2 7 7 ...

Страница 4: ... 21 0 1 8 1 19 1 2 8 A A 2 5 1 B A C 5 4 5 2 4 5 5 B B 5 1 8 B B A 8 7 8 1D0 17 28 8 1 9 E 0 F 61 1 2 0 A A 5 2 9 E 0 B 2 0 A F 1 687 A A A 2 A A 5 A 2 8 2 C A A 7 G C A 5 2 4 ...

Страница 5: ...5 A H A 5 5 A 5 B A 5 7 7 A 5 5 5 B 5 A 6 0 C 5 5 4 5 5 5 5 5 5 D 5 5 A 5 5 5 5 5 B A 5 5 C A 5 5 4 5 5 5 5 5 5 B 5 5 B 5 B 8 2 A 5 B A 5 B A B 1 98 8 7 8 1 8 A B A B 2 A B 17 A B 2 A 1 1 8 F 7 7 8 5 2 8 B A 7 C 5 8 B C 11 8 4 1 8 8 A 1 ...

Страница 6: ...1 6 B 8 B 4 4 4 A 7 G 73 73 I A 5 B A 7 0 A A A A A 5 B B B 1G A B 7 5 B A 5 B 5 2 G B 21 J 1 0 8 A 7 1 J 2 89 A 7 1 J 8 170 1 A A 7 0 A A A A 2 6 BC A 5 A B 73 2 J A B C A 4 A J A 0 J A 5 0 A B 2 G 0 A C J A A 2 0 A A ...

Страница 7: ...5 0 A 5 17 0 1 A 5 A 2 J A 5 5 2 2 J A 5 B 1G 0 A 55 C 6 9 2 A 5C A F A 54 8 0 1 5 7 0 5 5 1 87 1 1 1 5 5 1 87 1 F 5 B 1G 5 B 7 0 5 B 9 5 C A 1 5 4 A 2 5 870 8 B B 9 9 B B 8 1 8 1 1 B A 8 B A B B 1 8 1 B B B B B 2 B A 82 9 1 1 F 8 1 B 5 20 8 B 5 B F1 7121 B B 7 1G B ...

Страница 8: ... 4 C 9 5 4 6 B 54 4 4 9 5 4 A 8 B 54 4 B 54 4 B 5 4 B 5 4 4 B B B 4 9 B B 1 8 871 B B 1 B B B B 1 1 F 6 771 20 8 1 0 871 C 821 8 1 0 871 C 1 7 C 2 C 1 1 1 0 871 C C 1 C C 2 C C A 8 61 6 771 20 8 1 0 C A 6 2 1 9 C A 7 2 C A 2 C 8 1 8 7 F 6 B5 BC 0 7 F 6 B5 BC B 0 7 F 6 B5 BC B A 0 7 F 6 B5 BC B A 5 0 7 F 6 B5 BC A B 5 ...

Страница 9: ... 4 1 F 1 0 7 F 6 B5 BC 1 98 8 7 0 7 F 6 B5 BC 89 8 F1 891 0 J 0 7 F 89 8 F1 891 0 J 0 7 F 6 F6 8 F1 891 0 J 0 7 F A 1 8 71 8 A 5 7 1 1 0 21 1 1 82 8 1 B B 117 9 6 80 1 F C C 689 8 89 7 0 0 21 F1 80 1 4 4 689 8 0 1 61 1 2 7 F 8 88 712 0 01 C 1 1 1 28 8 28 10 8 1 8 J 4 ...

Страница 10: ... 0 7 6 6 766 6 B4 I G 0 2 7 27 CB 0 8 27 0 02 0 17 8 61 70 1 7 5 I ABC 45B 27 2 02 0 17 8 61 I 2 F F F I 6 27 2 0 0 I G ...

Страница 11: ... G 1 1 4 5 0 0 0 0 I G 2 3 3 4 3 5 5 K L L L L L M L L L L L L L M L L N 8 L O L L L L M O M L M ...

Страница 12: ...SSA OLET ALTTIINA NÄKYMÄTTÖMÄLLE LASERSÄTEILYLLE ÄLÄ KATSO SÄTEESEEN LUOKAN 3B LASERLAITE ADVARSEL USYNLIG LASERSTRÅLING UNNGÅ DIREKTE KONTAKT MED LASERENHETEN NÅR TOPPDEKSELET ER ÅPENT KLASSE 3B LASERPRODUKT ATTENTION RADIATIONS LASER INVISIBLES QUANDOUVERT ET VERROUILLAGE ENLEVE EVITER EXPOSITIONS DIRECTES AU FAISCEAU PRODUIT LASER CLASSE 3B VORSICHT UNSICHTBARE LASERSTRAHLUNG WENN ABDECKUNG GEÖ...

Страница 13: ... G 6 7 0 1 SS T9 FU ...

Страница 14: ... G ...

Страница 15: ... 0 1 2 23 0 1 4 1 56 7 0 8 1 9 1 8 0 3 1 1 2 23 5 9 8 8 ...

Страница 16: ... 0 12223 4 5 0 6 56 7 0 5 7 AB 3 0 B 1 6 1 C 4 7 7 0 7 5 5 6 7 5 75 9 9 6 D 0 E 8 F 1 D 0 0 E 1 D 7 5 E F 5 2 4 4 3 5 3 4 4 5 4 3 5 5 782 4 0 1 G 2 23 0 1 G 4 1 G 4 B 4 0 4 1 A 4 H ...

Страница 17: ... 1 9 9 1 0 5 A 0 5 A A 7 5 A 5 6 ...

Страница 18: ... 1 I C3 I 1 7 1 G 2 23 0 1 4 G 1 G 0 1 G 2 23 0 1 4 G 1 G 6 0 1 G 2 23 0 1 4 G 1 G 0 9 4 F F 4 I 6 I C J 1 0 5 C A A 0 I F 6 6 I 0 1 2 0 3 4 ...

Страница 19: ... 1 5 A 0 3 3 0 1 5 7 4 AB 3 0 B D 5 6 E 1 2 23 0 1 4 1 G 4 5 D 6 E 6 1 2 23 0 1 4 1 G 0 D E 0 0 0 C B 6 0 I 3 0 C 4I 0 0 0 C 4 6 00J 5 6 56I 6I 6 C 6 0 5 6 7 7 8 77 7 9 7 7 9 9 7 5 5 ...

Страница 20: ... 5 I 5 K I 5 K I 1 I 3 1 JI 1 4 I I I 5 2 A 4 I 5 3 A I 5 A I 3 F I 3 F 6 C 1 6 C 3 I 3 C 1 3 C 6 7 5 5 5 6 ...

Страница 21: ... C B 5 7 7 6 5 4 1 4 7 6 2 0 0 A 4 40 A 4 B B 46 6 5 5 4 6 5 K 4 0 1 0 6 7 5 B B 40 0 0 4 4 5 75 4A H 6 4 5 4 A 5 56 A A 7 0 4 5 A 5 B B 7 7 1 2 23 1 4 1 1 2 23 1 4 1 7 1 2 23 4 0 ...

Страница 22: ... 3 6 3 3 6 A 3 1 I C 3 I C D E 3 3 F F ...

Страница 23: ... 2 D0 E 6 C 2 3 3 3 F F F F 7 B 3 B 3 H B 3 B 6 5 7 5 3 0 5H 0 5H C L 3 5 7 5 6 6 A 5 8 7 5 5 5 7 5 A 5 0 5 7 5 5 5 7 57 7 5 B 5 7 5 7 6 7 5 6 7 B 6 C 6 57 5 7D 6 0 5 57D 5 5 7 5 3 7D 75 5 57 0 5 7 A ...

Страница 24: ... 1 3 3 I 3 I I 3 6 A I 0 3 A I 0 3 7 6 0 6 7 6 6 7 5 0 6 7 5 6 1 6 ...

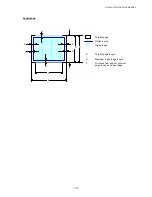
Страница 25: ... 7 7 0 0 A B C D E F G F G E G G Physical page Printable area Logical page B Physical page length D Maximum logical page length F DIstance from edge of physical page to edge of logical page ...

Страница 26: ... 2C 2M C M C M 3 3 M C 3 CM 3 CM 3 CM 3 M 7 M 3 3 M C 2 M 23 3 3 M C M B 4 3 C M C M C 2M C C M M 4 C 2 M C3 2 3 M 2 M 2 2 3 M 2 M 7 2 M C C 2 M C3 M C 2 M C3 M 2 C3 M C 2 M 3 2 M 3C 2 M 3 M C M 23 3C M 2 C M 3 C CM 2 C M M 3M 2 2 2 M C 2M CC 2 2 M C M C M M 22 3 M 23 23 3 M C 3 M 23 M 7 5 7 7 E B7 C 5 ...

Страница 27: ... A B C D E F G F G E G G Physical page Printable area Logical page B Physical page length D Maximum logical page length F D istance from edge of physical page to edge of logical page ...

Страница 28: ... 3 3 2M 2 M 3 CM 3 3 3 M C C 3CM 3 3 M C M 7 3 3 M C M 3 M M M B 4 C M 3 C M C 2 C M 2 3 C M M 4 2 3 M 2 C 2 M C3 2 M 3 C 2 M C3 M 7 C 2 M C3 2 M C M 2 2 M C M 2 2 M 3 C3 M C 2 M C C3 M C M M 2 C M 23 3C M 3 C M 23 3C M M 2 2 M C 3M 2 2 3 M 3 3M 2 3 2M 2 M 3 M 23 M 22 3 M 3 M 22 M 7 5 7 7 E B7 C 5 7 1 70 8 ...

Страница 29: ... 0 1 2 0 2 0 3 4 5 6 5 7 1 8 9 1 3 5 7 3 5 3 5 1 1 3 5 1 3 ...

Страница 30: ... 0 5 0 0 1 ...

Страница 31: ... A 4 5 B 7 97 9 5 B 1 5 B 43 0 CCC 1 0 1 0 2 0 3 4 5 6 0 3 4 7 4 1 0 4 4 0 4 D 4 1 0 4 4 ...

Страница 32: ... 1 2 0 0 1 1 1 5 2 0 13 8 0 9 6 2 0 0 0 6 ...

Страница 33: ... E 0 0 14 1 0 C Reprint Data Go Job cancel Back Set READY 15 1 F 0 8 0 0 0 2 0 0 C ...

Страница 34: ... 2 6 0 G 9 H 4 1 2 0 1 0 7 I 0 4 43 2 0 1 0 G 9 H 4 43 0 7 0 1 0 43 0 A 6 0 B 2 0 1 2 0 0 2 0 1 8 9 8 2 ...

Страница 35: ... I A 5 B I 0 1 4 3 E 9 I 1 7 0 A 0 A 6 A A 3 0 3 3 3 3 0 4 0 1 4 3 3 ...

Страница 36: ... 1 1 3 0 5 3 0 9 5 C 0 C 0 0 5 6 0 0 5 0 G 9 H 4 2 1 0 7 I 4 1 1 0 7 4 0 6 3 For Network shared printer users A 4 J 0 19 ...

Страница 37: ... 4 For Brother Peer to Peer network printer users LPR recommended Peer to Peer printing method KA 5 B 7 97 9 L 4 GE H 0 7 C 3E 0 7 4 J 0 0 1 1 0 A KA 5 B 1 9 5 B L 4 GE H 0 7 00 2 C D 1 0 7 C J BC 0 7 1 0 ...

Страница 38: ... 5 For Brother Peer to Peer network printer users NetBIOS 4 3 4 0 7 C 0 C 0 3 J 0 1 0 A 6 0 0 43 B 1 0 3 E 9 I 1 ...

Страница 39: ... 6 1 0 1 1 0 E 5 M 0 0 B 1 2 666666 0 6 1 E A I 0 1 3 M E 5 699 ...

Страница 40: ... 3 0 N 3 2 A OE J O J C 3 1 0 A O J C 8 2 0 0 0 0 2 E 0 0 8 2 5 N 1 4 1 5 1 ...

Страница 41: ... 0 0 1 00 0 0 5 0 72 0 0 0 2 0 1 2 1 9 1 ...

Страница 42: ... 1 3 D E 4 C 0 C C C C C C C C C C C 0 2 1 00 F 0 F 0 0 6 0 0 2 E 0 0 8 2 5 N 1 1 1 0 0 1 ...

Страница 43: ... 00 0 0 5 0 72 0 0 1 6 1 5 D 7 2 1 3 1 0 1 0 0 0 0 0 2 0 1 F 2 00 0 3 2 F F 4 C 0 0 2 2 1 1 00 F 0 0 5 7 1 0 0 F F 0 ...

Страница 44: ... 5 N A 5 1 4 1 5 0 0 1 00 0 0 0 5 0 72 0 0 1 2 1 ...

Страница 45: ... I 3 D E 5 0 0 5 N 1 9 1 1 2 3 3 D 7 E 5 7 97 9 5 1 5 1 2 0 1 E E 9 5 N E 5 1 E 2 1 F 0 0 6 0 2 F 00 ...

Страница 46: ... 4 0 3 4 E ACC P C 00 00 0 0 0 2 0 0 0E 00 8 0 2 0 ...

Страница 47: ... 7 4 EC I EC E 5 Reprint Data Go Job cancel Back Set 1 4 EC 3 0 EC E ...

Страница 48: ... 4 I 0 F G 2 F F HF 1F F 0 C C 9 G 2 4 4 777 H 1 0 0 4 4 F 0 4 0 C C C 0 A C 4C 0 0 2 4C 4C 2 0 F 3 1 0 4 G 2 G 2 5 GNO DATA H 2 GJOB CANCELLIGH 2 GREADYH ...

Страница 49: ... 4 2 0 READY 5 4C C 5 6 4 C 4 4 QC 4C 3 H 3 2 1 00 G H 2 0 0 0 0 2 2 0 0 2 0 NO DATA STORED 0 2 3 0 F 2 0 0 4 5 1 I 0 COPIES 1 COPIES 999 ...

Страница 50: ... 6 7 8 4 C 4C 1 2 0 PRESS SET TO PRINT F 1 0 F 4C C 4 0 5 F 0 2 0 J I 0 F 0 C H COPIES 1 COPIES 3 REPRINTING ...

Страница 51: ...2 8 8 9 E GNO DATA STORED H 9 6 4 ODELETE STORAGEJ 4C 4 2 9 2 6 G 2 2 G 2 2 H 1 LAST JOB SECURE USER XXXXXXX NO DATA STORED JOB XXXXXXX PASSWORD XXXX COPIES 1 PRINTING H I H I 2 2 0 GPRESS SET TO PRINTH ...

Страница 52: ... 1 4 3 H 6 1 H I C E H I C E H I H I 0 H I H I 4 4 C E 0 4 5 C E 3 0 3 0 5 3 0 5 0 4 3 0 0 2 1 0 0 1 0 2 0 00 0 4 5 5 0 0 A C O 3EC4 FJ ...

Страница 53: ... 4 0 E 0 F 9 F R 5 C 9 4 9 4 4 ...

Страница 54: ... 4 6 READY PROCESSING 3 SLEEP PRINTING SELF TEST PAUSE F NOW INITIALIZING WARMING UP MEMORY SIZE XX MB 88 3 JOB CANCELING 2 RESOLUTION ADAPT PRESS SET TO PRINT 4 RESET TO FACTORY SETTING ...

Страница 55: ... I 4 3 N H I E C 5 0 777 5 0 6 5 O A 4 J READY INFORMATION PAPER SOURCE MP FIRST OFF ON ON H H I 0 4 H H 0 G ...

Страница 56: ... 4 4 A INFORMATION6 A O A J PAPER6 A O C J QUALITY6 A OS E J SETUP6 A 1 O4C J PRINT MENU6 A O C J NETWORK6 A O C 5 O INTERFACE6 A I O C A CJ RESET MENU6 A O C4C C J ...

Страница 57: ...INT FONTS 21 SER NO ROM VER 0 ROM DATE NET VER 0 NET DATE 0 VERSION RAM SIZE MB PAGE COUNTER REMAIN DRUM REMAIN PF KIT1 REMAIN PF KIT2 REMAIN FUSER MAINTENANCE REMAIN LASER 4 4 SOURCE P 9 9 9 M MP FIRST P AA 9 A MANUAL FEED P AA 9 DUPLEX P AA 9 E F 3 9 4 3 M P P P ...

Страница 58: ... 4 9 U LCD DENSITY P 9 9 POWER SAVE TIME P 77 AUTO CONTINUE P AA 9 P AA 9 9 0 LOCK PANEL 44 PVVV REPRINT P 9 AA PAGE PROTECTION C P AA EC C 1 ECF E EMULATION P C 4 9 3 9 E 4C RC 9 U KEEP PCL P AA 9 RAMDISK SIZE P 9 9 U 3 C4 W 21 SECURE FILE 4 2 DATA ID PVVVV MACRO ID PVVVV FONT ID PVVVV DELETE STORAGE FORMAT W ...

Страница 59: ...1 X OFFSET 0 X Y PRINT POSITION Y OFFSET 0 X Y AUTO FF OFF P AA 9 6 677 0 FF SURPRESS P AA 9 9 FONT NO P 6WWWWW FONT PITCH POINT PWWW WW SYMBOL CHARACTER SET 9 U 4 TABLE PRINT AUTO LF OFF P AA 9 6 YEA AA6 AUTO CR OFF P AA 9 6 EA EAY AAY Z Z Y AA6 A A AA AA Z Z AUTO WRAP OFF P AA 9 E HP LASERJET AUTO SKIP ON P AA 9 E ...

Страница 60: ... 4 6 H A 6 HP LASERJET LINES PVVVV 4 FONT NO P 6WWWWW FONT PITCH POINT PWWW WW SYMBOL CHARACTER SET 9 U 4 TABLE PRINT AUTO LF OFF P AA 9 6 YEA AA6 AUTO MASK P AA 9 LEFT MARGIN PVVVV 4 RIGHT MARAGIN PVVVV 4 TOP MARGIN PVVVV 4 6 H A P BOTTOM MARGIN PVVVV 4 6 H A P EPSON FX 850 LINES PVVVV 4 ...

Страница 61: ... CHARACTER SET 9 U 4 TABLE PRINT AUTO LF OFF P AA 9 6 YEA AA6 AUTO CR OFF P AA 9 LEFT MARGIN PVVVV 4 RIGHT MARAGIN PVVVV 4 TOP MARGIN PVVVV 4 6 H A P BOTTOM MARGIN PVVVV 4 6 H A P IBM PROPRINTER LINES PVVVV 4 ERROR PRINT P AA 9 BR SCRIPT APT P AA 9 6 ...

Страница 62: ... PV TCP IP IP METHOD P 9 4 9 9 3 9 NETWARE ENABLE P 9 AA NETWARE NET FRAME P 9 9 C C 9 9 4 APPLETALD P 9 AA NETBEUI P 9 AA DLC LLC P 9 AA BANYAN P 9 AA LAT P 9 AA NETBIOS IP P 9 AA ENET P 9 3 A 9 3 9 3 A 9 3 4 4 AUTO IF TIME P 6 677 4C INPUT BUFFER P E 6 6 C4 C W 5 21 HIGH SPEED P 9 AA 9 AA PARALLEL BI DIR ON OFF P 9 AA 9 AA ...

Страница 63: ... 4 4 RESET PRINTER X X FACTORY RESET X X 4 OE J 4 4 9 NETWORK TCP IP TCP IP ENABLE IP ADDRESS 192 0 0 192 H I G C 5 H H 0 H I INFORMATION 0 123 0 0 192 123 45 67 89 123 45 67 89 ...

Страница 64: ... 4 4 2 3 E R 0 E R 7 3 4 4 3 4 4 4 4 4 E C 06 5 77 4 4 E 06 5 7 4 4 E 06 5 7 4 4 E 0 0 06 5 7 4 4 E C 5 E 777 C 4 A8 3 8E 4 4 4 F 0 00 0 00 8 I A 8 2 A2 A 2 8 2 G 2 A 0 0 0 0 I 0 C 5 0 0 3 0 1 ...

Страница 65: ... C TONER SAVE P AA QUALITY DENSITY P LANGUAGE PC FE 4 LCD DENSITY P POWER SAVE TIME P AUTO CONTINUE P AA LOCK PANEL P AA REPRINT P EMULATION P C 4 SETUP KEEP PCL P AA MEDIA TYPE P E C PAPER P 1 9 EC C COPIES P ORIENTATION P PRINT POSITION 8 AA4C P AA4C P AUTO FF TIME P PRINT MENU FF SUPPRESS P AA ...

Страница 66: ... 3 F PVVVV HP LASER JET E C4PVVVV A P 7 A 9 P 9 4 3 E 9 C 4C P 4 4 EAP AA 4 P AA ECA F PVVVV F F PVVVV F PVVVV 3 F PVVVV EPSON FX 850 E C4PVVVV A P 7 A 9 P 9 4 3 E 9 C 4C P 3 EAP AA P AA ECA F PVVVV F F PVVVV F PVVVV 3 F PVVVV IBM PROPRINTER E C4PVVVV C P AA PRINT MENU BR SCRIPT P AA ...

Страница 67: ... 7 9 C 3ECP C P C44P 7 7 4 3 C 4 P F C5 P 3 C4P TCP IP C P C 5 C C 3ECP NETWARE CC A CP APPLETALK P NETBEUI P DLC LLC P BANYAN P LAT P NETBIOS IP P NETWORK ENET P ...

Страница 68: ... 1 4 5 N 4 5 5 2 4 5 EC E 0 0 0 0 2 00 0 0 0 00 7 7 0 7 0 0 5 4 2 00 0 7 0 00 02 0 0 1 D 1 0 A 0 4 5 A 7 O 4 C CJ C ...

Страница 69: ... 1 5 0 9 894 8 0 E 9EE 3 Z C4 C E 3C 3 0 A O 4 EE C C J 5 1 3 1 3 1 0 0 0 1 4 ...

Страница 70: ... 1 0 3 1 1 5 I 3 7 0 1 0 ...

Страница 71: ... 1 5 5 1 1 D0 E EC 0 3 3 8 0 1 D E EC 3 8 A C 0 3 0 1 D0 E EC 0 5 0 0 E EC F A EC EC F ...

Страница 72: ... 11 ...

Страница 73: ...age power supply block Laser unit Drive block DC motor Drum unit Transfer block Drum Charging block External device External device Paper tray unit Paper cassette MP tray Fixing unit Paper eject block Paper feed system Image generation system Interface block Parallel USB RAM 8MB Paper dust cleaner block Developing block Toner cartridge Network board Duplex printing unit Standard for HL 1670N Optio...

Страница 74: ... EEPROM 8192 x 8 bits CPU Core MB86834 A S I C Oscillator 48MHz Address Decoder DRAM Control Timer FIFO CDCC Parallel I O Soft Support EEPROM I O Engine Control I O To Engine PCB BUS INT To PC USB I O To PC Network Program 2 0 Mbytes PCI Bus Control Network Board To PC or Hub Option for HL 1650 Oscillator 33 3MHz ...

Страница 75: ... 0 1 2 3 4 5 5 6 74 8 4 9 65 0 7 8 56 4 7 8 ...

Страница 76: ... 6 7 8 4 4 0 7 8 1 1 0 A ...

Страница 77: ... 0 6 B 7 8 ...

Страница 78: ... 0 5 B 7 8 ...

Страница 79: ... 6 4 7 8 ...

Страница 80: ... 5 0 6 4 7 8 ...

Страница 81: ... 7 8 0 5 ...

Страница 82: ... 0 0 ...

Страница 83: ... 0 B 6 6 5 5 0 0 4 5 5 0 C 7 8 B9 7 8 ...

Страница 84: ... 1 0 1 0 ...

Страница 85: ... 0 0 0 4 0 3 5 1 0 1 2 D 0 4 0 A 0 2 5 E 6 09B A B 0 1 2 D ...

Страница 86: ... F C 2 F 6C 2 CI 9 5 CI 9 B9 CB 0 1 B9 4 J 0 1 D Heater Circuit Thermal Fuse Feedback Line Filter Fuse Rectifier Oscillator 24V Regulation Circuit 24V 3 3V Lamp Heater Engin Circuit Main Circuit 3 3V Regulation Circuit Lightning Surge Absorber Fuse 8V ...

Страница 87: ...ler Supply Roller Photosensitive Drum Development Roller Corona Unit Current Regulator Current Regulator Voltage Regulator Voltage Regulator B1 B61 Q63 B81 Q82 Voltage Regulator Z51 VR51 VR21 24VI GND R1 VR81 Voltage Regulator VR31 Cleaning Brush ...

Страница 88: ... ...

Страница 89: ... Motor Rear Cover Sensor Panel Back Light PCB Toner Sensor PCB Light reception 80 mm sq Fan Motor SOL Relay PCB DX Solenoid Registration Solenoid Casette Solenoid MP Solenoid Toner Sensor PCB Light emission DX Sensor PCB DX Tray Sensor DX Paper Size Sensor Main Motor Paper Eject Sensor Thermister For Heat Roller Thermister Relay PCB Jam Clear Cover Sensor Rear Registration Sensor Casette Sensor PC...

Страница 90: ... ...

Страница 91: ...er Photosensitive drum Paper feed pinch roller Front registration sensor lever Rear registration sensor lever Paper feed roller Transfer roller Duplex Tray Pressure roller First eject roller Paper guide Paper outer guide Paper cover ...

Страница 92: ... 0 0 1 1 2 34 3 ...

Страница 93: ... 05 05 05 6 6 0 05 34 ...

Страница 94: ... 0 0 3 34 2 34 ...

Страница 95: ... 7 3 7 7 0 8 6 03 Organic Photoconductor layer Aluminum drum sleeve Photosensitive Drum HVPS 870V Voltage Regulator Grid Corona wire 9 6 6 ...

Страница 96: ...urface Potential V 870 400 150 1 2 3 a b Time 1 2 3 Primary charging Laser beam exposure and developing a Unexposed area Non image area b Exposed area Image area Transfer the image to paper Drum Sleeve 0 0 1 1 1 1 2 1 θ ...

Страница 97: ... 0 03 3 3 0 4 ...

Страница 98: ... ...

Страница 99: ...g irons or other heat generating tools take care not to accidentally damage parts such as wires PCBs and covers 4 Before handling any PCBs touch a metal portion of the equipment to discharge any static electricity charge on your body or the electronic parts or components may be damaged 5 When transporting PCBs be sure to wrap them in the correct protective packaging 6 Be sure to replace self tappi...

Страница 100: ... 8 MP COVER ASSY 9 PROCESS UNIT COVER ASSY 10 PAPER PICK UP ROLLER ASSY 13 LOW VOLTAGE PS PCB ASSY 16 MAIN PCB ASSY 17 18 FAN MOTOR FAN MOTOR 60 FEED MP UNIT 14 EXIT ROLLER UNIT 26 DRIVE UNIT 15 PAPER FEED ROLLER ASSY 24 FIRST FEED ROLLER ASSY 25 A TONER SENSOR PCB UNIT 22 TONER LED PCB UNIT 23 DX SENSOR PCB ASSY 21 BASE PLATE 19 ENGINE PCB ASSY HIGH VOLTAGE PS PCB ASSY 20 A ...

Страница 101: ...assembling printer parts 3 1 AC Cord 1 Disconnect the AC cord from the printer AC inlet Fig 4 1 3 2 Drum Unit 1 Press the cover release button and open the process unit cover ASSY and remove the drum unit from the printer Fig 4 2 AC cord AC inlet Printer Cover release button Drum unit Process unit cover ASSY ...

Страница 102: ... from the printer and remove the paper from the cassette Fig 4 3 2 Remove the pad holder ZLh ASSY by pulling it upwards then remove the separation pad spring 300 from the paper cassette Fig 4 4 Paper cassette Separation pad spring 300 Pad holder ZLh ASSY Paper cassette MP cover ...

Страница 103: ... screw and remove the paper tray cover from the front of the cassette Fig 4 6 NOTE The cover film must not be reused after it has been removed Always replace it with a new one The screw securing the paper cassette cover indicated RED in the figure above is very special When disassembling re assembling the screw you need a special screw driver Refer to the parts reference list Paper cassette Paper ...

Страница 104: ...oller collar 7 Remove the sponge holder ASSY from the holder The two sponge holder springs will also come off Fig 4 7 8 Keeping the paper cassette upside down remove the two cup B M2 6x5 Taptite screws 9 Unhook the catches of each side guide then press the lock lever towards the front of the cassette to release the pressure plate Fig 4 8 Pressure roller collar Pressure roller holder Paper cassette...

Страница 105: ...ile pulling the plastic frame outwards then unhook the other two catches B of the plate while pulling the plastic frame outwards to remove the pressure plate ASSY 13 Unhook the pressure plate spring from the plastic hook to remove the two pressure plate springs Fig 4 10 Pressure plate ASSY Pressure plate spring Paper cassette hook Plastic frame Step 12 Step 13 catches A Step 12 catch B Side guide ...

Страница 106: ...oblems may occur 14 Remove the release lever extension spring 15 Unhook the two catches and rotate the lock lever to remove it downwards from the cassette Fig 4 11 NOTE When re assembling the lock lever insert it upwards from underneath the cassette and rotate it until the two catches lock into place 16 Slide the rear paper guide fully forwards in the cassette and remove it from the slot Fig 4 12 ...

Страница 107: ... the racks are in line with the inside edge of the paper guide release slots in the cassette before refitting the spring and gear When replacing re assembling the paper cassette remove the old grease and apply a suitable amount of grease onto both sides of the paper cassette referring to the figure below Fig 4 14 Taptite cup B M3x8 Side guide gear Friction spring Side guide rack Grease Molykote PG...

Страница 108: ...te screw to remove the tray lock lever from the paper cassette 21 Unhook the four catches to remove the paper tray rear from the paper cassette Fig 4 15 Taptite pan B M3x8 Tray lock lever Paper tray rear catch Paper cassette catches catch ...

Страница 109: ... screws to remove the PCB access plate Fig 4 16 3 Remove the two bind S M3x8 Taptite screws to remove the network board cover plate 4 Disconnect the connector connected with the main PCB and remove the network board Fig 4 17 PCB access plate Taptite bind S M3x8 Printer Access cover Main PCB Taptite bind S M3x8 Network board Printer ...

Страница 110: ... cover and disconnect the two harnesses for the panel PCB ASSY 4 Remove the top cover from the printer Fig 4 18 5 Remove the paper stopper and the paper stopper S from the top cover Fig 4 19 Shoulder screws Top cover Side cover R Side cover L Process unit cover ASSY Rear cover Top cover Paper stopper Paper stopper S Shoulder screws ...

Страница 111: ...el cover ASSY from the top cover Fig 4 20 8 Disconnect the connector and the harness connected with the panel PCB ASSY 9 Remove the three cup B M3x8 Taptite screws to remove the panel PCB ASSY from the panel cover ASSY Fig 4 21 Taptite cup B M3x8 Top cover Back side Panel cover ASSY Taptite cup B M3x8 Taptite cup B M3x8 Panel PCB ASSY LCD holder Panel cover ASSY ...

Страница 112: ...e back light PCB ASSY by releasing two hooks from ASSY 11 Remove the LCD from the panel PCB ASSY by releasing two hooks and then remove the diffusion film from the ASSY Fig 4 22 Fig 4 23 hooks LCD holder Panel cover ASSY Back light PCB hooks Diffusion film LCD LCD holder ...

Страница 113: ...12 Remove the panel light guide and then remove the key from the panel cover Fig 4 24 13 Remove the key top A and the key top B form the key Fig 4 25 key Panel cover Panel light guide Key top B Key top A Key ...

Страница 114: ...per guide upper ASSY and then remove the ground wire from the ground wire cover 3 Remove the bind B M3x7 5 Taptite shoulder screw the washer and the bind B M3x8 Taptite screw to remove the paper guide upper ASSY from the DX feed ASSY Fig 4 27 DX feed ASSY Bind M3x4 Taptite bind B M3x8 Ground wire cover Ground wire Shoulder Taptite bind B M3x7 5A Paper guide upper ASSY DX feed ASSY Rear cover ...

Страница 115: ...from the DX feed ASSY 6 Turn the DX feed ASSY the correct way up and remove the side regist roller holder and the pressure rollers using a pair of tweezers by releasing the boss from the left guide plate ASSY Remove the two pressure rollers from the side regist roller holder Fig 4 29 boss Roller holder Pressure roller Paper guide upper ASSY Pressure rollers Side regist roller holder Taptite bind B...

Страница 116: ...the left guide springs are not fitted correctly See subsection 2 2 Service Calls in CHAPTER 6 for more information on ERROR 41 Fig 4 30 9 Remove the left guide plate from the DX feed ASSY while pushing down the DX paper actuator forward and then remove the DX feed roller ASSY Fig 4 31 Taptite bind B M3x8 Guide plate stopper Left guide springs 2 hook DX feed ASSY Back side 2 1 Side regist guide DX ...

Страница 117: ...emove the DX paper actuator and the guide actuator from the DX feed ASSY and then remove the paper actuator spring and the guide actuator spring from the each actuator Fig 4 33 DX feed ASSY Side regist roller T belt B40S2M224 T belt B40S2M142 Paper actuator spring DX feed ASSY Guide actuator spring hooks DX paper actuator Guide actuator ...

Страница 118: ...to release the DX outer chute ASSY from the rear cover Fig 4 34 3 Remove the DX outer chute ASSY from the printer by releasing the hooks at the right and left sides of the printer Fig 4 35 hook Printer DX outer chute ASSY Rear cover R DX rear chute Rear cover Rear cover L hook Printer DX outer chute ASSY 2 1 2 1 ...

Страница 119: ... 2 from the DX outer chute Fig 4 36 5 Remove rear cover from the printer by releasing the hooks at the right and left sides of the printer and then remove the DX rear chute from the rear cover C Fig 4 37 Flap 2 Frap 2 spring hook DX outer chute DX rear chute Rear cover C 1 2 ...

Страница 120: ...e cover R while releasing the hook and remove the side cover R from the printer while pulling outward taking care not to break the cover 4 Remove the shoulder screw to remove the side cover L from the printer by releasing the hook at the bottom of the cover CAUTION Use caution not to bend the hooks of the interface when handling the side cover R Fig 4 39 Rear cover R Printer Shoulder screws Rear c...

Страница 121: ...slightly upward Fig 4 40 2 Remove the cup B M3x6 Taptite screw to remove the side guide gear from the MP pager guide 1 ASSY 3 Remove the MP side guide R and MP side guide L from the ASSY Fig 4 41 Printer MP paper guide 1 ASSY MP cover ASSY hook MP side guide R MP side guide L MP paper guide 1 ASSY 2 3 1 Side guide gear Taptite cup B M3x6 ...

Страница 122: ...P cover ASSY from the printer Fig 4 42 5 Remove the MP side guide 2 from the MP cover and then MP side guide 3 from the MP side guide 2 Fig 4 43 Printer hook MP cover ASSY MP side guide 3 MP side guide 2 MP cover hook hook ...

Страница 123: ...Taptite screws to remove the process unit cover from the process unit cover ASSY 3 Remove the lock lever spring from the process unit cover ASSY and then the P cover lock lever R and P cover lock lever L from the cover Fig 4 45 Taptite cup B M3x8 Process unit cover Lock lever spring 2 1 P cover lock lever L P cover lock lever R Process unit cover ASSY hook Printer 2 1 Process unit cover ASSY ...

Страница 124: ...rews 3 Push the P harness cover to the right to release it from the hook and remove the P harness cover 4 Disconnect the LD harness and the polygon motor connector 5 Taking care not to touch the lens and mirror remove the laser unit Fig 4 47 Taptite cup S M3x16 LD harness Laser unit Polygon motor connector hook P harness cover Polygon motor connector Screw cup S tite 3x6 Fan relay PCB ASSY Main un...

Страница 125: ...to subsection 3 3 Cleaning the Scanner Window in CHAPTER 5 Fig 4 48 3 12 Fixing Unit 1 Place the main frame on its base so that the rear side is facing you 2 Disconnect the two connectors of the heater harness and release the harness from the hooks on the right side of the fixing unit 3 Remove the shoulder screw and the cup S M3x8 Taptite screw securing the fixing unit 4 Remove the fixing unit fro...

Страница 126: ...ixing unit Fig 4 50 6 Remove the two cup B M3x20 Taptite screws from the top of the fixing unit frame 7 Release the thermistor harness from the hooks Fig 4 51 Fixing unit Screw bind B tite 3x10 FU front paper guide Pin Taptite cup B M3x20 Taptite cup B M3x20 Thermistor harness Fixing unit hooks ...

Страница 127: ...onnector from the FU frame upper 11 Lift the right hand end of the heat roller 25 and remove the halogen heater lamp from the heat roller 25 Fig 4 53 NOTE When re assembling the halogen heater lamp ensure that the direction of the halogen heater lamp is correct referring to the figure above Halogen heater lamp Heat roller 25 Taptite pan B M3x10 Screw cup M3x6 Halogen heater lamp Colored side 115V ...

Страница 128: ...Lift and remove the heat roller 25 The HR gear 34 will also come off 13 Remove the HR bearing 25 from the left hand end of the heat roller 25 To remove the HR bearing 25 at the gear side first remove the two washers then remove the bearing Fig 4 55 CAUTION Never touch the surface of the heat roller Heat roller 25 Heat roller bearing 25 Heat roller gear 34 HR bearing 25 Washer Washer Screw cup M 3x...

Страница 129: ...es on the frame as shown in the figure below Fig 4 56 When re assembling the heat roller 25 to the FU frame upper ensure you do not damage the heat roller 25 with the four pick off fingers on the FU frame upper Fig 4 57 Heat roller 25 FU frame upper Pick off fingers Pick off fingers Heat roller gear 34 HR bearing 25 Heat roller 25 projection boss ...

Страница 130: ...he cleaner spring 30 onto the FU frame upper ensure that the direction of the roller is correct referring to the figure above that the spring is seated correctly in the locating channel and does not protrude from either end to push down the cleaner ASSY H to hook it onto the FU frame upper and then fit the heat roller 25 and release the hook of the cleaner ASSY H so that the cleaner ASSY H contact...

Страница 131: ...istor cleaner spring from the each cleaner pinch roller ASSY Fig 4 59 NOTE When re assembling the cleaner pinch roller ASSY complete with the cleaner spring onto the FU frame lower ensure the direction of the roller is correct referring to the figure above Ensure that the both springs are seated correctly in the locating channel and does not protrude from either end Ensure also that the proper spr...

Страница 132: ...e FU frame lower Fig 4 60 21 Release the paper eject actuator from the hook on the FU frame lower and then slide the paper eject actuator to the right direction to remove the paper eject actuator and the eject actuator spring from the FU frame lower Fig 4 61 Screw bind B tite 3x10 Eject sensor PCB ASSY FU frame lower Thermistor relay PCB ASSY Eject paper spring Paper eject actuator hook FU frame l...

Страница 133: ...orrectly in the locating channel referring to the figure below Fig 4 62 22 Release the thermistor harness from the hooks on the FU frame upper and then remove the one cup B M3x12 Taptite screw and remove the thermistor ASSY Fig 4 63 Thermistor ASSY FU frame upper hooks FU frame lower Eject actuator spring Paper eject actuator hook Taptite cup B M3x12 ...

Страница 134: ...roller and then remove the left end of the roller from the hook first then remove the eject roller from the FU frame upper NOTE When removing the left end of the eject roller align the protrusion of the hook of the frame with the concave part of the roller and then pull the roller through underneath the protrusion Fig 4 65 FU frame upper Idle gear 13H Eject roller Thermistor Taptite cup B M3x12 FU...

Страница 135: ... the four eject pinch roller F from the two eject pinch roller holder R and the four eject pinch roller F from the two eject pinch roller holder L Fig 4 67 Eject pinch springs Eject pinch springs Eject pinch roller F with eject pinch roller holder L Eject pinch roller F with eject pinch roller holder R FU frame upper Eject pinch roller F Eject pinch roller F Eject pinch roller holder R Eject pinch...

Страница 136: ...e frame up side down Remove the cup B M3x6 Taptite screw to remove the pick off finger holder plate and then remove the pick off finger using a piece of tweezers Fig 4 68 Pick off finger holder plate Taptite cup B M3x6 Pick off finger FU frame upper Tweezers Pick off finger ...

Страница 137: ...r pick up roller ASSY with two roller collars to the left the bearing R side to release from the paper pick up roller shaft 4 Remove the paper pick up roller ASSY and the roller collars from the front chute ASSY 5 Remove the bearing L from the front chute ASSY Fig 4 69 Bearing L Bearing R Main frame Bearing L Bearing R Paper pick up roller ASSY Roller collar Paper pick up roller ASSY Roller collar...

Страница 138: ...oller collars to the left the bearing R side to release from the MP paper pick up roller shaft 4 Remove the paper pick up roller ASSY and the roller collars from the MP chute ASSY 5 Remove the bearing L from the MP chute ASSY Fig 4 70 Bearing R Bearing L MP roller cover Bearing R Bearing L Paper pick up roller Roller collar Paper pick up roller ASSY Roller collar 3 1 2 MP chute ASSY ...

Страница 139: ...m the MP chute cover 9 Release the two bosses at the both ends of the MP pressure plate ASSY using a flat screwdriver and then remove it from the main frame Fig 4 71 Separation plate ASSY MP pressure spring 25 MP pressure spring 25 Screw bind B tite 3x10 Screw bind B tite 3x10 boss MP pressure plate ASSY boss MP chute cover ...

Страница 140: ...6 screws securing the reversing drive frame unit 3 Disconnect the harness connector and remove the bind M3x4 screw to remove the reversing switch solenoid from the reversing drive frame unit Fig 4 72 Fig 4 73 Screw cup S tite 3x6 Printer body Drive unit Reversing switch solenoid Reversing drive frame unit Screw bind M3x4 Reversing drive frame unit ...

Страница 141: ...ws to remove the gear pressure plate from the gear plate 6 Shift the pendulum gear 30 to the arrow direction and release the hook from the gear 21 to remove the gear 21 by pulling upward through the opening space of the gear plate Fig 4 75 hook Drive unit hook Gear Gear hook T belt Switch arm ASSY Gear pressure plate Gear plate Gear 21 Pendulum gear 30 Screw cup S tite 3x6 hook ...

Страница 142: ...oner LED PCB unit 10 Remove the drive sub ASSY A from the main frame Fig 4 76 CAUTION Be sure to hold the pendulum gear 30 when removing the drive sub ASSY A in order not to lose the friction spring fitted under the gear name Be careful not to lose the joint spring on the develop joint when removing the drive sub ASSY A Tapes Screw cup S tite M3x6 Main frame Drive sub ASSY A Main motor ASSY hooks ...

Страница 143: ...Y from the drive sub ASSY A Fig 4 77 8 Place the main frame so that the drive unit side is at the right as the figure shown below 9 Remove the two bind B M4x10 Taptite screws Fig 4 78 Main motor ASSY Drive sub ASSY A Main frame Solenoid unit Taptite bind B M4x10 Screw cup S tite 3x6 Screw cup S tite 3x6 ...

Страница 144: ...emove the bind M3x4 screw to remove the feed solenoid ASSY from the main frame L CAUTION Be sure not to lose the solenoid return spring F R when removing the clutch lever F R 15 Remove the clutch lever F R from the main frame Fig 4 80 Solenoid ASSY P R red hook hook Solenoid unit Solenoid ASSYMP black Clutch lever F R Feed solenoid ASSY Screw bind M3x4 Screw bind M3x4 DX guide rail L Main frame Cl...

Страница 145: ...16 Low voltage Power Supply PCB ASSY 1 Remove the eight cup S tite 3x6 screws and the pan M3 5x6 screw with washer and the lead wire FG and then disconnect the engine PCB connector 2 Remove the PS PCB ASSY from the main frame Fig 4 82 Gear 60 P R Middle roller gear Main frame Conductor bearing 5 Conductor bearing H Gear 72 MP Screw cup S tite 3x6 Screw cup S tite 3x6 PS PCB ASSY PS PCB Conductor b...

Страница 146: ...o disconnect the fan motor connector on the fan relay PCB before removing the fan motor and fan motor 60 1 Release the two hooks and remove the fan motor from the fan duct by pulling slightly forward 2 Remove the fan motor 60 from the main frame by pulling upward Fig 4 84 NOTE When re assembling the fan motor and the fan motor 60 fit the both motors with the labeled surface facing the printer Main...

Страница 147: ...3 Slide the base plate to the rear of the printer to remove it Fig 4 85 3 20 Engine PCB ASSY High voltage Power Supply PCB ASSY 1 Remove the two bind B M4x10 Taptite screws to remove the PCB insulation sheet Fig 4 86 Taptite bind B M4x10 Screw cup S tite 3x6 Base plate Main frame Taptite bind B M4x10 PCB insulation sheet Main frame Screw cup S tite 3x6 ...

Страница 148: ... the both PCB ASSY with each other by the central connector And then fit the high voltage PS PCB ASSY straight downward onto the frame Fix the both PCB ASSY with the two screws CAUTION Even if you want to remove only one of either the engine and high voltage power supply PCBs ensure you remove all screws securing both PCBs and disconnect the central connector while lifting both of them up Failure ...

Страница 149: ...ove the two cup S tite 3x6 screws to remove the DX guide rail L with DX sensor PCB ASSY from the main frame Fig 4 88 2 Remove the bind B M3x8 Taptite screw to remove the DX sensor PCB ASSY from the DX guide rail L Fig 4 89 Main frame DX guide rail L Screw cup S tite 3x6 DX sensor PCB ASSY Taptite bind B M3x8 DX guide rail L DX sensor PCB ASSY ...

Страница 150: ... remove it 3 Remove the cup S tite 3x6 screw to remove the toner sensor PCB unit Fig 4 90 3 23 Toner LED PCB Unit Light Emission NOTE Be sure to disconnect the toner LED light emission connector on the engine PCB before removing the toner sensor PCB ASSY light emission Release the two hooks from the LED holder and remove the toner LED PCB unit light emission by pulling upward Fig 4 91 hook Toner S...

Страница 151: ...e paper feed roller ASSY Fig 4 92 3 25 First Feed Roller ASSY NOTE Be sure to disconnect the engine PCB connector on the cassette sensor PCB ASSY and remove the tape on the engine PCB connector before removing the cassette sensor PCB ASSY 1 Place the frame upside down 2 Remove the bind B tite 3x10 screw to remove the PE sensor cover and the cassette sensor PCB ASSY from the front chute ASSY Fig 4 ...

Страница 152: ...ont chute ASSY Fig 4 94 5 Turn the front chute ASSY upside down and then remove the bearing 5 and the joint 5 to remove the first feed roller from the front chute ASSY Fig 4 95 Taptite bind B M4x10 Paper pick up roller shaft First feed roller shaft Front chute ASSY Taptite bind B M4x10 Bearing 5 Front chute ASSY hook First feed roller Joint 5 CA actuator PE actuator ...

Страница 153: ...rom the exit roller unit 3 Lift up and remove the pinch roller ASSY from the exit roller unit and then remove the pinch roller spring from the pinch roller ASSY 4 Remove the cup B M3x8 Taptite screw to remove the rear cover sensor PCB ASSY from the unit Fig 4 97 Shoulder screws Exit roller unit Exit roller ASSY ZLh Exit roller unit Rear cover sensor PCB ASSY Taptite cup B M3x8 Pinch roller ASSY Pi...

Страница 154: ... 4 56 5 Remove the fan motor 60A unit from the exit roller holder Fig 4 98 Fan motor 60A unit Exit roller holder ...

Страница 155: ...4 57 3 27 Harness Winding Form ...

Страница 156: ... 4 58 4 PACKING Fig 4 99 AC Cords Accessory Bag Accessory Carton Drum Unit with Toner Cartridge included Pad Printer Pad Carton ...

Страница 157: ... 0 12 222 34 5 6 7 8 3 8 9 318 9 3 8 ...

Страница 158: ... 1 3 8 4 3 18 358 3 8 4 3 8 3 8 3 8 3 8 0 1 2 3 4 2 5 5 6 2 3 3 3 3 1 3 3 3 7 8 9 0 4 0 9 A 0 22 B 34 5 6 7 8 ...

Страница 159: ... 3 8 9 318 9 3 58 3 8 9 358 C 6 3 8 3 8 3 8 3 8 3 8 ...

Страница 160: ... 5 3 8 3 8 3 8 3 3 3 3 1 3 3 3 5 5 5 6 2 1 3 4 3 7 4 4 1 2 7 5 3 5 2 2 0 2 2 2 2 2 3 3 3 7 8 9 ...

Страница 161: ... 0 1 2 3 144 5 6 7 8994 4 9 999 2 3 1 95 6 7 994 4 9 999 4 1 6 A4 994 4 9 999 4 3 6 4 9994 4 99 999 44 ...

Страница 162: ... 3 3 2 0 8 18 4 8 9 3 3 2 4 3 3 4 8 18 9 8 9 ...

Страница 163: ... 58 1 5 5 2 2 8 8 2 3 4 8 18 9 8 9 58 3 8 ...

Страница 164: ... 8 8 9 3 3 3 3 3 3 3 3 3 3 3 4 8 18 8 4 ...

Страница 165: ... H 5 3 D 3 8 D 0 5 222 0 2 3 9 C 8 ...

Страница 166: ... 2 ...

Страница 167: ... 0 1 2 1 2 1 3 4 5 6 78 9 78 1 3 4 A B 7 8 5 6 78 ...

Страница 168: ... C ...

Страница 169: ...er jam occurs Printed image has a problem 6 Image Defects 3 3 Paper Feeding Problems Printout is not correct 7 Incorrect Printout The printer does not print Printed page has a problem 2 1 Operator Calls 2 2 Service Calls 5 Malfunctions The printer does not load paper Turn off and on the printer power switch The same error appers 8 Network Problem ...

Страница 170: ... TONER EMPTY NO PAPER XXXX COVER OPEN FUSER OPEN 0 0 0 FACE UP OPEN JAM XXXXXX 0 0 MANUAL FEED 1 2 BUFFER ERROR STORAGE FULL DOWNLOAD FULL FONT FULL MEMORY FULL 3 3 22 ...

Страница 171: ...GNORE DATA SIZE ERROR DX NO DX TRAY DX LEVER ERROR NO TRAY1 CLEAN DRUM UNIT 01 CHANGE DRUM SOON 2 01 TONER LOW 3 45 67 1 01 REPLACE PF KIT1 REPLACE PF KIT2 8 9 1 6 8 1 6 8 1 6 01 REPLACE FUSER 2 7 01 REPLACE LASER 2 01 ...

Страница 172: ... 3 Error occurs Confirm the LCD indication Turn OFF ON the power switch Error occurs again See section 5 MALFUNCTIONS Temporary error Use the printer with out corrective action NO YES ERROR SERVICE CALL ...

Страница 173: ... ERROR S01 A ERROR S02 A ERROR S03 2 A ERROR S04 A ERROR S05 A ERROR S06 A ERROR S07 A ERROR S08 A ERROR S09 7 A ERROR S10 A ERROR S11 A ERROR S12 A ERROR S13 A ERROR S21 4 A ERROR E41 2 ...

Страница 174: ...R E51 2 2 B ERROR E52 2 2 B ERROR E54 2 2 B ERROR H60 A ERROR H61 62 ERROR H63 2 2 D 62 2 7E 2 ERROR H66 7E 2 2 D 62 2 7E 2 ERROR H67 7E 2 2 D 62 2 7E 2 ERROR H68 7E 2 2 D 62 2 7E 2 ERROR H73 ERROR H74 ERROR H37 ERROR H38 2 A4 ERROR H39 A 7 ...

Страница 175: ... C 1 2 2 2 ...

Страница 176: ... D 0 0 0 0 0 5 F 29 0 JAM TRAY1 JAM TRAY2 JAM MP TRAY JAM INSIDE JAM REAR JAM DUPLEX PAPER JAM ...

Страница 177: ... 0 0 G 0 0 1 02 1 ...

Страница 178: ... 4 0 2 0 3 4 ...

Страница 179: ... 0 5 3 0 3 1 00 4 4 3 5 1 2 0 3 1 00 5 5 2 6 5 2 00 5 2 3 2 6 ...

Страница 180: ... 00 0 0 5 5 5 2 3 0 5 54 2 0 0 6 1 4 0 7 0 5 8 5 2 ...

Страница 181: ... 6 0 0 1 0 2 B 6 3 F ...

Страница 182: ... 0 4 0 3 5 3 6 0 3 ...

Страница 183: ... 9 0 5 0 3 0 5 5 2 5 7 4 2 1 0 3 7 5 4 1 0 0 5 2 0 0 D 1 2 ...

Страница 184: ... B 0 0 B 6 3 6 0 0 0 4 B 5 C D ...

Страница 185: ... C 7 7 7 0 0 0 0 0 G 8 7 F 0 C 2 D 3 7 3 F DD C 2 A F BD 2 C 2 F D F 0 0 0 C 2 F 0 F 0 0 0 C 2 ...

Страница 186: ... D 0 0 4 4 9 H 8 9 BDI H 8 3 H 8 3 H 8 7 3 9 ...

Страница 187: ... 9 A J BDI 9 0 4 2 2 3 9 1 ...

Страница 188: ... 1 5 K A 4 A 9 9 C 7 67 26 C 7 67 26 H 7 2 A H 7 A 8 ...

Страница 189: ... 4 6 9 6 C 7 67 26 H 7 2 A H 7 A 8 4 2 9 2 6 C 7 67 26 H 7 2 A DD2H 7 A ...

Страница 190: ... 2 2 L L 4 A 9 4 A 2 4 A 3 E H K M E K A D3 C 7 4 A 4 A 4 A 3 H 7 N B O A PA A P 2 4 A D D7 4 A N B B B O A PA A P 2 4 A D D7 4 A A A 8 9 3 2 ...

Страница 191: ... 2 2 7 H 7 H 7 H 8 A 4 H 8 2 7 7 7 7 H 7 2 57 9 A 2 H 8 A PCB lead pin lead pin Voltage Engine P5 2 P5 3 Approx 24V P3 10 P3 9 Approx 5V 7 A 0 1 22 1 ...

Страница 192: ... 2 2 C A H 7 2 H 8 A AH 8 A 2 A AH 8 A 2 7 A H 7 A 8 A 6 76 E A 3 E DE H 7 H 8 2 A AH 8 A ...

Страница 193: ... 2 H 8 A A 8 A 7 A 2 3 A H 7 A 3 H 8 3 H 8 3 7 3 H 8 2 A D A H 7 8 ...

Страница 194: ... B 2 B A H 7 Q E L7 A E H 7 Q E Q E Q E A A 8 2 C A H 7 A 3 H 8 3 H 8 3 7 3 H 8 A 3 H 7 9 0 3 0 2 54 0 0 5 5 6 2 3 0 0 ...

Страница 195: ... C 2 D 62 2 7E 2 2 A C 7 67 26 H 7 A H 8 A 2 RR 2 A C 7 67 26 H 7 A H 8 A 2 H 7 3 H 8 A A 3 H 8 A 2 H 8 ...

Страница 196: ... D 2 A4 A H 7 7 H 8 2 A AH 8 A ...

Страница 197: ...u t t e s t p r i n t o u t t e s t P r i n t o u t t e s t p r i n t o P r i n t o u t t e s t p r i n t o u t t e s t p r i n t o u t t e s t P r i n t o u t t e s t p r i n t o P r i n t o u t t e s t p r i n t o P r i n t o u t t e s t p r i n t o u t t e s t p r i n t o u t t e s t P r i n t o u t t e s t p r i n t o P r i n t o u t t e s t p r i n t o u t t e s t p r i n t o u t t e s t P r ...

Страница 198: ... 7 9 8 4 L 8 1 4 0 4 5 2 L H 8 H 8 H 7 A A A H 8 A A 2 A A A H 8 A A H 8 H 8 9 ...

Страница 199: ... L H 8 H 8 H 8 A A A H 8 A 2 A H 7 A A H 7 A 9 ...

Страница 200: ... L H 8 H 8 7 H 8 H 8 H 7 2 A H AH 8 A H 8 H 7 A ...

Страница 201: ... L H 8 H 8 H 8 A H 7 A A AH 8 A 2 A AH 8 A 9 ...

Страница 202: ... 3 H H 8 H H 8 7 A 9 0 0 5 7 0 5 0 5 6 2 9 7 G 5 2 749 5 7L 7 9 5 7 9 5 7 76 2 9 5 7 9 B C ...

Страница 203: ... A D H 8 H 8 H 8 H 8 H 8 3 9 5 0 54 0 6 3 6 2 0 0 5 52 4 2 9 ...

Страница 204: ... B A 1 L 1 C H 8 1 C H 8 1 C H 8 H 8 A AH 8 A B A L H 8 H 8 9 ...

Страница 205: ... C C H 8 H 8 D 1 L H 8 9 9 ...

Страница 206: ... D 3 H 8 H 7 S H 8 0 8 H 7 3 H 8 H 8 H 7 A AH 8 A ...

Страница 207: ... t o P r i n t o u t t e s t p r i n t o P r i n t o u t t e s t p r i n t o u t t e s t p r i n t o u t t e s t P r i n t o u t t e s t p r i n t o P r i n t o u t t e s t p r i n t o P r i n t o u t t e s t p r i n t o u t t e s t p r i n t o u t t e s t P r i n t o u t t e s t p r i n t o P r i n t o u t t e s t p r i n t o P r i n t o u t t e s t p r i n t o u t t e s t p r i n t o u t t e s t...

Страница 208: ... C H 8 76 3 H 8 7 H 8 H 8 H 8 9 76 3 ...

Страница 209: ... 9 0 9 A 0 3 0 0 2 0 0 4 7 0 2 BA 0 5 6 3 02 CA 8 3 0 0 2 3 0 0 2 2A 0 7 5 2 C ...

Страница 210: ... A L C H 8 76 3 H 7 B 3 C H 8 3 A AH 8 A 9 76 ...

Страница 211: ... A L H 7 H 8 ...

Страница 212: ... B L 7 8 5 9 H 8 H 8 H 8 7 A 9 5 02 2 0 2 2 C 3 H 8 7 9 ...

Страница 213: ... D H 8 A AH 8 A 1 L H 7 H 7 ...

Страница 214: ... B L H 8 H 7 B A AH 8 A L H 8 H 8 A AH 8 A 9 ...

Страница 215: ... C 9 ...

Страница 216: ... D 8 7 7 7 1 2 4 L L L B B ...

Страница 217: ... 3 3 9 C 7 67 26 B C 7 67 26 H 7 9 4 2 0 3 4 7 5 3 02 4 D 8 2 ...

Страница 218: ... 4 5 7 6E 479 9 3 3 22 L 2 2 4 2 9 0 0 5 0 72 5 6 3 4 0 2 4 52 26 8 4 9 9 3 3 22 9 0 0 5 0 72 4 1 22 1 1 H 8 3 1 22 3 1 22 A 22 1 8 22 H 7 A ...

Страница 219: ... 9 2 4 3 0 0 9 A K F A A R B D A2 R F ...

Страница 220: ... 4 B G 4 K 2 E 7 7 7 6 T A6 6 67 7 6 7 9 4 0 5 6 0E K 4 8 3 4 8 FD F A4 8 2 6 B 7 K E 4 E 6 2 7 7 67 6 7 E 7 6 2 67 Print Server Status Control A B D 7 7 6 2 K 2 B B 6 ...

Страница 221: ... K 2 E 7 K DA DDA R K DDA R DA K 1 U 3 G A 0 3 J 3 0 4 6T K 0 0 J A ...

Страница 222: ... 4 C 7 9 K 9 5 5 0 5 2 4 3 0 5 2 E 2 4 A LL 4 6 7 7L 6A 2 A 67 L 3 R 2 J E etc ethers etc hosts 47 R 5 9 L 8 4 1 7 9 2 etc printcap VKV VWV 5 0 1 J usr spool 3 R 3 lp dev null lp A 47 R A J ...

Страница 223: ... A 3 0 6 N O 3 K SET SERVICE BRN_xxxxxx_P1 EOT 2 B 0 6 3 K SET SERVICE BRN_xxxxxx_P1 EOT 3 C 3 R etc printcap D E 0 0 2A mx 0 etc printcap 4 2 C C A 7 9 7 7 K 2 7 7 4 52C54C A A 7 9 C CB 2 K 2 A C CB 2 7 4 L 8 A C CB 2 A ...

Страница 224: ... B 4 3 52C54C A 9 A 7 9 C CB F K F C CB C CB 7 K R R F 2 7 F F 4 4 52C54C C 1 6C 666 A A 7 9 C CB 2 7 D DDD 7 A 6 K 2 A 7 A 6 C CB 2 7 D DDD 7 A 6 8 C CB 2 7 D DDD A 2 4 5 C A 7 9 6 6 6T 8 A ...

Страница 225: ...E INFORMATION CURRENTLY ATTACHED SERVERS K 9 5 5 0 5 2 3 0 5 2 A SET NETWARE PASSWORD A A 67 6 J 67 6 A 7 SET NETWARE SERVER servername ENABLED 3 7 H 2 67 6 7 5 U J BD SET NETWARE FRAME A 6 4 0 2 64 4 D 4 7 9 2 K 2 7 2 2 EB 33 J 8 7 2 ...

Страница 226: ... D E 1 A 1 1 3 1 SET APPLETALK ZONE 3 L A E 2 4 C 4 A B 4 2 L 2 5 9 5U 9 3 7 DD A 7P333333P P 333333 3 2 7 DDD 7 DDD A 6P333333P P 333333 3 2 7 DD J 4 7 9 C A 3 3 3 2 A 7 7 D 2 3 D ...

Страница 227: ... 5 5 G 5L6 26 9 J K Left Right 9 7 9 D E 9 8 J 7E 2 6 57EP 269 5D9 J J 1 9 J 7E 2 3 7 7E 2 6 G 57EP 2 7 9 5D9 2 9 J 9 J 7 3 9 J 4 9 J 7 5 9 J 6 9 J 9 J G 1 DDY 9 J Y 9 J 7 1 9 J 7 9 2 9 J 7 9 J C 2 ...

Страница 228: ... 5 9 6 G Left Right CTPEDSMRFGL2FRE 3 67 J 3 6 3 K ...

Страница 229: ...67K 1 9 A J 6 K 7 D 67K 7 R 2 9 A J R 6 K R S 67K 1 9 A J R 6 K 1 M 67K 3 9 A J 2 6 K 7 R 67K R 4 9 A J R 6 K R F 67K 3 5 9 A J 3 6 K 3 G 67K 6 9 A J 6 K 7 L 67K 9 A J 6 K 7 2 67K 7 9 A J 6 K F 67K 9 A J 6 K 7 R 67K 1 9 A J 6 K 7 E 67K 2 9 A J 0 6 K 7 9 7 ...

Страница 230: ... ...

Страница 231: ... 0 1 2 3 0 0 4 5 05 0 ...

Страница 232: ... 5 6 7 2 8 6 8 5 1 9 9 9 1 1 5 9 5 6 1 6 1 9 9 5 1 6 1 2 9 2 1 9 9 6 2 5 1 1 8 1 1 1 9 9 9 5 2 2 9 5 9 8 6 9 2 8 1 1 1 1 9 9 9 9 ...

Страница 233: ...8 SECONDARY FONT 8 IBM CHR SET MODE IBM E1H Esszet 9 7 C IBM E1H Beta 9C C W BOLD ON OFF W BOLD OFF W BOLD ON D 6 1 DLFNT Bd It DLFNT Bd It NO DLFNT Bd It YES E D 0 6 B PROD ON OFF B PROD OFF B PROD ON D 0 6 6 CONDENCE SELECT CONDENC 16 66p CONDENC 17 14p C OEM FONT SELECT OEMFONT DISABLE OEMFONT ENABLE 6 6 ISR FONT SELECT ISRFONT DISABLE ISRFONT ENABLE 6 6 6 BRO FONT SELECT BROBITM DISABLE BROBIT...

Страница 234: ...QUE 1 6 2 6 ITA ITALIC SEL 2 6 exit FONT PAPER TRAY SIZE DEF PAPER LT 6 0 2 7 1 68 DEF PAPER A4 6 0 2 4 7 1 68 PARALLEL MENU PARALLEL TIMING CDCC PSW H C E 1 1 1 5 C 1 1 5 68 CDDC PSW L C E 1 1 1 5 C 1 1 STB ACK DELAY CDCC BSSL L 0H 1 6 C E 1 1 5 68 CDCC BSSL H 0H 1 C E 1 1 exit PARALLEL REPRINT ON OFF REPRINT ON 1 6 1 6 1 REPRINT OFF 6 DRAM CHECK START START DRAM TEST 5 ...

Страница 235: ...5 0 0 PS QUOTE BINARY PS QUOTEBIN OFF 6 8 2 BS QUOTEBIN ON 6 8 PS IMAGE MASK PS IMAGEMSK OFF BS IMAGEMSK ON D 2 PS CELL MODE PS CEIL FLOOR PS CEIL CEIL PS STATUS ECHO STATUS ECHO ON STATUS ECHO OFF D BOISE ID MODE BOISE ID IEEE BOISE ID WIN95 C 6 8 A I PROTECT OFF MODE PRO OFF AUTO 0 1 PRO OFF NORMAL 0 1 HP ESC E COMMAND HP ESC E RESET 0 HP ESC E F F 0 0 DPX FF SUP MODE DPX FF SUP NORMAL J DPX FF ...

Страница 236: ...MAL RESET JOB CD 0 1 9 9J 6 JOB TIMEOUT SEL TIMEOUT ON C 5 5 2 TIMEOUT OFF C 5 5 8 BACKLIGHT TEST BACKLIGHT OFF BACKLIGHT GREEN BACKLIGHT RED BACKLIGHT ORANGE exit 5 6 1 VIEWANGLE TEST VIEWANGLE 0 VIEWANGLE 1 VIEWANGLE 2 exit 5 2 1 0 8 NV RAM DEBUG NV RAM DISPLAY NV RAM HEX PRINT exit 8 3 JOB CANCEL TIME TIME OUT XXsec 9J 6 J 6 6 exit MENU ...

Страница 237: ...NGE 8 6 PF KIT 1 CHANGE 8 6 PF KIT 2 CHANGE 8 6 FUSER CHANGE 8 6 LASER CHANGE 8 6 COVERAGE 8 2 1 2 1 1 7 K 2 1 0 3 G 6 7 68 1 95 5E A4 PAGE 8 6 1 1 4 7 LETTER PAGE 8 6 1 1 7 LEGAL PAGE 8 6 1 1 1 7 EXECUTIVE PAGE 8 6 1 1 2 7 B5 PAGE 8 6 1 1 C 7 JIS B5 PAGE 8 6 1 1 C 7 A5 PAGE 8 6 1 1 7 A6 PAGE 8 6 1 1 7 ...

Страница 238: ...PAGE 8 6 1 1 C 7 COM10 PAGE 8 6 1 1 0 7 C5 PAGE 8 6 1 1 0 7 DL PAGE 8 6 1 1 7 MONARCH PAGE 8 6 1 1 7 A4LONG PAGE 8 6 1 1 4 1 7 ERROR HISTORY 1 2 3 10 8 0 0 1 2 3 4 5 1 RESET COUNT RESET ALL COUNT 7 3 0 7 2 6 1 2 4 7 4 6 1 ...

Страница 239: ...DE ON DEMO MODE OFF 6 6 1 8 1 0 8 5 6 LANG ENGLISH 1 1 8 HEX DUMP MODE 8 6 1 68 1 9 9 0 3 0 DRAM CHECK MODE 0 GO TEST MODE I 0 5 LINE TEST MODE 0 1 ZLH HV CHECK 0 5 68 1 1 5 9 2 2 1 9MMMM 0 0 8 5 68 2 8 1 1 5 9 9 1 9 5 5 0 8 1 9 9 9 6 0 0 5 5 0 5 6 ...

Страница 240: ... ...

Страница 241: ...Appendix 1 Connection Diagram HL 1650 1670N A 1 ...

Страница 242: ...Appendix 2 Main PCB Circuit Diagram HL 1650 1670N 1 6 CODE LJ8453001 B512078CIR 1 6 A 2 NAME ...

Страница 243: ...Appendix 3 Main PCB Circuit Diagram HL 1650 1670N 2 6 CODE LJ8453001 B512078CIR 2 6 A 3 NAME ...

Страница 244: ...Appendix 4 Main PCB Circuit Diagram HL 1650 1670N 3 6 CODE LJ8453001 B512078CIR 3 6 A 4 NAME ...

Страница 245: ...Appendix 5 Main PCB Circuit Diagram HL 1650 1670N 4 6 CODE LJ8453001 B512078CIR 4 6 A 5 NAME ...

Страница 246: ...Appendix 6 Main PCB Circuit Diagram HL 1650 1670N 5 6 CODE LJ8453001 B512078CIR 5 6 A 6 NAME ...

Страница 247: ...Appendix 7 Main PCB Circuit Diagram HL 1650 1670N 6 6 CODE LJ8453001 B512078CIR 6 6 A 7 NAME ...

Страница 248: ...8 NAME B512079CIR 1 2 Straight Red 3 Pin PH Right Angle Red 6 Pin PH Right Angle White 5 Pin PH Straight White 2 Pin PH Red 5 Pin PH Right Angle Black 6 Pin PH Right Angle Right Angle White 3 Pin PH Right Angle White 4 Pin PH Right Angle Red 4 Pin PH Right Angle White 6 Pin ...

Страница 249: ...Appendix 9 Engine PCB Circuit Diagram HL 1650 1670N 2 2 CODE LJ8439001 A 9 NAME B512079CIR 2 2 Right Angle Red 9 Pin PH Straight White 9 Pin PH Straight Black 5 Pin PH ...

Страница 250: ...Appendix 10 Network Board PCB Circuit Diagram HL 1650 1670N CODE LJ8439001 A 10 NAME B512058CIR ...

Страница 251: ...Appendix 11 Low voltage Power Supply PCB Circuit Diagram 100V A 11 NAME Low voltage PS Circuit 100V ...

Страница 252: ...Appendix 12 Low voltage Power Supply PCB Circuit Diagram 200V A 12 NAME Low voltage PS Circuit 200V ...

Страница 253: ...Appendix 13 High voltage Power Supply PCB Circuit Diagram A 13 NAME High voltage PS Circuit ...

Страница 254: ... 0 1 2 3 4 5 1 1 4 5 1 4 5 465 1 7 8 87 9 7 8 8 9 9 7 8 87 9 2 9 8 9 87 9 18 2 9 ...

Страница 255: ... 4 5 1 4 5 7 8 87 9 7 8 7 8 8 9 8 9 8 9 18 2 9 8 2 9 0 2 87 9 87 9 8 8 18 2 1 3 8 2 ...

Страница 256: ... 9 1 4 5 1 8 φ 69 4 696 5 1 8 φ 9 4 9 5 6 8 φ 9 4 9 5 1 φ 090 40 9 5 8 φ 9 4 9 5 1 8 φ 9 4 9 5 8 φ 9 4609 5 ...

Страница 257: ... 1 A B 8 9 B B 2 1 2 8 2 C 1 2 C A 1 A B 9 9 1 9 9 8 9 9 C 1 6 9 9 C A 1 ...

Страница 258: ... 0 1 C D 1 9 2 3 4 2 5 32 4 5 1 9 4 5 1 1 9 1 9 48 95 6 1 9 ...

Страница 259: ...2020202 100 0 99 9 MZ L2000000006801 6 9 D D 9 1 D 9 D 8 7 9 93 23 3 5 HH1 A3 I 41 5 I 4 5 J 4 95 K 4 95 1 A3 4 L 09 5 A 09 I 9 6 09 A 09 I A3 4 L 09 L 69 5 A 09 I 9 6 409 L 69 5 A 09 I 960 A3 4 L 09 L 69 K 5 A 09 I 9 409 L 69 K 5 A 09 I 90 3 D 9 0 1 0 1 1 ...

Страница 260: ... 7 4 3 2 1 9 D 9 K 8 9 K D K L K L L 6 L 6 L 6 L 6 L 6 I 0 D 1 D 9 00 00 00 00 00 00 6 600 6 0 000 0 00 D D000 00 D D000 Value in units of 1 000 Refer to the list below ...

Страница 261: ... 7 4 9 5 2 M 3 9 23 3 1 4 D C 4 5 1 2 C9 4 5 D N O 9 6 465 9 4 5 C 0 9 6 4 5 K M D 3 9 6 ...

Страница 262: ... 5 6 7 8 9 1 7 8 5 6 7 8 5 7 8 6 P D 9 4 K 65 P 8 D 9 4 K 5 1 3 P 3 9 4 K 5 ...

Страница 263: ... 6 6 5 1 O 5 65 1 9 2 3 4 5 2 2 2 7 2 N O O N O9 4 5 P D K 9 6 4 5 D 9 465 1 9 D F G B 9 F G D D N 9 O9 ...

Страница 264: ... 9 1 N1 O O N1 O9 D D C N O O 9 4 5 P D K 9 KD C 0 9 6 4 5 D C 0 C 9 C D C 9 9 6 ...

Страница 265: ... 465 C 0 D K 9 6 4 5 C C D 9 4 5 1 9 4 C 95 B 9 ...

Страница 266: ... 2 2 5 2 1 11 Q N P P 82 2 R 1 2 8O9 9 4 5 P D K 9 6 4 5 1 C 0 9 465 K D D D D 9 6 0 1 2 ...

Страница 267: ... 8 92 D 4 95 6 D 9 F 8 1 7G 4 5 K S S 8 S 4 0 S K 5 C S C A S 4 5 B 11 Q N18 1 P 8 2 O9 ...

Страница 268: ... 4 5 A 9 4 5 D 4 2 5 6 465 2 A D K 2 9 2 9 3 C 9 4 5 D 9 1 1 ...

Страница 269: ... 0 0 0 1 1 1 1 1 1 1 1 23 4 5 ...

Страница 270: ... 5 6 5 5 5 5 5 5 0 0 0 7 7 5 0 0 4 8 8 6 6 6 83 8 2 3 3892 0 5 ...

Страница 271: ... 0 3 8 6 0 1 4 2 3 5 5 5 6 5 ...

Страница 272: ... 6 0 4 5 4 4 6 5 ...

Страница 273: ... 11 7 8 1 9 ...

Страница 274: ... ...

Страница 275: ... ...

Страница 276: ... 012 1 23 4 35 6 7 869 9 5 7 5 35 6 5 1 99 1 ...

Страница 277: ... ...

Страница 278: ... ASSY 8 LJ5088001 1 REVERSING SWITCH SOLENOID 9 LJ5015001 1 T BELT B40S2M142 10 LJ5100001 1 TONER SENSOR PCB UNIT RECEPTION 11 UL8507001 4 RUBBER FOOT 12 UL9070001 1 GEAR 21 13 UL9069001 2 CONDUCTOR BEARING 5 14 LJ5533001 1 CONDUCTOR BEARING H 15 LJ5117001 1 FAN MOTOR 60 16 LJ8363001 1 DX SENSOR PCB ASSY 17 LJ8724001 3 TAPE 60X12 18 LE1169001 1 USB GROUND PLATE 19 087320615 11 SCREW CUP S TITE 3X6...

Страница 279: ...ATE ASSY 9 LJ5188001 1 MP PRESSURE PLATE ASSY 10 LJ5197001 1 MP COVER 11 LJ5199001 1 MP PAPER GUIDE 1 12 LJ5200001 1 MP SIDE GUIDE L 13 LJ5201001 1 MP SIDE GUIDE R 14 LJ5203001 1 MP PAPER GUIDE 2 15 LJ5204001 1 MP PAPER GUIDE 3 16 LJ5013001 1 PROCESS UNIT COVER ASSY 16 1 LJ5205001 1 PROCESS UNIT COVER 16 2 LJ5206001 1 P COVER LOCK LEVER L 16 3 LJ5207001 1 P COVER LOCK LEVER R 16 4 LJ5208001 1 LOCK...

Страница 280: ...5224001 1 FRAP 2 2 3 LJ5225001 1 FRAP 2 SPRING 3 LJ5226001 1 DX REAR CHUTE 4 LJ5227001 1 REAR COVER C 5 LJ5569001 1 FAN MOTOR 60 A UNIT 6 LJ5228001 1 DX FEED ASSY 6 1 LJ5232001 3 ROLLLER HOLDER 6 2 UH2360000 5 PRESSURE ROLLER 6 3 LJ5233001 1 GROUND WIRE 6 4 LJ5235001 1 DX FEED ROLLER ASSY 6 5 LJ5238001 2 SIDE REGIST ROLLER 6 6 LJ5015001 1 T BELT B40S2M142 6 7 LJ5240001 1 T BELT B40S2M224 6 8 LJ524...

Страница 281: ... HOLDER ZLH ASSY 2 1 10 LJ4705001 1 SEPARATION PAD SPRING 300 1 11 LJ5259001 1 PAPER INDICATOR 1 12 UL9092001 1 LOCK LEVER 1 13 UL9095001 1 RELEASE LEVER EXTENSION SPRING 1 14 LJ4196001 1 PRESSURE ROLLER HOLDER 1 15 LJ5260001 1 PRESSURE ROLLER COLLAR 1 16 LJ5261001 1 PRESSURE ROLLER SHAFT 1 17 LJ4197001 1 PAPER TRAY COVER 1 18 LJ4272001 1 TRAY COVER FILM 1 19 LJ4221001 1 SCRATCH SPONGE HOLDER ASSY...

Страница 282: ...01 2 EJECT PINCH ROLLER HOLDER L 1 7 LJ5277001 2 EJECT PINCH ROLLER HOLDER R 1 8 LJ5540001 8 EJECT PINCH ROLLER F 1 9 LJ5279001 4 EJECT PINCH SPRING 1 10 LJ5280001 4 PICK OFF FINGER ASSY 2 1 11 LJ5283001 1 THERMISTOR ASSY 1 12 UL8916001 2 PR BEARING 1 13 LJ5286001 2 PR SPRING 1 14 LJ5268001 5 CLEANER PINCH ROLLER ASSY 1 15 LJ5287001 1 PRESSURE ROLLER 25 1 16 LJ8356001 1 THERMISTOR RELAY PCB ASSY 1...

Страница 283: ...B ASSY 6 7 LJ5301001 1 LCDLMG161S6 TPT 6 8 LJ8362001 1 BACK LIGHT PCB ASSY 6 9 LJ5073001 1 DIFFUSION FILM 6 10 LJ5302001 1 LCD HOLDER 6 11 087310815 6 TAPTITE CUP B M3X8 7 LJ5006001 1 ACCESS COVER 8 LJ5007001 1 REAR COVER R 9 LJ5008001 1 REAR COVER L 10 LJ5030001 1 BROTHER EMBLEM 11 LJ5472001 1 PRINTED LCD COVER ASSY 1650 11 LJ5467001 1 PRINTED LCD COVER ASSY 1670N 12 LJ5579001 1 LASER CAUTION LAB...

Страница 284: ...2 1 1 1 1 1 2 8 MAIN PCB REF NO CODE Q TY DESCRIPTION SYMBOL REMARK 1 LJ8451001 1 MAIN PCB ASSY 1650 B512078 300E 1 LJ8650001 1 MAIN PCB ASSY 1670N B512078 320C 1 1 LJ8793001 1 MASK ROM HL 1650 LOW 1 2 LJ8794001 1 MASK ROM HL 1650 HIGH MODEL HL 1650 1670N 84U Z21 Z22 101 14 ...

Страница 285: ...B ASSY 1650 B512079 200C MODEL HL 1650 1670N 84U Z21 Z22 151 10 LOW VOLTAGE POWER SUPPLY PCB REF NO CODE Q TY DESCRIPTION 1 LJ8388001 1 PS PCB ASSY ZLH 115V 1 LJ8389001 1 PS PCB ASSY ZLH 230V 2 LJ8424001 1 POWER SWITCH RIGHT ANGLE 3 LJ8391001 1 INLET HARNESS ASSY 115V 4 LJ8723001 2 TAPE 50X40 5 087320615 3 SCREW CUP S TITE 3X6 6 0A5350606 1 SCREW PAN M3 5X6 S P WASHER MODEL HL 1650 1670N 84U Z21 Z...

Страница 286: ...PCB ASSY ZLH 2 085411015 1 TAPTITE BIND B M4X10 MODEL HL 1650 1670N 84U Z21 Z22 220 12 AC CORDS REF NO CODE Q TY DESCRIPTION REMARK 1A UH1051001 1 AC CORD UL CSA 1B UK4503001 1 AC CORD ASSY SAA 1C UK4502001 1 AC CORD ASSY SEV 1D UK4099001 1 AC CORD CHLI 1E UH1054001 1 AC CORD BS 1F U34322001 1 AC CORD 6 ISRAEL 1G UK4094001 1 AC CORD DEMKO 1H UK4501001 1 AC CORD ASSY VDE 1I LJ8288001 1 AC CORD ASSY...

Страница 287: ...01 1 SOFT GUIDE FRA 3 LJ5405001 1 SOFT GUIDE GER 3 LJ5425001 1 SOFT GUIDE NOR 3 LJ5430001 1 SOFT GUIDE NL 3 LJ5439001 1 SOFT GUIDE DEN 3 LJ5444001 1 SOFT GUIDE SPA 3 LJ5449001 1 SOFT GUIDE ITA 3 LJ5454001 1 SOFT GUIDE SWE 4 LJ5631001 1 NETWORK SET UP GUIDE US 4 LJ5633001 1 NETWORK SET UP GUIDE FRA 4 LJ5632001 1 NETWORK SET UP GUIDE GER 4 LJ5638001 1 NETWORK SET UP GUIDE NOR 4 LJ5634001 1 NETWORK S...

Страница 288: ... LL0322001 1 CARTON HL 1670N US 1 LL0318001 1 CARTON HL 1650 EUR 1 LL0323001 1 CARTON HL 1670N EUR 2 LL0282001 1 STYROFORM PAD ASSY 3 LL0280001 1 CARTON 4 LJ5583001 1 BAG 800X900H 5 LJ5557001 1 PROCESS BAG 400X480 MODEL HL 1650 1670N 84U Z21 Z22 930 15 NETWORK BOARD REF NO CODE Q TY DESCRIPTION SYMBOL REMARK 1 LJ8671001 1 BRNET PCB UNIT 4100H B512058 211A 1 1 087320616 2 TAPTITE CUP S M3X6 MODEL H...

Страница 289: ...16 PERIODICAL MAINTENANCE PARTS REF NO CODE Q TY DESCRIPTION REMARK 1 LJ5615001 1 PAPER FEEDING KIT 1 1 LJ5016001 1 PAPER PICK UP ROLLER ASSY 1 1 2 LJ5256001 1 PAD HOLDER ZLH ASSY 2 1 Refer to 3 PAPER FEEDER MP UNIT 2 Refer to 5 PAPER CASSETTE MODEL HL 1650 1670N 84U Z21 Z22 24 ...

Отзывы: