23
● ● ● ● ● ● ● ● ● ● ● ● ● ● ● ● ● ● ● ● ● ● ● ● ● ● ● ● ● ● ● ● ● ● ● ● ● ● ● ● ● ● ● ● ● ● ● ● ● ● ● ● ● ● ● ● ●
MAKING AN EMBROIDERED APPLIQUÉ FROM A ONE-POINT PATTERN
CONTENTS
Chapter 1
Chapter 2
Chapter 3
Chapter 4
Chapter 5
INDEX
Chapter 6
●
●
8.
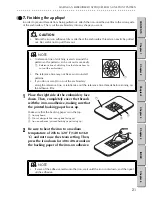
Attaching the appliqué
To ensure that an iron-on appliqué will not come off after repeated washings, sew it to the fabric
either by hand or with a sewing machine.
To iron on the appliqué:
1
Place the appliqué right side up on the
fabric at the place where you want to attach
it. Then, place an extra piece of cloth over
the embroidery to protect it.
Be sure to iron on a hard surface, like an ironing board.
1
Ironing board
2
Fabric
3
Appliqué
4
Extra piece of cloth
2
Be sure to heat the iron to a medium
temperature of 285 to 320
F (140 to 160
C) and do not use the steam setting. Then, use both hands to press the iron
down hard for 20 to 30 seconds on the extra piece of cloth covering the
appliqué.
If the appliqué did not attach well to the fabric, iron it from the back.
CAUTION
•
When cutting out the embroidery in any shape you want, cut at least 3/16” (5 mm) away
from the edge of the embroidery. If you cut too close to the embroidery, you might cut
the embroidery threads.
•
When cutting along the reference line, cut outside of the reference line. Do not cut inside
the reference line.
•
If the iron-on adhesive film did not completely attach to the appliqué and must be ironed
on again, make sure that the film is covered by the backing paper. Place the backing
paper on top of the film with the printed side of the backing paper facing up.
WARNING
•
Be very careful when using the iron since it is very hot and can cause burns.
•
During or after ironing the pre-cut design fabric, wait until the fabric has cooled down
before touching it, otherwise you may be burned.
•
After ironing on the appliqué, wait until it cools down completely (about 20 minutes)
before folding it or pulling on it.
1
2
3
4


