Brother DCP-J772DW Скачать руководство пользователя страница 76

 Home > 

Print

 > 

Print from Your Computer (Windows

®

)

 > Print a Colour Document in Greyscale (Windows

®

)

Print a Colour Document in Greyscale (Windows

®

)

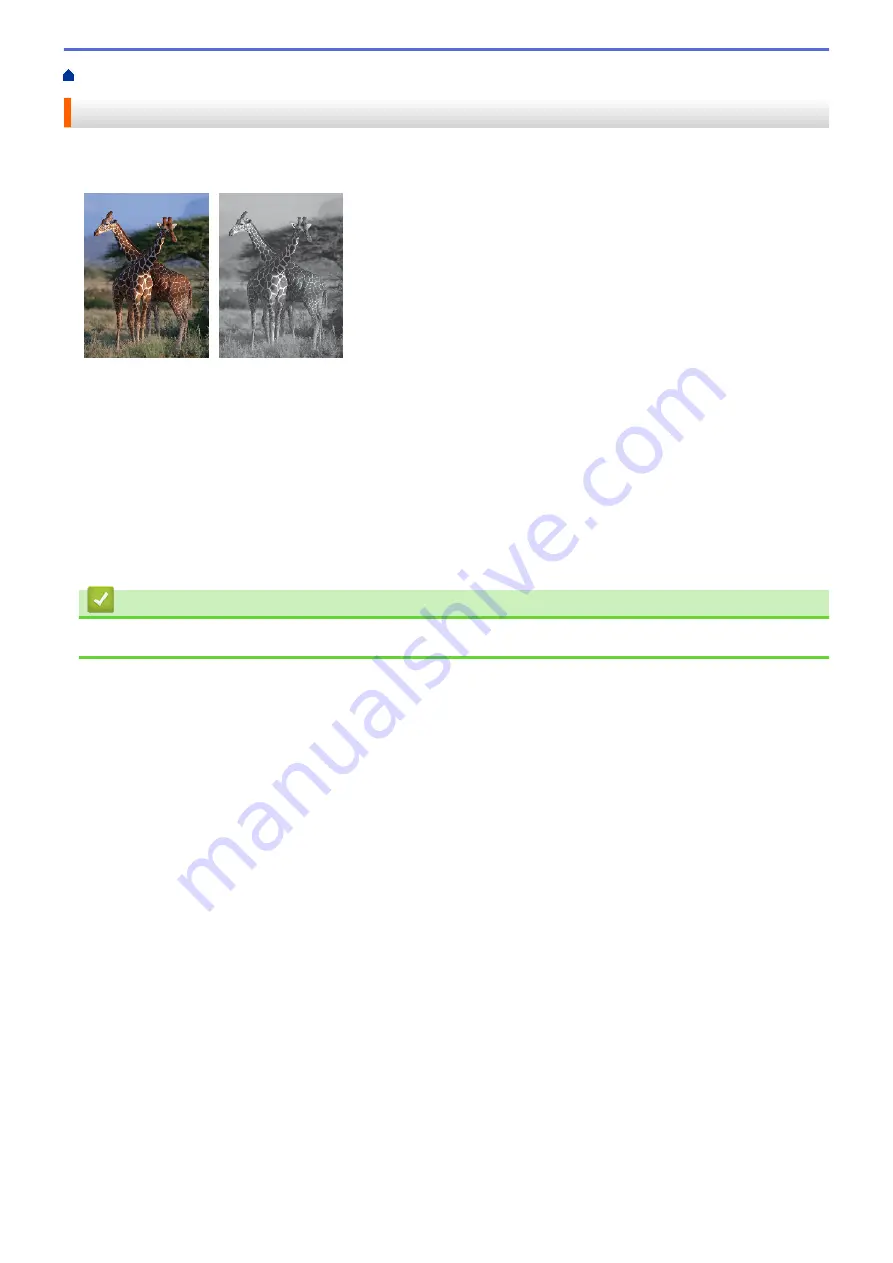
Greyscale mode makes the print processing speed faster than colour mode. If your document contains colour,
selecting Greyscale mode prints your document in 256 levels of greyscale.

1. Select the print command in your application.
2. Select 

Brother MFC-XXXX Printer

 (where XXXX is the name of your model), and then click the printing

properties or preferences button.
The printer driver window appears.

3. Click the 

Advanced

 tab.

4. For 

Colour / Greyscale

, select 

Greyscale

.

5. Change other printer settings if needed.
6. Click 

OK

.

7. Complete your print operation.

  Related Information

Print from Your Computer (Windows

®

)


69

Содержание DCP-J772DW

Страница 1: ...Online User s Guide DCP J772DW DCP J774DW MFC J890DW MFC J895DW 2017 Brother Industries Ltd All rights reserved ...

Страница 2: ...oad Documents in the Automatic Document Feeder ADF 52 Load Documents on the Scanner Glass 54 Unscannable Area 55 Print 56 Print from Your Computer Windows 57 Print a Photo Windows 58 Print a Document Windows 60 Cancel a Print Job Windows 61 Print More Than One Page on a Single Sheet of Paper N in 1 Windows 62 Print as a Poster Windows 63 Print on Both Sides of the Paper Automatically Automatic 2 s...

Страница 3: ...g ControlCenter4 Advanced Mode Windows 132 Scan Using Nuance PaperPort 14SE or Other Windows Applications 147 Scan Using Windows Fax and Scan 152 Install BookScan Enhancer and Whiteboard Enhancer Windows 156 Scan from Your Computer Mac 157 Scan Using Brother iPrint Scan Mac 158 Scan Using TWAIN Compliant Applications Mac 159 Copy 162 Copy a Document 163 Enlarge or Reduce Copied Images 165 Sort Cop...

Страница 4: ...ctly from Media 282 Compatible Media 283 Important Information about Photo Printing 284 Print Photos from Media on the Brother Machine 285 Copy Photos from Media to a Computer 294 Before Copying Photos 295 Copy Photos from Media Over a Local Connection 296 Print Photos from ControlCenter4 Windows 297 Edit Photos Using ControlCenter4 Windows 299 Network 301 Supported Basic Network Features 302 Netw...

Страница 5: ...Print 360 Google Cloud Print Overview 361 Before Using Google Cloud Print 362 Print from Google Chrome or Chrome OS 367 Print from Google Drive for Mobile 368 Print from Gmail Webmail Service for Mobile 369 AirPrint 370 AirPrint Overview 371 Before Using AirPrint macOS 372 Print Using AirPrint 373 Scan Using AirPrint macOS 376 Send a Fax Using AirPrint macOS 377 Mobile Printing for Windows 378 Mop...

Страница 6: ... Ink Cartridges 456 Clean Your Brother Machine 459 Clean the Scanner 460 Clean the Print Head from Your Brother Machine 462 Clean the Print Head from Your Computer Windows 463 Clean the Print Head from Your Computer Mac 465 Clean the Machine s LCD 466 Clean the Outside of the Machine 467 Clean the Machine s Printer Platen 468 Clean the Paper Feed Rollers 469 Clean the Base Pad 471 Clean the Paper ...

Страница 7: ...hange Machine Settings from Your Computer 527 Change the Machine Settings Using Remote Setup 528 Appendix 540 Specifications 541 Enter Text on Your Brother Machine 548 Information Regarding Recycled Paper 549 Brother Numbers 550 Home Table of Contents vi ...

Страница 8: ...Home Before You Use Your Brother Machine Before You Use Your Brother Machine Definitions of Notes Trademarks Important Note 1 ...

Страница 9: ...y hazardous situation which if not avoided may result in damage to property or loss of product functionality NOTE NOTE specifies the operating environment conditions for installation or special conditions of use Tips icons indicate helpful hints and supplementary information Electrical Hazard icons alert you to possible electrical shock Bold Bold style identifies buttons on the machine s control p...

Страница 10: ...emarks are subject to Google Permissions Mozilla and Firefox are registered trademarks of the Mozilla Foundation The Bluetooth word mark and logos are registered trademarks owned by the Bluetooth SIG Inc and any use of such marks by Brother Industries Ltd and related companies is under license Other trademarks and trade names are those of their respective owners Intel is a trademark of Intel Corpo...

Страница 11: ...FC J895DW are used unless otherwise specified In this User s Guide the illustrations of the MFC J895DW are used unless otherwise specified The screens in this User s Guide are for illustration purposes only and may differ from the actual screens Unless otherwise specified the screens in this manual are from Windows 7 and macOS v10 12 x Screens on your computer may vary depending on your operating ...

Страница 12: ...to Your Brother Machine Introduction to Your Brother Machine Before Using Your Machine Control Panel Overview Touchscreen LCD Overview Settings Screen Overview Navigate the touchscreen Access Brother Utilities Windows 5 ...

Страница 13: ...ing or receiving a fax into memory or while scanning a document into the computer Fax sending will not be stopped during printing from your computer However when the machine is copying or receiving a fax on paper it pauses the printing operation and then continues printing when copying or fax receiving has finished DCP models do not support the fax feature Firewall Windows If your computer is prot...

Страница 14: ...cel Press to cancel an operation 4 LED Power Indicator The LED lights up depending on the machine s power status When the machine is in Sleep Mode the LED blinks 5 Power On Off Press to turn the machine on Press and hold down to turn the machine off The touchscreen will display Shutting Down and will stay on for a few seconds before turning itself off If you have connected an external telephone or...

Страница 15: ...Related Information Introduction to Your Brother Machine Near Field Communication NFC 8 ...

Страница 16: ...e next command 1 Date Time Displays the date and time set on the machine 2 Quiet Mode This icon appears when the Quiet Mode setting is set to On The Quiet Mode setting can reduce printing noise When Quiet Mode is turned on the print speed becomes slower 3 Shortcuts Create Shortcuts for frequently used operations such as sending a fax copying scanning Web Connect and Apps services There are three S...

Страница 17: ...ngs menu 6 Ink Displays the available ink volume Press to access the Ink menu When an ink cartridge is near the end of its life or having a problem an error icon is displayed on the ink colour 7 Modes Press to switch to each mode Fax Copy Scan Photo Web Apps Download Software 8 Information icon 8 New information from Brother appears in the information bar when the notification settings such as Mes...

Страница 18: ...s slower 2 Shortcuts Create Shortcuts for frequently used operations such as copying scanning Web Connect and Apps services There are three Shortcuts screens You can program four shortcuts on each screen To display the other Shortcuts screens press d or c 3 Wireless Status Each icon in the following table shows the wireless network status Your machine is not connected to the wireless access point ...

Страница 19: ...pps Download Software 7 Information icon 7 New information from Brother appears in the information bar when the notification settings such as Message from Brother and Firmware Auto Check are set to On Internet connection is needed and data rates may apply Press to view the details 8 Warning icon 8 The warning icon appears when there is an error or maintenance message press to view the details and ...

Страница 20: ... Error and Maintenance Messages 13 ...

Страница 21: ...mation from Brother New information from Brother appears in the information bar when the notification settings such as Message from Brother and Firmware Auto Check are set to On Press to view the details Internet connection is needed and data rates may apply Related Information Touchscreen LCD Overview 14 ...

Страница 22: ...access the Quiet Mode menu When this menu is set to On is displayed on the Home screen 3 Fax Preview Displays the Fax Preview setting Press to access the Fax Preview menu 4 Receive Mode Displays the current Receive Mode 5 Date Time Displays the date and time Press to access the Date Time menu 6 Wi Fi Press to set up a wireless network connection If you are using a wireless connection a three level...

Страница 23: ...e Quiet Mode setting Press to access the Quiet Mode menu When this menu is set to On is displayed on the Home screen 4 Date Time Displays the date and time Press to access the Date Time menu 5 Wi Fi Press to set up a wireless network connection If you are using a wireless connection a three level indicator on the screen displays the current wireless signal strength 6 Paper Size Press to access the...

Страница 24: ...ate the touchscreen Press your finger on the LCD to operate it To display and access all the options press d c or a b on the LCD to scroll through them NOTE This product adopts the font of ARPHIC TECHNOLOGY CO LTD Related Information Introduction to Your Brother Machine 17 ...

Страница 25: ...8 Tap or click Brother Utilities either on the Start screen or the desktop Windows 8 1 Move your mouse to the lower left corner of the Start screen and click if using a touch based device swipe up from the bottom of the Start screen to bring up the Apps screen When the Apps screen appears tap or click Brother Utilities Windows 10 Click Brother Brother Utilities 2 Select your machine 3 Select the o...

Страница 26: ... Move your mouse to the lower left corner of the Start screen and click if using a touch based device swipe up from the bottom of the Start screen to bring up the Apps screen When the Apps screen appears tap or click Brother Utilities Windows 10 Click Brother Brother Utilities 2 Click the drop down list and then select your model name if not already selected Click Tools in the left navigation bar ...

Страница 27: ...Home Paper Handling Paper Handling Load Paper Load Documents 20 ...

Страница 28: ...Paper in the Paper Tray Load Photo or Photo L Paper in Photo Paper Tray Load Paper in the Manual Feed Slot Unprintable Area Paper Settings Acceptable Paper and Other Print Media Error and Maintenance Messages Paper Handling and Printing Problems 21 ...

Страница 29: ...per Handling Load Paper Load Paper in the Paper Tray Load Paper in the Paper Tray Load Cut Sheet Paper or Photo 2L Paper in the Paper Tray Load Photo Paper in the Paper Tray Load Envelopes in the Paper Tray 22 ...

Страница 30: ... Size and Paper Type settings if needed following the LCD instructions Load only one size and type of paper in the paper tray at a time When you load a different paper size in the tray you must change the Paper Size setting in the machine or the paper size setting on your computer 1 If the paper support flap 1 is open close it and then close the paper support 2 2 1 2 Pull the paper tray completely...

Страница 31: ... jams and misfeeds Always make sure the paper is not curled or wrinkled 6 Gently load paper in the paper tray with the printing surface face down Make sure the paper is flat in the tray and the paper length guide 1 touches the edges of the paper 1 24 ...

Страница 32: ...ith the paper you are adding Always fan the stack of paper well to prevent the machine from feeding multiple pages 7 Gently adjust the paper width guides 1 to fit the paper Make sure the paper width guides touch the edges of the paper 1 8 Close the output paper tray cover 9 Slowly push the paper tray completely into the machine 10 Pull out the paper support 1 until it locks into place and then unf...

Страница 33: ... Change the Check Paper Size Setting Choose the Right Print Media Change the Paper Size and Paper Type 26 ...

Страница 34: ...settings if needed following the LCD instructions Load only one size and type of paper in the paper tray at a time When you load a different paper size in the tray you must change the Paper Size setting in the machine or the paper size setting on your computer 1 If the paper support flap 1 is open close it and then close the paper support 2 2 1 2 Pull the paper tray completely out of the machine 3...

Страница 35: ...surface face down Loading more than 20 sheets of photo paper may cause paper jams 7 Gently adjust the paper width guides 1 to fit the paper Make sure the paper width guides touch the edges of the paper and the paper is flat in the tray 1 8 Slowly push the paper tray completely into the machine 28 ...

Страница 36: ...t 1 until it locks into place and then unfold the paper support flap 2 2 1 Related Information Load Paper in the Paper Tray Change the Check Paper Size Setting Choose the Right Print Media Change the Paper Size and Paper Type 29 ...

Страница 37: ...er size setting on your computer Before loading envelopes in the tray press the corners and sides of the envelopes to make them as flat as possible See Related Information About Envelopes 1 If the paper support flap 1 is open close it and then close the paper support 2 2 1 2 Pull the paper tray completely out of the machine 3 Open the output paper tray cover 1 1 4 Load up to 10 envelopes in the pa...

Страница 38: ...Close the output paper tray cover 6 Slowly push the paper tray completely into the machine 7 Pull out the paper support 1 until it locks into place and then unfold the paper support flap 2 2 1 Related Information Load Paper in the Paper Tray About Envelopes Change the Check Paper Size Setting 31 ...

Страница 39: ... Choose the Right Print Media Change the Paper Size and Paper Type 32 ...

Страница 40: ...r size Change the Paper Size and Paper Type settings if needed following the LCD instructions Load only one size and type of paper in the paper tray at a time When you load a different paper size in the tray you must change the Paper Size setting in the machine or the paper size setting on your computer 1 If the paper support flap 1 is open close it and then close the paper support 2 2 1 2 Pull th...

Страница 41: ...per support flap when using the photo paper tray Otherwise it is difficult to take out the printouts IMPORTANT When you have finished printing photos return the photo paper tray to the Normal printing position If you do not you will get a No Paper Fed error when you use cut sheet paper Photo Paper Tray in the Normal printing position Photo Paper Tray in the Photo printing position Related Informat...

Страница 42: ...et at a time The machine automatically turns on Manual Feed mode when you put paper in the manual feed slot 1 Open the manual feed slot cover 2 Lift up the paper support 3 Slide the manual feed slot paper guides to fit the width of the paper you are using 4 Load only one sheet of paper in the manual feed slot with the printing surface face up 35 ...

Страница 43: ...wn in the illustration See Related Information IMPORTANT DO NOT load more than one sheet of paper in the manual feed slot at any time Doing this may cause a paper jam When printing multiple pages do not feed the next sheet of paper until the LCD displays a message instructing you to feed the next sheet 36 ...

Страница 44: ...he paper support flap 2 2 1 If the document does not fit on one sheet the machine will prompt you to load another sheet of paper Place another sheet of paper in the manual feed slot and then press OK on the machine s control panel Make sure printing has finished before you close the manual feed slot cover When paper is placed in the manual feed slot the machine always prints from the manual feed s...

Страница 45: ...nd envelopes The machine can print in the shaded areas of cut sheet paper only when the Borderless print feature is available and turned on Cut Sheet Paper Envelopes Top 1 Left 2 Bottom 3 Right 4 Cut Sheet 3 mm 3 mm 3 mm 3 mm Envelopes 12 mm 3 mm 12 mm 3 mm The Borderless print feature is not available for envelopes and 2 sided printing Related Information Load Paper Paper Handling and Printing Pr...

Страница 46: ...Home Paper Handling Load Paper Paper Settings Paper Settings Change the Paper Size and Paper Type Change the Check Paper Size Setting Shrink Page Size of an Oversized Incoming Fax 39 ...

Страница 47: ...ngs 3 Press Paper Type 4 Press a or b to display the paper type options and then press the option you want 5 Press Paper Size 6 Press a or b to display the paper size options and then press the option you want 7 Press The machine ejects paper with the printed surface face up onto the paper tray at the front of the machine When you use glossy paper remove each sheet at once to prevent smudging or p...

Страница 48: ...a message asking if you want to change the Paper Size and Paper Type settings The default setting is On 1 Press Settings All Settings General Setup 2 Press a or b to display the Check Paper option and then press it 3 Press On or Off 4 Press Related Information Paper Settings Load Cut Sheet Paper or Photo 2L Paper in the Paper Tray Load Photo Paper in the Paper Tray Load Envelopes in the Paper Tray...

Страница 49: ...When you print on inkjet paper coated paper and glossy paper be sure to choose the proper print media in the Basic tab of the printer driver or in the Paper Type setting on the machine When you print on Brother Photo paper load one extra sheet of the same photo paper in the paper tray When using photo paper remove each sheet at once to prevent smudging or paper jams Avoid touching the printed surf...

Страница 50: ...d using the Brother paper listed in the table If Brother paper is not available in your country we recommend testing various paper types before purchasing large quantities Brother paper Paper Type Item A4 Plain BP60PA A4 Glossy Photo BP71GA4 A4 Inkjet Matte BP60MA 10 x 15 cm Glossy Photo BP71GP Related Information Acceptable Paper and Other Print Media 43 ...

Страница 51: ...m moisture direct sunlight and heat Avoid touching the shiny coated side of photo paper IMPORTANT DO NOT use the following kinds of paper Damaged curled wrinkled or irregularly shaped 1 1 1 2 mm or greater curl may cause jams to occur Extremely shiny or highly textured Paper that cannot be arranged uniformly when stacked Paper made with a short grain Related Information Acceptable Paper and Other ...

Страница 52: ... on them Have clasps or staples Are pre printed on the inside Are self adhesive Have double flaps Self adhesive Double flaps You may experience paper feed problems caused by the thickness size and flap shape of the envelopes you are using Before loading envelopes in the tray press the flaps edges and corners to make them as flat as possible as shown in the illustrations Fan the stack of envelopes ...

Страница 53: ... Load Envelopes in the Paper Tray Load Paper in the Manual Feed Slot 46 ...

Страница 54: ...a Choose the Right Print Media Paper Type and Paper Size for Each Operation Paper Capacity of the Paper Trays Paper Weight and Thickness Load Cut Sheet Paper or Photo 2L Paper in the Paper Tray Load Photo Paper in the Paper Tray Load Envelopes in the Paper Tray Load Paper in the Manual Feed Slot 47 ...

Страница 55: ... Yes Yes Yes Letter 215 9 x 279 4 mm Yes Yes Yes Yes Executive 184 1 x 266 7 mm Yes A5 148 x 210 mm Yes Yes A6 105 x 148 mm Yes Cards Photo 10 x 15 cm Yes Yes Yes Photo L 9 x 13 cm Yes Photo 2L 13 x 18 cm Yes Yes Index Card 13 x 20 cm Yes Envelopes C5 Envelope 162 x 229 mm Yes DL Envelope 110 x 220 mm Yes Com 10 104 7 x 241 3 mm Yes Monarch 98 4 x 190 5 mm Yes 1 MFC models only 2 DCP J772DW DCP J7...

Страница 56: ... J772DW DCP J774DW 100 1 Inkjet Paper 20 Glossy Paper Photo 20 Index Card 30 Envelopes 10 Photo Paper Tray DCP J772DW DCP J774DW Photo 10 x 15 cm and Photo L 89 x 127 mm Plain Paper Inkjet Paper Glossy Paper Recycled Paper and Photo 20 Manual Feed Slot DCP J772DW DCP J774DW MFC J890DW MFC J895DW A4 Letter Executive A5 A6 Envelopes C5 Com 10 DL Monarch Photo 10 x 15 cm Photo L 9 x 13 cm Photo 2L 13...

Страница 57: ... m 0 08 to 0 15 mm Inkjet Paper 64 to 200 g m 0 08 to 0 25 mm Glossy Paper 1 2 Up to 220 g m Up to 0 25 mm Cards Photo Card 1 2 Up to 220 g m Up to 0 25 mm Index Card 2 Up to 120 g m Up to 0 15 mm Envelopes 80 to 95 g m Up to 0 52 mm 1 BP71 260 g m paper is specially designed for Brother inkjet machines 2 Up to 120 g m for Manual Feed Slot Related Information Choose the Right Print Media Paper Han...

Страница 58: ...Home Paper Handling Load Documents Load Documents Load Documents in the Automatic Document Feeder ADF Load Documents on the Scanner Glass Unscannable Area 51 ...

Страница 59: ...e page at a time IMPORTANT DO NOT pull on the document while it is feeding DO NOT use paper that is curled wrinkled folded ripped stapled paper clipped pasted or taped DO NOT use cardboard newspaper or fabric Make sure documents with correction fluid or written in ink are completely dry 1 Lift up and unfold the ADF document support 1 1 2 Fan the stack of paper well to avoid paper jams and misfeeds...

Страница 60: ...Related Information Load Documents Copy a Document Error and Maintenance Messages Telephone and Fax problems Other Problems 53 ...

Страница 61: ...o use the scanner glass the ADF must be empty and the ADF document support must be closed 1 Lift the document cover 2 Place the document face down in the upper left corner of the scanner glass aligned with the arrow as shown in the illustration 3 Close the document cover IMPORTANT If you are scanning a book or thick document DO NOT slam or press on the document cover Related Information Load Docum...

Страница 62: ...settings in the application you are using The figures below show the typical unscannable measurements Usage Document Size Top 1 Bottom 3 Left 2 Right 4 Fax A4 3 mm 3 mm 1 Letter 4 mm Legal Copy All paper sizes 3 mm Scan 1 mm 1 mm 1 The unscannable area is 1 mm when using the ADF Related Information Load Documents 55 ...

Страница 63: ...Home Print Print Print from Your Computer Windows Print from Your Computer Mac 56 ...

Страница 64: ...Single Sheet of Paper N in 1 Windows Print as a Poster Windows Print on Both Sides of the Paper Automatically Automatic 2 sided Printing Windows Print as a Booklet Automatically Windows Print a Colour Document in Greyscale Windows Prevent Smudged Printouts and Paper Jams Windows Use a Preset Print Profile Windows Change the Default Print Settings Windows Print Settings Windows 57 ...

Страница 65: ...per in the paper tray 4 Click the Basic tab 5 Click the Media Type drop down list and then select the type of paper you are using IMPORTANT To get the best print quality for the settings you have selected always set the Media Type option to match the type of paper you load 6 Click the Paper Size drop down list and then select your paper size 7 Select the Borderless check box if needed 8 For Colour...

Страница 66: ... Print Settings Windows 59 ...

Страница 67: ...tch the type of paper you load 6 Click the Paper Size drop down list and then select your paper size 7 For Colour Mode select the Natural or Vivid option 8 In the Orientation field select the Portrait or Landscape option to set the orientation of your printout If your application contains a similar setting we recommend that you set the orientation using the application 9 Type the number of copies ...

Страница 68: ...rint or was sent to the print queue in error you may have to delete it to allow subsequent jobs to print 1 Double click the printer icon in the task tray 2 Select the print job you want to cancel 3 Click the Document menu 4 Select Cancel 5 Click Yes Related Information Print from Your Computer Windows Monitor Machine Status from Your Computer Windows 61 ...

Страница 69: ...rientation field select the Portrait or Landscape option to set the orientation of your printout If your application contains a similar setting we recommend that you set the orientation using the application 5 Click the Multiple Page drop down list and then select the 2 in 1 4 in 1 9 in 1 or 16 in 1 option 6 Click the Page Order drop down list and then select your page order 7 Click the Border Lin...

Страница 70: ...XX Printer where XXXX is the name of your model and then click the printing properties or preferences button The printer driver window appears 3 Click the Basic tab 4 Click the Multiple Page drop down list and then select the 1 in 2x2 pages or 1 in 3x3 pages option 5 Change other printer settings if needed 6 Click OK 7 Complete your print operation Related Information Print from Your Computer Wind...

Страница 71: ... where XXXX is the name of your model and then click the printing properties or preferences button The printer driver window appears 3 Click the Basic tab 4 In the Orientation field select the Portrait or Landscape option to set the orientation of your printout If your application contains a similar setting we recommend that you set the orientation using the application 5 Click the 2 sided Booklet...

Страница 72: ...ght Short Edge Left 8 Select the Binding Offset check box if you want to specify the offset for binding in inches or millimetres 9 Click OK to return to the printer driver window 10 Change other printer settings if needed The Borderless feature is not available when using this option 11 Click OK again and then complete your print operation 65 ...

Страница 73: ...Related Information Print from Your Computer Windows Print Settings Windows Print as a Booklet Automatically Windows 66 ...

Страница 74: ...it may wrinkle 1 Select the print command in your application 2 Select Brother MFC XXXX Printer where XXXX is the name of your model and then click the printing properties or preferences button The printer driver window appears 3 Click the Basic tab 4 In the Orientation field select the Portrait or Landscape option to set the orientation of your printout If your application contains a similar sett...

Страница 75: ...t having to change the order of the printed pages You can specify the number of sheets in each smaller booklet set from 1 15 This option can be helpful when folding a printed booklet that has a large number of pages 9 Select the Binding Offset check box if you want to specify the offset for binding in inches or millimetres 10 Click OK to return to the printer driver window 11 Change other printer ...

Страница 76: ...prints your document in 256 levels of greyscale 1 Select the print command in your application 2 Select Brother MFC XXXX Printer where XXXX is the name of your model and then click the printing properties or preferences button The printer driver window appears 3 Click the Advanced tab 4 For Colour Greyscale select Greyscale 5 Change other printer settings if needed 6 Click OK 7 Complete your print...

Страница 77: ... Advanced tab 4 Click the Other Print Options button 5 Select the Reduce Smudge option on the left side of the screen 6 Select one of the following options Media Type Option Description Plain Paper 2 sided Printing or Simplex Printing Off Select this mode to print at normal speed using a normal amount of ink Low Select this mode to print at a slower speed using a normal amount of ink High Select t...

Страница 78: ... printing properties or preferences button The printer driver window appears 3 Click the Print Profiles tab 4 Select your profile from the print profile list The profile settings are shown on the left side of the printer driver window 5 Do one of the following If the settings are correct for your print job click OK To change the settings go back to the Basic or Advanced tab change settings and the...

Страница 79: ...Related Information Print from Your Computer Windows Create or Delete Your Print Profile Windows Print Settings Windows 72 ...

Страница 80: ...anced tab and configure the print settings you want for the new Print Profile 4 Click the Print Profiles tab 5 Do one of the following To create a new print profile a Click Add Profile The Add Profile dialog box appears b Type the new profile name in the Name field c Click the icon you want to use to represent this profile from the icon list d Click OK The new Print Profile name is added to the li...

Страница 81: ... Server 2016 Click Windows System Control Panel In the Hardware and Sound group click View devices and printers For Windows Server 2012 Move your mouse to the lower right corner of your desktop When the menu bar appears click Settings and then click Control Panel In the Hardware group click View devices and printers For Windows Server 2012 R2 Click Control Panel on the Start screen In the Hardware...

Страница 82: ...ted media type Slow Drying Paper Select this option if you use a type of plain paper on which ink dries slowly This option may cause slight blurring of the text 2 Print Quality Select the print resolution you want Because print quality and speed are related the higher the quality the longer it will take to print the document 3 Paper Size Select the size of the paper you want to use You can either ...

Страница 83: ...e copy of your document will print and then reprint according to the number of copies you choose If this option is not selected then each page will print according to the number of copies chosen before the next page of the document is printed Reverse Order Select this option to print your document in reverse order The last page of your document will be printed first 7 Multiple Page Select this opt...

Страница 84: ...ove its sharpness white balance and colour density This process may take several minutes depending on the image size and your computer s specifications 3 Ink Save Mode Select this option to print using lighter colours and emphasise image outlines The amount of ink that is saved varies depending on the type of documents printed Ink Save Mode may make your printouts look different than they appear o...

Страница 85: ...int data transfer mode to improve print quality or print speed Advanced Colour Settings Select the method that the machine uses to arrange dots to express halftones The printout colour can be adjusted to achieve the closest match to what appears on your computer screen Reduce Smudge Some types of print media may need more drying time Change this option if you have problems with smudged printouts o...

Страница 86: ... Change the Default Print Settings Windows Change the Print Setting Options When Having Printing Problems 79 ...

Страница 87: ...Photo Mac Print a Document Mac Print on Both Sides of the Paper Automatically Automatic 2 sided Printing Mac Print More Than One Page on a Single Sheet of Paper N in 1 Mac Print a Colour Document in Greyscale Mac Prevent Smudged Printouts and Paper Jams Mac Print Options Mac 80 ...

Страница 88: ...s your model name For more page setup options click the Show Details button 4 Click the Paper Size pop up menu and then select your paper size To print photographs without margins select a borderless paper size option 5 Click the Orientation button that matches the way you want the photo to print 6 Click the application pop up menu and then select Print Settings The Print Settings options appear 7...

Страница 89: ...and then select your paper size 5 Select the Orientation option that matches the way you want the document to print 6 Click the application pop up menu and then select Print Settings The Print Settings options appear 7 Click the Media Type pop up menu and then select the media type you want to use IMPORTANT To get the best print quality for the settings you have selected always set the Media Type ...

Страница 90: ...your model name For more page setup options click the Show Details button 3 Select the Orientation option that matches the way you want the document to print 4 Click the application pop up menu and then select Layout The Layout setting options appear 5 In the Two Sided section select the Short Edge binding or Long Edge binding option 6 Change other printer settings if needed The Borderless feature...

Страница 91: ...our model name For more page setup options click the Show Details button 3 Click the application pop up menu and then select Layout The Layout setting options appear 4 Click the Pages per Sheet pop up menu and then select the number of pages to print on each sheet 5 Select the Layout Direction option 6 Click the Border pop up menu and then select your border line type 7 Change other printer settin...

Страница 92: ...eyscale 1 From an application such as Apple TextEdit click the File menu and then select Print 2 Select Brother MFC XXXX where XXXX is your model name For more page setup options click the Show Details button 3 Click the application pop up menu and then select Print Settings The Print Settings options appear 4 Click the Color Grayscale pop up menu and then select the Grayscale option 5 Change othe...

Страница 93: ...op up menu and then select Print Settings The Print Settings options appear 4 Click the Advanced print settings list 5 Click the Reduce Smudge menu 6 Select one of the following options Media Type Option Description Plain Paper 2 sided Printing or Simplex Printing Off Select this mode to print at normal speed using a normal amount of ink Low Select this mode to print at a slower speed using a norm...

Страница 94: ...ose from standard paper sizes or create a custom paper size 2 Orientation Select the orientation portrait or landscape of your printout If your application contains a similar setting we recommend that you set the orientation using the application 3 Scale Type a value into the field to enlarge or reduce the pages in your document to fit the selected paper size 87 ...

Страница 95: ...eet of paper 3 Border Select the type of border to use when printing multiple pages on a single sheet of paper 4 Two Sided Select whether to print on both sides of the paper 5 Reverse page orientation Select this option to rotate the printed image 180 degrees 6 Flip horizontally Select this option to reverse the printed image on the page horizontally from left to right 88 ...

Страница 96: ...t page of the document is printed 2 Page Order Select the page order 3 Scale to fit paper size Select this option to enlarge or reduce the pages in your document to fit the selected paper size 4 Destination Paper Size Select the paper size to print on 5 Scale down only Select this option if you want to reduce the pages in your document when they are too large for the selected paper size If this op...

Страница 97: ...er in greyscale mode than it is in colour mode If your document contains colour and you select greyscale mode your document will be printed using 256 levels of greyscale 5 Advanced Change Data Transfer Mode Select the print data transfer mode to improve print quality or print speed Reduce Smudge Some types of print media may need more drying time Change this option if you have problems with smudge...

Страница 98: ...ed Colour Settings Select the Colour Enhancement check box and then set the options using the sliders This process may take several minutes depending on the size of the image and the specifications of your computer Related Information Print from Your Computer Mac Error and Maintenance Messages Paper Handling and Printing Problems Print a Photo Mac Print a Document Mac Print on Both Sides of the Pa...

Страница 99: ...Home Scan Scan Scan Using the Scan Button on Your Brother Machine Scan from Your Computer Windows Scan from Your Computer Mac 92 ...

Страница 100: ...a PDF File Save Scanned Data to a Memory Card or USB Flash Drive Scan Multiple Business Cards and Photos Auto Crop Scan to an Editable Text File Using OCR Scan to Email Attachment Web Services for Scanning on Your Network Windows 7 Windows 8 and Windows 10 Change Scan Button Settings from ControlCenter4 Windows Change Scan Button Settings from Brother iPrint Scan Mac 93 ...

Страница 101: ...of the following To change the settings press Options or Set at Device Press Start to start scanning without changing additional settings The machine starts scanning If using the machine s scanner glass follow the LCD instructions to complete the scanning job To use the Options or Set at Device setting a computer with either ControlCenter4 Windows or Brother iPrint Scan Mac software installed must...

Страница 102: ... you want to make this a One Touch Shortcut Follow the LCD instructions 6 Press Start The machine starts scanning If using the machine s scanner glass follow the LCD instructions to complete the scanning job Related Information Scan Using the Scan Button on Your Brother Machine 95 ...

Страница 103: ...press OK 4 Do one of the following To change the settings press Options or Set at Device and then go to the next step Press Start to start scanning without changing additional settings The machine starts scanning If using the machine s scanner glass follow the LCD instructions to complete the scanning job To use the Options or Set at Device settings a computer with ControlCenter4 Windows or Brothe...

Страница 104: ... you want to make this a One Touch Shortcut Follow the LCD instructions 6 Press Start The machine starts scanning If using the machine s scanner glass follow the LCD instructions to complete the scanning job Related Information Scan Using the Scan Button on Your Brother Machine 97 ...

Страница 105: ...llow the LCD instructions to complete the scanning job 6 Select the scan settings you want to change and then press OK Option Description Scan Type Select the scan type for your document Resolution Select the scan resolution for your document File Type Select the file format for your document Document Size Select your document size Scan Long Paper ADF MFC J890DW MFC J895DW Scan a long document usi...

Страница 106: ...ng the memory card or USB flash drive from the machine IMPORTANT The LCD displays a message while reading the data DO NOT unplug the power cord or remove the memory card or USB flash drive from the machine while it is reading the data You could lose your data or damage the memory card or USB flash drive Related Information Scan Using the Scan Button on Your Brother Machine Compatible Media 99 ...

Страница 107: ...lash drives and digital cameras that use the USB mass storage standard Other USB devices are not supported Compatible Memory Cards USB flash drive Compatible Memory Cards SD Memory Card SDHC Memory Card SDXC Memory Card MultiMediaCard MultiMediaCard plus miniSD Adapter required miniSDHC Adapter required microSD Adapter required microSDHC Adapter required MultiMediaCard mobile Adapter required Rela...

Страница 108: ...ce the documents at least 10 mm away from each other Auto Crop adjusts the skew of the document on the scanner glass however if your document is skewed more than 45 degrees at less than 300 x 300 dpi or 10 degrees at 600 x 600 dpi this feature will not work The ADF must be empty to use Auto Crop ADF models only The Auto Crop feature is available for a maximum of 16 documents depending on the size ...

Страница 109: ...Related Information Scan Using the Scan Button on Your Brother Machine 102 ...

Страница 110: ... press the computer name If the LCD prompts you to enter a PIN use the LCD to enter the four digit PIN for the computer and then press OK 4 Do one of the following To change the settings press Options or Set at Device Press Start to start scanning without changing additional settings The machine starts scanning If using the machine s scanner glass follow the LCD instructions to complete the scanni...

Страница 111: ...tcut press Save as Shortcut You will be asked if you want to make this a One Touch Shortcut Follow the LCD instructions 6 Press Start The machine starts scanning If using the machine s scanner glass follow the LCD instructions to complete the scanning job Related Information Scan Using the Scan Button on Your Brother Machine 104 ...

Страница 112: ... If the LCD prompts you to enter a PIN use the LCD to enter the four digit PIN for the computer and then press OK 4 Do one of the following To change the settings press Options or Set at Device Press Start to start scanning without changing additional settings The machine scans the document and saves it as a file attachment It then launches your email application and opens a new blank email messag...

Страница 113: ...ess Save as Shortcut You will be asked if you want to make this a One Touch Shortcut Follow the LCD instructions 6 Press Start The machine scans the document and saves it as a file attachment It then launches your email application and opens a new blank email message with the scanned file attached Related Information Scan Using the Scan Button on Your Brother Machine 106 ...

Страница 114: ... and Windows 10 The Web Services protocol enables Windows 7 Windows 8 and Windows 10 users to scan using a Brother machine on the network You must install the driver via Web Services Use Web Services to Install Drivers Used for Scanning Windows 7 Windows 8 and Windows 10 Scan Using Web Services from the Brother Machine Windows 7 Windows 8 and Windows 10 Configure Scan Settings for Web Services 107...

Страница 115: ...s 8 Move your mouse to the lower right corner of your desktop When the menu bar appears click Settings Change PC settings Devices Add a device The machine s Web Services Name appears Windows 8 1 Move your mouse to the lower right corner of your desktop When the menu bar appears click Settings Change PC settings PC and devices Devices Add a device The machine s Web Services Name appears Windows 10 ...

Страница 116: ...racters in the messages displayed on the LCD may be replaced with spaces if the language settings of your OS and your Brother machine are different If the LCD displays an insufficient memory error message choose a smaller size in the Paper size setting or a lower resolution in the Resolution DPI setting 1 Load your document 2 Press Scan WS Scan 3 Press a or b to select the type of scan you want an...

Страница 117: ... devices and printers 2 Right click the machine icon and then select Scan profiles The Scan Profiles dialog box appears 3 Select the scan profile you want to use 4 Make sure the scanner selected in the Scanner list is a Brother machine that supports Web Services for scanning and then click the Set as Default button 5 Click Edit The Edit Default Profile dialog box appears 6 Select the Source Paper ...

Страница 118: ...s from ControlCenter4 Windows 1 Click the ControlCenter4 icon in the task tray and then click Open 2 Click the Device Settings tab 3 Click the Device Scan Settings button The Device Scan Settings dialog box appears 4 Click the tab for the Scan to action you want to change Image OCR E mail or File 5 Change the settings as needed 6 Click OK 111 ...

Страница 119: ... Yes Yes Brightness Yes Yes Yes Yes Contrast Yes Yes Yes Yes Auto Crop Yes Yes Yes ID Card Scan Yes Yes Yes Yes Advanced Settings Yes Yes Yes Yes Default Yes Yes Yes Yes File Type Select the file type you want to use for the scanned data Target Application Select the destination application from the drop down list OCR Language Set the optical character recognition OCR language to match the languag...

Страница 120: ...ze drop down list If you select the 1 to 2 A4 option the scanned image will be divided into two A5 size documents Brightness Set the Brightness level by dragging the slider to the right or left to lighten or darken the image If the scanned image is too light set a lower brightness level and scan the document again If the image is too dark set a higher brightness level and scan the document again Y...

Страница 121: ... your computer screen the number of total pages saved and blank pages skipped Default Select this option to restore all settings to their factory setting values Related Information Scan Using the Scan Button on Your Brother Machine 114 ...

Страница 122: ...click the iPrint Scan icon The Brother iPrint Scan screen appears 2 If your Brother machine is not selected click the Select your Machine button and then follow the on screen instructions to select your Brother machine 3 Click the Machine Scan Settings button and then follow the on screen instructions to change the scan settings Related Information Scan Using the Scan Button on Your Brother Machin...

Страница 123: ...r Brother machine Use the software applications provided by Brother or use your favourite scanning application Scan Using ControlCenter4 Home Mode Windows Scan Using ControlCenter4 Advanced Mode Windows Scan Using Nuance PaperPort 14SE or Other Windows Applications Scan Using Windows Fax and Scan Install BookScan Enhancer and Whiteboard Enhancer Windows 116 ...

Страница 124: ...e Mode Windows Use ControlCenter4 Home Mode to access your machine s main features Scan Using ControlCenter4 Home Mode Windows Save Scanned Data to a Folder as a PDF File Using ControlCenter4 Home Mode Windows Scan Settings for ControlCenter4 Home Mode Windows Change the Operation Mode in ControlCenter4 Windows 117 ...

Страница 125: ...n Size if needed 6 Click Scan The machine starts scanning and the scanned image appears in the image viewer 7 If you scanned multiple pages using the ADF click the left or right arrow buttons to preview each scanned page ADF models only 8 Crop the scanned image if needed 9 Do one of the following Click Save to save scanned data Click Print to print scanned data Click Open with an Application to op...

Страница 126: ...pe Using ControlCenter4 Home Mode Windows Change Scan Size Using ControlCenter4 Home Mode Windows Crop a Scanned Image Using ControlCenter4 Home Mode Windows Print Scanned Data Using ControlCenter4 Home Mode Windows Open with an Application Using ControlCenter4 Home Mode Windows 119 ...

Страница 127: ...Mode Windows Select the Document Type option that matches the type of original you want to scan Option Description Photo 600 x 600 dpi 24bit Colour Text and Graph 300 x 300 dpi 24bit Colour Monochrome Text 200 x 200 dpi Black White Custom 300 x 300 dpi 24bit Colour as default Select the scan settings you want from the Custom Settings button Related Information Scan Using ControlCenter4 Home Mode W...

Страница 128: ...e but produce a finer scanned image Scan Type Select from a range of scan colour depths Auto Use for any type of document This mode automatically picks an appropriate colour depth for the document Black White Use for text or line art images Grey Error Diffusion Use for photographic images or graphics Error Diffusion is a method for creating simulated grey images without using true grey dots Black ...

Страница 129: ...ine will scan each document and create separate files or a single multi page file Continuous Scanning Select this option to scan multiple pages After a page is scanned select either continue scanning or finish ID Card Scan Select this check box to scan both sides of an identification card onto one page Advanced Settings Configure advanced settings by clicking the Advanced Settings button in the Sc...

Страница 130: ...olCenter4 Home Mode Windows Change Scan Size Using ControlCenter4 Home Mode Windows Change Scan Size Using ControlCenter4 Home Mode Windows For faster scan speeds select the exact size of your document from the Scan Size drop down menu Related Information Scan Using ControlCenter4 Home Mode Windows 123 ...

Страница 131: ...splays the scanned image so that the entire image fits in the window 3 Zoom In Zooms in on the scanned image 4 Zoom Out Zooms out of the scanned image 5 Crop and Edit Removes the outer parts of the image Click the Crop and Edit button and then change the frame to contain the area you want to keep after cropping 6 Page Counter Indicates the page number of the scanned page currently shown in the ima...

Страница 132: ...c Zooms out of the image d Rotates the image counter clockwise 90 degrees e Rotates the image clockwise 90 degrees f Click and drag the frame to adjust the area to be cropped 3 Click OK The edited image appears in the image viewer Related Information Scan Using ControlCenter4 Home Mode Windows 125 ...

Страница 133: ...ine and then print copies using the printer driver features that are available in ControlCenter4 1 Scan a document 2 Click Print a Shows which images are currently selected b Click the Properties button to change specific printer settings c Select the Paper Size Media Type and Layout options The current settings are enclosed in a blue square 3 Configure the print settings and then click the Start ...

Страница 134: ...an Application Using ControlCenter4 Home Mode Windows The Open with an Application button lets you scan an image directly into your graphics application for editing 1 Click the Open with an Application button 2 Select the application from the drop down list and then click OK The image will be opened in the application you have selected Related Information Scan Using ControlCenter4 Home Mode Window...

Страница 135: ...e setting for ControlCenter4 1 Load your document 2 Click the ControlCenter4 icon in the task tray and then click Open 3 Click the Scan tab 4 Select the Document Type 5 Change the size of your document if needed 6 Click Scan The machine starts scanning and the scanned image appears in the image viewer 7 Click the left or right arrow buttons to preview each scanned page 8 Click Save The Save dialog...

Страница 136: ...st click and then type the password 10 To change the file name click the Change button if needed 11 Click the folder icon to browse and select the folder where you want to save your scanned documents 12 Click OK The scanned document is saved to the destination folder as a PDF Related Information Scan Using ControlCenter4 Home Mode Windows 129 ...

Страница 137: ...work Graphics png PDF Single Page pdf recommended for scanning and sharing documents PDF Multi Page pdf recommended for scanning and sharing documents High Compression PDF Single Page pdf High Compression PDF Multi Page pdf Secure PDF Single Page pdf Secure PDF Multi Page pdf Searchable PDF Single Page pdf Searchable PDF Multi Page pdf XML Paper Specification xps the XML Paper Specification is ava...

Страница 138: ... to specify the destination where you want to save your scanned documents Show Folder Select this option to automatically display the destination folder after scanning File Size Priority Adjust the data compression ratio of the scanned image Change the file size by moving the File Size Priority slider to the right or left Custom Settings Select the Custom option click the Custom Settings button an...

Страница 139: ...ControlCenter4 Advanced Mode Windows Save Scanned Data to a Folder as a PDF File Using ControlCenter4 Advanced Mode Windows Scan Both Sides of an ID Card Using ControlCenter4 Advanced Mode Windows Scan to Email Attachment Using ControlCenter4 Advanced Mode Windows Scan to an Editable Text File OCR Using ControlCenter4 Advanced Mode Windows Scan to an Office File Using ControlCenter4 Advanced Mode ...

Страница 140: ...can Photos and Graphics Using ControlCenter4 Advanced Mode Windows Send scanned photos or graphics directly to your computer Select Advanced Mode as the mode setting for ControlCenter4 1 Load your document 2 Click the ControlCenter4 icon in the task tray and then click Open 3 Click the Scan tab 4 Click the Image button The scan settings dialog box appears 133 ...

Страница 141: ...e the file name click Change To change Destination Folder click the folder icon To preview and configure the scanned image select the PreScan check box 6 Click Scan The machine starts scanning The image opens in the application you have selected Related Information Scan Using ControlCenter4 Advanced Mode Windows 134 ...

Страница 142: ... Advanced Mode Windows Save Scanned Data to a Folder as a PDF File Using ControlCenter4 Advanced Mode Windows Scan documents and save them to a folder on your computer as PDF files Select Advanced Mode as the mode setting for ControlCenter4 1 Load your document 2 Click the ControlCenter4 icon in the task tray and then click Open 3 Click the Scan tab 135 ...

Страница 143: ...down list click and then type the password 6 Click the folder icon to browse and select the folder where you want to save your scanned documents 7 Change the scan settings such as file format file name resolution and colour if needed To preview and configure the scanned image select the PreScan check box 8 Click Scan The machine starts scanning The file is saved in the folder you selected Related ...

Страница 144: ... Card Using ControlCenter4 Advanced Mode Windows Scan Both Sides of an ID Card Using ControlCenter4 Advanced Mode Windows Select Advanced Mode as the mode setting for ControlCenter4 1 Place an ID card on the scanner glass 2 Click the ControlCenter4 icon in the task tray and then click Open 3 Click the Scan tab 137 ...

Страница 145: ...7 Change the scan settings such as file format file name scan location resolution and colour if needed 8 Click Scan The machine starts scanning one side of the identification card 9 After the machine has scanned one side turn over the identification card and then click Continue to scan the other side 10 Click Finish Related Information Scan Using ControlCenter4 Advanced Mode Windows 138 ...

Страница 146: ...Select Advanced Mode as the mode setting for ControlCenter4 The Scan to Email feature does not support Webmail services Use the Scan to Image or Scan to File feature to scan a document or a picture and then attach the scanned file to an email message The machine scans to your default email client 1 Load your document 2 Click the ControlCenter4 icon in the task tray and then click Open 3 Click the ...

Страница 147: ...hange To change Destination Folder click the folder icon To preview and configure the scanned image select the PreScan check box 6 Click Scan The machine starts scanning Your default email application opens and the scanned image is attached to a new blank email message Related Information Scan Using ControlCenter4 Advanced Mode Windows 140 ...

Страница 148: ...Mode Windows Your machine can convert characters in a scanned document to text using optical character recognition OCR technology You can edit this text using your preferred text editing application Select Advanced Mode as the mode setting for ControlCenter4 1 Load your document 2 Click the ControlCenter4 icon in the task tray and then click Open 3 Click the Scan tab 4 Click the OCR button The sca...

Страница 149: ...k Change To change Destination Folder click the folder icon To preview and configure the scanned image select the PreScan check box 6 Click Scan The machine scans the document converts it to editable text and then sends it to your default word processing application Related Information Scan Using ControlCenter4 Advanced Mode Windows 142 ...

Страница 150: ...computer must be connected to the Internet 1 Load your document 2 Click the ControlCenter4 icon in the task tray and then click Open 3 Click the Scan tab 4 Click the E mail or File button The scan settings dialog box appears 5 Click the File Type drop down list and then select the Microsoft Office Word docx Microsoft Office PowerPoint pptx or Microsoft Office Excel xlsx option 6 Change the scan se...

Страница 151: ...nning Yes Yes Yes Yes Auto Crop Yes Yes Yes ID Card Scan Yes Yes Yes Yes Advanced Settings Yes Yes Yes Yes Default Yes Yes Yes Yes File Type Select the file type you want to use for the scanned data For Image E mail and File Windows Bitmap bmp JPEG jpg recommended for most users when scanning pictures TIFF Single Page tif TIFF Multi Page tif Portable Network Graphics png PDF Single Page pdf recomm...

Страница 152: ...save your scanned documents Scan Location Select the Folder or SharePoint radio button to specify the destination where you want to save your scanned documents Show Folder Select this option to automatically display the destination folder after scanning Show Save As Window Select this option to specify the scanned image s destination every time you scan File Size Priority Adjust the data compressi...

Страница 153: ...rease the Contrast level by moving the slider to the right or left An increase emphasises dark and light areas of the image while a decrease reveals more details in grey areas You can also type a value into the field to set the Contrast level Continuous Scanning Select this option to scan multiple pages After a page is scanned select either continue scanning or finish Auto Crop Scan multiple docum...

Страница 154: ...supports both TWAIN and WIA drivers the TWAIN driver recommended is used in these steps Depending on the model of your machine Nuance PaperPort 14SE may not be included If it is not included you can use other software applications that support scanning 1 Load your document 2 Start PaperPort 14SE Do one of the following Windows 7 Using your computer click Start All Programs Nuance PaperPort 14 Pape...

Страница 155: ...ment Size drop down list and then select your document size 10 Click PreScan if you want to preview your image and crop unwanted portions before scanning 11 Click Start The machine starts scanning Related Information Scan from Your Computer Windows TWAIN Driver Settings Windows 148 ...

Страница 156: ...you want to scan Scan Image Type Resolution Scan Type Photo Use for scanning photo images 300 x 300 dpi 24bit Colour Web Use for attaching the scanned image to web pages 100 x 100 dpi 24bit Colour Text Use for scanning text documents 200 x 200 dpi Black White 2 Resolution Select a scanning resolution from the Resolution drop down list Higher resolutions take more memory and transfer time but produ...

Страница 157: ...agging the slider to the right or left to lighten or darken the image If the scanned image is too light set a lower brightness level and scan the document again If the image is too dark set a higher brightness level and scan the document again You can also type a value in the field to set the brightness level 6 Contrast Increase or decrease the Contrast level by moving the slider to the right or l...

Страница 158: ...acters of the original sharper Reduce Noise Improve and enhance the quality of your scanned images with this selection The Reduce Noise option is available when selecting the 24bit Colour option and the 300 x 300 dpi 400 x 400 dpi or 600 x 600 dpi scan resolution Paper Handling Edge Fill Fill in the edges on four sides of the scanned image using the selected colour and range Continuous Scan Select...

Страница 159: ...e scanner glass also called the flatbed 1 Load your document 2 Launch Windows Fax and Scan 3 Click File New Scan 4 Select the scanner you want to use 5 Click Import or OK The New Scan dialog box appears 6 Adjust the settings in the Scanner Setup dialog box if needed The scanner resolution can be set to a maximum of 1200 dpi If you want to scan at higher resolutions use the Scanner Utility software...

Страница 160: ... WIA Driver Settings Windows 153 ...

Страница 161: ... option from the drop down list Picture Type Image Type Select Color picture Grayscale picture Black and white picture or text or Custom Settings for the type of document you want to scan To change advanced settings click the Adjust the quality of the scanned picture link Page size The Page size option is available if you select the Document Feeder as the Paper source option 154 ...

Страница 162: ...in Contrast Increase or decrease the Contrast level by moving the slider to the right or left An increase emphasises dark and light areas of the image while a decrease reveals more details in grey areas You can also type a value in the field to set the contrast level Resolution DPI Select a scanning resolution from the Resolution DPI list Higher resolutions take more memory and transfer time but p...

Страница 163: ...d enhance text and images in photos taken of a whiteboard These applications are not available for Windows Server series The machine must be turned on and connected to the computer The computer must be connected to the Internet You must be logged on with Administrator access privileges 1 Click Brother Utilities 2 Select your machine from the drop down list 3 Select Do More in the left navigation b...

Страница 164: ...eral ways you can use your Mac to scan photos and documents on your Brother machine Use the software applications provided by Brother or your favourite scanning application Scan Using Brother iPrint Scan Mac Scan Using TWAIN Compliant Applications Mac Scan Using AirPrint macOS 157 ...

Страница 165: ...rint Scan screen appears 2 If your Brother machine is not selected click the Select your Machine button and then follow the on screen instructions to select your Brother machine 3 Click the Scan icon and then follow the on screen instructions to scan your documents Related Information Scan from Your Computer Mac Brother iPrint Scan for Windows and Mac Change Scan Button Settings from Brother iPrin...

Страница 166: ...t your graphics application and then select the scan operation The scanner setup dialog box appears 2 Change the scan settings such as Resolution Scan Type or Adjust Image if needed 3 Click the Document Size pop up menu and then select your document size 4 Click the PreScan option to preview your image and crop unwanted portions before scanning After you select a document size adjust the scanning ...

Страница 167: ...ur depths Black White Use for text or line art images Gray Error Diffusion Use for photographic images or graphics Error Diffusion is a method for creating simulated grey images without using true grey dots Black dots are put in a specific pattern to give a grey appearance True Gray Use for photographic images or graphics This mode is more accurate because it uses up to 256 shades of grey 24bit Co...

Страница 168: ...e brightness Contrast Increase or decrease the Contrast level by moving the slider to the right or left An increase emphasises dark and light areas of the image while a decrease reveals more details in grey areas You can also type a value in the box to set the contrast Reduce Noise Improve and enhance the quality of your scanned images with this selection The Reduce Noise option is available when ...

Страница 169: ...py Copy Copy a Document Enlarge or Reduce Copied Images Sort Copies Make Page Layout Copies N in 1 or Poster Copy on Both Sides of the Paper 2 sided Copy Copy an ID Card Copy in Ink Save Mode Copy Options 162 ...

Страница 170: ...hscreen Press to display the keyboard on the touchscreen and then enter the number of copies using the touchscreen keyboard Press OK Options Press to change the copy settings for the next copy only When you have finished changing settings press OK Current setting indications Press the area indicated on the screen in the previous step to change these settings for the next copy only Quality Paper Ty...

Страница 171: ...Related Information Copy Load Documents in the Automatic Document Feeder ADF Load Documents on the Scanner Glass Copy Options 164 ...

Страница 172: ...e the displayed percentage or press d to move the cursor and then enter an enlargement or reduction ratio from 25 to 400 Press OK If you selected 100 or the Fit to Page option go to the next step 7 Read and confirm the displayed list of options you have selected and then press OK 8 When you have finished changing settings press Mono Start or Colour Start If you selected the Fit to Page option your...

Страница 173: ...oard Press OK 4 Press Options Stack Sort Sort 5 Read and confirm the displayed list of settings you have selected and then press OK 6 When you have finished changing settings press Mono Start or Colour Start If you placed the document in the ADF ADF models only the machine scans the document and starts printing 7 If you are using the scanner glass repeat the following steps for each page of the do...

Страница 174: ... a poster use the scanner glass Make sure the paper size is set to A4 or Letter You can make only one Poster copy at a time 1 Load your document 2 Press Copy 3 Enter the number of copies in one of the following ways Press or on the touchscreen Press to display the keyboard on the touchscreen and then enter the number of copies using the touchscreen keyboard Press OK 4 Press Options Page Layout 5 P...

Страница 175: ...hen press OK 7 When you have finished changing settings press Mono Start or Colour Start If you placed the document in the ADF ADF models only or are making a poster the machine scans the pages and starts printing 8 If you are using the scanner glass repeat the following steps for each page of the document Place the next page on the scanner glass and then press Continue to scan the page After scan...

Страница 176: ...ed copies from a 2 sided document use the scanner glass You can use only A4 A5 or Letter size plain paper Portrait 1 sided to 2 sided Long Edge Flip 1 sided to 2 sided Short Edge Flip 2 sided to 2 sided 1 1 2 1 1 2 Landscape 1 sided to 2 sided Long Edge Flip 1 sided to 2 sided Short Edge Flip 2 sided to 2 sided 1 Load your document 2 Press Copy 3 Enter the number of copies in one of the following ...

Страница 177: ...s only the machine scans the pages and starts printing 9 If you are using the scanner glass repeat the following steps for each page of the document Place the next page on the scanner glass and then press Continue to scan the page After scanning all the pages press Finish DO NOT touch the printed page until it is ejected the second time The machine will print the first side and eject the paper and...

Страница 178: ... greater top left b 207 mm c 145 mm d Scannable area 2 Press Copy 3 Enter the number of copies in one of the following ways Press or on the touchscreen Press to display the keyboard on the touchscreen and then enter the number of copies using the touchscreen keyboard Press OK 4 Press Options Page Layout 2in1 ID 5 Read and confirm the displayed list of settings you have selected When you have finis...

Страница 179: ...Related Information Copy 172 ...

Страница 180: ...ment The Ink Save Mode feature is supported by technology from Reallusion Inc 1 Load your document 2 Press Copy 3 Enter the number of copies in one of the following ways Press or on the touchscreen Press to display the keyboard on the touchscreen and then enter the number of copies using the touchscreen keyboard Press OK 4 Press Options Advanced Settings Ink Save Mode 5 Read and confirm the displa...

Страница 181: ...t ratio for the next copy Reduce Select a reduction ratio for the next copy Fit to Page Adjusts the copy size to fit on the paper size you have set Custom 25 400 Enter an enlargement or reduction ratio 2 sided Copy Select to copy on both sides of the paper 1 sided 2 sided 2 sided 2 sided 1 1 2 1 1 2 Density Increase the density to make the text darker Decrease the density to make the text lighter ...

Страница 182: ...of images Thin Paper Copy Avoids bleeding through thin paper when copying Book Copy Corrects dark borders and skew when copying from the scanner glass Watermark Copy Places text in your document as a watermark Set New Default Saves the copy settings that you use most often by setting them as the default settings Factory Reset Restores any changed copy settings to the factory settings 175 ...

Страница 183: ...t settings by pressing Save as Shortcut MFC J890DW MFC J895DW The Ink Save Mode Thin Paper Copy Book Copy and Watermark Copy features are supported by technology from Reallusion Inc Related Information Copy Copy a Document 176 ...

Страница 184: ...Home Fax Fax Send a Fax Receive a Fax Voice Operations and Fax Numbers Telephone Services and External Devices Fax Reports PC FAX 177 ...

Страница 185: ...Manually Send a Fax at the End of a Conversation Send the Same Fax to More than One Recipient Broadcasting Send a Fax in Real Time Send a Fax at a Specified Time Delayed Fax Change the Fax Auto Redial Setting Cancel a Fax in Progress Check and Cancel a Pending Fax Fax Options 178 ...

Страница 186: ...y Address Book Press Address Book Do one of the following Select the number you want and then press Apply Press and then enter the first letter of the name and press OK Press the name you want to dial If the name has two numbers press the number you want Press Apply 4 To change the fax settings press Options When finished press OK 5 Press Fax Start If you are using the ADF the machine starts scann...

Страница 187: ... finished scanning pages The machine starts sending the document Press Yes to scan another page Place the next page on the scanner glass and then press OK The machine starts scanning the page Repeat this step for each additional page Related Information Send a Fax Fax Options 180 ...

Страница 188: ... receiving tones while sending a fax 1 Load your document 2 To listen for a dial tone pick up the handset of the external telephone 3 Dial the fax number using the external telephone 4 When you hear fax tones press and then press Fax Start If you are using the scanner glass press Send 5 Replace the handset of the external phone Related Information Send a Fax 181 ...

Страница 189: ...n you can send a fax to the other party before you both hang up 1 Ask the other party to wait for fax tones beeps and to press the Start key before hanging up 2 Load your document 3 Press to display the Fax Start button 4 Press Fax Start If you are using the scanner glass press Send 5 Replace the handset of the external telephone Related Information Send a Fax 182 ...

Страница 190: ...ress Add Number You can add numbers to the broadcast in the following ways Press Add Number and enter a fax number using the dial pad Press OK Press Add from Address book Press a or b to display the numbers you want to add to the broadcast Select the check boxes of the numbers you want to add When finished press OK Press Search in Address book Press the first letter of the name and press OK Press ...

Страница 191: ... Cancel a Broadcast in Progress Set up Groups for Broadcasting Enter Text on Your Brother Machine 184 ...

Страница 192: ...adcast job 1 Press to return to the Home screen 2 Press 3 Do one of the following To cancel the entire broadcast press Entire Broadcast Press Yes to confirm or press No to exit without cancelling To cancel the current number being dialled press the name or number on the touchscreen Press Yes to confirm or press No to exit without cancelling To exit without cancelling press Related Information Send...

Страница 193: ...eve the scan from its memory turn on Real Time TX If you are sending a colour fax or if the machine s memory is full and you are sending a monochrome fax from the ADF the machine sends the document in real time even if Real Time TX is set to Off In Real Time Transmission the automatic redial feature does not work when using the scanner glass 1 Load your document 2 Press Fax If Fax Preview is set t...

Страница 194: ... Delayed Fax 5 Press On 6 Press Set Time 7 Enter the time you want the fax to be sent using the touchscreen Press OK The number of pages you can scan into the memory depends on the amount and type of data 8 Press OK 9 Enter the fax number 10 Press Fax Start If you are using the scanner glass go to the next step 11 When the touchscreen displays Next page do one of the following Press No when finish...

Страница 195: ...J895DW If you are sending a fax automatically and the line is busy when the Fax Auto Redial setting is set to On the machine redials up to three times at five minute intervals The default setting is On 1 Press Settings All Settings Initial Setup Fax Auto Redial 2 Press On or Off 3 Press Related Information Send a Fax 188 ...

Страница 196: ...dels MFC J890DW MFC J895DW 1 Press to return to the Home screen 2 Press to cancel a fax that is already in progress 3 When you press while the machine is dialling or sending the touchscreen displays Cancel Job Press Yes Related Information Send a Fax Telephone and Fax problems 189 ...

Страница 197: ...n memory the LCD displays No Jobs Waiting You can cancel a fax job before it is sent 1 Press Settings All Settings Fax Remaining Jobs 2 Do the following for each fax job you want to check or cancel a Press a or b to scroll through the waiting jobs If needed press the job you want to cancel b Press OK c Press Yes to confirm or press No to exit without cancelling 3 When finished press Related Inform...

Страница 198: ...them immediately Use the ADF to send colour faxes with multiple pages You cannot send a colour fax when Preview is set to On Delayed Fax monochrome only Set the time of day the delayed faxes will be sent Batch TX monochrome only Economise by sending all delayed faxes scheduled for the same time and fax number as one fax to save transmission time Real Time TX Send a fax immediately without waiting ...

Страница 199: ...x Receive a Fax Receive Mode Settings Fax Preview Shrink Page Size of an Oversized Incoming Fax Set the Fax Receive Stamp Receive a Fax at the End of a Telephone Conversation Memory Receive Options Remote Fax Retrieval 192 ...

Страница 200: ...x Receive Mode Settings Receive Mode Settings Receive Modes Overview Choose the Correct Receive Mode Set the Number of Rings Before the Machine Answers Ring Delay Set the F T Ring Time Pseudo Double ring Set Fax Detect 193 ...

Страница 201: ...e Manual Manual mode turns off all automatic answering functions unless you are using the BT Call Sign feature To receive a fax in Manual mode lift the handset of the external telephone When you hear fax tones short repeating beeps press the Start button and then select Receive to receive a fax You can also use the Fax Detect feature to receive faxes by lifting a handset on the same line as the ma...

Страница 202: ...ted on the same line as the machine Yes Fax Only No No No Manual Yes External TAD Fax Tel Are you using the voice message function of an external telephone answering device Do you want the machine to answer fax and telephone calls automatically Yes 1 Press Settings All Settings Fax Setup Receive Receive Mode If the option to change the Receive Mode is unavailable make sure the BT Call Sign feature...

Страница 203: ...ne rings before it answers in Fax Only and Fax Tel modes If you have external or extension telephones on the same line as the machine select the maximum number of rings 1 Press Settings All Settings Fax Setup Receive Ring Delay 2 Press the number of times you want the line to ring before the machine answers If you select 0 the machine will answer immediately and the line will not ring at all avail...

Страница 204: ... hear the F T ring it means that a voice caller is on the line Because the F T ring is a setting only on your Brother machine extension and external telephones will not ring however you can still answer the machine s call on any telephone 1 Press Settings All Settings Fax Setup Receive F T Ring Time 2 Press how long the machine will double ring to alert you to a voice call 3 Press Even if the call...

Страница 205: ...tton and then select Receive to receive the fax If you answered at an extension or external telephone press 51 If Fax Detect is set to On but your machine does not connect a fax call when you lift an extension or external telephone handset press the remote activation code 51 If you send faxes from a computer on the same telephone line and the machine intercepts them set Fax Detect to Off 1 Press S...

Страница 206: ...Home Fax Receive a Fax Fax Preview Fax Preview Use the Fax Preview feature to view received faxes on the LCD Set Fax Preview to On Preview New Faxes 199 ...

Страница 207: ...Fax Receive Stamp is turned on the Fax Preview screen will not display the received date and time 1 Press Settings 2 Press Fax Preview 3 Press On or Off The touchscreen displays a message saying future received faxes will not be printed 4 Press Yes 5 Press If faxes are stored in the memory when you change Fax Preview to Off do one of the following If you do not want to print the stored faxes press...

Страница 208: ...s old and new faxes A blue mark appears next to new faxes Press the fax you want If you want to print or delete all the faxes in the list press Print Delete Do one of the following Press Print All New Faxes to print all faxes you have not yet viewed Press Print All Old Faxes to print all faxes you have viewed Press Delete All New Faxes to delete all faxes you have not yet viewed Press Delete All O...

Страница 209: ...the machine s memory press No If the fax has multiple pages do one of the following Press Print All Pages to print the whole message A touchscreen message asks if you want to delete the fax from the machine s memory To delete the fax press Yes To keep the fax in the machine s memory press No Press Print Displayed Only to print only the displayed page Press Print From Displayed to print from the di...

Страница 210: ... feature is On your Brother machine reduces any oversized incoming fax page to fit on your paper The machine calculates the reduction ratio using the page size of the fax and your Paper Size setting 1 Press Settings All Settings Fax Setup Receive Auto Reduction 2 Press On or Off 3 Press Related Information Receive a Fax Paper Settings Paper Handling and Printing Problems 203 ...

Страница 211: ...achine to print the date and time of receipt at the top of each incoming fax page Make sure you have set the current date and time on the machine This feature is available only for monochrome faxes 1 Press Settings All Settings Fax Setup Receive Fax Rx Stamp 2 Press On or Off 3 Press Related Information Receive a Fax 204 ...

Страница 212: ... also speaking on a telephone connected to his fax machine at the end of the conversation the other party can send you a fax before you both hang up Your machine s ADF must be empty 1 Ask the other party to load the fax and to press the Start or Send key 2 Press to display the Fax Start button 3 When you hear CNG tones slow repeated beeps press Fax Start 4 Press Receive to receive the fax 5 Replac...

Страница 213: ...torage PC Fax Receive Forward to Cloud The machine forwards your received faxes to the online services Off This feature is available only for monochrome faxes Forward Incoming Faxes to Another Machine Store Incoming Faxes in the Machine s Memory Use PC Fax Receive to Transfer Received Faxes to Your Computer Windows only Change Memory Receive Options Turn Off Memory Receive Print a Fax Stored in th...

Страница 214: ...r b to display the Fax Forward option and then press it 3 Enter the forwarding fax number up to 20 digits using the dial pad Press OK 4 Press Backup Print On or Backup Print Off If you select Backup Print On the machine prints received faxes at your machine so you will have a copy When Fax Preview is turned on a backup copy of received faxes will not be printed even if you select Backup Print On I...

Страница 215: ...sages from your fax machine when you are at another location using the Remote Retrieval commands Your machine prints a backup copy of each stored fax This feature is available only for monochrome faxes 1 Press Settings All Settings Fax Setup Receive Memory Receive 2 Press a or b to display the Fax Storage option and then press it 3 Press Related Information Memory Receive Options Forward Faxes Rem...

Страница 216: ...e PC FAX Receiving software running on your computer Even if your computer is turned off your machine will receive and store faxes in its memory When you start your computer and the PC FAX Receiving software runs your machine transfers faxes to your computer automatically 1 Press Settings All Settings Fax Setup Receive PC Fax Receive 2 Press On The touchscreen displays the message Run the PC Fax R...

Страница 217: ...e touchscreen displays Print all faxes If you press Yes faxes in the memory will be printed before the setting changes If you press No faxes in the memory will not be printed and the setting will be unchanged If received faxes are left in the machine s memory when you change to PC Fax Receive from another option Fax Forward Forward to Cloud or Fax Storage press USB or the name of the computer if y...

Страница 218: ...the machine to save or transfer incoming faxes 1 Press Settings All Settings Fax Setup Receive Memory Receive 2 Press Off The touchscreen displays Print all faxes or Erase all documents if received faxes are in your machine s memory 3 Press Related Information Memory Receive Options Change Memory Receive Options Error and Maintenance Messages Telephone and Fax problems 211 ...

Страница 219: ...er you print the fax it is erased from the machine s memory If you select Fax Storage you can print all faxes from the memory 1 Press Settings All Settings Fax Print Document You can also print the faxes from the memory by pressing Stored Faxes on the touchscreen 2 Press Yes Related Information Memory Receive Options Store Incoming Faxes in the Machine s Memory Error and Maintenance Messages Telep...

Страница 220: ...eval to call your machine from any touch tone telephone or fax machine and use a remote access code and remote commands to retrieve fax messages Set a Remote Access Code Use Your Remote Access Code Remote Retrieval Commands Forward Faxes Remotely Change the Fax Forwarding Number 213 ...

Страница 221: ...x Remote Access 2 Enter a three digit code using the numbers 0 through 9 or using the dial pad The preset cannot be changed Press OK DO NOT use the same code used for your Remote Activation Code 51 or Remote Deactivation Code 51 To delete your code press and hold to restore the inactive setting and then press OK 3 Press Related Information Remote Fax Retrieval Use Your Remote Access Code Operation...

Страница 222: ...ne has not received a fax 4 When the machine gives two short beeps enter a command The machine will hang up if you wait longer than 30 seconds to enter a command The machine will beep three times if you enter an invalid command 5 When finished press 9 and then press 0 to deactivate your machine 6 Hang up If your machine is set to Manual mode and you are using Remote Retrieval wait for about 100 se...

Страница 223: ...ing has not been set up for example a Fax Forwarding number has not been registered You can register your Fax Forwarding number by entering 4 After you register the number Fax Forwarding will work 4 Fax Forwarding number 6 Fax Storage 96 Retrieve a fax 2 Retrieve all faxes Enter the fax number of a remote fax machine to receive stored fax messages 3 Erase faxes from memory If you hear one long bee...

Страница 224: ...hear one long beep you have messages 3 When you hear two short beeps press 9 6 2 4 Wait for the long beep and then use the dial pad to enter the fax number up to 20 digits of the remote fax machine where you want your fax messages sent followed by You cannot use and as dial numbers but you can press to insert a pause in the fax number 5 Hang up after you hear one long beep Your Brother machine wil...

Страница 225: ...g beep you have messages 3 When you hear two short beeps press 9 5 4 4 Wait for the long beep enter the new number up to 20 digits of the remote fax machine you want your fax messages forwarded to using the dial pad then enter You cannot use and as dial numbers but you can press to insert a pause in the fax number 5 Press 9 0 to stop Remote Access when finished 6 Hang up after you hear one long be...

Страница 226: ...Home Fax Voice Operations and Fax Numbers Voice Operations and Fax Numbers Voice Operations Store Fax Numbers Set up Groups for Broadcasting 219 ...

Страница 227: ...Home Fax Voice Operations and Fax Numbers Voice Operations Voice Operations Pick up a Voice Call in Fax Tel Receive Mode 220 ...

Страница 228: ...Ring pseudo double ringing to alert you to pick up a voice call If you are at the machine lift the external telephone s handset and then press Pickup button to answer If you are at an extension telephone lift the handset during the F T Ring and then press 51 between the pseudo double rings If no one is on the line or if someone wants to send you a fax send the call back to the machine by pressing ...

Страница 229: ... and Fax Numbers Store Fax Numbers Store Fax Numbers Store Address Book Numbers Store Address Book Numbers from Outgoing Calls Store Address Book Numbers from Caller ID History Change or Delete Address Book Names or Numbers 222 ...

Страница 230: ...se between numbers You can press Pause as many times as needed to increase the length of the pause Be sure to include the area code when entering a fax or telephone number Depending on the country the Caller ID names and history may not be displayed correctly if the area code is not registered with the fax or telephone number e To store the second fax or telephone number press Address 2 Enter the ...

Страница 231: ... want to store and then press it 3 Press Edit Add to Address Book Name To delete the number from the Outgoing Call history list press Edit Delete Press Yes to confirm 4 Enter the name up to 16 characters using the touchscreen Press OK 5 To store the second fax or telephone number press Address 2 Enter the second fax or telephone number up to 20 digits using the touchscreen Press OK 6 Press OK to c...

Страница 232: ... 2 Press a or b to display the name or number you want to store and then press it 3 Press Edit Add to Address Book Name To delete the number from the Caller ID history list press Edit Delete Press Yes to confirm 4 Enter the name up to 16 characters using the touchscreen Press OK 5 To store the second fax or telephone number press Address 2 Enter the second fax or telephone number up to 20 digits u...

Страница 233: ...o change the first fax or telephone number press Address 1 Enter the new fax or telephone number up to 20 digits using the touchscreen Press OK To change the second fax or telephone number press Address 2 Enter the new fax or telephone number up to 20 digits using the touchscreen Press OK Press OK to finish To change a character press d or c to position the cursor to highlight the character you wa...

Страница 234: ...ess Fax Address Book 2 Do the following steps a Press Edit Setup Groups Name b Enter the Group name up to 16 characters using the touchscreen Press OK c Press Add Delete d Add Address Book numbers to the Group by pressing them to display a red checkmark Press OK e Read and confirm the displayed list of names and numbers you have selected and then press OK to save your Group To store another Group ...

Страница 235: ...nge 2 Press a or b to display the Group you want to change and then press it 3 Press Name 4 Enter the new Group name up to 16 characters using the touchscreen Press OK To change a character press d or c to position the cursor to highlight the incorrect character and then press Enter the new character 5 Press OK 6 Press Related Information Set up Groups for Broadcasting Enter Text on Your Brother M...

Страница 236: ...elete a Broadcasting Group Delete a Broadcasting Group Related Models MFC J890DW MFC J895DW 1 Press Fax Address Book Edit Delete 2 Press a or b to display the Group you want to delete and then press it 3 Press OK 4 Press Related Information Set up Groups for Broadcasting 229 ...

Страница 237: ...you want to change and then press it 3 Press a or b to display Add Delete and then press it 4 Press a or b to display the number you want to add or delete 5 Do the following for each number you want to change To add a number to the Group press the check box of the number to add a check mark To delete a number from the Group press the check box of the number to remove the check mark 6 Press OK 7 Pr...

Страница 238: ...Devices Telephone Services and External Devices Use BT Call Sign Caller ID Set the Telephone Line Type Voice Over Internet Protocol VoIP Telephone Line Interference External TAD Telephone Answering Device External and Extension Telephones 231 ...

Страница 239: ...nction allowing you to dedicate a second telephone number on the same telephone line just for receiving faxes This feature is available only in the U K You can switch BT Call Sign Off temporarily then turn it back on When you get a new fax number make sure you reset this function This machine will automatically answer incoming calls that use your new fax number When you set the BT Call Sign featur...

Страница 240: ...our External Telephone only Related Models MFC J890DW MFC J895DW This feature is available only in the U K 1 Press Settings All Settings Fax Miscellaneous BT Call Sign 2 Press On or Off 3 Press When you turn off BT Call Sign the receive mode stays in Manual You must set the receive mode again Related Information Use BT Call Sign Choose the Correct Receive Mode Error and Maintenance Messages 233 ...

Страница 241: ...ion Call your telephone company for more information Once you answer a call the Caller ID information disappears from the LCD and is stored in Caller ID memory View the list or select a number and fax to it add it to the Address Book or delete it from the history You can print a list of the Caller ID information received by your machine This feature is not available in some countries The Caller ID...

Страница 242: ...C J895DW This feature is available only in the U K and Ireland If you subscribe to the Caller ID service on your phone line set Caller ID to On to display the caller s telephone number on the LCD as the telephone rings 1 Press Settings All Settings Fax Miscellaneous Caller ID 2 Press On 3 Press Related Information Caller ID 235 ...

Страница 243: ...ine Set 2 Press Normal PBX or ISDN 3 If you selected PBX do the following steps a Press On or Always If you select On the machine dials a prefix number before the fax number only when R is pressed If you select Always the machine always dials a prefix number before the fax number b Press Dial Prefix c Enter the prefix number using the touchscreen and then press OK Use the numbers 0 to 9 l and You ...

Страница 244: ...X The machine s recall feature supports timed break recall only TBR TBR will work with most PBX systems allowing you to gain access to an outside line or transfer calls to another extension Press R to use this feature Program a press of the R button as part of a number stored in the Address Book When programming the Address Book number press R first the LCD displays then enter the telephone number...

Страница 245: ... your telephone cord is connected to the socket labelled LINE on your machine The other end of the telephone cord may be connected to a modem phone adapter splitter or other such device If you have questions about how to connect your machine to the VoIP system please contact your VoIP provider After you have connected your machine to the VoIP system check for a dial tone Lift the external telephon...

Страница 246: ...he external TAD must answer within four rings we recommend setting it to two rings This is because your machine cannot hear the CNG tones until the external TAD has picked up the call The sending machine will send CNG tones for only eight to ten seconds longer We do not recommend using the toll saver feature on your external TAD if it needs more than four rings to activate it 1 1 1 TAD IMPORTANT D...

Страница 247: ... 1 Set your external TAD to one or two rings The machine s Ring Delay setting does not apply 2 Record the outgoing message on your external TAD 3 Set the TAD to answer calls 4 Set the Receive Mode on your machine to External TAD Related Information External TAD Telephone Answering Device Receive Modes Overview Choose the Correct Receive Mode Telephone and Fax problems 240 ...

Страница 248: ... tones We recommend beginning your OGM with an initial five second silence because the machine cannot hear fax tones over a loud voice You may try leaving out this pause but if your machine has trouble receiving faxes then you should re record the OGM to include it 2 Limit your speaking to 20 seconds 3 End your 20 second message by giving your Remote Activation Code for people sending manual faxes...

Страница 249: ...nnect the unit to the last line on the system This prevents the machine being activated each time the system receives telephone calls If all incoming calls will be answered by a switchboard operator we recommend setting the Receive Mode to Manual We cannot guarantee that your machine will operate correctly under all circumstances when connected to a PBX Any difficulties with sending or receiving f...

Страница 250: ...and External Devices External and Extension Telephones External and Extension Telephones Connect an External or Extension Telephone Operation from External and Extension Telephones Use Extension Telephones Use the Remote Codes 243 ...

Страница 251: ...rnal or Extension Telephone Related Models MFC J890DW MFC J895DW You can connect a separate telephone to your machine as shown in the diagram below 1 Extension telephone 2 External telephone 1 2 Please make sure you use an external telephone with a cable no more than three metres long Related Information External and Extension Telephones 244 ...

Страница 252: ...If the machine answers a voice call and pseudo double rings for you to take over you can take the call at an extension telephone by pressing the Remote Deactivation Code 51 If you answer a call and no one is on the line You should assume that you re receiving a manual fax Press 51 and wait for the chirp or until the LCD shows Receiving and then hang up You can also use the Fax Detect feature to ma...

Страница 253: ...r slave configuration see fig 2 In this configuration the machine can always detect whether a telephone is in use Thus it will not attempt to seize the line during that time This is known as telephone off hook detection The inadvisable configuration is shown in figure 1 and the recommended master slave configuration is shown in figure 2 This new connection configuration can be arranged by contacti...

Страница 254: ...receive the fax by pressing the Start button and then selecting the option to receive Remote Deactivation Code If you receive a voice call and the machine is in F T mode it will start to sound the F T ring pseudo double ring after the initial Ring Delay If you pick up the call on an extension telephone you can turn the F T ring off by pressing 51 make sure you press this between the rings If the m...

Страница 255: ...al TAD remotely try changing the three digit remote codes using the numbers 0 9 1 Press Settings All Settings Fax Setup Receive Remote Codes 2 Do one of the following To change the Remote Activation Code press Act Code Enter the new code and then press OK To change the Remote Deactivation Code press Deact Code Enter the new code and then press OK If you do not want to change the Codes go to the ne...

Страница 256: ...Home Fax Fax Reports Fax Reports Set the Transmission Verification Report s Style Set the Fax Journal s Interval Period Print Reports 249 ...

Страница 257: ...n of the fax s first page appears on the report Error only Prints a report if your fax is unsuccessful due to a transmission error Error only Image Prints a report if your fax is unsuccessful due to a transmission error A portion of the fax s first page appears on the report Off The report will not be printed 1 Press Settings All Settings Fax Report Setting XMIT Report 2 Press the option you want ...

Страница 258: ...jobs before the time you selected has passed the machine will print the Journal early and then erase all fax jobs from the memory If you want an extra report before it is due to print you can print it without erasing the jobs Every 50 Faxes The machine will print the Journal when the machine has stored 50 fax jobs 4 If you selected 6 12 24 hours 2 or 7 days press Time and enter the time of day usi...

Страница 259: ...Home Fax PC FAX PC FAX PC FAX for Windows PC FAX for Mac 252 ...

Страница 260: ...Home Fax PC FAX PC FAX for Windows PC FAX for Windows PC FAX Overview Windows Send a Fax Using PC FAX Windows Receive Faxes on Your Computer Windows 253 ...

Страница 261: ... PC FAX Overview Windows PC FAX Overview Windows Reduce paper consumption and save time by using Brother s PC FAX software to send faxes directly from your machine Configure PC FAX Windows Configure your PC Fax Address Book Windows 254 ...

Страница 262: ...n click the drop down list and select your model name if not already selected Click PC FAX in the left navigation bar and then click Setup Sending The PC FAX Setup dialog box appears 2 Do one of the following Click the User Information tab and then type your user information in the fields Each Microsoft account can have its own customised User Information screen for custom fax headers and cover pa...

Страница 263: ...Related Information PC FAX Overview Windows 256 ...

Страница 264: ... groups to personalise your Brother Address Book Add a Member to your PC FAX Address Book Windows Create a Group in your PC FAX Address Book Windows Edit Member or Group Information in your PC FAX Address Book Windows Delete a Member or Group in your PC FAX Address Book Windows Export your PC FAX Address Book Windows Import Information to your PC FAX Address Book Windows 257 ...

Страница 265: ...x software 1 Do one of the following Windows 7 Click Start All Programs Brother Brother Utilities Click the drop down list and select your model name if not already selected Click PC FAX in the left navigation bar and then click Address Book Send Windows 8 and Windows 10 Launch Brother Utilities and then click the drop down list and select your model name if not already selected Click PC FAX in th...

Страница 266: ...3 Type the member s information in the corresponding fields Only the Name field is required 4 Click OK Related Information Configure your PC Fax Address Book Windows 259 ...

Страница 267: ...of the following Windows 7 Click Start All Programs Brother Brother Utilities Click the drop down list and select your model name if not already selected Click PC FAX in the left navigation bar and then click Address Book Send Windows 8 and Windows 10 Launch Brother Utilities and then click the drop down list and select your model name if not already selected Click PC FAX in the left navigation ba...

Страница 268: ...le Names field select each name you want to include in the group and then click Add Members added to the group appear in the Group Members box 5 When finished click OK Each group can contain up to 50 members Related Information Configure your PC Fax Address Book Windows 261 ...

Страница 269: ... the drop down list and select your model name if not already selected Click PC FAX in the left navigation bar and then click Address Book Send Windows 8 and Windows 10 Launch Brother Utilities and then click the drop down list and select your model name if not already selected Click PC FAX in the left navigation bar and then click Address Book Send The Address Book dialog box appears 2 Select the...

Страница 270: ...op down list and select your model name if not already selected Click PC FAX in the left navigation bar and then click Address Book Send Windows 8 and Windows 10 Launch Brother Utilities and then click the drop down list and select your model name if not already selected Click PC FAX in the left navigation bar and then click Address Book Send The Address Book dialog box appears 2 Select the member...

Страница 271: ...he drop down list and select your model name if not already selected Click PC FAX in the left navigation bar and then click Address Book Send Windows 8 and Windows 10 Launch Brother Utilities and then click the drop down list and select your model name if not already selected Click PC FAX in the left navigation bar and then click Address Book Send The Address Book dialog box appears 2 Click the Fi...

Страница 272: ...rt and then click Add Select and add the items in the order you want them listed 5 If you are exporting to an ASCII file under the Divide Character section select the Tab or Comma option to separate the data fields 6 Click OK 7 Browse to the folder on your computer where you want to save the data type the file name and then click Save Related Information Configure your PC Fax Address Book Windows ...

Страница 273: ... the drop down list and select your model name if not already selected Click PC FAX in the left navigation bar and then click Address Book Send Windows 8 and Windows 10 Launch Brother Utilities and then click the drop down list and select your model name if not already selected Click PC FAX in the left navigation bar and then click Address Book Send The Address Book dialog box appears 2 Click the ...

Страница 274: ...xt file 5 If you are importing an ASCII file under the Divide Character section select the Tab or Comma option to separate the data fields 6 Click OK 7 Browse to the folder where you want to import the data type the file name and then click Open Related Information Configure your PC Fax Address Book Windows 267 ...

Страница 275: ...hods Click the numbers on the dial pad to type the number and then click Add Send Address If you select the Dial Restriction check box a confirmation dialog box will appear for you to re type the fax number using the keyboard This feature helps to prevent transmissions to the wrong destination Click the Address Book button and then select a member or group from the Address Book If you make a mista...

Страница 276: ...Receive Faxes on Your Computer Windows Receive Faxes on Your Computer Windows Use Brother s PC FAX software to receive faxes on your computer screen them and print only those faxes you want Receive Faxes Using PC FAX Receive Windows 269 ...

Страница 277: ...r computer When you turn off your computer your machine will continue to receive and store faxes in your Brother machine s memory The machine s LCD will display the number of stored faxes received When you start this application the software will transfer all received faxes to your computer at once You can enable the Backup Print option if you want the machine to print a copy of the fax before the...

Страница 278: ...All Programs Brother Brother Utilities Click the drop down list and select your model name if not already selected Click PC FAX in the left navigation bar and then click Receive Windows 8 and Windows 10 Launch Brother Utilities and then click the drop down list and select your model name if not already selected Click PC FAX in the left navigation bar and then click Receive 2 Confirm the message an...

Страница 279: ... appears 2 Click Settings 3 Configure these options as needed Preferences Configure to start PC FAX Receive automatically when you start Windows Save Configure the path to save PC FAX files and select the received document format Upload to Configure the path to the SharePoint server and select the option to upload automatically or manually available only for Administrators Device Select the Brothe...

Страница 280: ...Related Information Run Brother s PC FAX Receive on Your Computer Windows 273 ...

Страница 281: ... following the instructions for a network user then the machine should already be configured for your network 1 Double click the PC FAX Receive icon in your computer task tray The PC FAX Receive window appears 2 Click Settings 3 Click Device Add 4 Select the appropriate connection method Select your machine from the automatic search results below Connected Brother machines will be displayed Select...

Страница 282: ... computer name that will appear on the machine s LCD type the new name in the Enter your PC display name Max 15 Characters field 6 Click OK Related Information Run Brother s PC FAX Receive on Your Computer Windows 275 ...

Страница 283: ...Windows Related Models MFC J890DW MFC J895DW Receiving Status Icon Indicated Status Standby mode No unread messages Receiving messages Messages received Unread messages 1 Double click the PC FAX Receive icon in your computer task tray The PC FAX Receive window appears 2 Click any faxes in the list to view them 3 When finished click in the right top corner of the window to close it 276 ...

Страница 284: ...AX Receive is active and the PC FAX Receive icon will remain in your computer task tray To close PC FAX Receive click the icon in the computer task tray and click Close Related Information Receive Faxes Using PC FAX Receive Windows 277 ...

Страница 285: ... FAX for Mac PC FAX for Mac Use Brother s PC FAX software to send faxes directly from your Mac without printing them This feature helps reduce your paper consumption and save time Send Faxes from Your Application Mac 278 ...

Страница 286: ...he receiving fax machine supports colour faxes 1 Create a document in a Mac application 2 From an application such as Apple TextEdit click the File menu and then select Print 3 Click the application pop up menu and then select the Send Fax option 4 Click the Output pop up menu and then select the Facsimile option 5 Type a fax number in the Input Fax Number field and then click Add The fax number i...

Страница 287: ...er click the Add button after entering the first fax number and type the next fax number The destination fax numbers will be listed in the Destination Fax Numbers field 6 Click Print to send the fax Related Information PC FAX for Mac 280 ...

Страница 288: ...Home PhotoCapture Center PhotoCapture Center Print Photos Directly from Media Copy Photos from Media to a Computer Print Photos from ControlCenter4 Windows 281 ...

Страница 289: ...gital camera media or a USB Flash memory drive scan documents and save them directly to a memory card or USB flash drive When your machine is connected to a computer you can use your computer to access a memory card or USB flash drive inserted in the front of the machine Compatible Media Important Information about Photo Printing Print Photos from Media on the Brother Machine 282 ...

Страница 290: ...ras that use the USB mass storage standard Other USB devices are not supported Compatible Memory Cards USB flash drive Compatible Memory Cards SD Memory Card SDHC Memory Card SDXC Memory Card MultiMediaCard MultiMediaCard plus miniSD Adapter required miniSDHC Adapter required microSD Adapter required microSDHC Adapter required MultiMediaCard mobile Adapter required Related Information Save Scanned...

Страница 291: ...index or image the machine will print all the valid images even if one or more images have been corrupted Corrupted images will not be printed Memory card users Your machine is designed to read memory cards that have been formatted by a digital camera When a digital camera formats a memory card it creates a special folder into which it copies image data If you must use your computer to modify the ...

Страница 292: ...int Photos from Media on the Brother Machine Preview and Print Photos from Media Print a Photo Index Sheet Thumbnails from Media Print Photos by Image Number Print ID Photos Print Photos with Auto Cropping Print Borderless Photos from Media Print the Date from Your Photo s Data Print Settings for Photos 285 ...

Страница 293: ...oto you want to print and then press it To print all photos press Print All and then press Yes to confirm 5 Enter the number of copies in one of the following ways Press or on the touchscreen Press to display the keyboard on the touchscreen and then enter the number of copies using the touchscreen keyboard Press OK 6 Press OK 7 Repeat the last three steps until you have selected all the photos you...

Страница 294: ...used to identify the pictures Only file names that are 20 characters or less will be printed correctly on the index sheet File names cannot be printed correctly if they contain non alphanumeric characters but non alphanumeric characters do not affect photo print settings 1 Open the media slot cover 2 Put the memory card or USB flash drive in the correct slot 3 Press Photo Index Print Print Index S...

Страница 295: ...e numbers at one time using a comma or a hyphen For example enter 1 3 6 to print images No 1 No 3 and No 6 Print a range of images using a hyphen For example enter 1 5 to print images No 1 to No 5 Enter up to 12 characters including commas and hyphens for the image numbers you want to print 5 Enter the number of copies in one of the following ways Press or on the touchscreen Press to display the k...

Страница 296: ...edia slot cover 2 Put the memory card or USB flash drive in the correct slot 3 Press Photo ID Photo Print 4 Press d or c to display the photo you want and then press it 5 Press a or b to adjust the size of the crop you want and then press it The machine crops the photo to the selected size To crop to a different size repeat these steps 6 Confirm the displayed image Rotate the image if needed by pr...

Страница 297: ...ange this setting to Off If you set the Cropping setting to Off set the Borderless setting to Off also Cropping On Cropping Off 1 Open the media slot cover 2 Put the memory card or USB flash drive in the correct slot 3 Press Photo Select Files 4 Press d or c to display each photo When the photo you want appears press it and then press OK 5 Press OK 6 Press Print Settings Cropping 7 Press On or Off...

Страница 298: ...paper Printing time will be slower 1 Open the media slot cover 2 Put the memory card or USB flash drive in the correct slot 3 Press Photo Select Files 4 Press d or c to display each photo When the photo you want appears press it and then press OK 5 Press OK 6 Press Print Settings Borderless 7 Press On or Off 8 When finished press or OK 9 Press Start Related Information Print Photos from Media on t...

Страница 299: ... on the lower right corner To use this setting the photo must include the date 1 Open the media slot cover 2 Put the memory card or USB flash drive in the correct slot 3 Press Photo Select Files 4 Press d or c to display each photo When the photo you want appears press it and then press OK 5 Press OK 6 Press Print Settings Date Print 7 Press On or Off 8 When finished press or OK 9 Press Start Rela...

Страница 300: ...ut Brightness Adjust the brightness Contrast Adjust the contrast Increasing the contrast will make an image look sharper and more vivid Cropping Crop the image around the margin to fit the paper size or print size Turn this feature off when you want to print whole images or prevent unwanted cropping Borderless Expand the printable area to fit the edges of the paper Date Print Print the date on you...

Страница 301: ...otos from Media to a Computer If you would like to copy photos stored in a memory card or USB flash drive to a folder on your computer follow the steps for your connection type and Operating System Before Copying Photos Copy Photos from Media Over a Local Connection 294 ...

Страница 302: ...memory card or USB flash drive in the media drive of the machine You could lose your data or damage the media The machine will read only the media that was put in first While the machine is printing photos from the media your computer cannot access the photo printing for any other operation Related Information Copy Photos from Media to a Computer 295 ...

Страница 303: ...4 You can edit a file and save it to another drive on your computer 5 Quit all applications that are running stored data on the media 6 Do one of the following Windows In Windows Explorer right click the removable disk icon and select Eject Mac Drag the removable disk icon into the Trash icon 7 Wait until your Brother machine has stopped accessing the media before removing the media IMPORTANT DO N...

Страница 304: ...tra sheet of the same photo paper in the paper tray 2 Click the ControlCenter4 icon in the task tray and then click Open 3 Do one of the following If you are using Advanced Mode click the Photo tab and then click the Photo Print button If you are using Home Mode click the Photo tab 4 Select the folder that contains the image you want to print Option Description My CC4 Folder The My CC4 Folder butt...

Страница 305: ...Media Type and Layout options 10 Click the Properties button to configure the Print Quality Colour Greyscale and Colour Mode options if needed To print the image s timestamp in the lower right corner of the image select the Print Date check box 11 To change other printer settings click the Print Options button For Advanced Mode only 12 Click OK 13 Click the Preview button to view the image on scre...

Страница 306: ...te Fit to Window Set the zoom level so that the image fits the window Zoom In Zoom Out Enlarge or reduce the selected image Rotate Counterclockwise Rotate Clockwise Rotate the image by 90 degrees clockwise or counter clockwise Previous Next Display the previous or next image 3 Trimming This feature allows you to remove unwanted areas from your photos 4 Image Correction Auto Correction Select this ...

Страница 307: ...o enhance natural colours such as green and blue Night Scene Select this option to optimise the image adjustments for a night scene photo Soft Light Select this option to soften bright edges Related Information Print Photos from ControlCenter4 Windows 300 ...

Страница 308: ...Supported Basic Network Features Network Management Software and Utilities Additional Methods of Configuring Your Brother Machine for a Wireless Network Advanced Network Features Technical Information for Advanced Users 301 ...

Страница 309: ...macOS v10 12 x Printing Yes Yes Yes Scanning Yes Yes PC Fax Send Available only for certain models 1 Yes Yes PC Fax Receive Available only for certain models 1 Yes BRAdmin Light 2 Yes Yes BRAdmin Professional 3 Yes Yes Remote Setup Available only for certain models 1 Yes Status Monitor Yes Yes Driver Deployment Wizard Yes Yes Related Information Network 1 Not available for DCP models 2 BRAdmin Lig...

Страница 310: ...nd Utilities Network Management Software and Utilities Configure and change your Brother machine s network settings using a management utility Learn about Network Management Software and Utilities Change Machine Settings from Your Computer 303 ...

Страница 311: ...an also log activity of Brother devices on your network and export the log data Go to your model s Downloads page on the Brother Solutions Center at support brother com to download the latest version of Brother s BRAdmin Professional utility Node name The node name appears in the current BRAdmin Professional window The default node name is BRNxxxxxxxxxxxx for a wired network or BRWxxxxxxxxxxxx for...

Страница 312: ...etwork we recommend using the Brother installation disc Before Configuring Your Brother Machine for a Wireless Network Configure Your Machine for a Wireless Network Using the One Push Method of Wi Fi Protected Setup WPS Configure Your Machine for a Wireless Network Using the PIN Method of Wi Fi Protected Setup WPS Configure Your Machine for a Wireless Network When the SSID is Not Broadcast Use Wi ...

Страница 313: ...best method of connection for all types of documents and applications If you are printing large files such as multi page documents with mixed text and large graphics you may want to consider selecting wired Ethernet for faster data transfer supported models only or USB for the fastest throughput speed Although the Brother machine can be used in both a wired and wireless network supported models on...

Страница 314: ...s Network WLAN WPS 2 When Enable WLAN appears press Yes The wireless setup wizard starts To cancel press No 3 When the touchscreen instructs you to start WPS press the WPS button on your wireless access point router Then press OK on your machine Your machine automatically tries to connect to your wireless network If your wireless device is connected successfully the LCD displays Connected You have...

Страница 315: ...ings For more information on how to access WPS mode see the instructions provided with your wireless access point router Type A Connection when the wireless LAN access point router 1 doubles as the Registrar 1 Type B Connection when another device 2 such as a computer is used as the Registrar 1 2 Routers or access points that support WPS are marked with this symbol 1 Press Settings All Settings Ne...

Страница 316: ...ck Add a device To use a Windows 7 Windows 8 or Windows 10 computer as a Registrar you must register it to your network in advance For more information see the instructions supplied with your wireless LAN access point router If you use Windows 7 Windows 8 or Windows 10 as a Registrar you can install the printer driver after the wireless configuration by following the on screen instructions To inst...

Страница 317: ...If your router uses WEP encryption enter the key used as the first WEP key Your Brother machine supports the use of the first WEP key only 2 Press Settings All Settings Network WLAN Setup Wizard 3 When Enable WLAN appears press Yes The wireless setup wizard starts To cancel press No 4 The machine searches for your network and displays a list of available SSIDs Press a or b to display the New SSID ...

Страница 318: ...LCD displays Connected You have completed the wireless network setup To install the Full Driver Software Package necessary for operating your machine insert the Brother installation disc into your computer or go to your model s Downloads page on the Brother Solutions Center at support brother com Related Information Additional Methods of Configuring Your Brother Machine for a Wireless Network I Ca...

Страница 319: ...iguring Your Brother Machine for a Wireless Network Use Wi Fi Direct Use Wi Fi Direct Print or Scan from Your Mobile Device Using Wi Fi Direct Configure Your Wi Fi Direct Network I Cannot Complete the Wireless Network Setup Configuration 312 ...

Страница 320: ...using the one push or PIN Method of Wi Fi Protected Setup WPS You can also configure a wireless network by manually setting a SSID and password Your Brother machine s Wi Fi Direct feature supports WPA2 security with AES encryption 1 2 1 Mobile device 2 Your Brother machine Although the Brother machine can be used in both a wired supported models only and wireless network only one connection method...

Страница 321: ...s from your machine s control panel Wi Fi Direct Network Configuration Overview Configure Your Wi Fi Direct Network Using the One Push Method Configure Your Wi Fi Direct Network Using the One Push Method of Wi Fi Protected Setup WPS Configure Your Wi Fi Direct Network Using the PIN Method Configure Your Wi Fi Direct Network Using the PIN Method of Wi Fi Protected Setup WPS Configure Your Wi Fi Dir...

Страница 322: ...n Yes Go to Step 4 No See Related Information Configure Your Wi Fi Direct Network Manually 4 Does your mobile device support one push configuration for Wi Fi Protected Setup WPS Option Description Yes See Related Information Configure Your Wi Fi Direct Network Using the One Push Method of Wi Fi Protected Setup WPS No See Related Information Configure Your Wi Fi Direct Network Using the PIN Method ...

Страница 323: ...te Wi Fi Direct on your mobile device see your mobile device s user s guide for instructions when Activate Wi Fi Direct on other device Then Press OK appears Press OK on your Brother machine This will start the Wi Fi Direct setup 3 Do one of the following When your Brother machine is the Group Owner G O connect your mobile device to the machine directly When your Brother machine is not the Group O...

Страница 324: ...ile device the message Wi Fi Direct connection request received Press OK to connect will appear on the LCD Press OK to connect 1 Press Settings All Settings Network Wi Fi Direct Group Owner On 2 Press Push Button 3 Activate your mobile device s WPS one push configuration method see your mobile device s user s guide for instructions When Activate Wi Fi Direct on other device Then Press OK appears o...

Страница 325: ...roup Owner G O it will wait for a connection request from your mobile device When PIN Code appears enter the PIN displayed on your mobile device in the machine Press OK Follow the instructions If the PIN is displayed on your Brother machine enter the PIN in your mobile device When your Brother machine is not the Group Owner G O it will display available device names with which to configure a Wi Fi...

Страница 326: ... connect will appear on the LCD Press OK to connect 1 Press Settings All Settings Network Wi Fi Direct Group Owner On PIN Code 2 When Activate Wi Fi Direct on other device Then Press OK is displayed activate your mobile device s WPS PIN configuration method see your mobile device s user s guide for instructions and then press OK on your Brother machine This will start the Wi Fi Direct setup 3 The ...

Страница 327: ...PS you must configure a Wi Fi Direct network manually 1 Press Settings All Settings Network Wi Fi Direct Manual 2 The machine will display the SSID name and Password Go to your mobile device s wireless network settings screen and enter the SSID name and password If your mobile device connects successfully the machine displays Connected You have completed the Wi Fi Direct network setup Related Info...

Страница 328: ...Home Network Advanced Network Features Advanced Network Features Print the Network Configuration Report 321 ...

Страница 329: ...he Network Configuration Report shows 0 0 0 0 wait for one minute and try printing it again You can find your machine s settings such as the IP address subnet mask node name and MAC Address on the report for example IP address 192 168 0 5 Subnet mask 255 255 255 0 Node name BRN000ca0000499 MAC Address 00 0c a0 00 04 99 1 Press Settings All Settings Print Reports Network Configuration Yes The machi...

Страница 330: ...Home Network Technical Information for Advanced Users Technical Information for Advanced Users Reset the Network Settings to Factory Default Print the WLAN Report 323 ...

Страница 331: ...d and IP address This feature restores all wired supported models only and wireless network settings to the factory settings You can also reset the print server to its factory default settings using BRAdmin Light or BRAdmin Professional 1 Press Settings All Settings Network Network Reset 2 The message confirming reset will be displayed Press OK for two seconds The machine will restart Related Info...

Страница 332: ...ngs Print Reports WLAN Report Yes The machine will print the WLAN Report If the WLAN Report does not print check your machine for errors If there are no visible errors wait for one minute and then try to print the report again Related Information Technical Information for Advanced Users Wireless LAN Report Error Codes My Brother Machine Cannot Print Scan or PC FAX Receive over the Network I Want t...

Страница 333: ...z SSID ESSID Make sure the access point router is set to 2 4 GHz or 2 4 GHz 5 GHz mixed mode TS 04 The Authentication Encryption methods used by the selected wireless access point router are not supported by your machine Change the authentication and encryption methods of the wireless access point router Your machine supports the following authentication methods WPA Personal TKIP or AES WPA2 Perso...

Страница 334: ...ttings 2 See the documentation provided with your WLAN access point router for information on how to find the security settings If the WLAN access point router is set to not broadcast the SSID the SSID will not automatically be detected You will have to manually enter the SSID name The Network key may also be described as the Password Security Key or Encryption Key If you do not know the SSID and ...

Страница 335: ...Home Security Security Lock the Machine Settings 328 ...

Страница 336: ...ettings Before turning on the machine s Access Lock make a careful note of your password If you forget the password you must reset all passwords stored in the machine by contacting your administrator or Brother customer service About Using Memory Security 329 ...

Страница 337: ...e available Receiving faxes into memory limited by memory capacity Fax Forwarding if Fax Forwarding was already On Remote Retrieval if Fax Storage was already On and your Remote Access Code was already set While Memory Security is On the following operations are NOT available Operation from the control panel Printing received faxes PC printing PC scanning PC Fax Receive Printing with NFC Scanning ...

Страница 338: ...MFC J890DW MFC J895DW Make a careful note of your password 1 Press Settings All Settings Fax Miscellaneous Memory Security 2 Enter a four digit number for the password using the touchscreen Press OK 3 When the touchscreen displays Verify re enter the password using the touchscreen Press OK 4 Press Related Information About Using Memory Security 331 ...

Страница 339: ...gs All Settings Fax Miscellaneous Memory Security Set Password 2 Enter the registered four digit number for the current password using the touchscreen Press OK 3 Enter a four digit number for a new password using the touchscreen Press OK 4 When the touchscreen displays Verify re enter the new password using the touchscreen Press OK 5 Press Related Information About Using Memory Security 332 ...

Страница 340: ...red four digit password using the keyboard on the touchscreen Press OK The machine goes offline and the touchscreen displays Memory Security Turning off Memory Security a Press Unlock b Enter the current four digit password and then press OK If you enter the wrong password the touchscreen displays Wrong Password and stays offline The machine will stay in Secure Mode until the correct password is e...

Страница 341: ...ome Mobile Web Connect Mobile Web Connect Brother Web Connect Google Cloud Print AirPrint Mobile Printing for Windows Mopria Print Service Brother iPrint Scan for mobile Near Field Communication NFC 334 ...

Страница 342: ...r Using Brother Web Connect Set Up Brother Web Connect Scan and Upload Documents Using Brother Web Connect Upload a Document from an External Memory Device Using Brother Web Connect Download and Print Documents Using Brother Web Connect Download and Save a Document to an External Memory Device Using Brother Web Connect FaxForward to Cloud or E mail 335 ...

Страница 343: ... services 3 4 1 2 1 Printing 2 Scanning 3 Photos images documents and other files 4 Web Service To use Brother Web Connect your Brother machine must be connected to a network that has access to the Internet through either a wired or wireless connection For network setups that use a proxy server the machine must also be configured to use a proxy server If you are unsure of your network configuratio...

Страница 344: ...ote com Dropbox An online file storage sharing and synchronisation service URL www dropbox com OneDrive An online file storage sharing and management service URL https onedrive live com Box An online document editing and sharing service URL www box com OneNote An online document editing and sharing service URL www onenote com Brother CreativeCenter A website that offers various templates such as g...

Страница 345: ...X PPTX TIFF Upload images saved on media JPEG FaxForward to the online services MFC J890DW MFC J895DW JPEG PDF TIFF JPEG PDF TIFF Not all services are available in all countries For Hong Kong Taiwan and Korea Brother Web Connect supports only file names written in English Files named in the local language will not be downloaded Related Information Brother Web Connect 338 ...

Страница 346: ...er Web Connect Conditions for Using Brother Web Connect Conditions for Using Brother Web Connect Brother Software Installation for Using Brother Web Connect Configure the Proxy Server Settings Using the Machine s Control Panel 339 ...

Страница 347: ...uter that has access to the Internet and has the Brother machine s software installed Windows To install the Brother Software and configure the machine to be able to print over your wired or wireless network see the Quick Setup Guide included with your Brother machine Mac To install the Full Driver Software Package go to your model s Downloads page on the Brother Solutions Center at support brothe...

Страница 348: ...f your network uses a proxy server the following proxy server information must be configured on the machine Proxy server address Port number User Name Password 1 Press Settings All Settings Network Web Connect Settings Proxy Settings Proxy Connection 2 Press On 3 Press the option that you want to set and then enter the proxy server information Press OK 4 Press Related Information Conditions for Us...

Страница 349: ...r Web Connect Brother Web Connect Setup Overview Create an Account for Each Online Service Before Using Brother Web Connect Apply for Brother Web Connect Access Register an Account on Your Brother Machine for Brother Web Connect Set Up Brother Web Connect for Brother CreativeCenter 342 ...

Страница 350: ...n additional account 3 2 1 1 User registration 2 Web Service 3 Obtain account Step 2 Apply for Brother Web Connect access Start Brother Web Connect access using a computer and obtain a temporary ID 3 2 1 1 Enter account information 2 Brother Web Connect application page 3 Obtain temporary ID Step 3 Register your account information on your machine so you can access the service you want to use Ente...

Страница 351: ...Related Information Set Up Brother Web Connect 344 ...

Страница 352: ...reating an account log on and use the account once with a computer before using the Brother Web Connect feature Otherwise you may not be able to access the service using Brother Web Connect If you already have an account there is no need to create an additional account After you finish creating an account with the online service you want to use apply for Brother Web Connect access You do not need ...

Страница 353: ...l name if not already selected Click Do More in the left navigation bar and then click Brother Web Connect Windows 8 1 Move your mouse to the lower left corner of the Start screen and click if you are using a touch based device swipe up from the bottom of the Start screen to bring up the Apps screen Click Brother Utilities and then click the drop down list and select your model name if not already...

Страница 354: ...e machine The temporary ID is valid for 24 hours 5 Close the web browser Now that you have a Brother Web Connect access ID you must register this ID on your machine and then use your machine to access the web service you want to use Related Information Set Up Brother Web Connect 347 ...

Страница 355: ...Brother Web Connect appears press OK 4 Press Register Delete Register Account 5 The machine will prompt you to enter the temporary ID you received when you applied for Brother Web Connect access Press OK 6 Enter the temporary ID using the LCD and then press OK An error message will appear on the LCD if the information you entered does not match the temporary ID you received when you applied for ac...

Страница 356: ... for Brother CreativeCenter Brother Web Connect is set up to work with Brother CreativeCenter automatically No configuration is needed to create the calendars business cards posters and greeting cards available at www brother com creativecenter Brother CreativeCenter is not available in all countries Related Information Set Up Brother Web Connect 349 ...

Страница 357: ...respective service s website 1 Load your document 2 Press d or c to display Web Press Web You can also press Scan to Web If information regarding the Internet connection appears on the machine s LCD read the information and press OK Occasionally updates or announcements about Brother Web Connect s features will appear on the LCD Read the information and then press OK 3 Press a or b to display the ...

Страница 358: ...aged For Hong Kong Taiwan and Korea Brother Web Connect supports only file names written in English Files named in the local language will not be uploaded 1 Open the media slot cover 2 Insert a memory card or USB flash drive into your machine The LCD automatically changes 3 Press d or c to display Web Press Web If information regarding the Internet connection appears on the machine s LCD read the ...

Страница 359: ...e documents Certain services allow guest users to view documents that are public When accessing a service or an account as a guest user you can view documents that the owner has made public that is documents with no viewing restrictions To download other users documents you must have access privileges to view the corresponding albums or documents For Hong Kong Taiwan and Korea Brother Web Connect ...

Страница 360: ...n the information regarding access as a guest user appears press OK 4 Press a or b to display Download Print Press Download Print If you accessed the service as a guest user enter or select the account name of the user whose documents you want to download 5 Press a or b to display the desired album and then press it An album is a collection of documents However the actual term may differ depending...

Страница 361: ... the LCD Read the information and then press OK 2 Press a or b to display Print CreativeCenter Templates Press Print CreativeCenter Templates 3 Press a or b to display the desired category and then press it 4 Select the desired file Enter the number of copies you want to print and then press OK Repeat this step until you have selected all the files that you want to print 5 When finished press OK I...

Страница 362: ...are saved in the BROTHER folder which can be found on the root level of the media IMPORTANT DO NOT remove the memory card or USB flash drive while your Brother machine is accessing the media Otherwise the card USB flash drive or data stored on the card could be damaged 1 Open the media slot cover 2 Insert a memory card or USB flash drive into your machine The LCD automatically changes 3 Press d or...

Страница 363: ...lect the notebook and then select the note Some services do not require documents to be saved in albums For documents not saved in albums select See Unsorted Files or See UnsortedPhotos to select documents You cannot download documents from other users if the documents are not saved in an album Related Information Brother Web Connect 356 ...

Страница 364: ...rd to Cloud feature to automatically forward incoming faxes to your accounts with the available online services 1 1 Web Service Use the FaxForward to E mail feature to automatically forward incoming faxes to an inbox as email attachments Related Information Brother Web Connect Turn On FaxForward to Cloud or E mail Turn Off FaxForward to Cloud or E mail 357 ...

Страница 365: ... machine s LCD read it and then press OK Occasionally updates or announcements about Brother Web Connect s features will appear on the LCD Read the information and then press OK 2 Press a or b to display FaxForward to Cloud E mail Press FaxForward to Cloud E mail If information regarding FaxForward to Cloud E mail appears read it and then press OK 3 Press On 4 Press Forward to Cloud or Forward to ...

Страница 366: ...chine s memory you cannot turn off FaxForward 1 Press d or c to display Apps Press Apps If information regarding the Internet connection appears on the machine s LCD read it and then press OK Occasionally updates or announcements about Brother Web Connect s features will appear on the LCD Read the information and then press OK 2 Press a or b to display FaxForward to Cloud E mail Press FaxForward t...

Страница 367: ...ect Google Cloud Print Google Cloud Print Google Cloud Print Overview Before Using Google Cloud Print Print from Google Chrome or Chrome OS Print from Google Drive for Mobile Print from Gmail Webmail Service for Mobile 360 ...

Страница 368: ...inter registered to your Google account using a network compatible device such as a mobile phone or computer without installing the printer driver on the device Printing from Android apps requires installing the Google Cloud Print app from the Google Play Store 1 2 3 4 1 Print request 2 Internet 3 Google Cloud Print 4 Printing Related Information Google Cloud Print 361 ...

Страница 369: ...re Using Google Cloud Print Before Using Google Cloud Print Network Settings for Using Google Cloud Print Register Your Machine with Google Cloud Print Using Google Chrome Register Your Machine with Google Cloud Print Using Web Based Management 362 ...

Страница 370: ...g Google Cloud Print In order to use Google Cloud Print your Brother machine must be connected to a network that has access to the Internet either through a wired or wireless connection To connect and configure your machine correctly see the Quick Setup Guide or related topics in this guide Related Information Before Using Google Cloud Print 363 ...

Страница 371: ...n this section are examples for Windows users Screens on your computer may vary depending on your operating system and environment 1 Open Google Chrome on your computer 2 Sign in to your Google Account 3 Click the Google Chrome menu icon and then Settings Show advanced settings 4 In the Google Cloud Print section click Manage 5 Follow the on screen instructions to register your machine 6 When a co...

Страница 372: ...le device 2 Start your web browser 3 Type http machine s IP address in your browser s address bar where machine s IP address is the machine s IP address For example http 192 168 1 2 You can see your machine s IP address in the Network menu on the control panel of your machine If you have set a login password for Web Based Management type your password in the Login box then click 4 Click Google Clo...

Страница 373: ...Related Information Before Using Google Cloud Print Set the Date and Time 366 ...

Страница 374: ...gle Chrome or Chrome OS 1 Make sure your Brother machine is turned on 2 Open the web page that you want to print 3 Click the Google Chrome menu icon 4 Click Print 5 Select your machine from the printer list 6 Change print options if needed 7 Click Print Related Information Google Cloud Print 367 ...

Страница 375: ... sure your Brother machine is turned on 2 Access Google Drive from your Android or or iOS device s web browser 3 Open the document that you want to print 4 Tap the menu icon 5 Tap Print 6 Select your machine from the printer list 7 Change print options if needed 8 Tap or Print Related Information Google Cloud Print 368 ...

Страница 376: ... service from your Android or iOS device s web browser 3 Open the email that you want to print 4 Tap the menu icon If Print appears beside the attachment name you can also print the attachment Tap Print and then follow the instructions on your mobile device 5 Tap Print 6 Select your machine from the printer list 7 Change print options if needed 8 Tap or Print Related Information Google Cloud Print...

Страница 377: ...Home Mobile Web Connect AirPrint AirPrint AirPrint Overview Before Using AirPrint macOS Print Using AirPrint Scan Using AirPrint macOS Send a Fax Using AirPrint macOS 370 ...

Страница 378: ...sly print photos email web pages and documents from your iPad iPhone iPod touch and Mac computer without the need to install a driver AirPrint also lets you send faxes directly from your Mac computer without printing them and lets you scan documents to your Mac computer MFC models For more information visit Apple s website Related Information AirPrint 371 ...

Страница 379: ...o the printer list on your Mac computer 1 Select System Preferences from the Apple Menu 2 Click Printers Scanners 3 Click the icon below the Printers pane on the left 4 Click Add Printer or Scanner The Add screen appears 5 Select your Brother machine and then select AirPrint from the Use pop up menu 6 Click Add Related Information AirPrint 372 ...

Страница 380: ...Home Mobile Web Connect AirPrint Print Using AirPrint Print Using AirPrint Print from iPad iPhone or iPod Touch Print Using AirPrint macOS 373 ...

Страница 381: ...ine is turned on 2 Use Safari to open the page that you want to print 3 Tap or 4 Tap Print 5 Make sure your Brother machine is selected 6 If a different machine or no printer is selected tap Printer A list of available machines appears 7 Tap your machine s name in the list 8 Select the desired options such as the number of pages to print and 2 sided printing if supported by your machine 9 Tap Prin...

Страница 382: ...other machine is turned on 2 On your Mac computer use Safari to open the page that you want to print 3 Click the File menu and then select Print 4 Make sure your Brother machine is selected If a different machine or no printer is selected click the Printer pop up menu and then select your Brother machine 5 Select the desired options such as the number of pages to print and 2 sided printing if supp...

Страница 383: ... Scanner button The Scanner screen appears 6 If you place the document in the ADF select Use Document Feeder check box and then select the size of your document from the scan size setting pop up menu 7 Select the destination folder or destination application from the destination setting pop up menu 8 Click Show Details to change the scanning settings if needed You can crop the image manually by dr...

Страница 384: ...n the example below AirPrint supports only monochrome fax documents 1 Make sure your Brother machine is turned on 2 On your Mac computer open the file that you want to send as a fax 3 Click the File menu and then select Print 4 Click the Printer pop up menu and then select Brother MFC XXXX Fax where XXXX is your model name 5 Type the fax recipient information 6 Click Fax Related Information AirPri...

Страница 385: ...our Windows mobile device You can connect to the same network that your Brother machine is connected to and print without installing the printer driver on the device Many Windows apps support this function 2 1 3 1 1 Windows mobile device Windows 10 Mobile or later 2 Wi Fi connection 3 Your Brother machine Related Information Mobile Web Connect 378 ...

Страница 386: ... service you can connect to the same network as your machine and print without additional setup Many native Android apps support printing 1 2 3 1 Android 4 4 or later 2 Wi Fi Connection 3 Your Brother machine You must download the Mopria Print Service from the Google Play Store and install it on your Android device Before using this service you must turn it on Related Information Mobile Web Connec...

Страница 387: ...ogle Play Store app For Apple Devices Brother iPrint Scan allows you to use features of your Brother machine directly from your Apple device Download and install Brother iPrint Scan from the App Store For Windows Devices Brother iPrint Scan allows you to use features of your Brother machine directly from your Windows device without using a computer Download and install Brother iPrint Scan from the...

Страница 388: ...devices that are close to each other If your Android device is NFC enabled you can print data photos PDF files text files web pages and email messages from the device or scan photos and documents to the device by touching it to the NFC symbol on the machine s control panel You must download and install Brother iPrint Scan to your Android device to use this feature Related Information Mobile Web Co...

Страница 389: ...Center ControlCenter Use Brother s ControlCenter software utility to quickly access your frequently used applications Using ControlCenter gives you direct access to specific applications ControlCenter4 Windows 382 ...

Страница 390: ...ing ControlCenter4 Home Mode Windows Scan Using ControlCenter4 Advanced Mode Windows Set Up the Brother Machine Using ControlCenter4 Windows Create a Custom Tab Using ControlCenter4 Advanced Mode Windows Set Up the Brother Machine from Your Computer Windows Set Up Your Machine s Address Book Using ControlCenter4 Windows 383 ...

Страница 391: ...enter4 Windows Change the Operation Mode in ControlCenter4 Windows ControlCenter4 has two operation modes Home Mode and Advanced Mode You can change modes at any time Home Mode Advanced Mode Home Mode ControlCenter4 Home Mode lets you access your machine s main features easily 384 ...

Страница 392: ...ion mode 1 Click the ControlCenter4 icon in the task tray and then select Open 2 Click the Configuration button and then select Mode Select 3 The mode selection dialog box appears Select either the Home Mode or Advanced Mode option 4 Click OK Related Information ControlCenter4 Windows Scan Using ControlCenter4 Home Mode Windows Scan Using ControlCenter4 Advanced Mode Windows 385 ...

Страница 393: ...e Mode Windows Use ControlCenter4 Home Mode to access your machine s main features Scan Using ControlCenter4 Home Mode Windows Save Scanned Data to a Folder as a PDF File Using ControlCenter4 Home Mode Windows Scan Settings for ControlCenter4 Home Mode Windows Change the Operation Mode in ControlCenter4 Windows 386 ...

Страница 394: ...ControlCenter4 Advanced Mode Windows Save Scanned Data to a Folder as a PDF File Using ControlCenter4 Advanced Mode Windows Scan Both Sides of an ID Card Using ControlCenter4 Advanced Mode Windows Scan to Email Attachment Using ControlCenter4 Advanced Mode Windows Scan to an Editable Text File OCR Using ControlCenter4 Advanced Mode Windows Scan to an Office File Using ControlCenter4 Advanced Mode ...

Страница 395: ...dows Related Models MFC J890DW MFC J895DW 1 Click the ControlCenter4 icon in the task tray and then click Open 2 Click the Device Settings tab 3 Click the Remote Setup button 4 Configure the settings as needed Export Click to save the current configuration settings to a file Click Export to save your address book or all settings for your machine 388 ...

Страница 396: ... OK Cancel Click to exit the Remote Setup Program without uploading data to the machine Apply Click to upload data to the machine without exiting the Remote Setup Program 5 Click OK If your computer is protected by a firewall and is unable to use Remote Setup you may need to configure the firewall settings to allow communication through port numbers 137 and 161 If you are using Windows Firewall an...

Страница 397: ...Center4 1 Click the ControlCenter4 icon in the task tray and then click Open 2 Click the Configuration button and then select Create custom tab A custom tab is created 3 To change the name of a custom tab right click the custom tab and then select Rename custom tab 4 Click the Configuration button select Create custom button and then select the button you want to create The settings dialog box app...

Страница 398: ...You can change or remove the created tab button or settings Click the Configuration button and then follow the menu Related Information ControlCenter4 Windows 391 ...

Страница 399: ...Home Brother iPrint Scan for Windows and Mac Brother iPrint Scan for Windows and Mac Brother iPrint Scan Overview Scan Using Brother iPrint Scan Mac 392 ...

Страница 400: ... example of Brother iPrint Scan for Windows The actual screen may differ depending on the version of the application For Windows Go to your model s Downloads page on the Brother Solutions Center at support brother com to download the latest application For Mac Download and install Brother iPrint Scan from the App Store Related Information Brother iPrint Scan for Windows and Mac Brother iPrint Scan...

Страница 401: ...nner Cover and the Jam Clear Cover are fully closed Paper is inserted correctly in the paper tray The interface cables are securely connected to the machine and the computer or the wireless connection is set up on both the machine and your computer For network models The access point for wireless router or hub is turned on and its link button is blinking The machine s LCD is displaying messages If...

Страница 402: ... is set to Plain Paper in the Basic tab and Greyscale is selected in the Advanced tab of the printer driver you can use the machine as a monochrome printer Copying If the paper type is set to Plain Paper you can make copies in monochrome Faxing If the paper type is set to Plain Paper the machine will receive and print the faxes in monochrome Replace the ink cartridges See Related Information Repla...

Страница 403: ...le device cannot communicate during the Wi Fi Direct network configuration Move the mobile device closer to your Brother machine Move your Brother machine and the mobile device to an obstruction free area If you are using the PIN Method of WPS make sure you have entered the correct PIN Cover is Open The scanner cover is not locked in the closed position Lift the scanner cover and then close it aga...

Страница 404: ...urging and flushing operations The number of times a machine purges and flushes for cleaning varies depending on different situations For example frequently powering the machine on and off will cause numerous cleaning cycles since the machine automatically cleans upon power up The use of non Brother ink may cause frequent cleanings because non Brother ink could cause poor print quality which is re...

Страница 405: ...ple data storage devices were in the machine when it was turned on The machine can read only one memory card or USB flash drive at a time Remove the memory card s or USB flash drive that you are not using Media Error The memory card is either corrupted incorrectly formatted or there is a problem with the memory card Remove the memory card from the media drive slot of the machine and format it corr...

Страница 406: ...formation Load Paper The paper was not inserted in the centre position of the manual feed slot Remove the paper and reinsert it in the centre of the manual feed slot and then follow the LCD instructions See Related Information Load Paper in the Manual Feed Slot The Jam Clear Cover is not closed correctly Make sure the Jam Clear Cover is closed evenly at both ends See Related Information Printer Ja...

Страница 407: ...mpletely into the machine Paper or a foreign object has prevented the paper tray from being inserted correctly Pull the paper tray out of the machine and remove the jammed paper or foreign object If you cannot find or remove the jammed paper see Related Information Printer Jam or Paper Jam Repetitive No Paper Fed Paper dust has accumulated on the surface of the paper pick up rollers Clean the pape...

Страница 408: ...to your computer See Related Information Transfer Your Faxes or Fax Journal Report Unable to Scan XX The machine has a mechanical problem Disconnect the machine from the power for several minutes and then reconnect it If you cannot print received faxes transfer them to another fax machine or to your computer See Related Information Transfer Your Faxes or Fax Journal Report Unusable Device Disconne...

Страница 409: ...n the Manual Feed Slot Printer Jam or Paper Jam Clean the Paper Pick up Rollers Turn Off Memory Receive Print a Fax Stored in the Machine s Memory Change the Paper Size and Paper Type Print Settings Windows Print Options Mac Paper is Jammed Inside and in the Front of the Machine Jam A Inside Front Paper is Jammed in the Front of the Machine Jam B Front Paper is Jammed in the Back of the Machine Ja...

Страница 410: ...her Fax Machine See Related Information Transfer Faxes to Your Computer You can also transfer the Fax Journal report to see if there are any faxes you must transfer See Related Information Transfer the Fax Journal Report to Another Fax Machine Related Information Error and Maintenance Messages Transfer Faxes to Another Fax Machine Transfer Faxes to Your Computer Transfer the Fax Journal Report to ...

Страница 411: ...ion ID you cannot enter Fax Transfer mode 1 Press to interrupt the error temporarily 2 Press Settings All Settings Service Data Transfer Fax Transfer 3 Do one of the following If the touchscreen displays No Data there are no faxes left in the machine s memory Press Close and then press Enter the fax number where faxes will be forwarded 4 Press Fax Start Related Information Transfer Your Faxes or F...

Страница 412: ...ve Windows 8 and Windows 10 Click Brother Utilities and then click the drop down list and select your model name if not already selected Click PC FAX in the left navigation bar and then click Receive 3 Read and confirm the instructions on your computer Faxes in the machine s memory will be sent to your computer automatically When faxes in the machine s memory are not sent to your computer Make sur...

Страница 413: ...hine Related Models MFC J890DW MFC J895DW If you have not set up your Station ID you cannot enter fax transfer mode 1 Press to interrupt the error temporarily 2 Press Settings All Settings Service Data Transfer Report Transfer 3 Enter the fax number where the Fax Journal report will be forwarded 4 Press Fax Start Related Information Transfer Your Faxes or Fax Journal Report Set Your Station ID 406...

Страница 414: ...s turned on the network connection may not have been established yet Wait and try again Connection Error 07 Connection failed to server Set the correct Date Time Date and time settings are incorrect Set the date and time correctly Note that if the machine s power cord is disconnected the date and time settings may have reset to factory settings Authentication Error Error Messages Cause Action Auth...

Страница 415: ...er of pixels file size etc The file type is not supported The file is corrupted The file cannot be used Check the service s size or format restrictions Save the file as a different type If possible get a new uncorrupted version of the file Server Error 13 Service temporarily unavailable Try again later There is a problem with the service and it cannot be used now Wait and try again If you get the ...

Страница 416: ...me Troubleshooting Document Jams Document Jams Document is Jammed in the Top of the ADF Unit Document is Jammed inside the ADF Unit Remove Paper Scraps Jammed in the ADF Error and Maintenance Messages 409 ...

Страница 417: ...elated Models MFC J890DW MFC J895DW 1 Remove any paper that is not jammed from the ADF 2 Open the ADF cover 3 Remove the jammed document by pulling it upwards 4 Close the ADF cover 5 Press IMPORTANT To avoid future document jams close the ADF cover correctly by pressing it down in the centre Related Information Document Jams 410 ...

Страница 418: ...odels MFC J890DW MFC J895DW 1 Remove any paper that is not jammed from the ADF 2 Lift the document cover 3 Pull the jammed document out to the left 4 Close the document cover 5 Press IMPORTANT To avoid future document jams close the ADF cover correctly by pressing it down in the centre Related Information Document Jams 411 ...

Страница 419: ... MFC J890DW MFC J895DW 1 Lift the document cover 2 Insert a piece of stiff paper such as cardstock into the ADF to push any small paper scraps through 3 Close the document cover 4 Press IMPORTANT To avoid future document jams close the ADF cover correctly by pressing it down in the centre Related Information Document Jams 412 ...

Страница 420: ...d remove the jammed paper Paper is Jammed Inside and in the Front of the Machine Jam A Inside Front Paper is Jammed in the Front of the Machine Jam B Front Paper is Jammed in the Back of the Machine Jam C Rear Error and Maintenance Messages Paper Handling and Printing Problems 413 ...

Страница 421: ...Inside Front or Repeat Jam A Inside Front follow these steps 1 Unplug the machine from the electrical socket 2 Pull the paper tray 1 completely out of the machine 1 3 Pull the two green levers inside the machine to release the jammed paper 4 Place both hands under the plastic tabs on both sides of the machine to lift the scanner cover 1 into the open position 1 5 Slowly pull the jammed paper 1 out...

Страница 422: ...nect the power cord b Open the scanner cover again and then hold down until the print head moves to the centre c Unplug the machine from the power source and remove the jammed paper 3 2 If the paper is jammed under the print head unplug the machine from the power source and then move the print head to take out the paper Hold the concave areas with the triangle marks as shown in the illustration 3 ...

Страница 423: ...eeded to take out any paper remaining in this area Make sure scraps of paper are not left in the corners of the machine 1 and 2 1 2 When finished continue with the next step 6 Gently close the scanner cover using both hands 7 Slowly pull the jammed paper 1 out of the machine 1 416 ...

Страница 424: ...ny scraps of paper 1 b Squeeze both levers 1 and then open the Jam Clear Cover at the back of the machine 1 c Slowly pull the jammed paper out of the machine d Close the Jam Clear Cover Make sure the cover is closed completely When finished continue with the next step 8 Put the paper tray firmly back in the machine 417 ...

Страница 425: ...tray in the machine pull out the paper support 1 until it locks into place and then unfold the paper support flap 2 2 1 10 Reconnect the power cord Related Information Printer Jam or Paper Jam Error and Maintenance Messages 418 ...

Страница 426: ...Front of the Machine Jam B Front If the LCD displays Jam B Front or Repeat Jam B Front follow these steps 1 Unplug the machine from the electrical socket 2 Pull the paper tray 1 completely out of the machine 1 3 Pull the two green levers inside the machine to release the jammed paper 4 Slowly pull out the jammed paper 1 1 419 ...

Страница 427: ...craps of paper 1 b Squeeze both levers 1 and then open the Jam Clear Cover at the back of the machine 1 c Slowly pull the jammed paper out of the machine d Close the Jam Clear Cover Make sure the cover is closed completely When finished continue with the next step 5 Put the paper tray firmly back in the machine 420 ...

Страница 428: ... tray in the machine pull out the paper support 1 until it locks into place and then unfold the paper support flap 2 2 1 7 Reconnect the power cord Related Information Printer Jam or Paper Jam Error and Maintenance Messages 421 ...

Страница 429: ...per tray 1 completely out of the machine 1 3 Pull the two green levers inside the machine to release the jammed paper Depending on the paper size it is easier to remove the jammed paper from the front of the machine rather than from the back of the machine 4 Squeeze both levers 1 and then open the Jam Clear Cover at the back of the machine 1 5 Slowly pull the jammed paper out of the machine 6 Clos...

Страница 430: ...aper tray firmly back in the machine 8 While holding the paper tray in the machine pull out the paper support 1 until it locks into place and then unfold the paper support flap 2 2 1 9 Reconnect the power cord 423 ...

Страница 431: ...cover 2 Load one sheet of thick A4 or Letter sized paper such as glossy paper in the manual feed slot Insert the paper deep into the manual feed slot 3 Re connect the power cord The paper you placed in the manual feed slot will be fed through the machine and ejected If the thick paper is pushing any jammed paper out remove the jammed paper Related Information Printer Jam or Paper Jam Error and Mai...

Страница 432: ...the following topics You can correct most problems yourself If you need additional help go to your model s FAQs Troubleshooting page on the Brother Solutions Center at support brother com Using non Brother supplies may affect the print quality hardware performance and machine reliability Paper Handling and Printing Problems Telephone and Fax problems Other Problems Network Problems Google Cloud Pr...

Страница 433: ... Windows 10 and Windows Server 2016 Click Windows System Control Panel In the Hardware and Sound group click View devices and printers Right click the Brother MFC XXXX Printer where XXXX is your model name Click See what s printing If printer driver options appear select your printer driver Click Printer in the menu bar and make sure Use Printer Offline is not selected Windows Server 2012 Move you...

Страница 434: ...he printer driver are the same Print speed is too slow Try changing the printer driver setting The highest resolution needs longer data processing sending and printing time Try the other quality settings in the printer driver as follows Windows In the printer driver clear the Colour Enhancement check box on the Advanced tab Mac In the printer driver select Color Settings click Advanced Color Setti...

Страница 435: ...ently unplugging the machine and or leaving the machine unplugged for extended periods of time We recommend using to power down the machine Using allows minimal power to the machine resulting in periodic but less frequent cleaning of the print head Characters and lines are blurred Check the printing alignment See Related Information Check the Print Alignment from Your Brother Machine Change the pr...

Страница 436: ...J772DW DCP J774DW Return the photo paper tray to the Normal printing position when you use cut sheet paper See Related Information Load Photo or Photo L Paper in Photo Paper Tray If the machine s LCD displays a Paper Jam message and you still have a problem see Related Information Error and Maintenance Messages If the paper tray is empty load a new stack of paper into the paper tray If there is pa...

Страница 437: ...the other party to send the fax again Black lines when receiving The sender s scanner may be dirty Ask the sender to make a copy to see if the problem is with the sending machine Try receiving from another fax machine Left and right margins are cut off or a single page is printed on two pages If the received faxes are divided and printed on two pages or if you get an extra blank page your paper si...

Страница 438: ...r Jam or Paper Jam Shrink Page Size of an Oversized Incoming Fax Paper Weight and Thickness Print Settings Windows Print Options Mac Print a Photo Mac Prevent Smudged Printouts and Paper Jams Windows Prevent Smudged Printouts and Paper Jams Mac Clean the Base Pad Change the Print Setting Options When Having Printing Problems Reduce Printing Noise 431 ...

Страница 439: ...lated Information Choose the Correct Receive Mode Check for a dial tone If possible call your machine to hear it answer If there is still no answer check that the telephone line cord is plugged into the telephone wall socket and the LINE socket of the machine If there is no ringing when you call your machine ask your telephone company to check the line Handling Incoming Calls Difficulties Suggesti...

Страница 440: ...eceive faxes Another device or service at your location may be answering the call before your Brother machine answers To test this lower the Ring Delay setting If the Receive Mode is set to Fax Only or Fax Tel reduce the Ring Delay to one ring See Related Information Set the Number of Rings Before the Machine Answers Ring Delay If the Receive Mode is set to External TAD reduce the number of rings ...

Страница 441: ...or sending quality Try changing your resolution to Fine or S Fine Make a copy to check your machine s scanner operation If the copy quality is poor clean the scanner See Related Information Clean the Scanner Transmission Verification Report says RESULT NG There is probably temporary noise or static on the line Try sending the fax again If you are sending a PC Fax message and get RESULT NG on the T...

Страница 442: ...ose the Correct Receive Mode Set Fax Detect Set the Number of Rings Before the Machine Answers Ring Delay Connect an External TAD External TAD Telephone Answering Device Set the Telephone Line Type Print Reports Clean the Scanner Turn Off Memory Receive Print a Fax Stored in the Machine s Memory Cancel a Fax in Progress Check and Cancel a Pending Fax Load Documents in the Automatic Document Feeder...

Страница 443: ...ial Tone Detection Set Dial Tone Detection Related Models MFC J890DW MFC J895DW Setting the Dial Tone to Detection will shorten the Dial Tone detect pause 1 Press Settings All Settings Initial Setup Dial Tone 2 Press Detection or No Detection 3 Press Related Information Telephone and Fax problems 436 ...

Страница 444: ...ou want Basic for VoIP reduces the modem speed to 9 600 bps and turns off colour fax receiving and Error Correction Mode ECM except for colour fax sending Unless interference is a recurring problem on your telephone line you may prefer to use it only when needed To improve compatibility with most VoIP services Brother recommends changing the compatibility setting to Basic for VoIP Normal sets the ...

Страница 445: ...cuments on the Scanner Glass Poor copy results when using the ADF ADF models Try using the scanner glass See Related Information Load Documents on the Scanner Glass Fit to Page does not work correctly Make sure the document is not skewed on the scanner glass Reposition the document and try again Scanning Difficulties Difficulties Suggestions TWAIN or WIA errors appear when starting to scan Windows...

Страница 446: ...rted the memory card or USB Flash drive Part of my photo is missing when printed Make sure Borderless printing and Cropping are turned off See Related Information Print Borderless Photos from Media See Related Information Print Photos with Auto Cropping Software Difficulties Difficulties Suggestions Cannot print Uninstall and reinstall the Brother driver Device Busy appears on the computer screen ...

Страница 447: ...he Network Connection Repair Tool Windows Where Can I Find My Brother Machine s Network Settings I Cannot Complete the Wireless Network Setup Configuration My Brother Machine Cannot Print Scan or PC FAX Receive over the Network I Want to Check that My Network Devices are Working Correctly Troubleshooting 440 ...

Страница 448: ...ct your model name if not already selected Click Tools in the left navigation bar and then click Network Connection Repair Tool If the User Account Control screen appears click Yes 2 Follow the on screen instructions 3 Check the diagnosis by printing the Network Configuration Report The Network Connection Repair Tool will start automatically if you select the Enable Connection Repair Tool option i...

Страница 449: ...Difficulty with Your Machine Network Problems Where Can I Find My Brother Machine s Network Settings Where Can I Find My Brother Machine s Network Settings Change Machine Settings from Your Computer Print the Network Configuration Report 442 ...

Страница 450: ...e not broadcasting the SSID Enter the correct SSID name or Network Key manually Check the SSID name or the Network Key in the instructions supplied with your wireless LAN access point router and reconfigure the wireless network setup Wireless Your security settings SSID password are not correct Confirm the SSID and password When you are configuring the network manually the SSID and password are di...

Страница 451: ...Wi Fi Direct network and then check how many devices are connected For Windows If your wireless connection has been interrupted and you have checked and tried all of the above we recommend using the Network Connection Repair Tool Related Information Network Problems Configure Your Machine for a Wireless Network When the SSID is Not Broadcast Use Wi Fi Direct 444 ...

Страница 452: ...pears Reselect your network machine make sure Status is idle and then click OK Wired Wireless Your security software blocks your machine s access to the network The network PC Fax Receive feature does not work Windows Set the third party Security Firewall Software to allow PC FAX Rx To add port 54926 for Network PC FAX Rx type the information below In Name Type any description for example Brother ...

Страница 453: ...rs Printers Windows Server 2008 Click Start Control Panel Printers Windows Server 2012 Move your mouse to the lower right corner of your desktop When the menu bar appears click Settings Control Panel In the Hardware group click View devices and printers Printers Windows Server 2012 R2 Click Control Panel on the Start screen In the Hardware group click View devices and printers macOS v10 10 5 v10 1...

Страница 454: ... in the Windows command prompt or Mac Terminal application ping ipaddress or nodename Successful Your Brother machine is working correctly and connected to the same network as your computer Unsuccessful Your Brother machine is not connected to the same network as your computer Windows Ask the network administrator and use the Network Connection Repair Tool to fix the IP address and the subnet mask...

Страница 455: ...r key on your keyboard 3 Confirm the values for the IPv4 address and subnet mask 4 Type exit and then press the Enter key on your keyboard Configure the IP Address on your computer Mac 1 Select System Preferences from the Apple Menu 2 Click Network Advanced TCP IP 3 Confirm the values for the IPv4 address and subnet mask Configure the IP Address on your Brother machine Print the Network Configurat...

Страница 456: ... My Brother Machine Cannot Print Scan or PC FAX Receive over the Network 449 ...

Страница 457: ... See Related Information Certain files may not be printable or may not appear exactly as they are displayed I cannot register my Brother machine with Google Cloud Print Make sure your machine is connected to a network with Internet access Verify that the date and time are set correctly on your machine I do not see a confirmation message on my Brother machine when I try to register with Google Clou...

Страница 458: ...he wireless access point router or to your Brother machine I cannot print Make sure your Brother machine is turned on Confirm the network settings I am trying to print a multiple page document from an iOS device but ONLY the first page is printing Make sure you are running the latest OS version Refer to the following Apple support article for more information about AirPrint support apple com kb HT...

Страница 459: ...and firmware update 1 Press Settings All Settings Machine Info 2 Press one of the following options Serial No Check your machine s serial number Firmware Version Check your machine s firmware version Firmware Update Update your machine to the latest firmware Firmware Auto Check View firmware information on the Home screen 3 Press Related Information Troubleshooting 452 ...

Страница 460: ...rother Machine 1 Press Settings All Settings Initial Setup Reset 2 Press the reset option you want to use 3 Press OK for two seconds to reboot the machine Related Information Troubleshooting Reset Functions Overview Transfer Your Faxes or Fax Journal Report 453 ...

Страница 461: ...Address Book and Setup Groups Programmed fax jobs in the memory MFC J890DW MFC J895DW Delayed Fax and Delayed Batch Transmission Station ID Name and Number Remote Fax Options MFC J890DW MFC J895DW Report Transmission Verification Report Address Book and Fax Journal History Caller ID history and Outgoing Call Faxes in memory 4 All Settings Use the Settings Reset function to reset all machine s sett...

Страница 462: ...ntenance Replace the Ink Cartridges Clean Your Brother Machine Check Your Brother Machine Correct the Paper Feed to Clear Vertical Lines Change the Print Setting Options When Having Printing Problems Pack and Ship Your Brother Machine 455 ...

Страница 463: ...ds that you do not refill the ink cartridges provided with your machine We also strongly recommend that you continue to use only Brother Original replacement ink cartridges Use or attempted use of potentially incompatible ink and or cartridges in the Brother machine may cause damage to the machine and or may result in unsatisfactory print quality Our warranty coverage does not apply to any problem...

Страница 464: ...e machine from detecting the cartridge 1 Quickly shake just the black ink cartridge horizontally 15 times as shown before inserting it into the machine 4 Insert the ink cartridge in the direction of the arrow on the label Each colour has its own correct position 5 Gently push the area marked PUSH until the ink cartridge locks into place and then close the ink cartridge cover 457 ...

Страница 465: ...uch the cartridge insertion slots the ink may stain your skin If you mix the colours by installing an ink cartridge in the wrong position the LCD shows Wrong Ink Colour Check which ink cartridges are not matched by colour to their ink cartridge positions and move them to their proper positions When you open an ink cartridge install it in the machine and use it up within six months of installation ...

Страница 466: ...e Print Head from Your Brother Machine Clean the Print Head from Your Computer Windows Clean the Print Head from Your Computer Mac Clean the Machine s LCD Clean the Outside of the Machine Clean the Machine s Printer Platen Clean the Paper Feed Rollers Clean the Base Pad Clean the Paper Pick up Rollers 459 ...

Страница 467: ... ADF models only 2 1 ADF models only In addition to cleaning the scanner glass and glass strip with a soft lint free cloth moistened with water run your fingertip over the glass to see if you can feel anything on it If you feel dirt or debris clean the glass again concentrating on that area You may need to repeat the cleaning process three or four times To test make a copy after each cleaning atte...

Страница 468: ...Related Information Clean Your Brother Machine Telephone and Fax problems Other Problems 461 ...

Страница 469: ...T DO NOT touch the print head Touching the print head may cause permanent damage and may void the print head s warranty 1 Press Ink Print Head Cleaning You can also press Settings Maintenance Print Head Cleaning 2 Press Black only Colour only or All 3 Press Normal Strong or Strongest 4 Press Start The machine cleans the print head If you clean the print head and the print has not improved try inst...

Страница 470: ... Hardware group click View devices and printers For Windows 10 and Windows Server 2016 Click Windows System Control Panel In the Hardware and Sound group click View devices and printers 2 Right click the Brother MFC XXXX Printer icon where XXXX is your model name and then select Printing preferences If printer driver options appear select your printer driver The printer driver dialog box appears 3...

Страница 471: ... Clean the Print Head from Your Brother Machine 464 ...

Страница 472: ...ance 6 Select one of the following options Option Description Check Print Quality Use to print the test page and check the print quality Print Head Cleaning Use to start the cleaning process manually Select if a line or blank spaces appear in text or graphics on the test page 7 Do one of the following If you selected the Check Print Quality option click Start The machine prints the test page If yo...

Страница 473: ...Machine s LCD IMPORTANT DO NOT use liquid cleaners including ethanol 1 Press and hold down to turn off the machine The LCD displays Shutting Down for a few seconds before the power goes off 2 Clean the LCD with a dry soft lint free cloth Related Information Clean Your Brother Machine 466 ...

Страница 474: ...y crack the panel 1 If the paper support flap is open close it and then close the paper support 2 Pull the paper tray 1 completely out of the machine 1 3 Wipe the outside of the machine with a dry lint free cloth to remove dust 4 Lift the output paper tray cover and remove anything that is stuck inside the paper tray 5 Wipe the inside and the outside of the paper tray with a dry lint free cloth to...

Страница 475: ... the machine to lift the scanner cover into the open position 2 Clean the machine s printer platen 1 and the area around it wiping off scattered ink with a dry soft lint free cloth 1 2 IMPORTANT DO NOT touch the encoder strip the thin strip of plastic that stretches across the width of the machine 2 Doing this may cause damage to the machine 3 Gently close the scanner cover using both hands 4 Reco...

Страница 476: ...he Paper Feed Rollers 1 with a soft lint free cloth moistened with water using a side to side motion After cleaning wipe the rollers with a dry soft lint free cloth to remove all moisture 1 5 Lift the Jam Clear Flap 2 and then clean the back side of the Paper Feed Rollers 1 with a soft lint free cloth moistened with water After cleaning wipe the rollers with a dry soft lint free cloth to remove al...

Страница 477: ...Related Information Clean Your Brother Machine Paper Handling and Printing Problems 470 ...

Страница 478: ...e the paper support 2 Pull the paper tray 1 completely out of the machine 1 3 Clean the Base Pad 1 with a soft lint free cloth moistened with water For DCP J772DW DCP J774DW clean also the Base Pad 2 for the photo paper tray with a soft lint free cloth moistened with water After cleaning wipe the pad with a dry soft lint free cloth to remove all moisture 2 1 4 Slowly push the paper tray completely...

Страница 479: ... then close the paper support 2 2 1 3 Pull the paper tray completely out of the machine 4 Clean the Paper Pick up Rollers 1 with a soft lint free cloth moistened with water Slowly turn the rollers so that the whole surface is cleaned After cleaning wipe the rollers with a dry soft lint free cloth to remove all moisture 1 5 Slowly push the paper tray completely into the machine 6 Reconnect the powe...

Страница 480: ...rother Machine Check Your Brother Machine Check the Print Quality Check the Print Alignment from Your Brother Machine Check the Ink Volume Monitor Machine Status from Your Computer Windows Monitor Machine Status from Your Computer Mac 473 ...

Страница 481: ... you to check the print quality of each colour Press the number of the pattern 1 4 that most closely matches the printing result 6 Do one of the following If print head cleaning is needed press Start to start the cleaning procedure If print head cleaning is not needed the Maintenance screen reappears on the touchscreen Press 7 After the cleaning procedure is finished the touchscreen asks if you wa...

Страница 482: ...print head nozzle is clogged the printed sample looks like this After the print head nozzle is cleaned the lines are gone Related Information Check Your Brother Machine Paper Handling and Printing Problems 475 ...

Страница 483: ...Alignment 2 Press Next 3 Press Start The machine prints the Alignment Check Sheet A 4 For the A pattern press a or b to display the number of the test print with the fewest visible vertical stripes 1 9 and then press it in the example above row number 6 is the best choice Press OK Repeat this step for the rest of the patterns When the print alignment is not adjusted correctly text looks blurry or ...

Страница 484: ...e or having a problem one of the following icons is displayed The ink level is low The ink cartridge is at the end of its life There is a problem with the ink cartridge To check or print the model numbers of the ink cartridges press Back to go back to the Ink menu screen Press Ink Cartridge Model and follow the instruction on the touchscreen 2 Press You can also check the ink volume from your comp...

Страница 485: ...t already selected Click Tools in the left navigation bar and then click Status Monitor Windows 8 and Windows 10 Click Brother Utilities and then click the drop down list and select your model name if not already selected Click Tools in the left navigation bar and then click Status Monitor Troubleshooting Click the Troubleshooting button to access the troubleshooting website Looking for replacemen...

Страница 486: ... Status Monitor Indicators and What They Mean Windows Turn Off the Show Status Monitor Feature Windows Turn Off the Status Monitor Windows Cancel a Print Job Windows Check the Ink Volume 479 ...

Страница 487: ...dicators and What They Mean Windows When you start up your computer the Brother Status Monitor icon appears on the task tray A green icon indicates the normal stand by condition A yellow icon indicates a warning A red icon indicates an error has occurred A grey icon indicates the machine is offline Related Information Monitor Machine Status from Your Computer Windows 480 ...

Страница 488: ... default setting is Only when printing from this PC To turn it off follow these steps 1 Right click the Brother Status Monitor icon or window select the Status Monitor Settings option and then click Options The Options window appears 2 Select the Basic tab and then select Off for Show Status Monitor 3 Click OK Even if the Show Status Monitor feature is turned off you can check the machine s status...

Страница 489: ... Status from Your Computer Windows Turn Off the Status Monitor Windows Turn Off the Status Monitor Windows 1 Right click the Brother Status Monitor icon or window and then select Exit 2 Click OK Related Information Monitor Machine Status from Your Computer Windows 482 ...

Страница 490: ...ty button The Status Monitor screen appears Troubleshooting Click the Troubleshooting button to access the Brother Solutions Center offering FAQs Troubleshooting tips Visit the Genuine Supplies website Click the Visit the Genuine Supplies website button for more information about Brother original supplies Updating the machine s status To view the latest machine status while the Status Monitor wind...

Страница 491: ...Related Information Check Your Brother Machine 484 ...

Страница 492: ...es Adjust the paper feed to reduce vertical lines 1 Press Ink Improve Print Quality Correct Paper Feed You can also press Settings Maintenance Improve Print Quality Correct Paper Feed 2 Press the Next button and then follow the instructions on the touchscreen Related Information Routine Maintenance Other Problems 485 ...

Страница 493: ... driver 1 Press Settings Maintenance Print Setting Options 2 Press one of the following options Option Description Reduce Smudging Select this option according to whether you are using 1 sided or 2 sided printing if you have problems with smudged printouts or paper jams Slow Drying Paper Select this option if you use a type of plain paper on which ink dries slowly 3 Follow the LCD menus 4 Press Re...

Страница 494: ...rocess may lead to print problems and possible damage to the print head 1 Unplug the machine from the electrical socket 2 Unplug the machine from the telephone wall socket and take the telephone line cord out of the machine 3 Using both hands use the finger holds on each side of the machine to lift the scanner cover into the open position 4 Unplug the interface cable from the machine if it is conn...

Страница 495: ...ut it DO NOT leave the ink cartridges in the machine during shipping 9 Wrap the machine in the bag 10 Pack the machine in the original carton with the original packing material as shown below Do not pack the used ink cartridge in the carton 11 Close the carton and tape it shut 488 ...

Страница 496: ...Related Information Routine Maintenance Replace the Ink Cartridges 489 ...

Страница 497: ...mise settings and features create shortcuts and work with options displayed on the machine s LCD to make your Brother machine a more efficient work tool Change Machine Settings from the Control Panel Change Machine Settings from Your Computer 490 ...

Страница 498: ...ine Settings from the Control Panel Change Machine Settings from the Control Panel In the Event of Power Failure Memory Storage General Settings Save Your Favourite Settings as a Shortcut Print Reports Settings and Features Tables 491 ...

Страница 499: ...te and time must be re entered MFC models Programmed fax timer jobs and other fax jobs in the machine s memory will be lost MFC J890DW MFC J895DW Your menu settings are stored permanently and will not be lost Temporary settings for example Contrast and Overseas Mode will be lost The date and time and programmed fax timer jobs for example Delayed Fax will be retained for approximately 24 hours Othe...

Страница 500: ...ight Saving Time Automatically Set Sleep Mode Countdown Set the Machine to Power Off Automatically Set the Date and Time Adjust the LCD Backlight Brightness Change How Long the LCD Backlight Stays On Set Your Station ID Set Tone or Pulse Dialling Mode Reduce Printing Noise Change the Language Displayed on the LCD Change the Keyboard Setting 493 ...

Страница 501: ... For DCP models Press Settings All Settings General Setup Beep 2 Press one of the following options MFC models Option Description Ring Adjust the ring volume Beep Adjust the volume when you press a button make a mistake or after you send or receive a fax Speaker Adjust the speaker volume 3 Press a or b to display the Off Low Med or High option and then press the option you want 4 Press Related Inf...

Страница 502: ...d Models MFC J890DW MFC J895DW You can program the machine to change automatically for Daylight Saving Time It will reset itself forward one hour in the spring and backward one hour in the autumn Make sure you have set the correct date and time in the Date Time setting 1 Press Settings 2 Press Date Time Auto Daylight 3 Press On or Off 4 Press Related Information General Settings 495 ...

Страница 503: ... these instructions to set a time delay countdown before the machine enters Sleep Mode The timer will restart if any operation is carried out on the machine such as receiving a fax or a print job The factory setting is five minutes When the machine goes into Sleep Mode the LCD backlight turns off 1 Press Settings All Settings General Setup Sleep Mode 2 Press a or b to display the 1Min 2Mins 3Mins ...

Страница 504: ...e Auto Power Off feature has turned it Off press The machine will not power off automatically when The machine is connected to a telephone line MFC J890DW MFC J895DW The machine is connected to a wired network MFC J890DW MFC J895DW The machine is connected to a wireless network WLAN Enable is set to On or WLAN is selected in the Network I F setting 1 Press Settings All Settings General Setup Auto ...

Страница 505: ...nd time may not be current Re enter them 1 Press Settings 2 Press Date Time 3 Press Date 4 Enter the last two digits of the year on the touchscreen and then press OK 5 Enter two digits for the month on the touchscreen and then press OK 6 Enter two digits for the day on the touchscreen and then press OK 7 Press Time 8 Enter the time in 24 hour format using the touchscreen Press OK For example enter...

Страница 506: ...LCD Backlight Brightness Adjust the LCD Backlight Brightness If you are having difficulty reading the LCD changing the brightness setting may help 1 Press Settings All Settings General Setup LCD Settings Backlight 2 Press the Light Med or Dark option 3 Press Related Information General Settings 499 ...

Страница 507: ... Stays On Change How Long the LCD Backlight Stays On Set how long the LCD backlight stays on 1 Press Settings All Settings General Setup LCD Settings Dim Timer 2 Press a or b to display the 10Secs 30Secs 1Min 2Mins 3Mins or 5Mins option and then press the option you want 3 Press Related Information General Settings 500 ...

Страница 508: ...press OK 4 Press Name 5 Enter your name up to 20 characters using the touchscreen and then press OK Press to cycle between letters numbers and special symbols The available characters may differ depending on your country If you entered an incorrect character and want to change it press d or c to move the cursor to it Press and then enter the correct character To enter a space press Space 6 Press R...

Страница 509: ...dels MFC J890DW MFC J895DW Your Brother machine is set for a Tone dialling service If you have a Pulse dialling rotary service you must change the dialling mode This feature is not available in some countries 1 Press Settings All Settings Initial Setup Tone Pulse 2 Press Tone or Pulse 3 Press Related Information General Settings Telephone and Fax problems 502 ...

Страница 510: ... setting can reduce printing noise When Quiet Mode is turned on the print speed becomes slower The factory setting is Off When the Quiet Mode setting is turned on appears on the Home screen 1 Press Settings Quiet Mode 2 Press On or Off 3 Press Related Information General Settings Touchscreen LCD Overview Paper Handling and Printing Problems 503 ...

Страница 511: ...nge the Language Displayed on the LCD Change the Language Displayed on the LCD Change the LCD language if needed This feature is not available in some countries 1 Press Settings All Settings Initial Setup Local Language 2 Press your language 3 Press Related Information General Settings 504 ...

Страница 512: ...ol Panel General Settings Change the Keyboard Setting Change the Keyboard Setting You can choose the type of keyboard for the LCD 1 Press Settings All Settings General Setup Keyboard Settings 2 Press QWERTY or ABC 3 Press Related Information General Settings 505 ...

Страница 513: ...Home Machine Settings Change Machine Settings from the Control Panel Save Your Favourite Settings as a Shortcut Save Your Favourite Settings as a Shortcut Add Shortcuts Change or Delete Shortcuts 506 ...

Страница 514: ...tcut screens 3 Press where you have not added a Shortcut 4 Press a or b to display Copy 5 Press Copy 6 Press Options 7 Press a or b to display the available settings and then press the setting you want to change 8 Press a or b to display the available options for the setting and then press the option you want Repeat the previous and this steps until you have selected all the settings for this Shor...

Страница 515: ...y the Shortcut you want to change 3 Press and hold the Shortcut you want to change 4 Press Edit To delete the Shortcut press Delete To edit the name of the Shortcut press Rename and follow the LCD menus 5 Change the settings for the Shortcut you selected 6 Press Save as Shortcut when you have finished changing the settings 7 Press OK to confirm When changing Fax or Scan Shortcuts you will be asked...

Страница 516: ...Home Machine Settings Change Machine Settings from the Control Panel Print Reports Print Reports Reports Print a Report Fax Reports Telephone and Fax problems 509 ...

Страница 517: ...X means Receive Windows You can view and print the Fax Journal report from your computer using the Fax Journal Report software Go to your model s Downloads page on the Brother Solutions Center at support brother com to download the software User Settings The User Settings report prints a list of your current settings Network Configuration network models The Network Configuration report prints a li...

Страница 518: ...the Control Panel Print Reports Print a Report Print a Report 1 Press Settings All Settings Print Reports 2 Press a or b to display the report options and then press the option you want 3 Press Yes 4 Press Related Information Print Reports Caller ID 511 ...

Страница 519: ...e Settings Change Machine Settings from the Control Panel Settings and Features Tables Settings and Features Tables Settings Tables 2 7 67 5 mm touchscreen models Features Tables 2 7 67 5 mm touchscreen models 512 ...

Страница 520: ...ions Ink Volume Check the available ink volume Ink Cartridge Model Check your ink cartridge numbers Print Setting Options Reduce Smudging Reduce smudging on the paper or paper jams during printing Slow Drying Paper Use this setting when printing with a type of plain paper on which the ink dries very slowly Wi Fi TCP IP Set TCP IP protocol Setup Wizard Configure your wireless network settings manua...

Страница 521: ...pe Set the type of paper in the paper tray Paper Size Set the size of paper in the paper tray Check Paper Check the paper type and paper size when you pull the tray out of the machine Quiet Mode Decrease printing noise Beep DCP models Adjust the beeper volume Volume MFC models Ring Adjust the ring volume Beep Adjust the beeper volume Speaker Adjust the speaker volume LCD Settings Backlight Adjust ...

Страница 522: ...ety feature Memory Receive Set the machine to forward fax messages to store incoming faxes in the memory so you can retrieve them while you are away from your machine or the cloud service If you select Fax Forward or Forward to Cloud you can turn on the Backup Print safety feature Fax Rx Stamp Print the received time and date on the top of received faxes Report Setting XMIT Report Select the initi...

Страница 523: ... link mode Wired Status View the current wired status MAC Address View the machine s MAC address WLAN TCP IP BOOT Method Select the BOOT method that best suits your needs IP Address Enter the IP address Subnet Mask Enter the Subnet mask Gateway Enter the Gateway address Node Name Enter the Node name WINS Configuration Select the WINS configuration mode WINS Server Specify the IP address of the pri...

Страница 524: ...ce Name View your machine s device name SSID View the Group Owner s SSID When the machine is not connected the LCD displays Not Connected IP Address View your machine s current IP Address Status Information Status View the current Wi Fi Direct network status Signal View the current Wi Fi Direct network signal strength When your machine acts as Group Owner the LCD always indicates a strong signal I...

Страница 525: ...lls Settings All Settings Machine Info Level 1 Level 2 Descriptions Serial No Check your machine s serial number Firmware Version Main Version Check your machine s firmware version Firmware Update Update your machine to the latest firmware Firmware Auto Check View firmware information on the Home screen Settings All Settings Initial Setup Level 1 Level 2 Descriptions Date Time Date MFC models Add ...

Страница 526: ...errors select Basic for VoIP Reset Machine Reset Restore all the machine s settings that you have changed such as Date and Time and Ring Delay Network Restore all network settings back to the factory settings Address Book Fax MFC models Erase all stored phone numbers and fax settings All Settings Restore all the machine s settings back to the factory settings Local Language Available only for some...

Страница 527: ... number from the Caller ID History and then send a fax to it add it to the Address Book or delete it Edit Options Fax Resolution Set the resolution for outgoing faxes Contrast Adjust the contrast Glass Scan Size Adjust the scan area of the scanner glass to the size of the document Broadcasting Add Number Send the same fax message to more than one fax number Preview MFC J890DW MFC J895DW Preview a ...

Страница 528: ... the Address Book Call History Redial Redial the last number you dialled Outgoing Call Apply Select a number from the Outgoing Call history and then send a fax to it add it to the Address Book or delete it Edit Caller ID History Apply Select a number from the Caller ID History and then send a fax to it add it to the Address Book or delete it Edit Options Fax Resolution Set the resolution for outgo...

Страница 529: ...the old received faxes Delete All New Faxes Delete the new received faxes Delete All Old Faxes Delete the old received faxes Address Book Search Search within the Address Book Edit Store Address Book numbers set up Group numbers for Broadcasting and change and delete Address Book numbers Apply Start sending a fax using the Address Book Call History Redial Redial the last number you dialled Outgoin...

Страница 530: ... advanced copy settings Set New Default Save your settings as the default Factory Reset Restore all settings back to the factory settings Scan Level 1 Level 2 Level 3 Level 4 Descriptions to Media When a memory card or USB Flash drive is inserted Other Scan to Actions Scan documents and save them directly to a memory card or USB flash drive without using a computer Options Save as Shortcut to PC t...

Страница 531: ...ll photos in your USB flash drive Index Print Print Index Sheet Print Settings Print a thumbnail page Print Photos Print Settings Print photos by choosing the index numbers ID Photo Print Select ID Photo Size Rotate Image Print Settings Print ID photos for your resume passport and so on Web Level 1 Descriptions Web Connect the Brother machine to an Internet service Apps Level 1 Descriptions Apps C...

Страница 532: ...Delete the shortcut Ink Level 1 Level 2 Descriptions Ink Volume Check the available ink volume Ink Cartridge Model Check your ink cartridge numbers Improve Print Quality Check and correct the print quality alignment and paper feeding according to the LCD instructions Print Head Cleaning Clean the print head according to the LCD instructions Remove Paper Scraps Remove a piece of paper in the machin...

Страница 533: ...Level 1 Descriptions Scan to Media Scan documents into a USB flash drive Web Connect the Brother machine to an Internet service Related Information Settings and Features Tables 526 ...

Страница 534: ...e Machine Settings from Your Computer Change Machine Settings from Your Computer Change the Machine Settings Using Remote Setup Where Can I Find My Brother Machine s Network Settings Network Management Software and Utilities 527 ...

Страница 535: ...he Remote Setup program lets you configure many of your Brother machine s settings from your computer When you start Remote Setup the settings on your Brother machine will be downloaded to your computer and displayed on your screen If you change the settings on your computer you can upload them directly to the machine Remote Setup Windows Remote Setup Mac 528 ...

Страница 536: ...Change the Machine Settings Using Remote Setup Remote Setup Windows Remote Setup Windows Set Up the Brother Machine from Your Computer Windows Set Up the Brother Machine Using ControlCenter4 Windows Set Up Your Machine s Address Book Using ControlCenter4 Windows 529 ...

Страница 537: ...rograms Brother Brother Utilities Click the drop down list and select your model name if not already selected Click Tools in the left navigation bar and then click Remote Setup Windows 8 and Windows 10 Launch Brother Utilities and then click the drop down list and select your model name if not already selected Click Tools in the left navigation bar and then click Remote Setup The Remote Setup Prog...

Страница 538: ...selected items on the machine You cannot print the data until it is uploaded to the machine Click Apply to upload the new data to the machine and then click Print OK Click to start uploading data to the machine and then exit the Remote Setup Program If an error message appears confirm that your data is correct and then click OK Cancel Click to exit the Remote Setup Program without uploading data t...

Страница 539: ... Remote Setup you may need to configure the firewall settings to allow communication through port numbers 137 and 161 If you are using Windows Firewall and you installed the Brother software and drivers from the Brother installation disc the necessary firewall settings have already been set Related Information Remote Setup Windows ControlCenter4 Windows 532 ...

Страница 540: ... the Brother Machine Using ControlCenter4 Windows Related Models MFC J890DW MFC J895DW 1 Click the ControlCenter4 icon in the task tray and then click Open 2 Click the Device Settings tab 3 Click the Remote Setup button 4 Configure the settings as needed Export Click to save the current configuration settings to a file Click Export to save your address book or all settings for your machine 533 ...

Страница 541: ... OK Cancel Click to exit the Remote Setup Program without uploading data to the machine Apply Click to upload data to the machine without exiting the Remote Setup Program 5 Click OK If your computer is protected by a firewall and is unable to use Remote Setup you may need to configure the firewall settings to allow communication through port numbers 137 and 161 If you are using Windows Firewall an...

Страница 542: ...nter4 Windows Related Models MFC J890DW MFC J895DW Use Remote Setup through CC4 to add or change Address Book numbers on your computer 1 Click the ControlCenter4 icon in the task tray and then click Open 2 Click the Device Settings tab 3 Click the Address Book button The Address Book opens in a Remote Setup window 4 Add or update the Address Book information as needed 5 Click OK Related Informatio...

Страница 543: ...Settings from Your Computer Change the Machine Settings Using Remote Setup Remote Setup Mac Remote Setup Mac Set Up the Brother Machine with a USB Cable Connection Mac Set Up Your Machine s Address Book with a USB Cable Connection Mac 536 ...

Страница 544: ... MFC J890DW MFC J895DW Use Remote Setup to set up your Brother machine with a USB cable connection To use Remote Setup go to your model s Downloads page on the Brother Solutions Center at support brother com and download Remote Setup Remote Setup for Mac supports USB connections only 1 In the Finder menu bar click Go Applications Brother and then double click the Remote Setup icon The Remote Setup...

Страница 545: ...loaded to the machine Click Apply to upload the new data to the machine and then click Print OK Click to start uploading data to the machine and then exit the Remote Setup Program If an error message appears enter the correct data again and then click OK Cancel Click to exit the Remote Setup Program without uploading data to the machine Apply Click to upload data to the machine without exiting the...

Страница 546: ... numbers on your computer with a USB cable connection To use Remote Setup go to your model s Downloads page on the Brother Solutions Center at support brother com and download Remote Setup Remote Setup for Mac supports USB connections only 1 In the Finder menu bar click Go Applications Brother and then double click the Remote Setup icon The Remote Setup Program screen appears 2 In the left menu cl...

Страница 547: ...Home Appendix Appendix Specifications Enter Text on Your Brother Machine Information Regarding Recycled Paper Brother Numbers 540 ...

Страница 548: ...tal display 1 DCP J772DW DCP J774DW MFC J890DW MFC J895DW 2 7 in 67 5 mm TFT Colour Touchscreen LCD Power Source AC 220 to 240 V 50 60 Hz Power Consumption 2 DCP J772DW DCP J774DW Copying 5 Approx 17 W Ready 7 Approx 3 0 W Sleep 7 Approx 0 8 W Power Off 7 8 Approx 0 2 W MFC J890DW MFC J895DW Copying 6 Approx 17 W Ready 7 Approx 3 5 W Sleep 7 Approx 1 2 W Power Off 7 8 Approx 0 2 W Dimensions DCP J...

Страница 549: ...varies slightly depending on the usage environment or part wear 3 When resolution standard document ISO IEC 24712 printed pattern 4 When using ADF resolution standard document ISO IEC 24712 printed pattern 5 When single sided printing resolution standard document ISO IEC 24712 printed pattern 6 When using ADF single sided printing resolution standard document ISO IEC 24712 printed pattern 7 Measur...

Страница 550: ...led Paper Paper Size Photo 10 x 15 cm and Photo L 89 x 127 mm Maximum Paper Capacity Up to 20 sheets thickness 0 25 mm Manual Feed Slot Paper Type 1 Plain Paper Inkjet Paper coated paper Glossy Paper Recycled Paper Paper Size A4 Letter Executive A5 A6 Envelopes C5 Com 10 DL Monarch Photo 10 x 15 cm Photo L 9 x 13 cm Photo 2L 13 x 18 cm Index card 13 x 20 cm Maximum Paper Capacity Up to 1 sheet Pap...

Страница 551: ...opy Specifications Colour Monochrome Yes Yes Copy Width 204 mm 1 Multiple Copies Stacks Sorts up to 99 pages Enlarge Reduce 25 to 400 in increments of 1 Resolution Prints up to 1200 2400 dpi 2 sided Paper Type Plain Paper Recycled Paper Paper Size A4 Letter A5 1 When copying on A4 size paper PhotoCapture Center Specifications This function is available for DCP J772DW DCP J774DW MFC J890DW MFC J895...

Страница 552: ...ws 7 SP1 Windows 8 Windows 8 1 Windows 10 Colour Depth 30 bit colour processing Input 24 bit colour processing Output Greyscale 10 bit colour processing Input 8 bit colour processing Output Resolution Up to 19200 19200 dpi interpolated 1 from Scanner Glass Up to 1200 2400 dpi optical from ADF 2 Up to 1200 600 dpi optical Scanning Width and Length Single sided document Scanner Glass Width Up to 213...

Страница 553: ...ax Receive Windows only Remote Setup and to access photos over a network connection Brother BRAdmin Light Windows only is available as a download from Brother Solutions Center Go to your model s Downloads page on the Brother Solutions Center at support brother com and download the software Windows If you require more advanced machine management use the latest version of Brother BRAdmin Professiona...

Страница 554: ...ts are not supported 2 MFC J890DW MFC J895DW only 3 For WIA 1200 x 1200 resolution Brother Scanner Utility enables enhancing up to 19200 x 19200 dpi 4 Nuance PaperPort 14SE supports Windows 7 SP1 Windows 8 Windows 8 1 Windows 10 Home Windows 10 Pro Windows 10 Education and Windows 10 Enterprise 5 PC Fax supports black and white only MFC models 6 For the latest driver updates go to your model s Dow...

Страница 555: ...paces To enter a space press Space Or you can press c to move the cursor Making corrections If you entered an incorrect character and want to change it press d or c to highlight the incorrect character Press and then enter the correct character To insert a character press d or c to move the cursor to the correct place and then enter the character Press for each character you want to erase or press...

Страница 556: ...sing recycled paper saves natural resources and promotes the circular economy Paper is made using cellulose fibres from wood Collecting and recycling paper extends the life of fibres over multiple life cycles making the best use of the resources The recycled paper production process is shorter The fibres have already been processed so less water and energy and fewer chemicals are used Paper recycl...

Страница 557: ...other product Check here for Brother driver updates too support brother com Customer Service Visit www brother com for contact information on your local Brother office Service centre locations For service centres in Europe contact your local Brother Office Contact information for European offices can be found at www brother com and selecting your country Internet Addresses Brother Global Web Site ...

Страница 558: ...Visit us on the World Wide Web www brother com UK Version 0 ...

Отзывы: