background image


You can add an item to a type list, defining as it belonging to this type, and similar field content will be 
categorized to this type when it encounters the defined field values during field categorizing. For 
example, you can add Credit Card to the list 

Display name of Payment Type

, so that when the 

keyword Credit Card is recognized during field categorizing, it will be placed under the field of 

Display 

name of Payment Type

.  

 
To import a CSV file that contains multiple items, click the 

File 

menu and select 

Import User Define 

Field


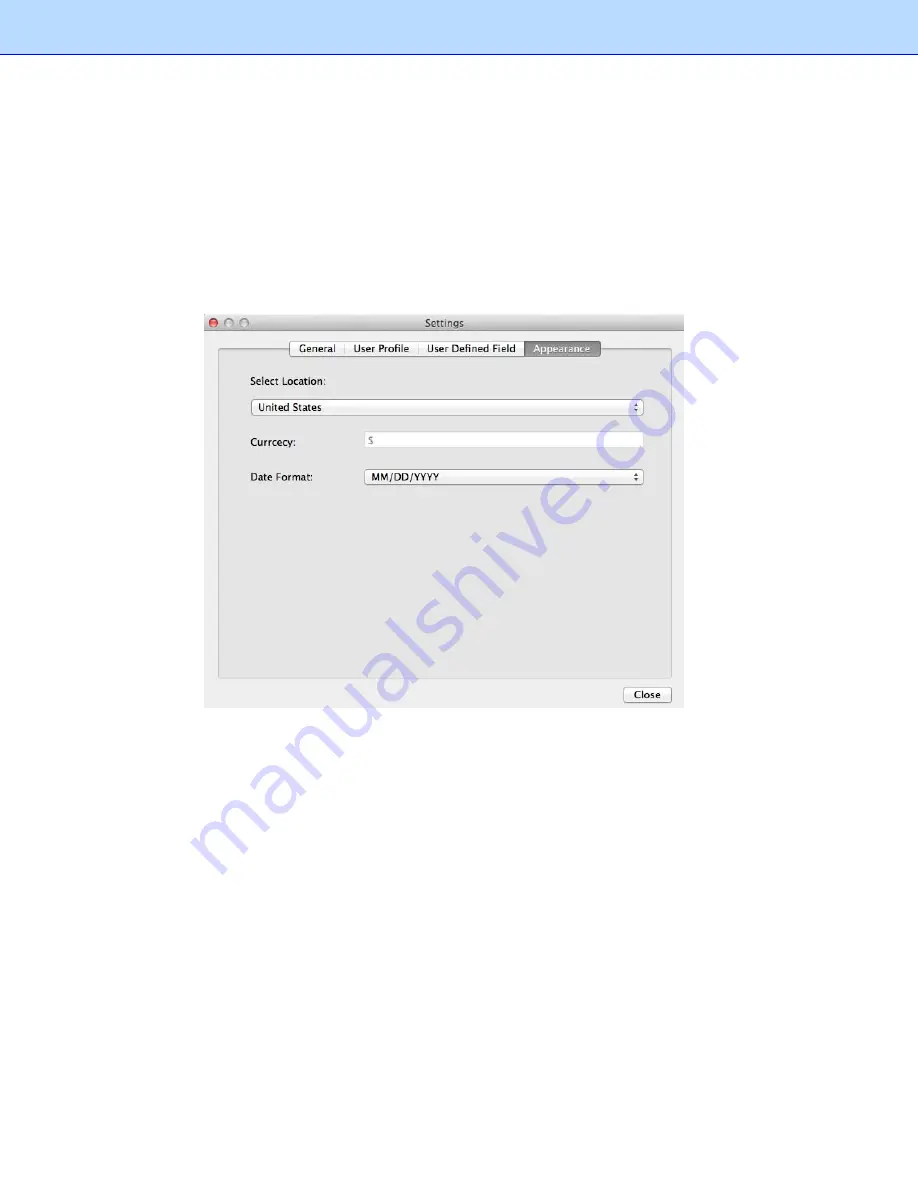
Appearance

: Select a location for easier management. 


Select Location

: Select a location to set up the currency type and date format for your receipts. For 

example, if you select United States, the currency unit will be US Dollars $, and the date format will be 
mm/dd/yyyy. When you create a receipt box, the currency type and date format of the receipts in this 
box will be formatted based on the selected location. You can change the location by right-clicking the 
receipt box and choosing 

Set Location


Collecting Receipts 

Use your scanner to digitize receipts and store them in a database. Receipts can also be added from 
another database, or from image files. 
 

Scanning Receipts 

For the most powerful results when using BR-Receipts, it is important to configure your folders 
properly. 

1. Click 

the 

File 

menu and select 

Scan Settings…

12


Содержание BR-Raceipts

Страница 1: ...BR Receipts User s Guide ...

Страница 2: ...R OR SILICON GRAPHICS BE LIABLE FOR ANY SPECIAL INCIDENTAL INDIRECT OR CONSEQUENTIAL DAMAGES OF ANY KIND OR ANY DAMAGES WHATSOEVER RESULTING FROM LOSS OF USE DATA OR PROFITS WHETHER OR NOT ADVISED OF THE POSSIBILITY OF DAMAGE AND ON ANY THEORY OF LIABILITY ARISING OUT OF OR IN CONNECTION WITH THE USE OR PERFORMANCE OF THIS SOFTWARE Tesseract Copyright A This product is created by NewSoft Technolog...

Страница 3: ... IMPLIED WARRANTIES INCLUDING BUT NOT LIMITED TO THE IMPLIED WARRANTIES OF MERCHANTABILITY AND FITNESS FOR A PARTICULAR PURPOSE ARE DISCLAIMED IN NO EVENT SHALL THE COPYRIGHT HOLDER OR CONTRIBUTORS BE LIABLE FOR ANY DIRECT INDIRECT INCIDENTAL SPECIAL EXEMPLARY OR CONSEQUENTIAL DAMAGES INCLUDING BUT NOT LIMITED TO PROCUREMENT OF SUBSTITUTE GOODS OR SERVICES LOSS OF USE DATA OR PROFITS OR BUSINESS I...

Страница 4: ...10 Setting up BR Receipts 10 Collecting Receipts 12 Scanning Receipts 12 Importing Receipts 15 Creating Receipts Manually 16 Using Receipt Templates 16 Select Vendor 16 New Template 17 Manual Input 20 Modify Template 20 Field Categorizing 21 Editing Receipts 23 Searching for Receipts 23 Creating Reports 23 5 Menu Commands 25 BR Receipts Menu 25 File Menu 26 Edit Menu 27 View Menu 27 Receipt Menu 2...

Страница 5: ...eceipts processes receipts by reading the information from scanned images and categorizing it using field recognition You can edit view items and track expenses by building and maintaining a database of all the information 1 1 ...

Страница 6: ...porting or scanning Read the information and categorize the data by field recognition Create reports to view and track expenses System Requirements Operating System For Intel Mac Intel Core Duo processor Mac OS 10 6 or higher is required Computer A minimum of 512 MB free hard disk space for installing the program A USB port for scanner connection Scanner A USB port for computer connection Receipts...

Страница 7: ...lts and try again 5 Export To You can save specific receipts or all the receipts in a folder as a file in CSV PDF QIF or QuickBooks IIF format Use the file format best suited to your particular needs a Click on the toolbar or select Export to File from the File menu to open the Export to File dialog box b Select All Receipts or Selected Receipts to control which receipts will be exported c Click S...

Страница 8: ...ogin dialog box Enter an email address and password to connect your Brother OnLine BOL account appears indicating that you can now send receipt images to the cloud from your local computer You can click to monitor the uploading status When you export successfully will appear in the status bar NOTE If you select a receipt box to upload all the folders in this receipt box will be uploaded 7 Create R...

Страница 9: ...nized data You can control which receipts are displayed in the list by clicking the All drop down list and selecting Recently Added receipts updated in the last three days or Unverified 3 Menu Bar The Menu bar provides the commands you use to perform program functions within BR Receipts For more information see the Menu Commands section 5 ...

Страница 10: ...end scanned receipt images to the cloud from your local computer NOTE If you select a receipt box to upload all the folders in this receipt box will be uploaded BR Receipts Website Click to open the BOL webpage and view the files you have uploaded if the account information is not saved in the Settings you will have to enter the account information first Folder View Folder view includes a Folder s...

Страница 11: ...folder commands Scan Receipt Scan receipts to the currently selected folder Import Receipt Images Import receipts to the currently selected folder Manually Create a New Receipt Create a new receipt and save it as a record Paste Receipt Paste a copied receipt to a folder Verify All Mark the folders as having been edited and approved Mark All as Unverified Mark the folders as not having been edited ...

Страница 12: ...folders Right click a receipt to see these commands Cut Copy and remove the selected receipt Copy Copy the selected receipt Paste Insert the contents of the clipboard Delete Delete the selected receipt Verify Mark the receipt as having been edited and approved Mark as Unverified Mark the receipt as not having been edited and approved Image View The Image View window displays the selected receipt Y...

Страница 13: ...an empty area to view these commands Zoom In Increase magnification Zoom Out Reduce magnification Fit to Page Adjust the image to match with the height or width of the page Fit to Width Adjust the image to match with the width of the page Rotate image Rotate an image clockwise 90 degrees Edit View To edit the receipt do one of the following Click Edit View from the View menu Double click a receipt...

Страница 14: ...roviding easy access when you send receipt images to the cloud from your local computer In addition to uploading from your local computer you can add a proxy to upload your receipt images or data Select Use a proxy server for this connection and then type the proxy address user name password and port to enable the proxy Click Browse to specify a receipt box path When you create a receipt box the r...

Страница 15: ...update The items under the selected type will be displayed as a list Click Add to open a dialog box type the item name and click OK to add the item to the selected list Click Edit to change an item name in the selected list Click Delete to remove an item from the selected list 11 ...

Страница 16: ...ement Select Location Select a location to set up the currency type and date format for your receipts For example if you select United States the currency unit will be US Dollars and the date format will be mm dd yyyy When you create a receipt box the currency type and date format of the receipts in this box will be formatted based on the selected location You can change the location by right clic...

Страница 17: ...ck Scan uses the settings defined in this screen as follows Resolution 300 dpi dots per inch will have the best recognition performance in most cases Image type The default setting is Color Set the Image type to Gray when scanning black and white receipts Carrier Sheet Mode Select Carrier Sheet Mode when scanning a receipt in a Carrier Sheet Scan Size Width Height and Unit fields are unavailable w...

Страница 18: ... must have an ADF function Receipt Position ADF only Select Left Right or Center from the drop down list if you want BR Receipts to tell you where you have placed the receipt in the scanner s document feeder Brightness and Contrast Drag the sliders to adjust the contrast and brightness of the scanned image Threshold When you select Black White from the Image Type drop down list the threshold slide...

Страница 19: ...enu and select Import Receipt Image or right click a folder in the Folder View section and select Import Receipt Images 2 In the dialog box select one or more image files to import choose the receipt language from the drop down list and click Settings to open the Options dialog box to configure your receipts before importing The first three options are in the Orientation drop down list Auto Detect...

Страница 20: ...eipt box and select Manually Create a New Receipt A set of empty fields will open in Edit mode allowing you to enter text 2 In Edit view you can select or type receipt information in each field to create or reconstruct the receipt Using Receipt Templates If your receipts share common data such as where the receipt originated how goods and services were paid for and who is responsible for them you ...

Страница 21: ...e receipt and perform OCR on it For more information see Field Categorizing New Template Create templates to apply to your receipts Create a different template for each vendor to help organize your receipts 1 Click New template to create a template for your receipts 17 ...

Страница 22: ...splayed with a red bar Click and drag the red bar to separate the top and bottom areas of the receipt Drag to select an area of the receipt right click the selected area and choose a field type from the pop up menu to verify this area ...

Страница 23: ...it as a field that has been used the field type will be unavailable For example if you have specified a store name as the vendor you cannot specify the dollar amount as the vendor Make sure that you accurately drag and place rectangles for the best OCR results If you select two or more data units and specify them as one item this field will be blank and unavailable 4 When the field verification is...

Страница 24: ...d without applying a template Modify Template To edit the template applied to a receipt select the receipt click the Receipt menu and then select Modify template The Modify template screen appears a template has been assigned to the selected receipt If you have verified an area of this receipt as one field the field type in the menu list will be unavailable and cannot be applied to another data un...

Страница 25: ...omputer Field Categorizing Field categorizing lets you sort receipt information by field recognition Click in Image View drag a rectangle to select an area right click the selected area and select the field type from Receipt Date Amount Sales Tax Vendor or Payment Type or drag the selected area directly to the desired field to recognize it 21 ...

Страница 26: ... into the desired field or click Cancel to discard it When finished the receipt and the data will be displayed and you can check and edit the data This is called the verification process You can mark a receipt as verified or you can come back and verify it later when you have time 22 ...

Страница 27: ...s After all of your receipts are entered and edited in BR Receipts you can generate reports that will show the data in an organized way Select options as described below and then click Create Report 1 Click the Receipt menu and select Create Report or click on the toolbar or right click a folder and choose Create Report The Report Wizard appears 2 Type a title for your report in the Title field Se...

Страница 28: ...f you want a cover page that includes receipt date user profile and summary Select Include Receipt if you want your report to display groups by spending type with detailed information for each group Select Include Image if you want the receipt images to be printed in the report 5 When finished click Continue 24 ...

Страница 29: ... Preferences Customizes BR Receipts features Services Starts or stops services Hide BR Receipts H Minimizes BR Receipts to an icon on the application bar at the bottom of the screen Hide Others H Minimizes all open programs to the application bar at the bottom of the screen Show All Maximizes all open programs Quit BR Receipts Q Quits BR Receipts 25 ...

Страница 30: ...Scan Settings Select Scanner Select a driver for your scanner or a different scanner connected to your computer Import Receipt Image Import receipts to the currently selected folder Import User Define Field Import a CSV file with customized items of different types in multiple fields Export to File Save the receipts as a file in CSV PDF QIF or IIF format or export your data to a third party applic...

Страница 31: ... current folder Unselect All Cancel all the selection in the current folder Invert Selection Select the unchecked receipts in the current folder View Menu Edit Items Hide or display Edit View Zoom In Increase magnification Zoom out Reduce magnification Fit into Window Adjust the image size to the current window Rotate Right 90 Degrees Rotate the selected image clockwise 90 degrees Rotate Image Rot...

Страница 32: ...urrent folder Modify template Edit the template applied to this receipt NOTE An error message will pop up if the receipt was not applied to any template before or if OCR is being performed on the receipt Delete template Remove an existing template from the program Create Report Show a data report for the selected receipts Help Menu Using Help Show BR Receipts Help documentation Link to Brother Web...

Страница 33: ...w 6 G General Information 1 Getting Started 5 H Help Menu 28 I Image View 8 Importing Receipts 15 L M Menu Bar 5 Menu Commands 25 Manual Input 20 Modify Template 20 N New Template 17 O Overview 3 R Receipt Menu 28 S Scanning Receipts 12 Searching for Receipts 23 Setting up BR Receipts 10 Status Bar 8 System Requirements 2 Select Vendor 16 U Using Receipt Template 16 V View Menu 27 W Working with B...

Отзывы: