background image

Programmer

68

Chapte 2 Programming with Help Function

Displaying a pattern image

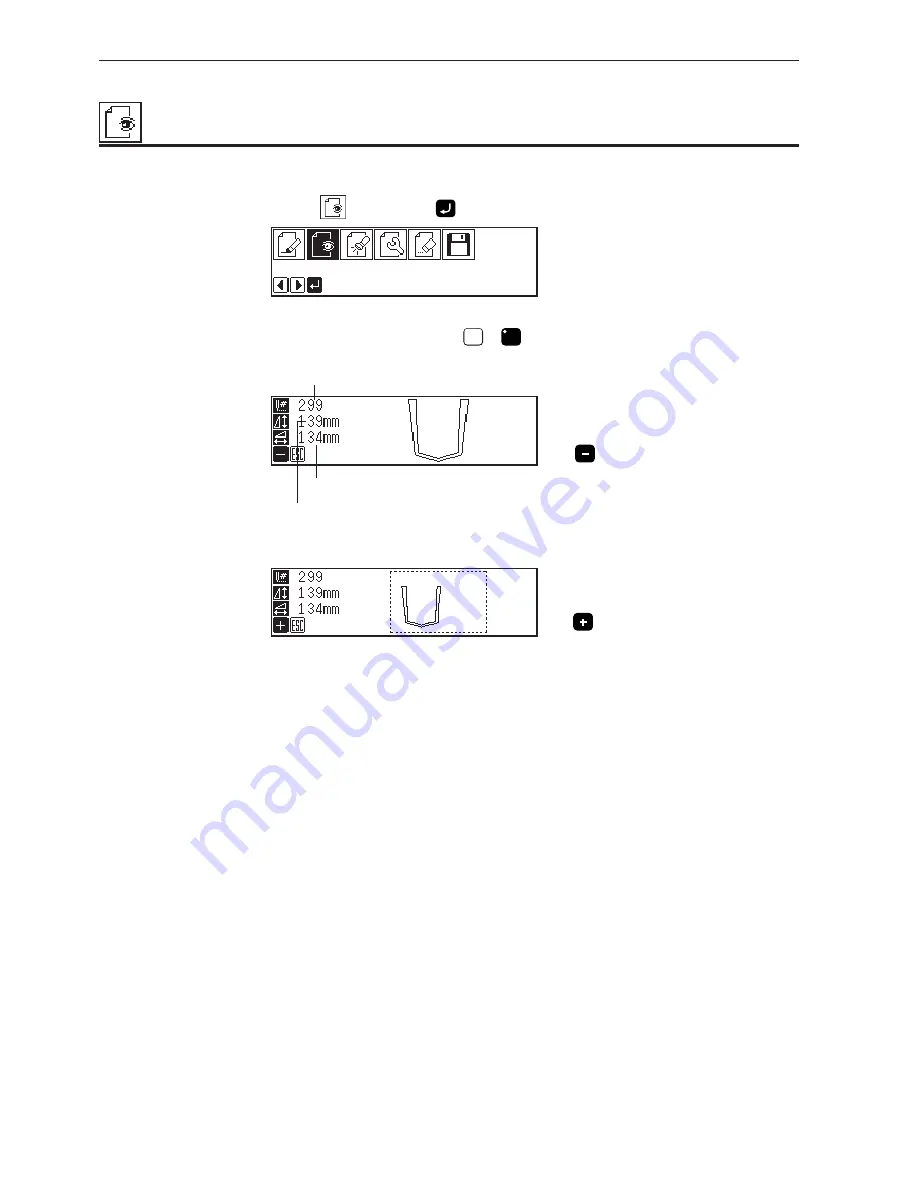
A data image is displayed during programming or editing.

1.

Select 

, then press 

 .

The pattern image is displayed. Press 

ESC

ESC

 or 

C

 to return to Main menu.

Press 

 to display the overall sewing area.

Press 

 to display the overall view of sewing data.

Displays the longitudinal length.

Displays the lateral length.

Displays the stich count.

Содержание BAS-761

Страница 1: ...PROGRAMMER INSTRUCTION MANUAL Please read this manual before using the machine Please keep this manual within easy reach for quick reference BAS 761 ...

Страница 2: ...atic Pocket Setter Instruction Manual carefully before using the machine Operation of this industrial sewing machine is usually carried out in front of moving parts such as the needle and the needle thread take up These parts may cause personal injury Please follow the operational and safety instructions by the experts instructors and use this machine correctly ...

Страница 3: ...g the program setting and setting attribute 20 Editing data 21 Deleting data 21 Programming example 22 Programming for each stitch 22 Lines 24 Curve 26 Double stitch 29 Feed 31 Needle racking 34 Example of modified program 35 Resizing pattern 35 Changing partially 37 Deleting the first stitch 40 Changing the first stitch position 42 Adding sewing point before the first stitch 45 Adding shunting po...

Страница 4: ...te 82 Other operations 83 Programming example 84 Programming for each stitch 84 Lines 85 Curve 86 Double stitch 88 Feed 89 Needle racking 91 Example of modified program 92 Resizing pattern 92 Changing partially 93 Deleting the first stitch 95 Changing the first stitch position 96 Adding sewing point before the first stitch 97 Adding shunting point before the first stitch 99 Moving the shunting poi...

Страница 5: ...a 126 Using the operation panel of the main body 128 Writing data 129 Using the operation panel of the main body 131 Deleting data in a floppy disk 132 Formatting a floppy disk 134 Chapter 5 Practical Programming Examples Programming examples 136 Example 1 Help function 137 Programming procedure 137 Operating procedure 138 Example 1 Command function 141 Programming procedure 141 Operating procedur...

Страница 6: ...Chapter 1 Initial Setup ...

Страница 7: ...l Setup Connection Connection of the programmer cable to the machine is described here Check that the machine power is OFF before connecting the cable 1 Connect the cable to the connector on the right side of the floppy disk drive ...

Страница 8: ...ammer 7 Chapter 1 Initial Setup Operation panel Press here for operation Display panel Displays messages during programming Handling the programmer After use Wind the cable for storage as shown in the figure ...

Страница 9: ...of the folding machine and conduct positioning EMERGENCY STOP RESET START FOLDER RESET 3 Set the pattern if it is prepared Fix the pattern sheet with adhesive tape on the feed plate to prevent displacement Put cloth below the work clamp if there is no pattern 4 Press P on the programmer The work clamp comes down Reset switch ...

Страница 10: ...rite the programmer data into a floppy disk Refer to Writing data page 129 If the data is not need to be saved delete it Refer to Deleting program data page 123 2 Press P on the programmer The panel turns off 3 Remove the pattern sheet 4 Switch OFF the machine ...

Страница 11: ...e Do not use or store floppy disks in a dusty place Do not bend the disk Do not put things on the disk Do not remove the disk out of the drive during the access lamp is lit Do not bring disks near magnetic mat ters such as magnetic screwdriver or the back side of the programmer Do not use floppy disks under high humidity Do not store floppy disks under direct sun light Avoid contact with solvent o...

Страница 12: ... the write protect notch to open the slot as shown below Setting a Floppy Disk to the Floppy Disk Drive Insert a floppy disk straight into the slot The label side of the disk must face the front Press the eject switch to remove the disk out of the drive Do not press the eject switch during the access lamp is lit This may lead to data corruption Slide the notch in this direction to prevent data los...

Страница 13: ...con input who use this machine for the first time who sometimes create programs Chapter 3 Programming with Command Function Describes the procedure to create programs using command functions It is recommended for persons who is specially responsible for program creation who have created programs for BAS 760 series Chapter 4 Reading Writing Data Describes the procedure to read from write into flopp...

Страница 14: ...edle tacking Reflected Two step tension Reflected Two row switch Reflected Slow conversion Ignored Two step switch data is reflected in the normal position when reading the data complying with the specifications for BAS760 retractable clamp As for other clamps slow conversion instructions to 2500 rpm or 3000 rpm are reflected as the two row switch data Turn the setting of two row switch to off Ava...

Страница 15: ...table clamp Inputting the code in other locations will damage the machine because the top part and the cylinder come into contact with each other Inputting numerical values Input numerical values such as commands or the number of stitch from the program ming instrument so that the numerical values become 3 digits The values can be input again before pressing Input the end code in this area ...

Страница 16: ...Chapter 2 Programming with Help Function ...

Страница 17: ... 5 1 2 3 6 7 8 9 Press this key to return to the previous step or when a setting is canceled This key may be used similarly as Messages and program description are displayed here Press this key and turn on the key lamp for programming with the help function Press this key to check setting Press these keys to input numerical values Press this key to return to the corresponding submenu Press this ke...

Страница 18: ...is not displayed press Creates program data Refer to page 58 Reads writes data in a floppy disk Refer to page 125 Deletes the created edited program data Displays the available keys Displays the image of program data Refer to page 68 Edits the program data Refer to page 72 Checks the program data or changes the setting Refer to page 69 ...

Страница 19: ...press Select an icon for programming Refer to page 58 Combine straight lines curves and other figures to make patterns on the pattern sheet After completing each pattern press ESC ESC or C key to return to the submenu The data is available until deletion The program outline may be checked or corrected during editing Input end code Refer to page 65 ...

Страница 20: ...ith Help Function Editing program Refer to page 72 Select then press Select an icon for editing Press after editing Checking and setting Refer to page 69 Select then press Move to the needle position for setting Press and carry out setting ...

Страница 21: ...a Editing the current data Moving a pattern in parallel by feeding Moving a pattern in parallel by sewing with the specified pitch Moving a pattern in parallel Offsetting double stitch data to the left side of the sewing path Offsetting double stitch data to the right side of the sewing path Ending programming Displaying the data image during editing Checking the program setting and setting attrib...

Страница 22: ...apter 2 Programming with Help Function Editing data Moving a pattern in parallel Changing a pitch Resizing a pattern Rotating a pattern clockwise Rotating a pattern counterclockwise Changing the X origin Deleting data ...

Страница 23: ...ng to the pattern The example in the left is used for explanation 1 Programming 1 Press P The work clamp comes down and the programmer screen is displayed 2 Select with then press 3 Move the needle with Press when the needle point is at point A of the pattern The first stitch point A is programmed 4 Select with then press 5 Move the needle with Press when the needle point is at point B of the patt...

Страница 24: ... Select with then press 2 Press The needle returns to the first stitch point A 3 Press ESC ESC Theneedlereturnstothestandbyposition 3 Saving Refer to Writing data page 129 for detailed operation 1 Select with then press 2 Select with then press 3 Input the program number then press 4 Press ESC ESC 4 Ending program 1 Press P ...

Страница 25: ...ect with then press 3 Move the needle with Press when the needle point is at point A of the pattern The first stitch point A is programmed 4 Select with then press 5 Input the stitch length then press 3 0 mm is input in the example Input 030 to make the stitch length to 3 0 mm 6 Move the needle with Press when the needle point is at point B of the pattern 7 Repeat step 6 and create the program to ...

Страница 26: ...ss 2 Press The needle returns to the first stitch point A 3 Press ESC ESC Theneedlereturnstothestandbyposition 3 Saving Refer to Writing data page 129 for detailed operation 1 Select with then press 2 Select with then press 3 Input the program number then press 4 Press ESC ESC 4 Ending program 1 Press P ...

Страница 27: ...ner point E If a split is not made the corner will be round When a split is made When a split is not made MoreintermediatepointssuchaspointsB C D F GorHwillcreatesmoothcurves 1 Programming 1 Press P The work clamp comes down and the programmer screen is displayed 2 Select with then press 3 Move the needle with Press when the needle point is at point A of the pattern The first stitch point A is pro...

Страница 28: ...ern 7 Repeat step 6 and create the program to point E 8 When point E is programmed press again PointEbecomesacornerandisprogrammed Tochangethe stitchlength press ESC ESC forresetting 9 Create the program to point I 10 When point I is programmed press again 11 Press ESC ESC twice 2 Inputting the end code 1 Select with then press 2 Press Press and the needle returns to the first stitch point A 3 Pre...

Страница 29: ... Programming with Help Function 3 Saving Refer to Writing data page 129 for detailed operation 1 Select with then press 2 Select with then press 3 Input the program number then press 4 Press ESC ESC 4 Ending program 1 Press P ...

Страница 30: ...D will create smooth curves 1 Programming 1 Press P The work clamp comes down and the programmer screen is displayed 2 Select with then press 3 Move the needle with Press when the needle point is at point A of the pattern The first stitch point A is programmed 4 Select with then press 5 Input the stitch length of the double stitch Press 3 0 mm is input in the example Input 030 to make the stitch l...

Страница 31: ... E 10 When point E is programmed press again 11 Program point F 12 When point F is programmed press again 13 Press The needle moves to points G and H 14 When the needle stops press ESC ESC three times 2 Inputting the end code 1 Select with then press 2 Press Press and the needle returns to the first stitch point A 3 Press ESC ESC The needle returns to the standby position ...

Страница 32: ... then press 4 Press ESC ESC 4 Ending program 1 Press P Feed After breaking thread halfway through sewing a feed is set to start sewing again from a different position The example in the left is used for explanation of programming an inner pattern with a feed after an outer pattern 1 Programming 1 Press P The work clamp comes down and the programmer screen is displayed 2 Select with then press ...

Страница 33: ...r programming press twice When each stitch is programmed press once 6 Select with then press 7 Move the needle with Press when the needle point is at point C of the pattern 8 Press ESC ESC 9 Program the inner pattern 10 When point D is programmed press ESC ESC The number of pressing ESC ESC depends on the programming method for inner pattern When is used for programming press twice When each stitc...

Страница 34: ...ion 3 Press ESC ESC The needle returns to the home position 3 Saving Refer to Writing data page 129 for detailed operation 1 Select with then press 2 Select with then press 3 Input the program number then press 4 Press ESC ESC 4 Ending program 1 Press P ...

Страница 35: ...ngth The needle actually drops at the point B because needle tacking is conducted on the machine side However point B of the program is created on the straight line between point A and point C 1 Programming 1 Create the program to point A 2 Select with then press 3 Input the stitch length then press 0 5 mm is input in the example Input 050 to make the width and the stitch length to 0 5 mm 4 Move t...

Страница 36: ...r explanation The center point reference point of resizing is as follows X coordinate Center of the outer shape of the data Y coordinate Uppermost position of the data Resizing scale between 90 to 110 are available All the settings of attributes become invalid if the pattern is resized without changing the stitch length Set the attributes after resizing the pattern 1 Calling data 1 Press P The wor...

Страница 37: ...lect the stitch length with and input the numerical value then press If the stitch length is 0 0 the pattern is resized with the same number of stitches as the original data Stitch length of the needle tacking data is not changed 5 Press Calculation is made The pattern is resized 3 Saving Refer to Writing data page 129 for detailed operation 1 Select with then press 2 Select with then press 3 Inpu...

Страница 38: ...attern is changed The example in the left is used for explanation of creating 5 6 and 7 1 Calling data 1 Press P The work clamp comes down and the programmer screen is displayed 2 Select with then press 3 Select with then press 4 Input the program number then press 5 Press ESC ESC 2 Moving to position 4 1 Select with then press ...

Страница 39: ...asses input a few stitches and press The needle returns for a few stitches of the input 4 Press ESC ESC 3 Programming a new point 1 Select with then press 2 Move the needle with Press when the needle point is at 5 3 Repeat step 2 and program 6 and 7 4 Press ESC ESC 5 Select with then press 6 Press 1 then press The needle point moves to 5 7 Press ESC ESC 4 Deleting unnecessary points 1 Select with ...

Страница 40: ...le is deleting 3 stitches ahead Press 3 3 The needle point moves to 6 7 and 8 Points 5 6 and 7 are deleted 4 Press ESC ESC twice 5 Saving Refer to Writing data page 129 for detailed operation 1 Select with then press 2 Select with then press 3 Input the program number then press 4 Press ESC ESC 6 Ending program 1 Press P ...

Страница 41: ... of deleting 1 and setting 2 for the sewing start position 1 Calling data 1 Press P The work clamp comes down and the programmer screen is displayed 2 Select with then press 3 Select with then press 4 Input the program number then press 5 Press ESC ESC 2 Moving to position 1 1 Select with then press 2 Press 1 then press The needle moves to the sewing start position 3 Press ESC ESC ...

Страница 42: ...itches to be deleted then press The example is deleting 1 stitch Press 1 3 The needle point moves to 2 4 Press ESC ESC twice 4 Saving Refer to Writing data page 129 for detailed operation 1 Select with then press 2 Select with then press 3 Input the program number then press 4 Press ESC ESC 5 Ending program 1 Press P ...

Страница 43: ...r explanation of moving the sewing start position from 1 to 1 1 Calling data 1 Press P The work clamp comes down and the programmer screen is displayed 2 Select with then press 3 Select with then press 4 Input the program number then press 5 Press ESC ESC 2 Moving to position 1 1 Select with then press 2 Press 1 then press The needle moves to the start position 3 Press ESC ESC ...

Страница 44: ...needle point is at 1 1 is programmed 3 Press ESC ESC 4 Deleting 1 1 Select with then press 2 Press then press The needle moves to the sewing start position 3 Press ESC ESC 4 Select with then press 5 Input the number of stitches to be deleted then press The example is deleting 1 stitch Press 1 6 The needle point moves to 1 7 Press ESC ESC twice ...

Страница 45: ... Programming with Help Function 5 Saving Refer to Writing data page 129 for detailed operation 1 Select with then press 2 Select with then press 3 Input the program number then press 4 Press ESC ESC 6 Ending program 1 Press P ...

Страница 46: ... left is used for explanation of changing the sewing start position from 1 to 1 1 Calling data 1 Press P The work clamp comes down and the programmer screen is displayed 2 Select with then press 3 Select with then press 4 Input the program number then press 5 Press ESC ESC 2 Moving to position 1 1 Select with then press 2 Press 1 then press The needle moves to the sewing start position 3 Press ESC...

Страница 47: ...mmed 4 Move the needle with to the opposite position of coordinates recorded in step 2 so that the needle point is at 1 of the pattern 5 Press 1 is programmed again 6 Press ESC ESC 4 Deleting 1 1 Select with then press 2 Press 2 then press The needle moves to the sewing start position 3 Press ESC ESC 4 Select with then press 5 Input the number of stitches to be deleted then press The example is de...

Страница 48: ...ction 6 The needle point moves to 1 7 Press ESC ESC twice 5 Saving Refer to Writing data page 129 for detailed operation 1 Select with then press 2 Select with then press 3 Input the program number then press 4 Press ESC ESC 6 Ending program 1 Press P ...

Страница 49: ...provided for prevention of the work clamp interference with impediments on it when it moves directly from the standby position to the sewing start position 1 Calling data 1 Press P The work clamp comes down and the programmer screen is displayed 2 Select with then press 3 Select with then press 4 Input the program number then press 5 Press ESC ESC 2 Moving to position 1 1 Select with then press 2 ...

Страница 50: ...s programmed 4 Move the needle with to the opposite position of coordinates recorded in step 2 so that the needle point is at 1 of the pattern 5 Press 1 is programmed again 6 Press ESC ESC 4 Deleting 1 1 Select with then press 2 Press 2 then press The needle moves to the sewing start position 3 Press ESC ESC 4 Select with then press 5 Input the number of stitches to be deleted then press The examp...

Страница 51: ...ction 6 The needle point moves to A 7 Press ESC ESC twice 5 Saving Refer to Writing data page 129 for detailed operation 1 Select with then press 2 Select with then press 3 Input the program number then press 4 Press ESC ESC 6 Ending program 1 Press P ...

Страница 52: ...lanation of moving the shunting point from A to B 1 Calling data 1 Press P The work clamp comes down and the programmer screen is displayed 2 Select with then press 3 Select with then press 4 Input the program number then press 5 Press ESC ESC 2 Moving to position A 1 Select with then press 2 Press 1 and press The needle moves to the start position 3 Press ESC ESC ...

Страница 53: ...edle point is at B B is programmed 3 Press ESC ESC 4 Deleting 1 1 Select with then press 2 Press 1 then press The needle moves to the sewing shunting point A 3 Press ESC ESC 4 Select with then press 5 Input the number of stitches to be deleted then press The example is deleting 1 stitch Press 1 6 The needle point moves to B 7 Press ESC ESC twice ...

Страница 54: ...s 2 Select with then press 3 Input the program number then press 4 Press ESC ESC 6 Ending program 1 Press P Deleting the shunting point The shunting point is deleted The example in the left is used for explanation of deleting A 1 Calling data 1 Press P The work clamp comes down and the programmer screen is displayed 2 Select with then press ...

Страница 55: ...ESC 2 Moving to position A 1 Select with then press 2 Press 1 then press The needle moves to the shunting point 3 Press ESC ESC 3 Deleting A 1 Select with then press 2 Input the number of stitches to be deleted then press The example is deleting 1 stitch Press 1 3 The needle point moves to 1 4 Press ESC ESC twice Standby position ...

Страница 56: ...t the program number then press 4 Press ESC ESC 5 Ending program 1 Press P Moving the entire pattern in parallel The entire program data is moved in parallel The example in the left is used for explanation of moving the program data in parallel 1 Calling data 1 Press P The work clamp comes down and the programmer screen is displayed 2 Select with then press Standby position ...

Страница 57: ... Press ESC ESC 2 Moving 1 Select with then press 2 Select with then press 3 Move the needle with Press when the needle point is at point A of the pattern 4 Press ESC ESC 3 Saving Refer to Writing data page 129 for detailed operation 1 Select with then press 2 Select with then press 3 Input the program number then press ...

Страница 58: ...rogramming The example in the left is used for explanation of deleting 2 stitches at 8 and creating a new program 1 Press ESC ESC in the position 8 to display the screen on the right 2 Select with then press 3 Input the number of stitches to be deleted then press The example is deleting 2 stitches backward Press 2 4 The needle point moves to 6 5 Press ESC ESC 6 Continue programming ...

Страница 59: ... the needle with then press Creating tacking data Values 0 1 to 1 0 mm are available for the stitch length Tacking width of the needle is set with the dial on the back of the top part of the machine Values 1 0 to 3 5 mm are available for the tacking width 1 Select then press Distance from the previous point in the direction of X or Y axis Remaining plot count ...

Страница 60: ...One to 99 points are available for plotting 1 Select then press 2 Input the stitch length then press 3 Move the needle with then press 4 Press twice at the sewing end position Check that both values are 0 00 mm Stitch length Distance from the previous point in the direction of X or Y axis Remaining plot count Remaining plot count Distance from the previous point in the direction of X or Y axis Tac...

Страница 61: ...attern sheet the desired double stitch may not be achieved Values 0 0 to 9 9 mm are available for the double stitch width 1 Select then press 2 Input the double stitch width and the stitch length then press 3 Move the needle with then press Press twice to change the direction of sewing Remaining plot count Distance from the previous point in the direction of X or Y axis Stitch length Double stitch...

Страница 62: ... souds after is pressed twice After the alarm press again Then an alarm sounds and the double stitch pattern is calculated When the alarm stops the needle moves in the order of A B C D The program is completed when the needle comes to D Press three times End Start Press twice Press twice Press twice ...

Страница 63: ...dle with then press Creating feed data Create feed data of the needle to move the needle from the current position to the next without dropping it 1 Select then press 2 Move the needle with then press Remaining plot count Distance from the previous point in the direction of X or Y axis Remaining plot count Distance from the previous point in the direction of X or Y axis ...

Страница 64: ...tching with the specified stitch length By stitching with the specified stitch length Moving data of the needle position after the current position in parallel by stitching when the moving distance is 6 0 mm or less and by feeding if it is more than 6 0 mm All the stitches after A are moved in parallel Offsetting double stitch data to the left side of the sewing path Offsetting double stitch data ...

Страница 65: ...hen press If is selected 1 Input the stitch length then press 2 Adjust the destination with then press If is selected 1 Adjust the destination with then press Distance from the previous point in the direction of X or Y axis Stitch length Distance from the previous point in the direction of X or Y axis ...

Страница 66: ...d the offset amount then press 2 Move the needle to the position where offset starts with and then press 3 Move the needle to the position where offset ends with and then press twice Ending programming When programming is completed input an end code 1 Select then press 2 Press Offset amount Stitch length ...

Страница 67: ...The pattern image is displayed Press or C to return to the mainmenu Press to display the overall sewing area Press to display the overall view of sewing data Checking the program setting and setting attribute Refer to Checking the program setting and setting attribute page 69 Displays the longitudinal length Displays the horizontal length Displays the stitch count ...

Страница 68: ...letion Refer to Checking the program setting and setting attribute page 69 for adjustment 1 Select then press 2 Input the stitch count to delete 3 Press to delete data following the current needle position for the input count Press to delete data prior to the current needle position The corresponding data is deleted ...

Страница 69: ...ayed during programming or editing 1 Select then press The pattern image is displayed Press ESC ESC or C to return to Main menu Press to display the overall sewing area Press to display the overall view of sewing data Displays the longitudinal length Displays the lateral length Displays the stich count ...

Страница 70: ...o row switch The clamp is set inside when it is set to ON and is set outside when it is changed from ON to OFF Option output Whether option output is conducted or not is set Slow conversion Three successive stitches at low speed are set Values 500 to 33500 rpm are available for the speed Feed data type is displayed Option output Whether option output is conducted or not is set The cylinder operate...

Страница 71: ...eedle steps by each stitch and the setting of the data is displayed Checking a series of stitches automatically 1 Input the stitch count to check 2 Press to move forward to backward The needle moves by the input count and the setting of the data is displayed Input 999 to check all stitches Setting the attribute stitch data 1 Move to the desired needle position then press The attribute setting scre...

Страница 72: ... Setting the attribute feed data 1 Move to the desired needle position then press The attribute setting screen appears 2 Set the attribute 3 Press after setting The screen returns to the confirmation screen Slow conversion Press for type selection Option output Press to mark with O Press to mark with O Press for selection Press for selection ...

Страница 73: ... stitch length Set the attributes after resizing the pattern Rotating a pattern clockwise in range of 1 to 359 degrees The reference point of rotation is the center of the external shape of the data Rotating a pattern counterclockwise in the range of 1 to 359 degrees The reference point of rotation is the center of the external shape of the data Modifying the X origin the position where the workin...

Страница 74: ...directions with 2 Press If is selected Pitch of the needle tacking data is not changed The following settings of attributes become invalid when the pitch is changed Set them again after changing the pitch Two step tension setting Two row switch Option output Slow conversion 1 Input the stitch length 2 Press ...

Страница 75: ... length Set the attributes after resizing the pattern 1 Input resizing scale in the X and Y directions Switch between X and Y directions with Resizing scale between 90 and 110 are available 2 Input the stitch length Switch between input fields of stitch length with If the stitch length is 0 0 the pattern is resized with the same number of stitches as the original data 3 Press If or is selected 1 I...

Страница 76: ... the position detected by the X origin sensor as 0 Values 2 0 and 5 0 mm are available for the position The values indicated in the right side of the working clamp are positive and those indicated in the left side are negative 1 Input the position to be changed Set the and signs with and 2 Press Positive values Position detected by the X origin sensor Negative values ...

Страница 77: ...hapte 2 Programming with Help Function Deleting data Delete the current program data 1 Press ESC ESC or C and return to Main menu 2 Select then press 3 Check the screen then press Press ESC ESC to cancel this command ...

Страница 78: ...Chapter 3 Programming with Command Function ...

Страница 79: ...ancels an image display Lights when the feed is set Press this key for smoothing or editing Deletes a part of the data Press this key to create a line or tacking data Press this key to start or end a program Turning power OFF Refer to page 9 Press this key to display the data image being created Press these keys to input numerical values Press this key to cancel operation Press this key to input a...

Страница 80: ...eet After completing each pattern press L The data is available until deletion Input end code Refer to page 111 Display screen Press P and the following screen appears If the screen is not displayed press Displays the command status Displays the current needle position total stitch count Displays the input value Displays the stitch length Displays the end code 111 if applicable Displays distance f...

Страница 81: ...g with Command Function Editing Move to the standby position or the needle position for editing Input command for editing Refer to page 117 Checking and setting Move to the needle position for editing Input command and carry out setting ...

Страница 82: ...data before stitches Ending programming E 1 1 1 Ending programming Creating program M Changing stitch length when creating a double stitch an offset and a curve Input the stitch length in LI LI 0 Creating a line Input the stitch length in 0 M 0 Creating a curve Input a stitch pitch in Input L 7 8 9 to complete the curve data M 2 Creating a double stitch in the reverse direction to the sewing path ...

Страница 83: ... the specified stitch length Setting attribute L 3 3 3 Setting needle tacking L 3 3 4 Canceling needle tacking L 6 0 5 Sewing speed of successive three stitches becomes 500 rpm L 6 0 6 Canceling L 6 0 5 L 6 0 1 Sewing speed of successive three stitches becomes 1000 rpm L 6 1 1 Canceling L 6 0 1 L 6 1 5 Sewing speed of successive three stitches becomes 1500 rpm L 6 1 6 Canceling L 6 1 5 L 6 0 2 Sew...

Страница 84: ... 0 1 8 Setting two row switch L 1 8 1 Canceling two row switch Other operations ESC ESC Returning from pattern image to the setting screen Returning from error message to the previous screen Displaying data image P Turning on off the programmer Canceling command ...

Страница 85: ...e work clamp comes down and the programmer screen is displayed 2 Move the needle with Press L when the needle point is at point A of the pattern The first stitch point A is programmed 3 Repeat step 2 and create the program to point C 2 Inputting the end code 1 Press L at the last stitch and press E 1 1 1 The needle returns to the sewing start position 3 Saving 1 Specify the program number on the o...

Страница 86: ... L when the needle point is at point A of the pattern The first stitch point A is programmed 3 Input the stitch length 3 0 mm is input in the example Input 030 to make the stitch length to 3 0 mm 4 Press LI LI To change the stitch length specify the pitch value before pressing LI LI 5 Move the needle with Press L when the needle point is at point B of the pattern 6 Repeat steps 4 and 5 and create ...

Страница 87: ...dy page 131 for detailed operation 4 Ending program 1 Press P Curve A pattern with curves is programmed Be sure to press L 7 8 9 for a split at corner point E If a split is not made the corner will be round When a split is made When a split is not made More intermediate points such as points B D F G or H will create smooth curves 1 Programming 1 Press P The work clamp comes down and the programmer...

Страница 88: ... D 6 Move the needle with Press L 7 8 9 when the needle point is at point E of the pattern Point E becomes a sharp corner 7 Press M To change the stitch length specify the pitch value before pressing M 8 Repeat step 4 and create the program from points F to H 9 Press L 7 8 9 as in step 6 at point I The range from points C to E is programmed 2 Inputting the end code 1 Press E 1 1 1 The needle retur...

Страница 89: ...amming 1 Press P The work clamp comes down and the programmer screen is displayed 2 Move the needle with Press L when the needle point is at point A of the pattern The first stitch point A is programmed 3 Press 2 3 0 then press M 2 is the command for the double stitch Input the width of the double stitch in 3 0 mm is input in the example 4 Input the stitch length then press M 3 0 mm is input in th...

Страница 90: ...press switch for writing into the floppy disk Refer to Using the operation panel of the main body page 131 for detailed operation 4 Ending program 1 Press P Feed After breaking thread halfway through sewing a feed is set to start sewing again from a different position The example in the left is used for explanation of programming an inner pattern with a feed after an outer pattern 1 Programming 1 ...

Страница 91: ... is at point C of the pattern 6 Program the inner pattern 2 Inputting the end code 1 Press E 1 1 1 The needle returns to the sewing start position 3 Saving 1 Specify the program number on the operation panel then press switch for writing into the floppy disk Refer to Using the operation panel of the main body page 131 for detailed operation 4 Ending program 1 Press P ...

Страница 92: ... the point B because needle tacking is conducted on the machine side However point B of the program is created on the straight line between point A and point C 1 Programming 1 Create the program to point A 2 Move the needle with Press L when the needle point is at point A of the pattern The first stitch point A is programmed 3 Press 9 then press M 9 is the command for the tacking Input the width o...

Страница 93: ... invalid if the pattern is resized without changing the stitch length Set the attributes after resizing the pattern 1 Calling data 1 Specify the program number on the operation panel then press switch to read the data Refer to Using the operation panel of the main body page 128 for detailed operation 2 Resizing 1 Press 8 8 8 then press M Input the resizing command 2 Press 0 9 0 then press F Input ...

Страница 94: ...ally A part of the programmed pattern is changed The example in the left is used for explanation of creating 5 6 and 7 1 Calling data 1 Specify the program number on the operation panel then press switch to read the data Refer to Using the operation panel of the main body page 128 for detailed operation 2 Moving to position 4 1 Press 9 9 9 then press The work clamp comes down and the programmer sc...

Страница 95: ...ting unnecessary points 1 Press C 2 Input the number of stitches to be deleted then press The example is deleting 3 stitches ahead Press 3 3 The needle point moves to 6 7 and 8 Points 5 6 and 7 are deleted 5 Saving 1 Specify the program number on the operation panel then press switch for writing into the floppy disk Refer to Using the operation panel of the main body page 131 for detailed operatio...

Страница 96: ...ad the data Refer to Using the operation panel of the main body page 128 for detailed operation 2 Moving to position 1 1 Press 1 then press The needle moves to the sewing start position 3 Deleting 1 1 Press C 2 Input the number of stitches to be deleted then press The example is deleting 1 stitch ahead Press 1 3 The needle point moves to 2 4 Saving 1 Specify the program number on the operation pan...

Страница 97: ...ration panel then press switch to read the data Refer to Using the operation panel of the main body page 128 for detailed operation 2 Moving to position 1 1 Press 1 then press The needle moves to the sewing start position 3 Programming a new point 1 Move the needle with Press L when the needle point is at 1 of the pattern 1 is programmed 4 Deleting 1 1 Press 1 then press The needle point returns t...

Страница 98: ...ess P Adding sewing point before the first stitch A point is added before the current sewing point to change the sewing start position The example in the left is used for explanation of changing the sewing start position from 1 to 1 1 Calling data 1 Specify the program number on the operation panel then press switch to read the data Refer to Using the operation panel of the main body page 128 for ...

Страница 99: ...ss L 4 Press 2 then press The needle moves to the sewing start position 4 Deleting 1 1 Press 1 then press The needle point returns to the first stitch 2 Press C 3 Input the number of stitches to be deleted then press The example is deleting 1 stitch Press 1 4 The needle point moves to 1 5 Saving 1 Specify the program number on the operation panel then press switch for writing into the floppy disk ...

Страница 100: ...tandby position to the sewing start position 1 Calling data 1 Specify the program number on the operation panel then press switch to read the data Refer to Using the operation panel of the main body page 128 for detailed operation 2 Moving to position 1 1 Press 1 then press The needle moves to the sewing start position 3 Programming a new point 1 Press F 2 Move the needle with so that the needle p...

Страница 101: ...tch 2 Press C 3 Input the number of stitches to be deleted then press The example is deleting 1 stitch Press 1 4 The needle point moves to A 5 Saving 1 Specify the program number on the operation panel then press switch for writing into the floppy disk Refer to Using the operation panel of the main body page 131 for detailed operation 6 Ending program 1 Press P ...

Страница 102: ...ress switch to read the data Refer to Using the operation panel of the main body page 128 for detailed operation 2 Moving to position A 1 Press 1 then press The neddle moves to the shunting point 3 Programming a new point 1 Press F 2 Move the needle with Press L when the needle point is at B of the pattern B is programmed 4 Deleting 1 1 Press 1 then press The needle point returns to A 2 Press C 3 ...

Страница 103: ...ody page 131 for detailed operation 6 Ending program 1 Press P Deleting the shunting point The shunting point is deleted The example in the left is used for explanation of deleting A 1 Calling data 1 Specify the program number on the operation panel then press switch to read the data Refer to Using the operation panel of the main body page 128 for detailed operation 2 Moving to position A 1 Press ...

Страница 104: ...floppy disk Refer to Using the operation panel of the main body page 131 for detailed operation 5 Ending program 1 Press P Moving the entire pattern in parallel The entire program data is moved in parallel The example in the left is used for explanation of moving the program data in parallel 1 Calling data 1 Specify the program number on the operation panel then press switch to read the data Refer...

Страница 105: ... of the main body page 131 for detailed operation 4 Ending program 1 Press P Deleting a part of the program during programming A program can be modified during programming The example in the left is used for explanation of deleting 2 stitches at 8 and creating a new program 1 Press ESC ESC in the position 8 to display the screen on the right 2 Input the number of stitches to be deleted then press ...

Страница 106: ...gramming Creating a line Command to be used LI LI 0 Input the stitch length in Example Pitch Input 0 5 mm 005 6 0 mm 060 1 Select the sewing start position with then press L 2 Input the stitch length in 3 digits then press LI LI 3 Move the needle with then press L ...

Страница 107: ...ion of a curve Increase the number of plotting points to create a smoother curve One to 99 points are available for plotting 1 Select the start point with then press L 2 Input the stitch length in 3 digits then press M 3 Move the needle with then press L in the position to be plotted 4 Input L 7 8 9 at the end position of the needle Displays the number of the command input Displays the number of t...

Страница 108: ...ng out double stitch on the left side to the sewing path E 1 1 1 Starting double stitch calculations If sharp angles or fine curves are included in the pattern sheet the desired double stitch may not be achieved 1 Select the sewing start position with then press L 2 Determine the width then input M 2 To change the stitch length input it after this procedure 3 Move the needle with to select the sec...

Страница 109: ... point moves to the end position Creating feed data Create feed data of the needle to move the needle from the current position to the next without dropping it Command to be used F L 7 7 7 Moving in parallel for the feed 1 Move to the point immediately preceding the point to be fed 2 Press F 3 Determine the feed point with then press L Displays the number of the command input ...

Страница 110: ...o 1 0 mm are available for the stitch length Tacking width of the needle is set with the dial on the back of the top part of the machine Values 1 0 to 3 5 mm are available for the tacking width 1 Determine the sewing start position with then press L 2 Determine the stitch length then input 9 LI 3 Move the needle with then press L Displays the number of the command input ...

Страница 111: ...Function Ending programming When programming is completed input an end code Command to be used E 1 1 1 Ending programming 1 When the data is created input the end code Data after the end code is input is deleted Displays the number of the command input ...

Страница 112: ... successive stitches at low speed are set Values 500 to 33500 rpm are available for the speed Feed data type is displayed Option output Whether option output is conducted or not is set The cylinder operates when chancing option output two row switch and two step tension setting The option output is connected to the following ports Number of connector P26 MN OPT OUT Number of common pin 5 or 6 24V ...

Страница 113: ...ly Checking each stitch 1 Press to move forward to backward The needle steps by each stitch and the setting of the data is displayed Checking a series of stitches automatically 1 Input the stitch count to check 2 Press to move forward to backward The needle moves by the input count and the setting of the data is displayed Input 999 to check all stitches This screen is displayed while the needle is...

Страница 114: ...3 3 3 Setting needle tacking L 3 3 4 Canceling needle tacking 1 Move to the desired needle position Refer to page 112 on how to move the needle position 2 Input the command of needle tacking Setting two step tension output Command to be used L 3 3 3 Setting two step tension output L 3 3 4 Canceling two step tension output 1 Move to the desired needle position Refer to page 112 on how to move the n...

Страница 115: ...t Command to be used L 7 7 3 Setting option output L 7 7 4 Canceling option output setting 1 Move the needle to the desired position 2 Input the command for option output Setting two row switch Command to be used L 0 1 8 Setting two row switch L 1 8 1 Canceling two row switch 1 Move the needle to the desired position 2 Input the command of two row switch Indicates ON when it is set Indicates when ...

Страница 116: ...successive three stitches becomes 2000 rpm L 6 2 1 Canceling L 6 0 2 L 6 2 5 Sewing speed of successive three stitches becomes 2500 rpm L 6 2 6 Canceling L 6 2 5 L 6 3 0 Sewing speed of successive three stitches becomes 3000 rpm L 6 3 1 Canceling L 6 3 0 L 6 3 5 Sewing speed of successive three stitches becomes 3500 rpm L 6 6 3 Canceling L 6 3 5 1 Move to the desired needle position for setting 2 ...

Страница 117: ... pitch of the needle tacking data is not changed The following settings of attributes become invalid when changing the pitch Set them again after changing the pitch Two step tension setting Two row switch Option output Slow conversion 1 Check to see that the needle at in the standby position Press R if it is not at the standby position 2 Input 1 1 1 M 3 Input the stitch length in 3 digits then pre...

Страница 118: ... Input the width to be offset in M Input the stitch length in Moving to stitches ahead Moving to stitches back It will automatically become the first point to be offset 1 Move the needle to the first point to be offset 2 Determine the stitch width then input M 4 or M 5 To change the stitch length input it after this procedure 3 Move to the last point to be offset 4 Press L twice Displays the numbe...

Страница 119: ...ockwise This function is available only when the needle is at the home position Values of 1 359 degrees are available for input The reference point of rotation is the center of the external shape of the data 1 Make sure that the needle is at the home position Press R if the needle is not at the home position 2 Input M 6 6 6 or M 6 6 7 3 Input the angle in 3 digits then press L ...

Страница 120: ...ributes become invalid if the pattern is resized without changing the stitch length Set the attributes after resizing the pattern 1 Make sure that the needle is at the home position Press R if the needle is not at the home position 2 Input M 8 8 8 3 Input the magnification in 3 digits in the X direction then press F Magnification values of 0 400 are available for input 4 Input the magnification in...

Страница 121: ...stitch length in 3 digits before pressing L 7 7 7 L Moving data of the needle position after the current position in parallel by stitching when the moving distance is 6 0 mm or less and by feeding when it is more than 6 0 mm 1 Move to the desired needle position Refer to page 112 on how to move the needle position When F L 7 7 7 2 Press F 3 Determine the destination with then press L 7 7 7 By feed...

Страница 122: ... Function When LI LI L 7 7 7 2 Press LI LI 3 Determine the destination with then press L 7 7 7 When L 7 7 7 2 Press L 7 7 7 3 Determine the destination with then press L Displays the number of the command input Displays the number of the command input ...

Страница 123: ...s displayed during programming or editing 1 Press Pattern image is displayed Press ESC ESC or C to return to the main menu Stitch count The data width is displayed in mm The data height is displayed in mm Press to display the overall sewing area Press to display the overall view of the data ...

Страница 124: ...itches becomes the sewing start position C Deletes data before stitches If this command is used at the sewing end position the end code is deleted 1 Move the needle to the desired position 2 Input the command Input C to delete data after the current needle position Input C to delete data before the current needle position Deleting program data Command to be used R 2 2 2 Deleting all the data input...

Страница 125: ...Programmer 124 Chapter 3 Programming with Command Function ...

Страница 126: ...Chapter 4 Reading Writing Data ...

Страница 127: ... is not available in the command mode Using the operation panel of the main body The data created with BAS 760 series can also be read It is available both in the help mode and the command mode 1 Select then press 2 Make sure that is selected then press 3 Input the number of program with a numeric key If there is data appears If there is no data appears If appears the data is from BAS 760 series ...

Страница 128: ...OFF again 6 Press An image is displayed Press ESC ESC or C to return to the submenu Press to display the overall sewing area Press to display the overall view of the sewing data 7 Press to read the data To cancel reading press ESC ESC OFF is highlighted if selected Displays the lateral length Displays the stitch count Displays the longitudinal length ...

Страница 129: ...e operation panel of the main body 1 Input the number of the program to be called up Select the digit with and select the number with 2 Press switch The following screen is displayed while reading The following screen is displayed when reading is completed ...

Страница 130: ...g to the procedure described in page 132 if it is not formatted Data can be written as follows Using the help function This is not available in the command mode Using the operation panel of the main body This is available both in the help mode and the command mode 1 Select then press 2 Select then press 3 Input the number of program with a numeric key If there is data appears If there is no data a...

Страница 131: ...d select 5 Press to turn ON Press to turn OFF again 6 Press An image is displayed This is the image from data saved in a floppy disk not the image currently in editing Press ESC ESC or C to return to the submenu Press to display the overall sewing area Press to display the overall view of the sewing data 7 Press to write the data To cancel writing press ESC ESC Displays the longitudinal length ...

Страница 132: ...he operation panel of the main body 1 Input the number of the program to be written Select the digit with and select the number with 2 Press switch The following screen is displayed while writing The following screen is displayed when writing is completed ...

Страница 133: ...mmand mode 1 Select then press 2 Select then press 3 Input the number of program to be deleted with a numeric key If there is data appears If there is no data appears If appears the data is from BAS 760 series Checking the image display go to 7 when not checking 4 Press and select 5 Press to turn ON Press to turn OFF again OFF is highlighted if selected ...

Страница 134: ...isk not the image currently in editing Press ESC ESC or C to return to the submenu Press to display the overall sewing areaa Press to display the overall view of the sewing data 7 Press to delete the data To cancel deletion press ESC ESC Displays the stitch count Displays the lateral length Displays the longitudinal length ...

Страница 135: ... floppy disk Formats a floppy disk for the programmer This operation cannot be available in command mode Formatting a floppy disk will erase all the data in it 1 Select then press 2 Select then press 3 Press for formatting and press ESC ESC for not formatting ...

Страница 136: ...Chapter 5 Practical Programming Examples ...

Страница 137: ... created patterns in each mode The following two patterns are programmed and the standard retractable clamp is used Example 1 Only straight lines are programmed Both ends of the pocket are reinforced with the needle tacking data Example 2 Straight lines and curves are programmed Both ends of the pocket are reinforced with the needle tacking data ...

Страница 138: ...ine C Straight line D Straight line E Input two row switch after moving the needle back several stitches then move it back again to point E Needle tacking F Straight line Example 1 Help function Programming procedure Functions to be used Straight line page 58 Needle tacking page 58 Checking the program setting and setting attribute page 69 Flow of programming ...

Страница 139: ...elect with then press 5 Input the stitch length then press 3 0 mm is input in the example Input 030 to make the stitch length to 3 0 mm 6 Move the needle with Press when the needle point is at point B of the pattern 7 Repeat step 6 and create the program to point E 8 When point E is programmed press ESC ESC twice 9 Select icon with then press 10 Input the number of stitches to return the needle to...

Страница 140: ...eed the needle to point E then press 5 is input in the example The needle moves 5 stitches ahead 15 Press 16 Select with then press 17 Input the stitch length of needle tacking then press 0 5 mm is input in the example Input 005 to make the stitch length to 0 5 mm 18 Move the needle with Press when the needle point is at point F of the pattern 19 Press ESC ESC twice 20 Select with then press ...

Страница 141: ...e program to point J 24 When point J is programmed press ESC ESC twice 25 Select with then press 26 Input the stitch length of needle tacking then press 0 5 mm is input in the example Input 005 to make the stitch length to 0 5 mm 27 Move the needle with Press when the needle point is at point A of the pattern 28 Press ESC ESC twice 2 Input the end code 1 Select with then press 2 Press The needle g...

Страница 142: ...ral stitches and put the needle position back to point E 9 LI LI Needle tacking F LI LI Straight line Example 1 Command function Programming procedure Functions to be used Straight line page 105 Needle tacking page 109 Checking attributes page 112 Two row switch page 114 Flow of programming G LI LI Straight line H LI LI Straight line I LI LI Straight line J 9 LI LI Needle tacking A E 1 1 1 End cod...

Страница 143: ...ess L when the needle point is at point B of the pattern 6 Repeat steps 4 and 5 and create the program to point E 7 Input the number of stitches to return the needle to the position where two row switch is input then press 5 is input in the example The needle moves 5 stitches back 8 Press 0 1 8 then press L The screen to set the attributes appear and two row switch is set 9 Input the number of sti...

Страница 144: ...int G of the pattern 14 Repeat steps 12 and 13 and create the program to point J 15 Press 9 then press LI LI 9 is a command for needle tacking Input the stitch length in 0 5 mm is input in the example 16 Move the needle with Press L when the needle point is at point A of the pattern 2 Input the end code 1 Press E 1 1 1 The needle goes back to the sewing start position and the retractable clamp is ...

Страница 145: ...ner Curve H I J K L Straight line M Input two row switch after moving the needle back several stitches then move it back again to point E Needle tacking Example 2 Help function Programming procedure Functions to be used Straight line page 58 Curve page 59 Needle tacking page 58 Checking the program setting and setting attribute page 69 Flow of programming Curve Curve Curve Curve ...

Страница 146: ... programmed 4 Select with then press 5 Input the stitch length then press 3 0 mm is input in the example Input 030 to make the stitch length to 3 0 mm 6 Move the needle with Press when the needle point is at point B of the pattern 7 When point B is programmed press ESC ESC twice 8 Select with then press 9 Input the stitch length then press 3 0 mm is input in the example Input 030 to make the stitc...

Страница 147: ...t L 14 When point L is programmed press again 15 Press ESC ESC twice 16 Select with then press 17 Press 18 Move the needle with Press when the needle point is at point M of the pattern 19 When point M is programmed press ESC ESC twice 20 Select with then press 21 Input the number of stitches to return the needle to the position where two row switch is input then press 5 is input in the example The...

Страница 148: ...tches ahead 26 Press ESC ESC 27 Select with then press 28 Input the stitch length of needle tacking then press 0 5 mm is input in the example Input 005 to make the stitch length to 0 5 mm 29 Move the needle with Press when the needle point is at point N of the pattern 30 Press ESC ESC twice 31 Select with then press 32 Input the stitch length then press 3 0 mm is input in the example Input 030 to ...

Страница 149: ...when the needle point is at point P of the pattern 38 Repeat step 37 and create the program to point T 39 When point T is programmed press again Point T is programmed to be a corner To change the stitch length press ESC ESC to set it again 40 Create the program to point Y 41 When point Y is programmed press again 42 Press ESC ESC twice 43 Select with then press 44 Press 45 Move the needle with Pre...

Страница 150: ...of needle tacking then press 0 5 mm is input in the example Input 005 to make the stitch length to 0 5 mm 49 Move the needle with Press when the needle point is at point A of the pattern 50 Press ESC ESC twice 2 Input the end code 1 Select with then press 2 Press The needle goes back to the sewing start position and the retractable clamp is positioned outside ...

Страница 151: ... several stitches and put the needle position back to point E N LI LI Straight line O P Q R S T L 7 8 9 U V W X Y LI LI Straight line Z 9 LI LI Needle tacking A E 1 1 1 End code Example 2 Command function Programming procedure Functions to be used Straight line page 105 Curve page 106 Needle tacking page 109 Checking attributes page 112 Two row switch page 114 Flow of programming M Curve M Curve M...

Страница 152: ... is input in the example 4 Press LI LI To change the stitch length specify it before pressing LI LI 5 Move the needle with Press L when the needle point is at point B of the pattern 6 Press M 7 Move the needle with Press L when the needle point is at point C of the pattern 8 Repeat step 7 and create the program to point F 9 Move the needle with Press L 7 8 9 when the needle point is at point G of ...

Страница 153: ...tributes appear and two row switch is set 16 Input the number of stitches to proceed the needle to point M then press 5 is input in the example The needle moves 5 stitches ahead 17 Press 9 then press LI LI 9 is a command for needle tacking Input the stitch length in 0 5 mm is input in the example 18 Move the work clamp with Press L when the needle point is at point N of the pattern 19 Press LI LI ...

Страница 154: ...d create the program to point Y 27 Press LI LI 28 Move the needle with Press L when the needle point is at point Z of the pattern 29 Press 9 then press LI LI 9 is a command for needle tacking Input the stitch length in 0 5 mm is input in the example 30 Move the needle with Press L when the needle point is at point A of the pattern 2 Input the end code 1 Press E 1 1 1 The needle goes back to the se...

Страница 155: ...INSTRUCTION MANUAL BROTHER INDUSTRIES LTD NAGOYA JAPAN Printed in Japan 151 761 S93761 012 1999 1 B 1 ...

Отзывы: