background image

Programmer

32

Chapter 2 Programming with Help Function

5.

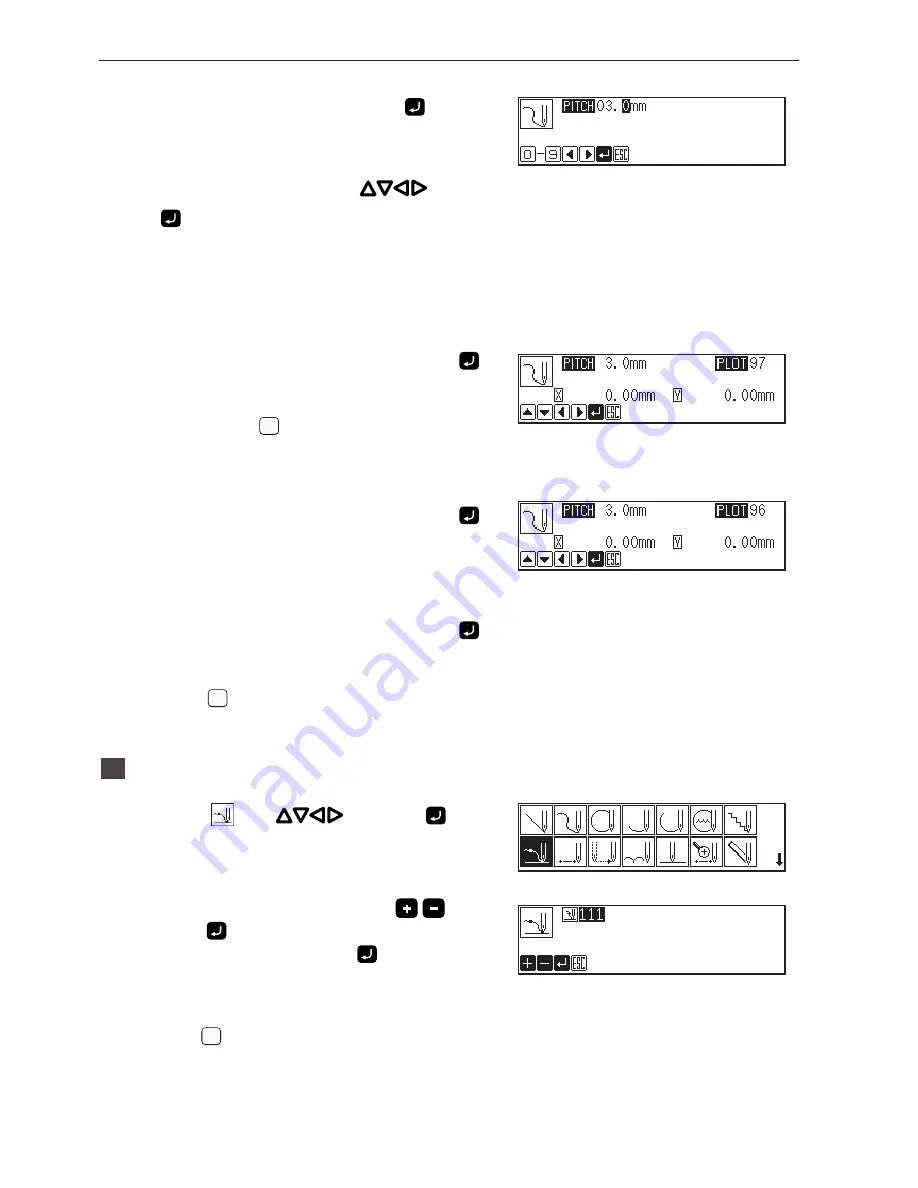
Input the stitch length and press 

.

3.0 mm is input in the example.
Input 030 to make the stitch length to 3.0 mm.

6.

Move the work clamp with 

. Press

 when the needle point is at point B of the

pattern.

7.

Repeat step 6 and create the program to

point C.

8.

When point C is programmed, press 

again.

Point C becomes a corner and is programmed. To change the

stitch length, press 

ESC

ESC

 for resetting.

9.

Create the program to point E.

10. When point E is programmed, press 

again.

11. Create the program to point I.

12. When point I is programmed, press 

again.

13. Press 

ESC

ESC

 twice.

2

Inputting the end code

1.

Select 

 with 

 and press 

.

2.

Select the end code type with 

 and

press 

.

"111" is selected in the example. Press 

 and the work clamp

returns to the first stitch (point A) .

3.  Press 

ESC

ESC

.

The work clamp returns to the home position.

Содержание BAS-311E

Страница 1: ...PROGRAMMER INSTRUCTION MANUAL Please read this manual before using the machine Please keep this manual within easy reach for quick reference BAS 300E Series ...

Страница 2: ...Electronic Pattern Sewer Instruction Manual carefully before using the machine Operation of this industrial sewing machine is usually carried out in front of moving parts such as the needle and the needle thread take up These parts may cause personal injuries Please follow the operational and safety instructions by the experts instructors and use this machine correctly ...

Страница 3: ...ng and setting attribute 23 Editing data 24 Deleting data 24 Programming example 25 Programming for each stitch 25 Magnified input 27 Lines 29 Curve 31 Double stitch 34 Feed 36 Basting 38 Symmetrical pattern 41 Splitting 44 Zigzag stitch 46 Multiple stitch 48 Example of modified program 52 Resizing pattern 52 Changing partially 54 Deleting the first stitch 57 Changing the first stitch position 59 ...

Страница 4: ...tting low speed sewing 102 Inputting the trigger 103 Creating a multiple stitch 104 Displaying a pattern image 106 Checking the program setting and setting attribute 107 Checking each stitch 108 Checking a series of stitches automatically 108 Skipping 108 Editing program 111 Deleting data 116 Chapter 3 Programming with Command Function Please read before programming 118 Panel description and usage...

Страница 5: ...g a circle zigzag circle by specifying the diameter 165 Creating a circle zigzag circle by specifying the radius 166 Creating an arc 168 Creating a semicircle 169 Creating a zigzag stitch 170 Creating a multiple stitch 172 Creating double stitch 173 Parallel stitch 174 Offset 175 Creating feed data 176 Creating split data 177 Creating magnified data 177 Low speed sewing 178 Setting the option outp...

Страница 6: ...ing the extended option output data 200 Table of condition number 201 Machine operation mode 201 Standard input 201 Standard output 202 Extended option external input 202 Extended option output 203 Table of extended option input 204 Table of extended option output 205 Example of extended option output 206 Chapter 5 Reading Writing Data Reading data 210 Reading additional data 212 Writing data to a...

Страница 7: ...Programmer 6 Contents ...

Страница 8: ...Chapter 1 Preparations of operation ...

Страница 9: ...ns of operation Connection Connection of the programmer cable to the machine is described here Check that the machine power is OFF before connecting the cable 1 Connect the cable to the connector on the left side of the operation panel ...

Страница 10: ...9 Chapter 1 Preparations of operation Handling the programmer After use Wind the cable for storage as shown in the figure Operation panel Press here for operation Display panel Displays messages during programming ...

Страница 11: ...mp 3 Set the pattern sheet Fix the pattern sheet with adhesive tape on the feed plate to prevent displacement 4 Press the foot switch pedal to lower the work clamp 5 Moving the needle closer to the pattern sheet by turning the pulley allows easier programming 6 Press P on the programmer The needle moves to the home position Foot switch pedal 2 3 mm Pattern sheet ...

Страница 12: ...a floppy disk page 214 If the data is not need to be saved delete it Refer to Deleting data in a floppy disk page 216 2 Press P on the programmer The panel turns off 3 Press the foot switch pedal to lift the work clamp 4 Remove the pattern sheet 5 Press the foot switch pedal to lower the work clamp 6 Switch OFF the machine Foot switch pedal ...

Страница 13: ...erature Do not use or store floppy disks in a dusty place Do not bend the disk Do not put things on the disk Do not remove the disk out of the drive during the access lamp is lit Do not bring disks near magnetic mat ters such as magnetic screwdriver or the back side of the programmer Do not use floppy disks under high humidity Do not store floppy disks under direct sun light Avoid contact with sol...

Страница 14: ... slide the write protect notch to open the slot as shown below Setting a Floppy Disk to the Floppy Disk Drive Insert a floppy disk straight into the slot The label side of the disk must face the front Press the eject switch to remove the disk out of the drive Do not press the eject switch during the access lamp is lit This may lead to data corruption Slide the notch in this direction to prevent da...

Страница 15: ...chine for the first time who sometimes create programs Chapter 3 Programming with Command Function Describes the procedure to create programs using command functions It is recommended for persons who is specially responsible for program creation who have created programs for BAS 300 series Chapter 4 Extended Option Output Describes on setting the extended option output Chapter 5 Reading Writing Da...

Страница 16: ...verted to BAS300E data by the programmer and becomes available for sewing 3 Restrictions for 2DD floppy disks The use of following functions added to the E series are restricted to maintain the compatibility with former BAS300A data with the needle at the lower end 1 e p y t a t a D y r o m e m r o f t n u o c h c t i t S n o i t u l o s e r a t a D k s i D t a m r o F e t i r W a t a D E 0 0 3 S ...

Страница 17: ...Programmer 16 Chapter 1 Preparations of operation ...

Страница 18: ...Chapter 2 Programming with Help Function ...

Страница 19: ...5 1 2 3 6 7 8 9 Press this key to return to the previous step or when a setting is canceled This key may be used similarly as Messages and program description are displayed here Press this key and turn on the key lamp for programming with the help function Press this key to check setting Press these keys to input numerical values Press this key to return to the corresponding submenu Press this key...

Страница 20: ...rogram data Refer to page 83 Reads writes data in a floppy disk Refer to page 210 Deletes the created edited program data Carries out the preference setting of the programming machine Displays the available keys Displays the image of program data Refer to page 106 Edits the program data Refer to page 111 Checks the program data or changes the setting Refer to page 107 ...

Страница 21: ...ress Select an icon for programming Refer to page 83 Combine straight lines curves and other figures to make patterns on the pattern sheet After completing each pattern press ESC ESC or C key to return to the submenu The data is available until deletion The program outline may be checked or corrected during editing Input end code Refer to page 91 ...

Страница 22: ...ith Help Function Editing program Refer to page 111 Select and press Select an icon for editing Press after editing Checking and setting Refer to page 107 Select and press Move to the needle position for setting Press and carry out setting ...

Страница 23: ...on Creating a semicircle of the specified diameter in the counterclockwise direction Creating a zigzag circle Creating a zigzag circle by specifying 3 points on the circumference Creating a zigzag circle of the specified diameter in the clockwise direction Creating a zigzag circle of the specified diameter in the counterclockwise direction Creating a zigzag circle of the specified radius in the cl...

Страница 24: ...h data to the left side of the sewing path Offsetting double stitch data to the right side of the sewing path Displaying the data image during editing Checking the program setting and setting attribute Editing the current data Moving a pattern in parallel by feeding Moving a pattern in parallel by sewing with the specified pitch Moving a pattern in parallel Repeated copying Copying a pattern symme...

Страница 25: ...he Y axis Moving a pattern symmetrically to the X axis Moving a pattern symmetrically to a point Resizing a pattern Copying a resized pattern Rotating a pattern clockwise Copying a pattern rotated clockwise Rotating a pattern counterclockwise Copying a pattern rotated counterclockwise Setting the extended option output Deleting data ...

Страница 26: ...attern The example in the left is used for explanation 1 Programming 1 Press P The work clamp moves to the home position and the programmer screen is displayed 2 Select with and press 3 Move the work clamp with Press when the needle point is at point A of the pattern The first stitch point A is programmed 4 Select with and press 5 Move the work clamp with Press when the needle point is at point B ...

Страница 27: ... and press 2 Select the end code type with and press 111 is selected in the example Press and the work clamp returns to the first stitch point A 3 Press ESC ESC The work clamp returns to the home position 3 Saving 1 Select with and press 2 Select with and press 3 Input the data number and press 4 Press ESC ESC 4 Ending program 1 Press P ...

Страница 28: ...ess P The work clamp moves to the home position and the programmer screen is displayed 2 Select with and press 3 Move the work clamp with Press when the needle point is at point A of the pattern The first stitch point A is programmed 4 Select with and press 5 Select and press 6 Move the work clamp with Press when the needle point is at point B of the pattern 7 Repeat step 6 and create the program ...

Страница 29: ...e end code type with and press 111 is selected in the example Press and the work clamp returns to the first stitch point A 3 Press ESC ESC The work clamp returns to the home position 3 Saving 1 Select with and press 2 Select with and press 3 Input the data number and press 4 Press ESC ESC 4 Ending program 1 Press P ...

Страница 30: ... 2 Select with and press 3 Move the work clamp with Press when the needle point is at point A of the pattern The first stitch point A is programmed 4 Select with and press 5 Input the stitch length and press 3 0 mm is input in the example Input 030 to make the stitch length to 3 0 mm 6 Move the work clamp with Press when the needle point is at point B of the pattern 7 Repeat step 6 and create the ...

Страница 31: ...e end code type with and press 111 is selected in the example Press and the work clamp returns to the first stitch point A 3 Press ESC ESC The work clamp returns to the home position 3 Saving 1 Select with and press 2 Select with and press 3 Input the data number and press 4 Press ESC ESC 4 Ending program 1 Press P ...

Страница 32: ...E If a split is not made the corner will be round When a split is made When a split is not made More intermediate points such as points B D F or G will create smooth curves 1 Programming 1 Press P The work clamp moves to the home position and the programmer screen is displayed 2 Select with and press 3 Move the work clamp with Press when the needle point is at point A of the pattern The first stit...

Страница 33: ...med press again Point C becomes a corner and is programmed To change the stitch length press ESC ESC for resetting 9 Create the program to point E 10 When point E is programmed press again 11 Create the program to point I 12 When point I is programmed press again 13 Press ESC ESC twice 2 Inputting the end code 1 Select with and press 2 Select the end code type with and press 111 is selected in the...

Страница 34: ...Programmer 33 Chapter 2 Programming with Help Function 3 Saving 1 Select with and press 2 Select with and press 3 Input the data number and press 4 Press ESC ESC 4 Ending program 1 Press P ...

Страница 35: ... points C or D will create smooth curves 1 Programming 1 Press P The work clamp moves to the home position and the programmer screen is displayed 2 Select with and press 3 Move the work clamp with Press when the needle point is at point A of the pattern The first stitch point A is programmed 4 Select with and press 5 Select the double stitch type and press 6 Input the stitch length and the width o...

Страница 36: ... again 10 Program point F 11 When point F is programmed press again 12 Press The needle moves to points F G and H 13 When the needle stops press ESC ESC three times 2 Inputting the end code 1 Select with and press 2 Select the end code type with and press 111 is selected in the example Press and the work clamp returns to the first stitch point A 3 Press ESC ESC The work clamp returns to the home p...

Страница 37: ...ding program 1 Press P Feed After thread breaking a feed is set for continuous sewing with the work clamp in position The example in the left is used for explanation of programming pattern 2 with a feed after pattern 1 1 Programming 1 Press P The work clamp moves to the home position and the programmer screen is displayed 2 Select with and press Pattern 1 Pattern 2 ...

Страница 38: ...ct with and press 7 Move the work clamp with Press when the needle point is at point C of the pattern 8 Press ESC ESC 9 Program pattern 2 10 When point D is programmed press ESC ESC The number of pressing ESC ESC depends on the programming method for pattern 1 When is used for programming press twice When each stitch is programmed press once 2 Inputting the end code 1 Select with and press 2 Selec...

Страница 39: ...the data number and press 4 Press ESC ESC 4 Ending program 1 Press P Basting Basting is programmed The example in the left is used for explanation of basting programming from point C to point F 1 Programming 1 Press P The work clamp moves to the home position and the programmer screen is displayed 2 Select with and press ...

Страница 40: ...h Press when the needle point is at point B of the pattern 6 Repeat step 5 and create the program to point C 7 When point C is programmed press ESC ESC 8 Select with and press 9 Move the work clamp with Press when the needle point is at point D of the pattern 10 Repeat step 9 and create the program to point F 11 Press ESC ESC 12 Select with and press 13 Create the program to point H 14 When point ...

Страница 41: ...e end code type with and press 111 is selected in the example Press and the work clamp returns to the first stitch point A 3 Press ESC ESC The work clamp returns to the home position 3 Saving 1 Select with and press 2 Select with and press 3 Input the data number and press 4 Press ESC ESC 4 Ending program 1 Press P ...

Страница 42: ...n of programming symmetric to the Y axis The following symmetrical pattern types are available 1 Programming 1 Press P The work clamp moves to the home position and the programmer screen is displayed 2 Select with and press 3 Move the work clamp with Press when the needle point is at point A of the pattern The first stitch point A is programmed 4 Create the program to point B Symmetric to point Se...

Страница 43: ...ple 3 Input the number of feed boundaries to be ignored and press Refer to Editing the current data page 98 for details 4 The needle point moves slowly from point B to point A in the right half and it is automatically programmed Press to make fast movement 5 Press ESC ESC twice 3 Inputting the end code 1 Select with and press 2 Select the end code type with and press 111 is selected in the example...

Страница 44: ...Programmer 43 Chapter 2 Programming with Help Function 4 Saving 1 Select with and press 2 Select with and press 3 Input the data number and press 4 Press ESC ESC 5 Ending program 1 Press P ...

Страница 45: ...rammer screen is displayed 2 Select with and press 3 Move the work clamp with Press when the needle point is at point A of the pattern The first stitch point A is programmed 4 Program pattern 1 5 Press ESC ESC when the needle point is at point B of the pattern The number of pressing ESC ESC depends on the programming method for pattern 1 6 Select with and press 7 Move the work clamp with Press whe...

Страница 46: ...attern 2 12 Program pattern 3 in the similar manner 13 When pattern 3 is programmed press ESC ESC 2 Inputting the end code 1 Select with and press 2 Select the end code type with and press 111 is selected in the example Press and the work clamp returns to the first stitch point A 3 Press ESC ESC The work clamp returns to the home position 3 Saving 1 Select with and press ...

Страница 47: ...mple in the left is used for explanation of even width of zigzag stitch on the sewing path Zigzag with curves may be programmed 1 Programming 1 Press P The work clamp moves to the home position and the programmer screen is displayed 2 Select with and press 3 Move the work clamp with Press when the needle point is at point A of the pattern The first stitch point A is programmed Zigzag width Stitch ...

Страница 48: ...itch input between the stitch length and the width use 7 Move the work clamp with Press when the needle point is at point B of the pattern To program curves repeat this step 8 Press again 9 Press ESC ESC three times 2 Inputting the end code 1 Select with and press 2 Select the end code type with and press 111 is selected in the example Press and the work clamp returns to the first stitch point A 3...

Страница 49: ...carried out in the sequence of programming Embroidering direction depends on programming sequence When embroidering direction should be changed at a sharp angle a split should be provided in the vicinity of the direction change point for finishing the multiple stitch in relatively uniform conditions Up to 200 points can be specified for one side If you attempt to input 201 or more points the needl...

Страница 50: ...nt on the outside line using a line 3 Provide one point or more points between the above two direction change points and connect them using a line Follow the procedure for curve points specification Specify points in pairs on the inside and outside lines The lines should be spaced uniformly 2 Programming 1 Press P The work clamp moves to the home position and the programmer screen is displayed Sho...

Страница 51: ...sure to press twice for a split at a corner like point e If a split is not made the corner will be round 8 Program the following points up to point 7 with the curve programming steps When there is a liner section move the needle point from the split to the next split and press twice In the example a linear line is programmed between points u and o Be sure to program a linear line also for the matc...

Страница 52: ...ot paired the needle point automatically returns to the previous point Correct the program 11 Press 12 Press ESC ESC 3 Inputting the end code 1 Select with and press 2 Select the end code type with and press 111 is selected in the example Press and the work clamp returns to the first stitch point A 3 Press ESC ESC The work clamp returns to the home position 4 Saving 1 Select with and press 2 Selec...

Страница 53: ... pattern is resized The example in the left is used for explanation The center point reference point of resizing can be changed The magnifying direction varies depending on the position of the reference point If the reference point is not determined the pattern is resized to the home position If the reference point is determined the pattern is resized to the reference point 1 Calling data 1 Press ...

Страница 54: ...zing percentage for the X and the Y axes 150 is input in the example To magnify the pattern by 150 input 150 4 Input the stitch length and press If the stitch length is 0 0 the pattern is resized with the same number of stitches as the original data 5 Move the needle to the reference point of resizing with If the needle is not moved the pattern is resized to the home position 6 Press Calculation i...

Страница 55: ... 3 Input the data number and press 4 Press ESC ESC 4 Ending program 1 Press P Changing partially A part of the programmed pattern is changed The example in the left is used for explanation of creating 5 6 and 7 1 Calling data 1 Press P The work clamp moves to the home position The programmer screen is displayed ...

Страница 56: ... and press 2 Press 9 9 9 and press The work clamp moves from the start position by each stitch 3 When the needle point reaches 4 press The work clamp stops If the work clamp passes input a few stitches and press The needle returns for a few stitches of the input 4 Press ESC ESC 3 Programming a new point 1 Select with and press 2 Move the work clamp with Press when the needle point is at 5 ...

Страница 57: ... and press 6 Press 1 and press The needle point moves to 5 7 Press ESC ESC 4 Deleting unnecessary points 1 Select with and press 2 Input the number of stitches to be deleted and press The example is deleting 3 stitches ahead Press 3 3 The needle point moves to 6 7 and 8 Points 5 6 and 7 are deleted 4 Press ESC ESC twice ...

Страница 58: ...ress ESC ESC 6 Ending program 1 Press P Deleting the first stitch The first stitch of the programmed pattern is deleted The example in the left is used for explanation of deleting 1 and setting 2 for the sewing start position 1 Calling data 1 Press P The work clamp moves to the home position The programmer screen is displayed 2 Select with and press ...

Страница 59: ...SC ESC 2 Moving to position 1 1 Select with and press 2 Press 1 and press The work clamp moves to the sewing start position 3 Press ESC ESC 3 Deleting 1 1 Select with and press 2 Input the number of stitches to be deleted and press The example is deleting 1 stitch Press 1 3 The needle point moves to 2 4 Press ESC ESC twice ...

Страница 60: ...Press ESC ESC 5 Ending program 1 Press P Changing the first stitch position The position of the sewing start position is changed The example in the left is used for explanation of moving the sewing start position from 1 to 1 1 Calling data 1 Press P The work clamp moves to the home position The programmer screen is displayed 2 Select with and press ...

Страница 61: ...1 Select with and press 2 Press 1 and press The work clamp moves to the start position 3 Press ESC ESC 3 Programming a new point 1 Select with and press 2 Move the work clamp with Press when the needle point is at 1 1 is programmed 3 Press ESC ESC 4 Deleting 1 1 Select with and press 2 Press 1 and press The work clamp moves to the sewing start position ...

Страница 62: ...d press 5 Input the number of stitches to be deleted and press The example is deleting 1 stitch Press 1 6 The needle point moves to 1 7 Press ESC ESC twice 5 Saving 1 Select with and press 2 Select with and press 3 Input the data number and press 4 Press ESC ESC 6 Ending program 1 Press P ...

Страница 63: ...t is used for explanation of changing the sewing start position from 1 to 1 1 Calling data 1 Press P The work clamp moves to the home position The programmer screen is displayed 2 Select with and press 3 Select with and press 4 Input the data number and press 5 Press ESC ESC 2 Moving to position 1 1 Select with and press 2 Press 1 and press The work clamp moves to the sewing start position 3 Press...

Страница 64: ...mmed 4 Move the work clamp with to the opposite position of coordinates recorded in step 2 so that the needle point is at 1 of the pattern 5 Press 1 is programmed again 6 Press ESC ESC 4 Deleting 1 1 Select with and press 2 Press 2 and press The work clamp moves to the sewing start position 3 Press ESC ESC 4 Select with and press 5 Input the number of stitches to be deleted and press The example i...

Страница 65: ...er 2 Programming with Help Function 6 The needle point moves to 1 7 Press ESC ESC twice 5 Saving 1 Select with and press 2 Select with and press 3 Input the data number and press 4 Press ESC ESC 6 Ending program 1 Press P ...

Страница 66: ...nt provided for prevention of the work clamp interference with the needle or the bar leg when the work clamp is lifted at the start point 1 Calling data 1 Press P The work clamp moves to the home position The programmer screen is displayed 2 Select with and press 3 Select with and press 4 Input the data number and press 5 Press ESC ESC 2 Moving to position 1 1 Select with and press 2 Press 1 and p...

Страница 67: ... programmed 4 Move the work clamp with to the opposite position of coordinates recorded in step 2 so that the needle point is at 1 of the pattern 5 Press 1 is programmed again 6 Press ESC ESC 4 Deleting 1 1 Select with and press 2 Press 2 and press The work clamp moves to the sewing start position 3 Press ESC ESC 4 Select with and press 5 Input the number of stitches to be deleted and press The ex...

Страница 68: ...er 2 Programming with Help Function 6 The needle point moves to A 7 Press ESC ESC twice 5 Saving 1 Select with and press 2 Select with and press 3 Input the data number and press 4 Press ESC ESC 6 Ending program 1 Press P ...

Страница 69: ...on of moving the escape point from A to B 1 Calling data 1 Press P The work clamp moves to the home position The programmer screen is displayed 2 Select with and press 3 Select with and press 4 Input the data number and press 5 Press ESC ESC 2 Moving to position A 1 Select with and press 2 Press 1 and press The work clamp moves to the start position 3 Press ESC ESC ...

Страница 70: ... needle point is at B B is programmed 3 Press ESC ESC 4 Deleting 1 1 Select with and press 2 Press 1 and press The work clamp moves to the sewing start position 3 Press ESC ESC 4 Select with and press 5 Input the number of stitches to be deleted and press The example is deleting 1 stitch Press 1 6 The needle point moves to B 7 Press ESC ESC twice ...

Страница 71: ...Input the data number and press 4 Press ESC ESC 6 Ending program 1 Press P Deleting the escape point The escape point is deleted The example in the left is used for explanation of deleting A 1 Calling data 1 Press P The work clamp moves to the home position The programmer screen is displayed 2 Select with and press ...

Страница 72: ...s ESC ESC 2 Moving to position A 1 Select with and press 2 Press 1 and press The work clamp moves to the start position 3 Press ESC ESC 3 Deleting A 1 Select with and press 2 Input the number of stitches to be deleted and press The example is deleting 1 stitch Press 1 3 The needle point moves to 1 4 Press ESC ESC twice ...

Страница 73: ...ESC 5 Ending program 1 Press P Moving the pattern in parallel 1 The program data is moved in parallel The example in the left is used for explanation of moving the pattern in parallel when the first stitch is the sewing start position 1 Calling data 1 Press P The work clamp moves to the home position The programmer screen is displayed 2 Select with and press ...

Страница 74: ... number and press 5 Press ESC ESC 2 Moving 1 Select with and press 2 Select with and press 3 Move the work clamp with Press when the needle point is at point A of the pattern 4 Press ESC ESC 3 Saving 1 Select with and press 2 Select with and press 3 Input the data number and press 4 Press ESC ESC ...

Страница 75: ...he example in the left is used for explanation of moving the pattern in parallel when the first stitch is the escape point 1 Calling data 1 Press P The work clamp moves to the home position The programmer screen is displayed 2 Select with and press 3 Select with and press 4 Input the data number and press 5 Press ESC ESC 2 Moving 1 Select with and press ...

Страница 76: ...pattern Record the coordinates values of X and Y Do not press 7 Press ESC ESC three times The needle point returns to the home position 8 Select with and press 9 Press 1 and press The work clamp moves to point C 10 Press ESC ESC 11 Select with and press 12 Select with and press 13 Move the work clamp with for the coordinates recorded in step 6 14 Turn the pulley with a hand and put a marking with ...

Страница 77: ...he top point 16 Press ESC ESC three times 17 Select with and press 18 Select with and press 19 Move the work clamp with Press when the needle point is at point D 20 Press ESC ESC 3 Saving 1 Select with and press 2 Select with and press 3 Input the data number and press 4 Press ESC ESC 4 Ending program 1 Press P ...

Страница 78: ...he example in the left is used for explanation of deleting 2 stitches at 8 and creating a new program 1 Press ESC ESC to display the screen in the right 2 Select with and press 3 Input the number of stitches to be deleted and press The example is deleting 2 stitches backward Press 2 4 The needle point moves to 6 5 Press ESC ESC 6 Continue programming ...

Страница 79: ...of moving patterns B an C in parallel 1 Calling data 1 Press P The work clamp moves to the home position The programmer screen is displayed 2 Select with and press 3 Select with and press 4 Input the data number and press 5 Press ESC ESC 2 Moving to position 1 1 Select with and press 2 Press 9 9 9 and press The work clamp moves from the start position by each stitch Feed Pattern A Pattern B Patter...

Страница 80: ...ss The needle returns for a few stitches of the input 4 Press ESC ESC 3 Moving in parallel 1 Select with and press 2 Select with and press 3 Move the work clamp with Press when the needle point is at 2 Move 3 to 4 in the similar manner 4 Press ESC ESC three times 4 Saving 1 Select with and press 2 Select with and press 3 Input the data number and press 4 Press ESC ESC ...

Страница 81: ... case every thread breakage including emergency stop is canceled Carry out the following setting for canceling thread breakage at the speci fied point 1 Programming 1 Create the program 1 stitch A before the desired end point 2 Press ESC ESC The number of pressing varies depending on the programming method 3 Select with and press 4 Move the work clamp with for the stitch length Press when the need...

Страница 82: ... C 8 Press ESC ESC 2 Inputting the end code 1 Select with and press 2 Select the end code type with and press 111 is selected in the example Press and the work clamp returns to the first stitch point A 3 Press ESC ESC The work clamp returns to the home position 3 Saving 1 Select with and press 2 Select with and press 3 Input the data number and press ...

Страница 83: ...Programmer 82 Chapter 2 Programming with Help Function 4 Press ESC ESC 4 Ending program 1 Press P ...

Страница 84: ...th and press 3 Move the needle with and press Creating a curve Increase the number of plotting points to create a smoother curve One to 99 points are available for plotting 1 Select and press 2 Input the stitch length and press Distance from the previous point in the direction of X or Y axis Remaining plot count Stitch length ...

Страница 85: ...ircle of the specified diameter in the clockwise direction Creating a circle of the specified diameter in the counterclockwise direction Creating a circle of the specified radius in the clockwise direction Creating a circle of the specified radius in the counterclockwise direction 1 Select and press 2 Select the method of creating a circle and press Stitch length Distance from the previous point i...

Страница 86: ... stitch count then press Values of 0 9 are available for input 2 Move the needle with to select the second point then press 3 Select the third point then press Stitch count for overlap sewing Stitch length Presss for selection Remaining plot count Distance from the previous point in the direction of X or Y axis ...

Страница 87: ...th and press Creating an arc 1 Select and press 2 Input the stitch length and press 3 Move the needle with to select the second point then press Stitch length Stitch count for overlap sewing Press for selection Remaining plot count Distance from the previous point in the direction of X or Y axis Stitch length Distance from the previous point in the direction of X or Y axis Remaining plot count ...

Страница 88: ... Creating a semicircle The following two options are available for creating a semicircle Creating a semicircle of the specified diameter in the clockwise direction Creating a semicircle of the specified diameter in the counterclockwise direction 1 Select and press 2 Select the method of creating a semicircle then press 3 Input the stitch length then press 4 Move the needle with and press ...

Страница 89: ...g a zigzag circle of the specified radius in the clockwise direction Creating a zigzag circle of the specified radius in the counterclockwise direction 1 Select and press 2 Select an option of creating a zigzag circle then press If is selected 1 Input the zigzag stitch width stitch length and the overlap stitch count then press Values of 0 9 are available for input 2 Move the neelde with to select...

Страница 90: ... press Creating a zigzag stitch The following three options are available for zigzag stitch Creating a zigzag stitch on the sewing path Creating a zigzag stitch on the left side of the sewing path Creating a zigzag stitch on the right side of the sewing path One to 99 points are available for plotting 1 Select and press Zigzag pitch Stitch count for overlap sewing Press for selection Zigzag width ...

Страница 91: ...ss 3 Input the stitch width and stitch length then press 4 Move the neelde with then press 5 Press twice at the sewing end position Zigzag width Zigzag pitch Press for selection Remaining plot count Distance from the previous point in the direction of X or Y axis Check that both values are 0 00 mm ...

Страница 92: ...x end codes are available 111 Normal end 112 Fixing the sewing speed at 1000 spm or lower 113 No carrying out thread removal 114 Setting the sewing speed at 1000 spm or lower without thread removal 115 Carrying out no thread breakage 116 Fixing the sewing speed at 1500 spm or lower 1 Select and press 2 Select the end code with then press ...

Страница 93: ... needle with then press Creating feed data Create feed data to move the needle to the next position without needle drop at the current position 1 Select and press 2 Move the needle with then press Remaining plot count Distance from the previous point in the direction of X or Y axis Remaining plot count Distance from the previous point in the direction of X or Y axis ...

Страница 94: ...y breakpoints for sewing a series of different patterns 1 Select and press 2 Use to specify whether to stop the needle at the lower end or not then press Remaining plot count Distance from the previous point in the direction of X or Y axis ON The needle stops at the lower end Thread breakage is not carried on OFF The needle stops at the upper end Thread breakage is carried on ...

Страница 95: ... scales of x2 x5 and x10 are available Prepare pattern sheets suitable for the magnified patterns Press ESC ESC or C to contract the magnified data 1 Select and press 2 Select magnification and press 3 Move the needle with then press 4 Press ESC ESC or C Remaining plot count Distance from the previous point in the direction of X or Y axis ...

Страница 96: ...ame direction to the left side of the sewing path Creating double stitch data in the same direction to the right side of the sewing path Offsetting double stitch data to the left side of the sewing path Offsetting double stitch data to the right side of the sewing path If sharp angles or fine curves are included in the pattern sheet the desired double stitch may not be achieved 1 Select and press ...

Страница 97: ... position An alarm souds after is pressed twice After the alarm press again Then an alarm sounds and the double stitch pattern is calculated When the alarm stops the needle moves in the order of A B C D The program is completed when the needle comes to D Press twice Press twice Press three times Start End ...

Страница 98: ...zontal length Displays the stitch count Displaying the data image during programming A data image is displayed during programming 1 Select and press The pattern image is displayed Press ESC ESC or C to return to the mainmenu Press to display the overall sewing area Press to display the overall view of data ...

Страница 99: ...parallel Copying repeatedly the previous data on the current and the following needle positions Copying the previous data symmetrically to the Y axis on the current and the following needle positions Copying the previous data symmetrically to the X axis on the current and the folowing needle positions Copying the previous data symmetrically to a point on the current and the following needle positi...

Страница 100: ...hen press If is selected 1 Input the stitch length then press 2 Adjust the destination with then press If is selected 1 Adjust the destination with then press Distance from the previous point in the direction of X or Y axis Stitch length Distance from the previous point in the direction of X or Y axis ...

Страница 101: ...er of ignored boundary feeds is 0 A B C C Data unit C is copied If the number of ignored boundary feeds is 1 A B C B C Data units B and C are copied If the number of ignored boundary feeds is 2 A B C A B C Data units A B and C are copied 1 Input the number of feed boundaries to be neglected Inputting 99 ignores all boundaries 2 Press ...

Страница 102: ...letion Refer to Checking the program setting and setting attribute page 107 for adjustment 1 Select and press 2 Input the stitch count to delete 3 Press to delete data following the current needle position for the input count Press to delete data prior to the current needle position The corresponding data is deleted ...

Страница 103: ...e maximum sewing speed is set at 1200 spm or lower 2 Low speed 2 The maximum sewing speed is set at 800 spm or lower 3 Low speed 3 The maximum sewing speed is set at 600 spm or lower 4 Low speed 4 The maximum sewing speed is set at 400 spm or lower 1 Select and press 2 Select an option of low speed sewing with 3 Input the stitch count for sewing with the reduced maximum speed 4 Press Low speed sew...

Страница 104: ...putting the trigger and setting attribute Refer to Checking the program setting and setting attribute page 107 1 Select and press 2 Input the option output number 3 Move with then use to specify whether to stop the machine or not ON The needle stops at the upper end without thread breakage and restarts after output of the extended option OFF Sewing does not stop ...

Страница 105: ...ve the needle point from the inside line to the outside line reversely F becomes valid after input of a split When programming be sure that the points and splits specified on the inside line are paired with those on the outside line respectively 4 When the needle point has reached the end point press three times A buzzer sounds Calculation is performed based on the input data A buzzer stops on com...

Страница 106: ...ing programs of multiple stitch Programs of multiple stitch written to floppy disks cannot be modified 1 Select and press 2 Press 9 9 9 The work clamp moves When the needle point is at the start point for a multiple stitch stop it by pressing 3 Press ESC ESC 4 Select and press 5 Select and press 6 Input the stitch length and the number of lines Press Calculation is performed based on the input dat...

Страница 107: ...displayed during programming or editing 1 Select and press The pattern image is displayed Press ESC ESC or C to return to Main menu Press to display the overall sewing area Press to display the overall view of data Displays the longitudinal length Displays the lateral length Displays the stich count ...

Страница 108: ...y of the option output Displayed at points where feed data with without thread is set Needle stop position of the split data Displayed at points where split data is set Extended option output no of the trigger data and Displayed at points where trigger is set with without machine stoppage Attribute of items marked with are available for setting An example of stitch data is shown below 1 Select or ...

Страница 109: ...ard to backward The needle moves by the input count and the setting of the data is displayed Input 999 to check all stitches Skipping 1 Input the stitch count to the destination 2 Press F then press to move forward and to move backward The needle skips sewing according to the input stitch count Input 999 to skip sewing to the sewing end position or to a breakpoint Setting the attribute stitch data...

Страница 110: ...ute feed data 1 Move to the desired needle position and press The attribute setting screen appears 2 Set the attribute 3 Press after setting The screen returns to the confirmation screen Option output Press to mark with O Slow conversion Press for type selection Press for selection Option output Press to mark with O Thread breakage ON OFF Press to select ON OFF ...

Страница 111: ...The screen returns to the confirmation screen Setting the attribute trigger data 1 Move to the desired needle position and press The attribute setting screen appears 2 Set the attribute 3 Press after setting The screen returns to the confirmation screen Stoppage of the needle at the lower end Press to select ON OFF Machine stop Press to select ON OFF Extended option output trigger Press or 0 9 to ...

Страница 112: ...ern symmetrically to the Y axis Moving a pattern symmetrically to the X axis Moving a pattern symmetrically to a point Resizing a pattern Copying a resized pattern Rotating a pattern clockwise Copying a pattern rotated clockwise Rotating a pattern counterclockwise Copying a pattern rotated counterclockwise 1 Select and press 2 Select an editing function and press If is selected 1 Adjust the distan...

Страница 113: ...and Y directions with Resizing scale between 0 and 400 are available 2 Input the stitch length Switch between input fields of stitch length with If the stitch length is 0 0 the pattern is resized with the same number of stitches as the original data 3 Press 4 Use to change the reference position for resizing 5 Press Resizing scale in the X axis direction Resizing scale in the Y axis direction Refe...

Страница 114: ...C A B A and B are copied A and B become split programs If the number of feed boundaries to be ignored is 2 A B C A B C A B and C are copied A B and C become split programs 1 Input resizing scale in the X and Y directions Switch between X and Y directions with Resizing scale between 0 and 400 are available 2 Input the stitch length Switch between the input fields of stitch length with If the stitch...

Страница 115: ... for resizing If no reference position is specified the home position is used as the reference 5 Press The copied data is added as split data If or is selected 1 Input the angle of rotation and press 2 Adjust the reference position for rotation with then press Resizing scale in the X axis direction Resizing scale in the Y axis direction Reference position Stitch length Angle Reference position ...

Страница 116: ...ed 1 Input the angle of rotation and number of feed boundaries to be ignored then press Inputting 99 ignores all boundaries Refer to If is selected page 113 2 Adjust the reference position with and press Angle The number of feed boundaries to be ignored Reference position ...

Страница 117: ... Chapte 2 Programming with Help Function Deleting data Delete the current program data 1 Press ESC ESC or C and return to Main menu 2 Select and press 3 Check the screen and press Press ESC ESC to cancel this command ...

Страница 118: ...Chapter 3 Programming with Command Function ...

Страница 119: ... Cancels an image display Lights when the feed is set Press this key for smoothing or editing Deletes a part of the data Press this key to create a line or a circle Press this key to start or end a program Turning power OFF Refer to page 11 Press this key to display the data image being created Press these keys to input numerical values Press this key to cancel operation Press this key to input an...

Страница 120: ...n sheet After completing each pattern press L The data is available until deletion Input end code Refer to page 179 Display screen Press P and the following screen appears If the screen is not displayed press Displays the command status Displays the current needle position total stitch count Displays the input value Displays the stitch length Displays the end code if applicable Displays distance f...

Страница 121: ...ing with Command Function Editing Move to the home position or the needle position for editing Input command for editing Refer to page 180 Checking and setting Move to the needle position for editing Input command and carry out setting ...

Страница 122: ...not applicable at the home position 9 9 9 F Skipping to the first point R Returning the position to the home position Deleting data R 2 2 2 Deleting all data C Deleting data from stitches C Deleting data before stitches Ending programming E 1 1 1 Normal end E 1 1 2 Fixing the sewing speed at 1000 spm or lower E 1 1 3 Not carrying out thread removal E 1 1 4 Setting the sewing speed at 1000 spm or l...

Страница 123: ... data M 2 Creating a double stitch in the reverse direction to the sewing path Input the width of double stitch in M 3 Creating an parallel stitch in the same direction to the sewing path Input the width of parallel stitch in M 4 Creating an offset Input the width for offset in M 5 0 0 Starting a multiple stitch M 5 Creating a multiple stitch Input the number of lines for a multiple stitch in M 7 ...

Страница 124: ...t the number of lines for a multiple stitch in M 6 6 6 Rotating a pattern clockwise M 6 6 7 Rotating a pattern counterclockwise M 6 7 6 Copying a pattern clockwise M 6 7 7 Copying a pattern counterclockwise M 8 8 8 Resizing a pattern Input the magnification in the X direction by F and in the Y direction by M M 9 9 9 Resizing and copying a pattern Input the magnification in the X direction by F and...

Страница 125: ... spm or lower L 6 6 9 The maximum sewing speed becomes 600 spm or lower L 6 6 0 Cancels low speed data setting L 7 7 1 Turns on option output 1 L 7 7 2 Turns on option output 2 L 7 7 3 Turns on option output 3 L 7 7 0 Turn off all option outputs L 9 8 0 Not breaking thread for feed only when the needle position is at feed L 9 8 1 Breaks thread for feed only when the needle position is at feed Othe...

Страница 126: ...n 1 Programming 1 Press P The work clamp moves to the home position and the programmer screen is displayed 2 Move the work clamp with Press L when the needle point is at point A of the pattern The first stitch point A is programmed 3 Repeat step 2 and create the program to point C 2 Inputting the end code 1 Press L at the last stitch and press E 1 1 1 The work clamp returns to the start position 3...

Страница 127: ...d the programmer screen is displayed 2 Press M 9 0 5 9 is the command for resizing input Input the magnification 02 05 10 in 3 Move the work clamp with Press L when the needle point is at point A of the pattern The first stitch point A is programmed 4 Repeat step 3 and create the program to point D 2 Inputting the end code 1 Press L at the last stitch and press E 1 1 1 The work clamp returns to th...

Страница 128: ...n the needle point is at point A of the pattern The first stitch point A is programmed 3 Input the stitch length 3 0 mm is input in the example Input 030 to make the stitch length to 3 0 mm 4 Press LI LI To change the stitch length specify the pitch value before pressing LI LI 5 Move the work clamp with Press L when the needle point is at point B of the pattern 6 Repeat steps 4 and 5 and create th...

Страница 129: ...sure to press L 7 8 9 for a split at corner points C or E If a split is not made the corner will be round When a split is made When a split is not made More intermediate points such as points B D F or G will create smooth curves 1 Programming 1 Press P The work clamp moves to the home position and the programmer screen is displayed 2 Move the work clamp with Press L when the needle point is at poi...

Страница 130: ...nge from points A to C is programmed 6 Press M To change the stitch length specify the pitch value before pressing M 7 Move the work clamp with Press L when the needle point is at point D of the pattern 8 Repeat step 7 and create the program to point E 9 Press L 7 8 9 as in step 5 The range from points C to E is programmed 10 Create the program to point I in the similar manner 2 Inputting the end ...

Страница 131: ...oth curves 1 Programming 1 Press P The work clamp moves to the home position and the programmer screen is displayed 2 Move the work clamp with Press L when the needle point is at point A of the pattern The first stitch point A is programmed 3 Press 2 3 0 and press M 2 is the command for the double stitch Input the width of the double stitch in 3 0 mm is input in the example 4 Input the stitch leng...

Страница 132: ...loppy disk 4 Ending program 1 Press P Feed After thread breaking a feed is set for continuous sewing with the work clamp in position The example in the left is used for explanation of programming pattern 2 with a feed after pattern 1 1 Programming 1 Press P The work clamp moves to the home position and the programmer screen is displayed 2 Move the work clamp with Press L when the needle point is a...

Страница 133: ... needle point is at point C of the pattern 6 Program pattern 2 2 Inputting the end code 1 Press L at the last stitch and press E 1 1 1 The work clamp returns to the start position 3 Saving 1 Specify the program number on the operation panel and press the read write switch for writing into the floppy disk 4 Ending program 1 Press P Pattern 1 Pattern 2 ...

Страница 134: ...programmer screen is displayed 2 Move the work clamp with Press L when the needle point is at point A of the pattern The first stitch point A is programmed 3 Repeat step 2 and create the program to point C 4 Input point C and press F 9 9 9 Input the basting command 5 Move the work clamp with Press L when the needle point is at point D of the pattern 6 Repeat steps 4 and 5 and create the program to...

Страница 135: ...py disk 4 Ending program 1 Press P Symmetrical pattern A pattern symmetric to the X axis or the Y axis is programmed After programming the pattern select the symmetrical pattern type to complete the pattern The example in the left is used for explanation of programming symmetric to the Y axis The following symmetrical pattern types are available Turnover Use command L 4 4 3 Symmetric to X axis Use...

Страница 136: ... the program to point B 4 Input point B and press L 4 4 2 Input the command symmetric to Y axis 5 The needle point moves slowly from point B to point A in the right half and it is automatically programmed Press to make fast movement 2 Inputting the end code 1 Press E 1 1 1 when needle stops at point A The work clamp returns to the start position 3 Saving 1 Specify the program number on the operati...

Страница 137: ... of the pattern The first stitch point A is programmed 3 Program pattern 1 4 Input point B and press F 5 Move the work clamp with Press L 6 6 6 when the needle point is at point C of the pattern To change the pattern press the pressure holder lift switch and replace the pattern 6 Program patterns 2 and 3 2 Inputting the end code 1 Press L at the last stitch and press E 1 1 1 The work clamp returns...

Страница 138: ...ed 2 Move the work clamp with Press L when the needle point is at point A of the pattern The first stitch point A is programmed 3 Press 7 3 0 and press M 7 is the command for the zigzag stitch Input the width of the zigzag stitch in 3 0 mm is input in the example 4 Input the stitch length and press M 3 0 mm is input in the example Input 030 to make the stitch length to 3 0 mm 5 Move the work clamp...

Страница 139: ...ng direction depends on programming sequence When embroidering direction should be changed at a sharp angle a split should be provided in the vicinity of the direction change point for finishing the multiple stitch in relatively uniform conditions Up to 200 points can be specified for one side If you attempt to input 201 or more points the needle point is automatically returned to the previous poi...

Страница 140: ...t them using a line Follow the procedure for curve points specification Specify points in pairs on the inside and outside lines The lines should be spaced uniformly 2 Programming 1 Press P The work clamp moves to the home position and the programmer screen is displayed 2 Move the work clamp with Press L when the needle point is at point q of the pattern The first stitch point q is programmed 3 Pre...

Страница 141: ...yond the previous split By pressing 1 the needle point is returned to the previous split However when the needle point is at a split it cannot be moved By pressing 2 the needle point is returned to the split before the previous split 7 Press F Move the work clamp with Press L when the needle point is at point 8 of the pattern 8 Program the following points up to point 4 in the same manner When pro...

Страница 142: ...nd Function 3 Inputting the end code 1 Press E 1 1 1 The work clamp returns to the start position 4 Saving 1 Specify the program number on the operation panel and press the read write switch for writing into the floppy disk 5 Ending program 1 Press P ...

Страница 143: ...explanation The center point reference point of resizing can be changed The magnifying direction varies depending on the position of the reference point If the reference point is not determined the pattern is resized to the home position If the reference point is determined the pattern is resized to the reference point 1 Calling data 1 Specify the program number on the operation panel and press th...

Страница 144: ...ecify the magnification percentage by 3 digits in 150 is specified in the example 4 Press 1 5 0 and press M Input the resizing percentage for the Y axis Specify the magnification percentage by 3 digits in 150 is specified in the example 5 Input the stitch length Press L If the stitch length is 0 0 the pattern is resized with the same number of stitches as the original data 3 Saving 1 Specify the p...

Страница 145: ...itch to read the data 2 Moving to position 4 1 Press 9 9 9 and press The work clamp moves from the start position by each stitch 2 When the needle point reaches 4 press The work clamp stops If the work clamp passes input a few stitches and press The needle returns for a few stitches of the input 3 Programming a new point 1 Move the work clamp with Press L when the needle point is at 5 5 is program...

Страница 146: ... deleted 5 Saving 1 Specify the program number on the operation panel and press the read write switch for writing into the floppy disk 6 Ending program 1 Press P Deleting the first stitch The first stitch of the programmed pattern is deleted The example in the left is used for explanation of deleting 1 and setting 2 for the sewing start position 1 Calling data 1 Specify the program number on the o...

Страница 147: ... the start position 3 Deleting 1 1 Press C 2 Input the number of stitches to be deleted and press The example is deleting 1 stitch ahead Press 1 3 The needle point moves to 2 4 Saving 1 Specify the program number on the operation panel and press the read write switch for writing into the floppy disk 5 Ending program 1 Press P ...

Страница 148: ...ogram number on the operation panel and press the read write switch to read the data 2 Moving to position 1 1 Press 1 and press The work clamp moves to the start position 3 Programming a new point 1 Move the work clamp with Press L when the needle point is at 1 of the pattern 1 is programmed 4 Deleting 1 1 Press 1 and press The needle point returns to the first stitch 2 Press C 3 Input the number ...

Страница 149: ...Press P Adding sewing point before the first stitch A point is added before the current sewing point to change the sewing start position The example in the left is used for explanation of changing the sewing start position from 1 to 1 1 Calling data 1 Specify the program number on the operation panel and press the read write switch to read the data 2 Moving to position 1 1 Press 1 and press The wo...

Страница 150: ...tes recorded in step 2 and press L If the moving distance is long press LI LI 5 Press R The work clamp returns to the home position 4 Deleting 1 1 Press 1 and press The needle point returns to the first stitch 2 Press C 3 Input the number of stitches to be deleted and press The example is deleting 1 stitch Press 1 4 The needle point moves to 1 5 Saving 1 Specify the program number on the operation...

Страница 151: ...or the bar leg when the work clamp is lifted at the start point 1 Calling data 1 Specify the program number on the operation panel and press the read write switch to read the data 2 Moving to position 1 1 Press 1 and press The work clamp moves to the start position 3 Programming a new point 1 Press F 2 Move the work clamp with so that the needle point is at A of the pattern Record the coordinates ...

Страница 152: ...st stitch point A and the first stitch 2 Press C 3 Input the number of stitches to be deleted and press The example is deleting 1 stitch Press 1 4 The needle point moves to A 5 Saving 1 Specify the program number on the operation panel and press the read write switch for writing into the floppy disk 6 Ending program 1 Press P ...

Страница 153: ... on the operation panel and press the read write switch to read the data 2 Moving to position A 1 Press 1 and press The work clamp moves to the escape point 3 Programming a new point 1 Press F 2 Move the work clamp with Press L when the needle point is at B of the pattern B is programmed 4 Deleting 1 1 Press 1 and press The needle point returns to A 2 Press C 3 Input the number of stitches to be d...

Страница 154: ...itch for writing into the floppy disk 6 Ending program 1 Press P Deleting the escape point The escape point is deleted The example in the left is used for explanation of deleting A 1 Calling data 1 Specify the program number on the operation panel and press the read write switch to read the data 2 Moving to position A 1 Press 1 and press The work clamp moves to the escape point ...

Страница 155: ...number on the operation panel and press the read write switch for writing into the floppy disk 5 Ending program 1 Press P Moving the pattern in parallel 1 The program data is moved in parallel The example in the left is used for explanation of moving the pattern in parallel when the first stitch is the sewing start position 1 Calling data 1 Specify the program number on the operation panel and pre...

Страница 156: ...ite switch for writing into the floppy disk 4 Ending program 1 Press P Moving the pattern in parallel 2 The program data is moved in parallel The example in the left is used for explanation of moving the pattern in parallel when the first stitch is the escape point 1 Calling data 1 Specify the program number on the operation panel and press the read write switch to read the data 2 Moving 1 Press 2...

Страница 157: ...e coordinates recorded in step 2 The moved point is now D If the moving distance is long press F before movement 6 Turn the pulley with a hand and put a marking with the needle to indicate the position of point D 7 Turn the pulley with a hand and move the needle to the top point 8 Press R The work clamp returns to the home position 9 Move the work clamp with Press L when the needle point is at D o...

Страница 158: ...number of stitches to be deleted and press The example is deleting 2 stitches backward Press 2 3 The needle point moves to 6 4 Continue programming Moving a part of continuous program in parallel A part of continuous program is moved in parallel The example in the left is used for explanation of moving patterns B an C in parallel 1 Calling data 1 Specify the program number on the operation panel a...

Страница 159: ...w stitches of the input 3 Moving in parallel 1 Press 7 7 7 and press F Input the command for parallel movement 2 Move the work clamp with Press L when the needle point is at 2 of the pattern If pattern C is present after pattern B pattern C is automatically moved in parallel If this is not preferred move pattern C in parallel as in steps 2 and 3 4 Saving 1 Specify the program number on the operati...

Страница 160: ...ing emergency stop is canceled Carry out the following setting for canceling thread breakage at the speci fied point 1 Programming 1 Create the program 1 stitch A before the desired end point 2 Press 9 9 9 and press F 3 Move the work clamp with for the stitch length Press L when the needle point is at point B of the pattern Point B is programmed 4 Press F 5 Move the work clamp with Press L when th...

Страница 161: ...ammer 160 Chapter 3 Programming with Command Function 3 Saving 1 Specify the program number on the operation panel and press the read write switch for writing into the floppy disk 4 Ending program 1 Press P ...

Страница 162: ...rogramming Creating a line Command to be used LI LI Input the stitch length in Example Pitch Input 0 5 mm 005 12 0 mm 120 1 Select the sewing start position with and press L 2 Input the stitch length in 3 digits and press LI LI 3 Move the needle with and press L ...

Страница 163: ... 0mm 120 L 7 8 9 This command represents completing creation of a curve Increase the number of plotting points to create a smoother curve One to 99 points are available for plotting 1 Select the start point with and press L 2 Input the stitch length in 3 digits and press M 3 Move the needle with and press L 4 Input L 7 8 9 at the end position of the needle ...

Страница 164: ... zigzag width in The zigzag width can be specified from 1 0 25 5 mm To specify the width of 10 0 mm or more input M 7 0 0 and input the width in 3 digits then press M Example Pitch Input 3 5mm M 7 3 5 18 0mm M 7 0 0 M 1 8 0 M Input this command to create a zigzag circle Input the zigzag stitch length in Example Pitch Input 0 5mm 005 12 0mm 120 1 Select the sewing start position with and press L 2 ...

Страница 165: ...eating a zigzag circle go to 6 when not creating a zigzag circle 4 Input M 7 width 5 Input the zigzag stitch length in 3 digits and press M 6 Move the needle with to select the second point and press L 7 Move the needle with to select the third point and press L ...

Страница 166: ...verlap stitch counts in Values 0 9 are available for input M 7 Input this command to create a zigzag circle Input the width of zigzag in Creating a circle zigzag circle by specifying 3 points Refer to page 163 M Input this command to create a zigzag circle Input the zigzag stitch length in Creating a circle zigzag circle by specifying 3 points Refer to page 163 1 Select the sewing start position w...

Страница 167: ...g a circle clockwise Input the overlap stitch counts in Values 0 9 are available for input LI LI 2 4 Creating a circle counterclockwise Input the overlap stitchcounts in Values 0 9 are available for input M 7 Input this command to create a zigzag circle Input the width of zigzag in Creating a circle zigzag circle by specifying 3 points Refer to page 163 M Input this command to create a zigzag circ...

Страница 168: ...I 2 3 or LI 2 4 3 Input the stitch length in 3 digits and press LI LI Creating a zigzag circle go to 6 when not creating a zigzag circle 4 Input M 7 width 5 Input the zigzag stitch length in 3 digits and press M 6 Move the needle with to select the second point and press L ...

Страница 169: ...d LI LI 3 0 0 Creating an arc passing 3 points 1 Select the sewing start position with and press L 2 Input LI 3 0 0 3 Input the stitch length in 3 digits and press LI LI 4 Move the needle with to select the second point then press L 5 Move the needle with to select the third point then press L ...

Страница 170: ...e used LI LI 3 1 0 Creating a semicircle clockwise LI LI 3 2 0 Creating a semicircle counterclockwise 1 Select the start point with and press L 2 Input LI LI 3 1 0 or LI LI 3 2 0 3 Input the stitch length in 3 digits and press LI LI 4 Move the needle with to select the second point then press L ...

Страница 171: ...zag circle by specifying 3 points Refer to page 163 L 7 8 9 Carrying out zigzag stitch symmetrically to the sewing path L 7 8 8 Carrying out zigzag stitch on the left side to the sewing path L 7 8 7 Carrying out zigzag stitch on the right side to the sewing path 1 Select the sewing start position with and press L 2 Input M 7 width 3 Input the stitch length in 3 digits and press M 4 Move the needle...

Страница 172: ... 9 to input a split 1 Determine the embroidering start point with and press L 2 Press M 5 0 0 3 Move the needle point to the second point or after with and press L 4 When the needle point is moved to the corner press L 7 8 9 5 Repeat steps 3 and 4 until the end point of the inside or the outside line is input Press F Move the needle point to the start point of the outside or the inside line with a...

Страница 173: ...ommands to be used M 5 Input the number of lines for a multiple stitch ranging from 2 to 99 in Ex The number of lines for a multiple stitch Input value 5 lines 505 M Input the stitch length in 1 Press R The work clamp moves to the home position 2 Press 9 9 9 The needle point moves When the needle point is at the start point for a multiple stitch stop it by pressing 3 Input the desired number of li...

Страница 174: ...ut double stitch on the left side to the sewing path L 7 8 8 Carrying out double stitch on the right side to the sewing path E 1 1 Starting double stitch calculations This is the end code Refer to page 179 for details If sharp angles or fine curves are included in the pattern sheet the desired double stitch may not be achieved 1 Select the sewing start position with and press L 2 Determine the wid...

Страница 175: ...idth of parallel stitch in Values 1 0 9 9 mm are available for the width Example Width Input 1 5mm 315 M Input the stitch length in L 7 8 9 Carrying out parallel stitch on the left side to the sewing path L 7 8 8 Carrying out parallel stitch on the right side to the sewing path E 1 1 Starting parallel stitch calculations This is the end code Refer to page 179 for details 1 Select the sewing start ...

Страница 176: ...mand to be used M 4 Creating offset Input the width of offset in Values 1 0 9 9 mm are available for the width Example Width Input 1 5 mm 415 M Input the stitch length in L 7 8 9 Carrying out offset on the left side to the sewing path L 7 8 8 Carrying out offset on the right side to the sewing path E 1 1 Starting offset calculations This is the end code Refer to page 179 for details 1 Select the s...

Страница 177: ...e the needle to the end point Input E 1 1 When the alarm sound is complete the needle point moves to the end position Creating feed data Command to be used L 6 6 6 F Specifying split the separation point for different patterns in sewing after feed L 7 7 7 F Moving in parallel for the feed L 8 8 8 F Creating split data after basting L 9 9 9 F Creating basting data 1 Press F 2 Determine the feed poi...

Страница 178: ...nput command depending on the split Creating magnified data Command to be used M 9 0 2 Input for magnification x2 M 9 0 5 Input for magnification x5 M 9 1 0 Input for magnification x10 The following three scales are available for magnification x2 x5 and x10 Use a pattern sheet suitable for the magnified pattern The magnified data is reduced when the end code is input 1 Make sure that the needle is...

Страница 179: ...speed becomes 400 spm or lower L 6 6 7 The maximum sewing speed becomes 1200 spm or lower L 6 6 8 The maximum sewing speed becomes 800 spm or lower L 6 6 9 The maximum sewing speed becomes 600 spm or lower L 6 6 0 Canceling setting for low speed data 1 Move to the desired needle position for setting 2 Select the type of low speed sewing and input the command If multiple settings are required input...

Страница 180: ...needle to the desired position 2 Input the command for option output Ending programming When programming is completed input an end code Command to be used E 1 1 1 Normal end E 1 1 2 Fixing the sewing speed at 1000 spm or lower E 1 1 3 Not carrying out thread removal E 1 1 4 Setting the sewing speed at 1000 spm or lower without thread removal E 1 1 5 Carrying out no thread breakage E 1 1 0 Fixing t...

Страница 181: ...home position 1 Make sure that the needle is at the home position Press R if the needle is not at the home position 2 Input M 0 0 1 3 Press L Moving symmetrically to the X axis Command to be used M 0 1 0 Moving symmetrically to the X axis passing the start point of sewing This function is available only when the needle is at the home position 1 Make sure that the needle is at the home position Pre...

Страница 182: ...y to a point Command to be used M 0 1 1 Moving symmetrically to the sewing start position This function is available only when the needle is at the home position 1 Make sure that the needle is at the home position Press R if the needle is not at the home position 2 Input M 0 1 1 3 Press L ...

Страница 183: ...otating counterclockwise This function is available only when the needle is at the home position Values of 1 359 degrees are available for input 1 Make sure that the needle is at the home position Press R if the needle is not at the home position 2 Determine the center point for rotation with 3 Input M 6 6 6 or M 6 6 7 4 Input the angle in 3 digits and press L ...

Страница 184: ...rclockwise This function is available only when the needle is at the home position Values of 1 359 degrees are available for input The copied data is linked to the original data with a split data 1 Make sure that the needle is at the home position Press R if the needle is not at the home position 2 Determine the center point for rotation with 3 Input M 6 7 6 or M 6 7 7 4 Input the angle in 3 digit...

Страница 185: ...ble only when the needle is at the home position 1 Make sure that the needle is at the home position Press R if the needle is not at the home position 2 Determine the reference point for resizing with 3 Input M 8 8 8 4 Input the magnification in 3 digits in the X direction and press F Magnification values of 0 400 are available for input 5 Input the magnification in 3 digits in the Y direction and...

Страница 186: ...to input magnification in the X direction M Used to input magnification in the Y direction This function is available only when the needle is at the home position The copied data is linked to the original data with a split data 1 Make sure that the needle is at the home position Press R if the needle is not at the home position 2 Determine the reference point for resizing with 3 Input M 9 9 9 4 In...

Страница 187: ...alue is 000 the stitch count remains unchanged The stitch length increases or decreases Repeated copying Command to be used L 3 3 3 Copying data from the sewing start position or the feed point excluding the number of feed boundaries to be ignored to the current needle position for the area after the current needle position 1 Move the needle to the desired position 2 Input L 3 3 3 The needle follo...

Страница 188: ... the number of feed boundaries to be ignored to the current needle position 1 Move the needle to the desired position 2 Input L 4 4 0 Copying to the X axis Command to be used L 4 4 1 Copying data to the X axis passing the current needle position from the start point or the feed point excluding the number of feed boundaries to be ignored to the current needle position 1 Move the needle to the desir...

Страница 189: ...ding the number of feed boundaries to be ignored to the current needle position 1 Move the needle to the desired position 2 Input L 4 4 2 Copying in the reverse direction Command to be used L 4 4 3 Copying data in the reverse direction from the start point or the feed point excluding the number of feed boundaries to be ignored to the current needle position 1 Move the needle to the desired positio...

Страница 190: ...7 7 Changing the movement data for the current needle position L 7 7 7 LI Moving data in parallel after the current needle position using needle drop data to the moved position 1 Move the needle to the desired position 2 Input L 7 7 7 or L 7 7 7 LI LI 3 Determine the destination point with and press L ...

Страница 191: ...s displayed during programming or editing 1 Press Pattern image is displayed Press ESC ESC or C to return to the main menu Stitch count The data width is displayed in mm The data height is displayed in mm Press to display the overall view of the data Press to display the overall sewing area ...

Страница 192: ...is deleted and the current needle position becomes the sewing start position C Deletes data before stitches If this command is used at the sewing end position the end code is deleted 1 Move the needle to the desired position 2 Input the command Input C to delete data after the current needle position Input C to delete data before the current needle position Input the stitch count in Deleting progr...

Страница 193: ...Programmer 192 Chapter 3 Programming with Command Function ...

Страница 194: ...Chapter 4 Extended Option Output ...

Страница 195: ...functions The relationship between the output and the conditions is as follows Enabling condition 1 Output condition 1 Extended option output process Output condition 2 Output condition 3 Enabling condition 2 Enabling condition 3 Disabling condition 1 Disabling condition 2 Disabling condition 3 Three items each for output conditions enabling conditions and disabling conditions can be set Operating...

Страница 196: ...ut Sets the details of the extended option output Refer to page 196 Sets the details of enabling conditions Refer to page 197 Reads the extended option output data of the floppy disk Refer to page 198 Writes the extended option output data of the floppy disk Refer to page 199 Deletes the extended option output data during editing or data of the floppy disk Refer to page 200 ...

Страница 197: ...Refer to page 205 Timer 1 Set the time until the output varies after the output condition is established Input the value in unit of 10 ms Value of 0 or 10 2550 ms is set Timer 2 Set the time for implementation of the extended option output Input the value in unit of 10 ms Value of 0 or 10 2550 ms is set When the value is 0 the output remains varying When setting is complete be sure to press To can...

Страница 198: ...r Specify a number out of 1 16 Refer to Table of extended option output Refer to page 205 Enabling conditions 3 numbers of enabling conditions can be input Refer to Table of condition number Refer to page 201 Disabling conditions 3 numbers of disabling conditions can be input Refer to Table of condition number Refer to page 201 When setting is complete be sure to press To cancel the set value inpu...

Страница 199: ...option output data from a floppy disk 1 Select and press 2 Make sure that the floppy disk is set and press Data is read and the submenu appears 3 Select and press 4 Input the number of extended option output Read data is displayed To register the data into the machine carry out the operation in the next page ...

Страница 200: ...he programmer into a floppy disk The data is also registered into the machine Be sure to use a formatted 2HD floppy disk Formatting a floppy disk Refer to page 218 One floppy disk can record the data of extended option output No 1 16 1 Select and press 2 Make sure that the floppy disk is set and press Data is written and the submenu appears ...

Страница 201: ...Programmer 200 Chapter 4 Extended Option Output Deleting the extended option output data Deletes the extended option output data 1 Select and press 2 Press The submenu appears ...

Страница 202: ...e point 7 After an emergency stop is reset 8 After a step back is started 9 Before halfway sewing is started 10 Afterthelowerthreadcounterchangesfrom1to0andthelowerthreadneedstobereplaced 11 After the lower thread is replaced 12 After a program is started 13 After a program is complete 14 When a trigger data is detected during sewing 15 After an emergency stop occurs 16 After a thread breakage occ...

Страница 203: ...ting the condition 40 When extended option input 1 is ON 41 When extended option input 1 is OFF 42 When extended option input 2 is ON 43 When extended option input 2 is OFF 44 When extended option input 3 is ON 45 When extended option input 3 is OFF 46 When extended option input 4 is ON 47 When extended option input 4 is OFF 48 When extended option input 5 is ON 49 When extended option input 5 is ...

Страница 204: ...n output 3 is OFF 76 When extended option output 4 is ON 77 When extended option output 4 is OFF 78 When extended option output 5 is ON 79 When extended option output 5 is OFF 80 When extended option output 6 is ON 81 When extended option output 6 is OFF 82 When extended option output 7 is ON 83 When extended option output 7 is OFF 84 When extended option output 8 is ON 85 When extended option out...

Страница 205: ... e n n o C e m a n t r a P n o i t i d n o C o N r o t c e n n o C l a n g i S V 4 2 V 0 1 r o s n e s t h g i r t c e j E N O 3 0 W S y r o m e M A N I X E 8 P 2 3 1 2 r o s n e s t f e l t c e j E N O 3 0 W S y r o m e M 5 6 4 3 8 9 7 4 1 1 2 1 0 1 5 4 1 5 1 3 1 6 B N I X E 9 P 2 3 1 7 5 6 4 8 8 9 7 9 1 1 2 1 0 1 0 1 4 1 5 1 3 1 1 1 W S T E S E R N O 7 1 W S y r o m e M 1 P 0 1 9 1 1 2 1 R E B I...

Страница 206: ... clamp turnover Memory SW 19 ON 2 6 3 7 P21 EXOUT 4 8 5 9 Signal tower green Memory SW 15 ON 6 10 Signal tower yellow Memory SW 15 ON 7 11 Signal tower red Memory SW 15 ON 8 12 NEEDLE DIPSWB 4 ON 8 13 FLIP DIPSWA 6 ON 4 14 FOOT DIPSWC 6 ON P4 AIR 3 15 LCLAMP When 2 stage pressure 2 bar is used 16 RCLAMP For the air type 1 1 Input available for optional parts It is not used as extended option input...

Страница 207: ...ram setting value Option output 4 BAR1 for holding material Option output 5 BAR2 for moving material Option output 6 AIR for air blow BAR1 BAR2 AIR 1 2sec 0 5sec 0 7sec 0 5sec Lifting of work clamp when embroidering is completed 1 7sec t u p t u O o N n o i t a r e p O g n i t t e s n o i t i d n o c t u p t u O 1 r e m i T S m 2 r e m i T S m n o i t i d n o c e l b a n E O X n o i t i d n o c e ...

Страница 208: ...c e l b a n E O X n o i t i d n o c e l b a s i D n o i t i d n o C o N n o i t p i r c s e D n o i t i d n o C o N n o i t p i r c s e D n o i t i d n o C o N n o i t p i r c s e D 3 N O 2 f o t n e m e v o M t n i o p t r a t s 0 0 6 f o n o i t e l p m o C g n i r e d i o r b m e 1 s n r u t e r e n i h c a M e m o h o t n o i t i s o p F F O 8 7 N O 5 t u p t u O 0 0 2 0 4 N O 4 1 r e g g i r ...

Страница 209: ...roidering is completed Movement of start point Detection of thread breakage t u p t u O o N n o i t a r e p O g n i t t e s n o i t i d n o c t u p t u O 1 r e m i T S m 2 r e m i T S m n o i t i d n o c e l b a n E O X n o i t i d n o c e l b a s i D n o i t i d n o C o N n o i t p i r c s e D n o i t i d n o C o N n o i t p i r c s e D n o i t i d n o C o N n o i t p i r c s e D 4 N O 2 t n i o ...

Страница 210: ...Chapter 5 Reading Writing Data ...

Страница 211: ... the R W button on the operation panel This operation cannot be available in command mode Data created in BAS 300 and BAS 300A series can also be read 1 Select and press 2 Make sure that is selected and press 3 Input the number of program with a numeric key If there is data appears If there is no data appears If appears the data is from BAS 300 or BAS 300A series ...

Страница 212: ...urn off again 6 Press An image is displayed Press ESC ESC or C to return to the submenu Press to display the overall sewing data Press to display the overall view of the data 7 Press to read the data To cancel reading press ESC ESC OFF is highlighted if selected Displays the longitudinal length Displays the lateral length Displays the stitch count ...

Страница 213: ...be available in command mode Data created in BAS 300 and BAS 300A series can also be read 1 Select and press 2 Select and press 3 Input the number of program with a numeric key If there is data appears If there is no data appears appears the data is from BAS 300 or BAS 300A series Checking the image display go to 7 when not checking 4 Press and select 5 Press to turn on Press to turn off again OFF...

Страница 214: ...d Press ESC ESC or C to return to the submenu Press to display the overall sewing data Press to display the overall view of the data 7 Press to read the data To cancel reading press ESC ESC Displays the longitudinal length Displays the stitch count Displays the lateral length ...

Страница 215: ...g the Read Write button on the operation panel Be sure to use a formatted 2HD floppy disk The floppy disk accompanying this product is already formatted This operation cannot be available in command mode 1 Select and press 2 Select and press 3 Input the number of program with a numeric key If there is data appears If there is no data appears If appears the data is from BAS 300 or BAS 300A series ...

Страница 216: ...This is the image from data saved in a floppy disk not the image currently in editing Press ESC ESC or C to return to the submenu Press to display the overall sewing data Press to display the overall view of the data 7 Press to write the data To cancel writing press ESC ESC OFF is highlighted if selected Displays the longitudinal length Displays the lateral length Displays the stitch count ...

Страница 217: ... mode 1 Select and press 2 Select and press 3 Input the number of program to be deleted with a numeric key If there is data appears If there is no data appears If appears the data is from BAS 300 or BAS 300A series Checking the image display go to 7 when not checking 4 Press and select 5 Press to turn on Press to turn off again OFF is highlighted if selected ...

Страница 218: ...oppy disk not the image currently in editing Press ESC ESC or C to return to the submenu Press to display the overall sewing area Press to display the overall view of data 7 Press to delete the data To cancel deletion press ESC ESC Displays the longitudinal length Displays the stitch count Displays the lateral length ...

Страница 219: ...ing Writing Data Formatting a floppy disk Formats a floppy disk for the programmer This operation cannot be available in command mode 1 Select and press 2 Select and press 3 Press for formatting and press ESC ESC for not formatting ...

Страница 220: ...e following 3 data can be read DST DSB DSZ This operation cannot be available in command mode 1 Select and press 2 Make sure that is selected and press 3 Select the data type for reading by pressing and press to put a check mark 4 Press The data name in 8 alphanumeric characters saved in a floppy disk is displayed ...

Страница 221: ...hen not checking 5 Press to select 6 Press to turn on Press to turn off again 7 Press to select the data to display 8 Press If the image is displayed press again to read data To cancel reading press ESC ESC or C Screen example when an image is displayed OFF is highlighted if selected ...

Страница 222: ...Chapter 6 Preference ...

Страница 223: ...vision within the specified pitch Area check When data is created or edited data outside the sewing area is not cre ated Language Display language such as error message is switched 1 Select and press 2 Select the item with Selecting smoothing equal division or area check 3 For setting press to put a check mark To cancel setting press to cancel the check mark Switching language 4 Press or The langu...

Страница 224: ...Programmer 223 Chapter 6 Preference 5 After setting is complete press ...

Страница 225: ...Programmer 224 Chapter 6 Preference ...

Страница 226: ...INSTRUCTION MANUAL BROTHER INDUSTRIES LTD NAGOYA JAPAN Printed in Japan 151 V11 S93V11 112 1998 08 B ...

Отзывы: