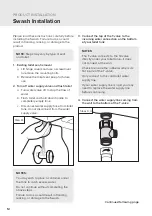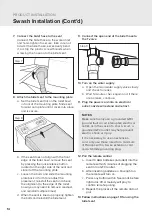
7. Connect the bidet hose to the seat
Connect the bidet hose to the water inlet
and hand-tighten to secure; take care not
to twist the bidet hose, excessively bend
it, or strip the plastic screw threads when
screwing the hose onto the bidet seat.
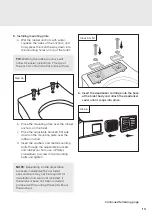
8. Attach the bidet seat to the mounting plate
a. Set the bidet seat flat on the toilet bowl
in front of the mounting plate. Slide seat
forward onto plate until it clicks into place
and is secure.
b. If the seat does not align with the front
edge of the toilet bowl, remove the seat
by pressing the quick-release button
located on the right side of the seat and
slide it off the mounting plate.
c. Loosen the bolts and slide the mounting
plate back or forth to readjust the
placement; reinstall the seat and check
the alignment to the edge of the toilet
bowl (you may need to remove, readjust,
and reinstall multiple times).
d. When the seat is lined up properly, tighten
the bolts and reinstall the bidet seat.
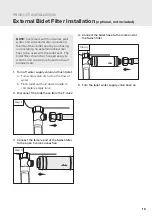
9. Connect the open end of the bidet hose to
the T-valve
10. Turn on the water supply
a. Open the main water supply valve slowly
and check for leaks.
b. Wait 5 minutes, check again and, if there
are no leaks, continue.
11. Plug the power cord into an electrical
outlet; nozzle will extend and retract.
12. Pair the remote control
a. Insert 3 AAA batteries (included) into the
remote within 5 minutes of plugging the
seat into a GFCI outlet.
b. After inserting batteries, a blue light on
the remote will turn on.
c. Press any button within 5 seconds before
light turns off. A melody will play to
confirm remote pairing.
d. Repeat the process if the remote did not
pair.
13. Follow instructions on page 19 for using the
bidet seat
14
PRODUCT INSTALLATION
Swash Installation (Cont’d)
NOTES:
Make sure to only use a grounded GFCI
(ground fault circuit interrupter) electrical
outlet, as in the case of a short circuit, a
grounded GFCI outlet may help prevent
electric shock or injury.
If it is necessary to use an extension
cord, only use those rated for a minimum
of 15 amps with a 3-wire extension cord
and a 3-blade grounding plug.
Step 7
Step 8
Step 9


