background image

10

10. MANUAL COMMAND FUNCTIONS, DATA AND ELECTRICAL WIRING LAYOUT

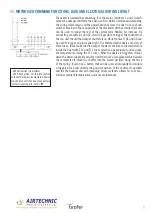
Start and end stroke microswitches

The devices that signal the start stroke and end stroke are two independent NC+NO 

dual contact switches. The first normally closed (NC) on contacts 21 and 22, whilst 

the second normally open (NO) on contacts 13 and 14. When the switch is triggered, 

the contact status is inverted, the NC contact opens and the NO contact closes. E.g.: 

the relay that controls the fan power supply is connected to contacts 21 and 22 (NC), 

whilst a luminous alarm indicator is connected to contacts 13 and 14 (NO). In this 

case, when the damper shuts, the fan will switch off and the alarm indicator pilot 

light will come on.

Switch technical data

- Casing: Fibre glass reinforced thermoplastic

- Protection rating (EN 60526 Standard): IP65

- Cable cross-section diameter: rigid 2.5mm² - flexible with ferrule 1.5 mm²

Operating temperature: from -25 to +70

Magnetic command

Where necessary, an electromagnet can be installed on the damper so as 

to anticipate the closing of the damper before the thermo fuse is triggered. 

Depending on the type of electromagnet (current input or breaker), it will send 

or cut off the electric power signal and the damper will close to prevent the 

diffusion of cold fumes. If a fire breaks out, when the temperature rises the 

thermo fuse will override the action of the electromagnet.

Magnet technical specs

- Retaining force: 120N

- Protection rating (EN 60529 Standard): IP40

- Absorbed current at 20°C: 1.6W (none) - 3.5W (emission)

- Operating temperature: from -30℃ to +85℃

Electromagnet

MD

Power supply

DC 24 V or CA 20 V

Содержание MDF30EURO

Страница 1: ...making air better MDF30EURO INSTALLATION AND OPERATION MANUAL FIRE PROTECTION EN...

Страница 2: ...RK 3 3 HANDLING AND INSTALLATION WARNINGS 4 4 MAINTENANCE 4 5 INSTALLATION IN BRICK WALLS 5 6 INSTALLATION IN CONCRETE FLOORS 6 7 INSTALLATION IN LIGHTWEIGHT WALLS 7 8 CONTROL FUNCTIONS 8 9 REPLACING...

Страница 3: ...has been installed the control unit will remain outside the masonry to make post installation interventions easier When installed following the instructions provided in this manual it can be used in H...

Страница 4: ...ch could prevent the correct operations of the commands outside the duct itself Keep as much access clearance as possible on the control unit side so as to ensure the user and maintenance operators ha...

Страница 5: ...d to be installed with vertical axis Respect the dimensions shown fig 2 table 1 4 Fill in the space between the wall and the damper using fireproof cement material M10 cat or higher to reinstate resis...

Страница 6: ...inst the damper casing so that it is blocked in the correct position fig 2 5 The metal brackets are designed to be fastened to the floor fig 3 6 Fill in the space between the floor and the damper usin...

Страница 7: ...he side of the bracket supporting the damper does not protrude over the outer edge of the flange Use the threaded bolts supplied with the brackets to fix them in place fig 3 5 Position the damper insi...

Страница 8: ...lectromagnetic circuit breaker Reset Power up the electromagnet electrical wiring diagram on page 8 Raise the metal lever on the control unit casing fig 1 Remove the reset lever from the housing compa...

Страница 9: ...he key supplied with the delivery into the housing on the servomotor and turn it counter clockwise by half a turn to enable the spring return that will automatically move the servomotor into the close...

Страница 10: ...Switch technical data Casing Fibre glass reinforced thermoplastic Protection rating EN 60526 Standard IP65 Cable cross section diameter rigid 2 5mm flexible with ferrule 1 5 mm Operating temperature...

Страница 11: ...device consists of three fuses these make the fire damper shutters sensitive to the temperature inside the duct with Tf 2 and Tf 3 fuses which can be replaced and to ambi ent temperatures using the Tf...

Страница 12: ...rofer it INSTALLER 19 143 43 211 70 55 500 210 21 30 051 Fax 210 22 23 283 BROFER SRL Via Roma 66 31023 Resana TV Italy Tel 39 0423 716611 Fax 39 0423 716612 info brofer it www brofer it making air be...

Отзывы: