


12.1
Water Treatment: For optimum performance after
installation, this boiler and its associated central heating system
should be flushed in accordance with the guidelines given in
BS7593: 1992 – Treatment of water in domestic hot water heating
systems. Full instructions are supplied with proprietary cleansers
sold for this purpose. If an inhibitor is to be used after flushing, it
should be used in accordance with the manufacturers instructions.
Remove all system cleanser before adding any inhibitor.
Suitable flushing agents and inhibitors are available from Betz
Dearborn on 0151 4209563, Fernox on 01799 550811 and
Salamandor on 0121 378 0952.
Remove the cabinet by pulling off the clip-on facia cover.
Unscrew the two fixing screws, release the sides and lift from the
top location.
Check that the electrical supply and the gas supply to the
appliance are turned off and that all the water connections
throughout the system are tight.
Open the system valves at the appliance. Refer to Fig 17.
Open all the radiator valves. Remove the automatic air vent cap.
Refer to Fig 40.
Fill the system through the Worcester Filling Link and Key. Refer
to Section 7, Sealed System.
Vent each radiator in turn. The automatic air vent, cap removed,
will vent the appliance. Refer to Fig 40.
It is very important that the appliance and system are fully
vented and that all air pockets are removed.
Remove the cap from the pump and turn the shaft about half a
turn. Replace the cap. Refer to Fig 41.
Check that the pressure relief valve operates by turning the knob
anti-clockwise until it releases. Lower the facia to gain access to
the relief valve. Refer to Fig 20. Water should be expelled from
the discharge pipe.
The appliance [as dispatched] can accommodate a system volume
of 100 litres. Refer to BS7074 Part 1, BS5449 and Table 8. If the
system volume is greater then an extra vessel must be fitted as
close as possible to the appliance central heating return connection
and pressurised to the same figure as the integral vessel.
12.2 Set the Expansion Vessel Pressure
The charge pressure of the expansion vessel as dispatched is
0.5bar, which is equivalent to a static head of 5m [17ft]. The
charge pressure must not be less than the static head at the
point of connection. A Schraeder type valve is fitted to the
expansion vessel to allow the charge pressure to be increased if
necessary. Refer to Fig 40.
The expansion vessel must be charged to 0.35bar less than the
initial system design pressure.
Note: 1bar = 10.2m = 33.5ft of water.
12.3 Set the System Pressure
Fill the system until the pressure gauge is at 2.5bar and check for
leaks. Release water from the system using the relief valve test
knob until the required system pressure is obtained, upto a
maximum of 1.5bar. Set the pointer on the pressure gauge to
record the set system pressure.
If the pressure indicated on the gauge is greater than 2.65bar
when operating at the maximum central heating temperature
then an extra expansion vessel must be fitted to the system as
close as possible to the appliance central heating return
connection.
12.4 Clock/Programmer
The controls fitted to the appliance should be set up at this stage
using the instructions supplied with the clock/programmer.
12.5 Checking the Burner Pressure
12.5 Check that the gas and electricity supplies are turned off.
Connect a pressure gauge to the gas valve to measure the inlet
and burner pressure. Refer to Fig 42.
12. Commissioning The Appliance
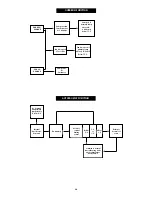
21
Fig. 40. Automatic air vent and combustion
test point
Fig. 41. Pump venting.
Pump
Pump
cap
Electrical
connections
cover
Fig. 42. Gas valve.
Modulating
solenoid
valve
Burner pres-
sure test
point
Burner connection
Safety solenoid
valve
Gas
Inlet pressure
test point
Minimum
pressure
adjustment
screw
Maximum
pressure
adjustment
screw
Automatic air vent
Flue connections
Expansion vessel charg-
ing point
Expansion vessel
Wall mounting frame
Combustion products
test point (front cap)
Содержание RD 628
Страница 34: ...34 1 2 3 4 7 5 6 8 9 10 11 12 4 15 13 16 19 14 17 18 20 22 23 21 ...
Страница 45: ...45 ...
Страница 46: ...46 ...
Страница 47: ...47 ...
Страница 51: ......
Страница 53: ......
Страница 55: ...L2 0mm ...
Страница 57: ......
Страница 58: ...RD 628 USER INSTRUCTIONS CUSTOMER CARE GUIDE G C NUMBER 47 108 14 ...
Страница 71: ...14 ...


