


ENGLISH
OPERATION MANUAL
BRITEQ
®
8/55
BT-BEAM70
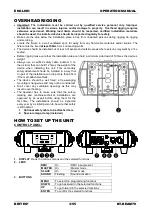
Offset Adjust
Used to adjust the home position of several functions:
Make sure that the unit is connected to a DMX-controller and set to 11CH
channel mode: set ch6 + ch7 to maximum.
If you’re not already in the setup menu, just press the MENU button
shortly to enter the setup
menu (“DMX Address” is shown on the display)
Now press the ENTER button for at least 5 seconds to go into offset
mode.
Use DOWN and UP buttons to select the function that you want to
adjust
Press the ENTER button, the display starts blinking.
Use DOWN and UP buttons to adjust the home position
Press the ENTER button to confirm your setting
To go back to the functions without any change press the MENU button
again.
If you want to go back to normal running mode: press the MENU button
for about 2 seconds, the new offset parameters for the different functions
are preserved in flash memory.
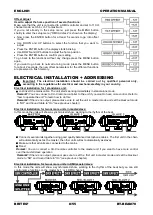
ELECTRICAL INSTAL ADDRESSING
Important: The electrical installation should be carried out by qualified personal only,
according to the regulations for electrical and mechanical safety in your country.
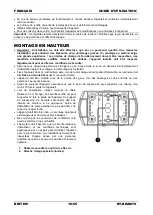
Electrical installation for 1 standalone unit:
Just insert the mains cable. The unit starts working immediately in stand-alone mode.
Remark1:
You can connect a CA-8 remote controller to the unit if you want to have more control. Refer to
“how to operate the unit” to learn how to do this.
Remark2:
if there’s no output, please make sure to set the unit in master mode and set the blackout mode
to “NO” and Sound State to “On” (see previous chapter)
Electrical installation for two or more units in master/slave:
In this mode the units will show a synchronized show, working to the rhythm of the beat.
Connect several units together using good quality balanced microphone cables. The first unit in the chain
will automatically act as the master, the other units will act automatically as slaves.
Make sure that all units are connected to the mains.
Done!
Remark:
You can connect a CA-8 remote controller to the master unit if you want to have more control
over the master/slave operation
Remark2:
if there’s no output, please make sure to set the first unit in master mode and set the blackout
mode to “NO” and Sound State to “On” (see previous chapter)
Electrical installation for two or more units in DMX-master/slave:
In this mode the units will show a synchronized show, working to the rhythm of the beat but you can still
control some functions on the master by 1 or 4 DMX-channels.


