background image

6

7

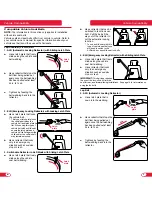
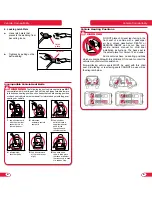
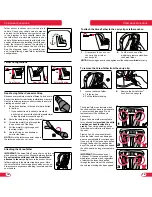
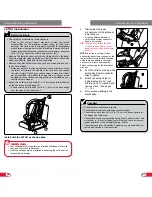
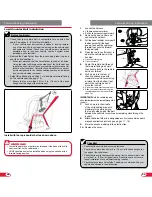
Compatible Vehicle Seat Belts
NOTE:

 The information in this section only applies to installation 

with vehicle seat belts. 

Vehicle seats and seat belts differ from vehicle to vehicle. Refer to 

your vehicle owner’s manual for specific information about your 

vehicle seat belts and their use with child seats. 

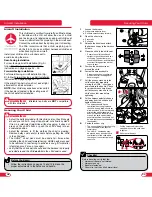
Lap-Shoulder (3-Point) Belt
1.  ALR (Automatic Locking Retractor) with Sliding Latch Plate 

Has a latch plate that freely 

slides along the vehicle seat 

belt webbing.

Has a retractor that stops the 

belt from being pulled out 

again once the belt webbing 

has been pulled out at least 

24 in. (61 cm). 

Tightens by feeding the 

belt webbing back into the 

retractor. 

Has a retractor that can be 

switched to function as an 

ALR. Pull the belt all the 

way out of the retractor to 

set the automatic locking 

function.

*  To use a child seat with this 

type of vehicle seat belt, you 

will need to switch to the 

ALR mode or use child seat lock-offs. 

2.  ELR (Emergency Locking Retractor) with Locking Latch Plate

Has a latch plate that locks 

the vehicle belt.

*  This type of latch plate locks 

the vehicle belt when the 

vehicle belt and latch plate lie 

flat. When using this type of 

vehicle belt with a child seat, 

ensure the latch plate and 

vehicle belt lie flat against the 

child seat or the vehicle belt 

may remain unlocked.

Has a retractor that locks 

only in an emergency 

situation such as sudden 

stop or crash. 

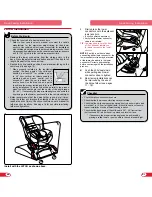
3.  Switchable Retractor in ALR Mode with Sliding Latch Plate

Has a latch plate that freely 

slides along the vehicle 

seat belt webbing.

4.  ELR (Emergency Locking Retractor) with a Sliding Latch Plate

Has a latch plate that freely 

slides along the vehicle 

seat belt webbing.

Has a retractor that locks 

only in an emergency 

situation such as sudden 

stop or crash.

IMPORTANT:

 This belt type requires 

the use of the lock-offs built into the 

seat for rear- and forward-facing installations. See page 14 for information on 
using the lock-offs.

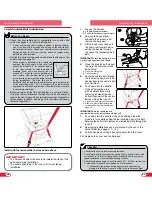
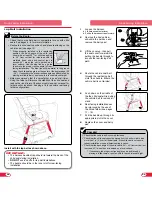
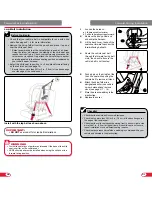
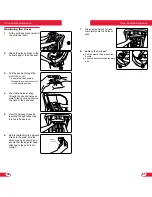
Lap Belt
5.  ALR (Automatic Locking Retractor)

Has a latch plate that is 

sewn into the webbing.

Has a retractor that stops the 

belt from being pulled out 

again once the belt webbing 

has been pulled out at least 

24 in. (61 cm). 

Tightens by feeding the 

belt webbing back into the 

retractor. 

Vehicle Compatibility

Vehicle Compatibility

24 in

.

Latch

plate

Latch

plate

Latch

plate

24 in

.

Latch

plate

Содержание HIGHWAY 65

Страница 1: ... behind the cover See features pages for reference IMPORTANTE Debe leer atentamente todas las instrucciones antes de instalar el asiento de seguridad para niños Guarde esta guía del usuario en el bolsillo detrás de la cubierta utilice las páginas sobre las características de referencia HIGHWAY 65 User Guide Guía del usuario ...

Страница 2: ...sting the Buckle Position 13 Fastening the Buckle 14 Releasing the Buckle 14 Using the Chest Clip 14 Using the Lock Offs 14 Infant Body Pillow 15 Recline Positions 15 Using the Lower Anchors and Tethers for Children LATCH 16 Using the Lower Connectors 17 Using the Energy Absorbing Versa Tether 17 Rear Facing Installation 20 LATCH Installation 20 Lap Shoulder Belt Installation 22 Lap Belt Installat...

Страница 3: ...ould cause damage to harness adjuster and webbing Always carry this child seat by its shell or tether straps The primary protection for occupants of a vehicle in a collision is the body of the vehicle itself a child seat will not protect a child when a vehicle is seriously impacted However correctly installed a child seat will substantially improve chances for survival in most crashes Make sure al...

Страница 4: ...these requirements because the child is too large review the forward facing guidelines on page 5 An infant positioning insert may be necessary for small infants to achieve a snug fit if the child is between 5 and 11 lbs 2 3 and 5 kg and the lowest harness slots fall above the infants shoulders The infant positioning insert is sold separately at select retailers and on www britaxusa com The include...

Страница 5: ... plate locks the vehicle belt when the vehicle belt and latch plate lie flat When using this type of vehicle belt with a child seat ensure the latch plate and vehicle belt lie flat against the child seat or the vehicle belt may remain unlocked b Has a retractor that locks only in an emergency situation such as sudden stop or crash 3 Switchable Retractor in ALR Mode with Sliding Latch Plate a Has a...

Страница 6: ...eats CANNOT be used See the diagram below Vehicle Seating Positions Incompatible Vehicle Seat Belts WARNING The following types of vehicle seat belts are NOT compatible with this child seat If any of the belt types listed below are in the chosen seating position choose another vehicle seating position or check your vehicle owner s manual for information on installing a car seat in your vehicle 1 L...

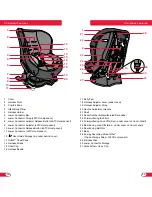
Страница 7: ...st Pads 14 Harness Straps 15 Chest Clip 16 Harness Buckle 17 Belly Pad 18 Harness Adjuster Lever under cover 19 Harness Adjuster Strap 20 Recline Adjustment Handle 21 Shell 22 Serial Number Manufactured Date Label 23 Forward Facing Belt Slot 24 Forward Facing Lock Offs Red under cover on front of shell 25 Rear Facing Lock Offs Blue under cover on front of shell 26 Rear Facing Belt Slot 27 Base 28 ...

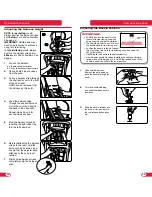
Страница 8: ...2 3 4 5 6 7 NOTE In rear facing mode always position the harness straps at or below your child s shoulders See page 5 IMPORTANT HUGS pads may need to be removed to achieve a snug fit in rear facing In forward facing mode always position the harness straps at or above your child s shoulders See page 5 1 Loosen the harness a Lift harness adjuster lever b Pull both harness straps forward 2 Unhook bot...

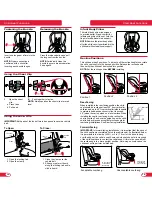
Страница 9: ...line handle then verify the child seat has locked into position NOTE Set the recline position BEFORE installing Position 1 Position 2 Position 3 Rear Facing When installed in the rear facing position the child seat should be reclined at least 30 from vertical for children and up to 45 from vertical for infants unable to maintain head and neck control not to exceed 45 when the car is parked on a le...

Страница 10: ...nd the Lower Connectors The lower connectors are located in the back of the base of the child seat Store the connectors in the slots when not in use Firmly push the lower connector into the slot or lower anchor until a click is heard NOTE The lower connectors store top down in the slots Child Seat Functions Child Seat Functions LATCH SYSTEM ANCHOR LOCATIONS Tether Anchor Lower Anchors Lower Anchor...

Страница 11: ...ring through until the strap is tight 5 Use the D ring as an attachment point for the tether NOTE Store the tether connector strap in the tether pouch when not in use IMPORTANT The Versa Tether carry clip is only for use when you wish to carry the child seat between locations Do not install the child seat with the Versa Tether attached to the carry clip Secure the excess Versa Tether webbing in th...

Страница 12: ...Versa Tether is used at all times Using the tether will improve the stability of the child seat and reduce the risk of injury Check your vehicle owner s manual for tether anchor locations See page 18 for possible rear facing tether configurations LATCH Installation 1 Firmly press the lower connectors onto the adjacent lower anchors A click confirms attachment Verify that the lower connector strap ...

Страница 13: ...ness and remove the belly pad 3 Lift the back cover then pull the seat cover forward while pulling the buckle through to access the rear facing belt path IMPORTANT Ensure the buckle is in inner slot and lying away from the belt path 4 Open the blue lock off closest to where the vehicle belt will be buckled a Open the locking tab b Open the clamp 5 Route the vehicle belt through the rear facing bel...

Страница 14: ...ehicle owner s manual for tether anchor locations See page 18 for possible rear facing tether configurations 1 Loosen the harness a Lift harness adjuster lever b Pull both harness straps forward 2 Remove the body pillow unbuckle the harness and remove the belly pad 3 Lift the cover up then pull the seat cover forward while pulling the buckle through to access the rear facing belt path 4 Route the ...

Страница 15: ...ress the lower connectors onto the adjacent lower anchors A click confirms attachment Verify that the lower connector strap is not twisted TIP You may need to turn the back of the child seat toward you for easier access to the vehicle lower anchors NOTE If a click is not heard when connecting either lower connector the lower connector strap may be twisted or there may be debris in the lower connec...

Страница 16: ...he locking tab b Open the clamp 5 Route the vehicle belt through the forward facing belt slots then buckle Ensure the vehicle belt is not twisted 6 Push down into the rear of the child seating area with moderate force while removing all slack from the bottom lap part of the vehicle belt and close the lock off a Close the clamp over the vehicle belt b Slide your palm or thumb along the locking tab ...

Страница 17: ...oosen the harness a Lift harness adjuster lever b Pull both harness straps forward 2 Remove the body pillow and unbuckle the harness 3 Lift the back cover then pull the seat cover forward to access the forward facing belt path 5 Push down on the middle of the the child seat while pulling the vehicle belt to remove all slack 6 Attach the Versa Tether to a designated anchor see vehicle owner s manua...

Страница 18: ...ch time the child seat is used Before You Begin Follow the instructions on pages 12 and 13 to make the proper adjustments to the harness and buckle 1 Loosen the harness a Lift harness adjuster lever b Pull both harness straps forward 2 Open the chest clip a Press tabs b Pull apart 3 Release the buckle and attach the harness straps to the harness holders 4 Place the child in the child seat Ensure t...

Страница 19: ...belly pad b Remove the elastic strap from around the buckle 8 Detach the plastic hooks from the bottom edge of the child seat 9 Pull the buckle through the slot in the cover 7 Pull the harness straps through the shell and cover to the front of the child seat 10 Removethecoverfromthechild seat shell Cleaning the Cover HAND WASH the cover using cold water and mild soap LINE DRY to prevent the cover ...

Страница 20: ... back of the child seat 2 5 Nest the harness straps by inserting the right strap loop into the left strap loop 6 Before reattaching the harness straps to the yoke hold the harness yoke as shown and ensure that the adjuster strap attached to the yoke is not twisted 7 Slide nested harness straps completely onto the harness yoke 8 Replace the belly pad a Pull the elastic strap around the buckle b Pus...

Страница 21: ...hrough the cover Replacing the Buckle 1 Guide the buckle retainer down through the slot in the child seat shell 2 Slide the buckle webbing into the slot between buckle positions 3 Select the appropriate slot for the size of your child and turn the buckle webbing and slide it into the chosen slot 4 Ensure that the buckle strap is not twisted and that the button faces out IMPORTANT ALWAYS position t...

Страница 22: ... or to make substitutions To make a claim under this warranty you must contact Britax Consumer Services at 1 888 427 4829 or write to us using the address on the back cover of this booklet PLEASE COMPLETE AND MAIL THE OWNER REGISTRATION CARD WITHIN 30 DAYS OF PURCHASE You may also register online at www BritaxUSA com registration WARRANTY LIMITATIONS This warranty does not include damages which ar...

Страница 23: ... la hebilla 56 Cómo desabrochar la hebilla 56 Utilización del broche pectoral 56 Utilización de los seguros 56 Almohadilla para el cuerpo del bebé 57 Posiciones de reclinación 57 Anclajes inferiores y ranuras de retención para niños sistema LATCH 58 Uso de los conectores inferiores 59 Sistema de absorción de energía Versa Tether 60 Instalación de asientos con orientación trasera 62 Instalación con...

Страница 24: ...r Nunca debe emplearse la correa de ajuste del arnés para levantar o transportar el asiento de seguridad para niños ya que podría dañar el ajuste del arnés e incluso el propio cinturón Sostenga siempre el asiento de protección para niños por el exterior o por las correas de retención En cualquier colisión la principal protección para los ocupantes es la propia carrocería del vehículo un asiento de...

Страница 25: ... colocarse cumpliendo estos requisitos porque excede los límites de peso o altura repase la información sobre asientos colocados con orientación delantera de la página 47 La almohada infantil que viene incluida puede que se llegue a necesitar para lograr un mejor ajuste y apoyo para los bebés más pequeños Vea la página 57 Usar la orientación trasera con niños que pesen entre 2 3 y 18 1 kg 5 y 40 l...

Страница 26: ...ico Para activar la función de bloqueo automático es necesario extraer el cinturón completamente del sistema retráctil Si desea utilizar un asiento de seguridad para niños con este tipo de cinturón de seguridad deberá elegir el modo de sistema retráctil de bloqueo automático o usar seguros para asientos infantiles 4 Sistema retráctil de bloqueo en caso de emergencia con hebilla deslizante a Dispon...

Страница 27: ...sal inflables 5 Bandas horizontales que nacen en la unión entre el asiento y el respaldo 6 Bandas horizontales con una hebilla cosida que tienen un sistema retráctil que se bloquea solo en caso de parada brusca Dispositivo de ajustebilla Hebilla ADVERTENCIA NO coloque el asiento de seguridad para niños orientado hacia atrás en el asiento delantero de un vehículo que tenga bolsas de aire AIR BAGS e...

Страница 28: ...ajo de cubierta 12 13 14 15 16 17 18 19 20 1 4 3 2 5 6 7 8 9 10 11 19 Correa de ajuste del arnés 20 Palanca de ajuste de la reclinación 21 Exterior del asiento 22 Etiqueta con la fecha de fabricación y el número de serie 23 Ranura para el cinturón de orientación delantera 24 Seguros de orientación delantera rojo bajo la cubierta de la parte delantera 25 Seguros de orientación trasera azul bajo la ...

Страница 29: ...del arnés siempre a la altura de los hombros del niño o por debajo de estos Consulte la página 47 IMPORTANTE Las almohadillas abrazadoras posiblemente tengan que ser removidas para lograr un mejor ajuste en posición mirando hacia atrás aproximadamente 3 meses de edad NOTA En posición mirando hacia adelante siempre coloque las correas del arnés al nivel o por encima de los hombros de su hijo Ver pá...

Страница 30: ...quedado bloqueado en esa posición NOTA Ajuste la posición de reclinación ANTES de instalar el asiento Posición 1 Posición 2 Posición 3 Orientación trasera Si el asiento de seguridad para niños se coloca orientado hacia detrás el ángulo de reclinación debe ser como mínimo de 30 respecto de la posición vertical para niños y de 45 en el caso de bebés que no pueden mantener la cabeza y el cuello ergui...

Страница 31: ...to o anclaje inferior 1 Mantenga pulsado el botón rojo de desbloqueo 2 Tire del conector inferior para extraerlo del compartimento o anclaje inferior Para acoplar el conector inferior al compartimento o anclaje inferior Uso de los conectores inferiores Ubicación de los conectores inferiores Los conectores inferiores se encuentran situados en la parte trasera de la base del asiento de seguridad par...

Страница 32: ...se use la correa de retención en todo momento cuando se esté instalando el asiento de seguridad para niños El uso de esta correa de retención mejorará la estabilidad del asiento de seguridad para niños y disminuirá el riesgo de lesiones Consulte los siguientes gráficos para ver las distintas opciones de instalación del Versa Tether con orientación delantera 3 5 El Versa Tether puede indicar cuando...

Страница 33: ...ón mejorará la estabilidad del asiento de seguridad para niños y disminuirá el riesgo de lesiones Verifique en el manual del vehículo dónde se encuentran los anclajes de retención Consulte la página 60 para ver las posibles opciones de instalación de las correas de retención con orientación trasera Instalación con LATCH 1 Presione con fuerza los conectores inferiores sobre los anclajes inferiores ...

Страница 34: ...l arnés hacia delante 2 Quite la almohadilla para el cuerpo desabroche el arnés y retire la almohadilla abdominal 3 Tire de la cubierta trasera hacia arriba y después hacia delante mientras pasa la hebilla para acceder al arco del cinturón de los asientos con orientación trasera IMPORTANTE Asegúrese de que la hebilla está en la ranura interna separada del arco del cinturón 4 Abra el seguro azul qu...

Страница 35: ...es de retención Consulte la página 60 para ver las posibles opciones de instalación de las correas de retención con orientación trasera Instalación con la banda horizontal como se indica arriba Instalación de asientos con orientación trasera 1 Afloje el arnés a Levante la palanca de ajuste del arnés b Tire de ambas correas del arnés hacia delante 2 Quite la almohadilla para el cuerpo desabroche el...

Страница 36: ...nferiores sobre los anclajes inferiores adyacentes Oirá un clic cuando estén correctamente acoplados Compruebe que la tira del conector inferior no está torcida SUGERENCIA Si gira la parte trasera del asiento de seguridad para niños hacia usted podrá acceder más fácilmente a los anclajes inferiores del vehículo NOTA Si no oye un clic al acoplar el conector inferior es posible que la tira de este e...

Страница 37: ...uerpo y desabroche el arnés 3 Tire de la cubierta trasera hacia arriba y después hacia delante para acceder al arco del cinturón de los asientos con orientación delantera 4 Abra el seguro rojo que queda más cerca de donde se abrochará el cinturón de seguridad del vehículo a Abra la lengüeta de bloqueo b Abra el dispositivo de fijación 5 Pase el cinturón de seguridad del vehículo por las ranuras de...

Страница 38: ...tilice el sistema de lock offs para instalar cuando utilice la correa de la cintura Instalación de asientos con orientación delantera 1 Afloje el arnés a Levante la palanca de ajuste del arnés b Tire de ambas correas del arnés hacia delante 2 Extraiga la almohadilla para el cuerpo y desabroche el arnés 3 Tire de la cubierta trasera hacia arriba y después hacia delante para acceder al arco del cint...

Страница 39: ... Cada vez que use el asiento de seguridad para niños compruebe que esté sujetado correctamente y que el arnés esté perfectamente ajustado al tamaño del niño Antes de comenzar Siga las instrucciones de las páginas 54 a 55 para realizar los ajustes oportunos al arnés y a la hebilla Sujeción del niño ADVERTENCIA Cinturones inflables no son compatiblescon este asiento para niños Certificado para su us...

Страница 40: ...ohadilla abdominal b Retire la cinta elástica que rodea la hebilla 8 Quite los enganches de plástico del borde inferior del asiento de seguridad para niños 7 Tire de las correas del arnés a través del exterior y la cubierta hacia el frente del asiento de seguridad para niños 2a 2b 1b 1a 5a 5b 8 9 Pase la hebilla por la ranura de la cubierta 10 Quite la cubierta del exterior del asiento de segurida...

Страница 41: ...as del arnés insertando la lazada de la correa derecha en la izquierda 6 Antes de volver a enganchar las correas del arnés sujete el gancho del arnés como se indica y compruebe que la correa de ajuste que va unida al gancho no está torcida Colocación de la cubierta 1 Coloque la cubierta sobre el exterior del asiento de seguridad para niños 1 Correa de ajuste 7 Deslice las correas del arnés unidas ...

Страница 42: ...Cómo volver a pasar la hebilla 1 Pase el dispositivo de retención de la hebilla por la ranura del exterior del asiento de seguridad para niños 2 Pase el cinturón por la ranura entre las posiciones de la hebilla 3 Seleccione la ranura correspondiente al tamaño de su hijo gire el cinturón y páselo por dicha ranura 4 Compruebe que la correa de la hebilla no está torcida y que el botón queda hacia fue...

Страница 43: ... reclamación de acuerdo con esta garantía debe ponerse en contacto con el departamento de atención al cliente de Britax llamando al 1 704 409 1700 o enviando una carta a la dirección especificada en la contraportada de este manual COMPLETE LA TARJETA DE REGISTRO DE COMPRA Y ENVÍELA POR CORREO EN UN PLAZO MÁXIMO DE TREINTA 30 DÍAS A PARTIR DE LA FECHA DE COMPRA También puede optar por registrarse e...

Страница 44: ...84 ...
Страница 45: ...Britax Child Safety Inc 13501 South Ridge Drive Charlotte NC 28273 USA A Britax Childcare Group Limited company Tel 1 704 409 1700 www Britax com ...

Отзывы: