19
4.2.2
Connecting an MDR to MDR-Dashboard 6.0 (Wi-Fi)
Center Servers
indicates when the MDR unit has connected to
a relevant MDR Server.
If the Chapter 4.1 MDR Unit procedure has been followed correctly
on the MDR, access
SYS INFO
→
SERVER STATUS
and
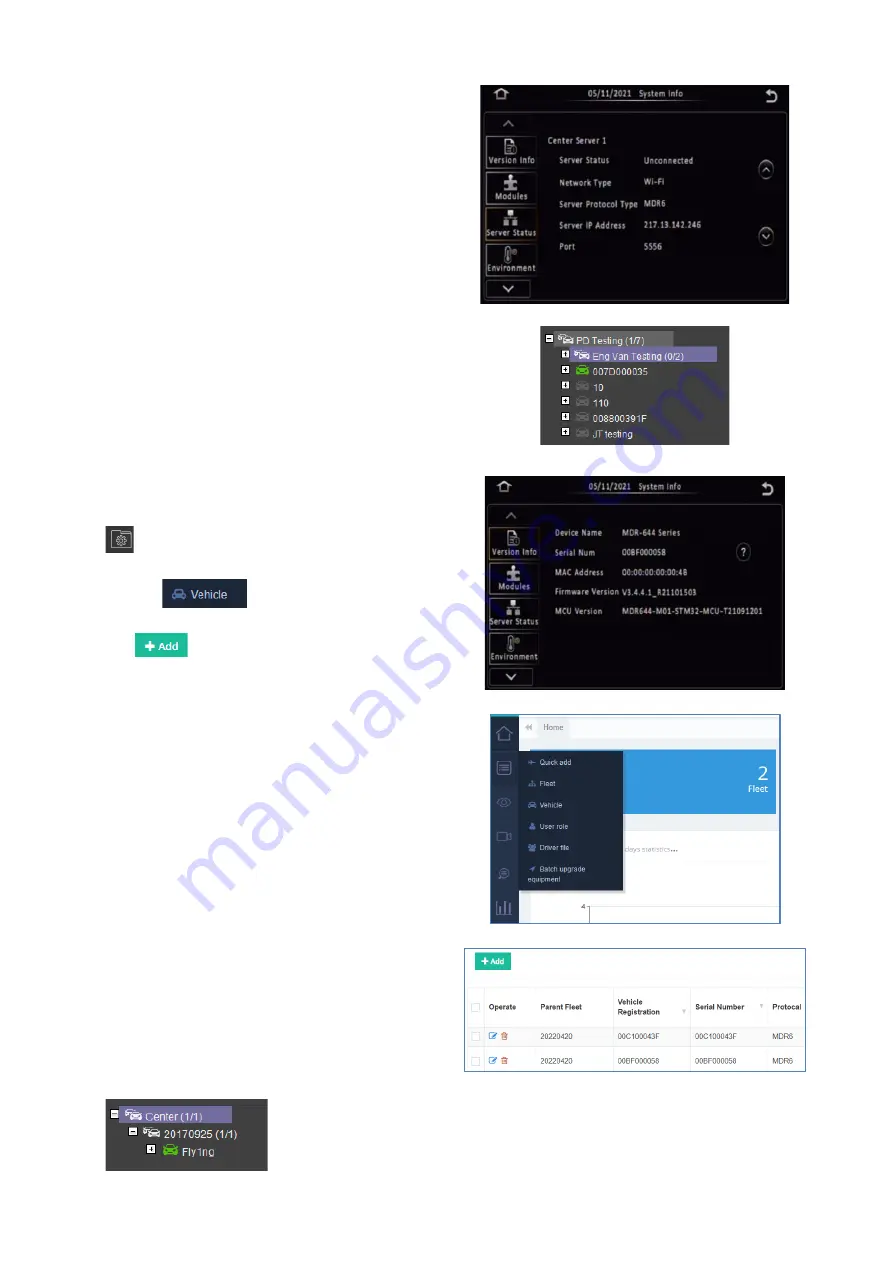
confirm the Center Server 1 has successfully connected. See
Center Server 1 Status Figure 51
Center Server 1 Status Figure 51
Once the above connection has been made, it may take a few
minutes for the MDR unit to appear in MDR-Dashboard 6.0.
If the MDR automatically appeared, it will be found under a group
labelled
TODAY’S DATE
and the MDR will be named using its
SERIAL NUM
. See
Automatically Found MDR Figure 52.
Automatically Found MDR Figure 52
Alternatively, manually connect the MDR to MDR-Dashboard by
following the steps below:
➢
In MDR-Dashboard 6.0, click
System Management
found on the top right of the software. It will redirect you
into a web page.
➢
Browse to
as shown in
➢
Click
as shown in
Version Information Figure 53
➢
Vehicle registration should match the vehicle’s actual
registration. This is your choice. The maximum is 50
alphanumeric characters.
➢
Ensure your
SERIAL NUMBER
from the MDR firmware is
entered correctly. An example is shown in
➢
PROTOCOL
by default is
MDR6
which works for all MDR
600 Series products.
Note:
MDR5
is
used for the 500 Series and the
MDR
is used for
the 400 Series
➢
Make sure
Number of Channels
are put in correctly,
this will determine how many channels are available in Live
View on MDR-Dashboard client and web interface.
➢
Transmit IP
and
Transmit port
are auto detected
and filled in. Do not change it manually. Other information
(
SIM card
,
Vehicle file
and
Equipment file
) is
optional.
➢
Once completed click
CONFIRM
.
➢
After all vehicles have been added, you will need to re-login
to the MDR-Dashboard 6.0 to make the additions come into
effect.
➢
The MDR will now appear under the group you assigned it to.
System Management Window Figure 55
Vehicle Window Figure 56


