Brigade DC-102 Скачать руководство пользователя страница 14

1

5

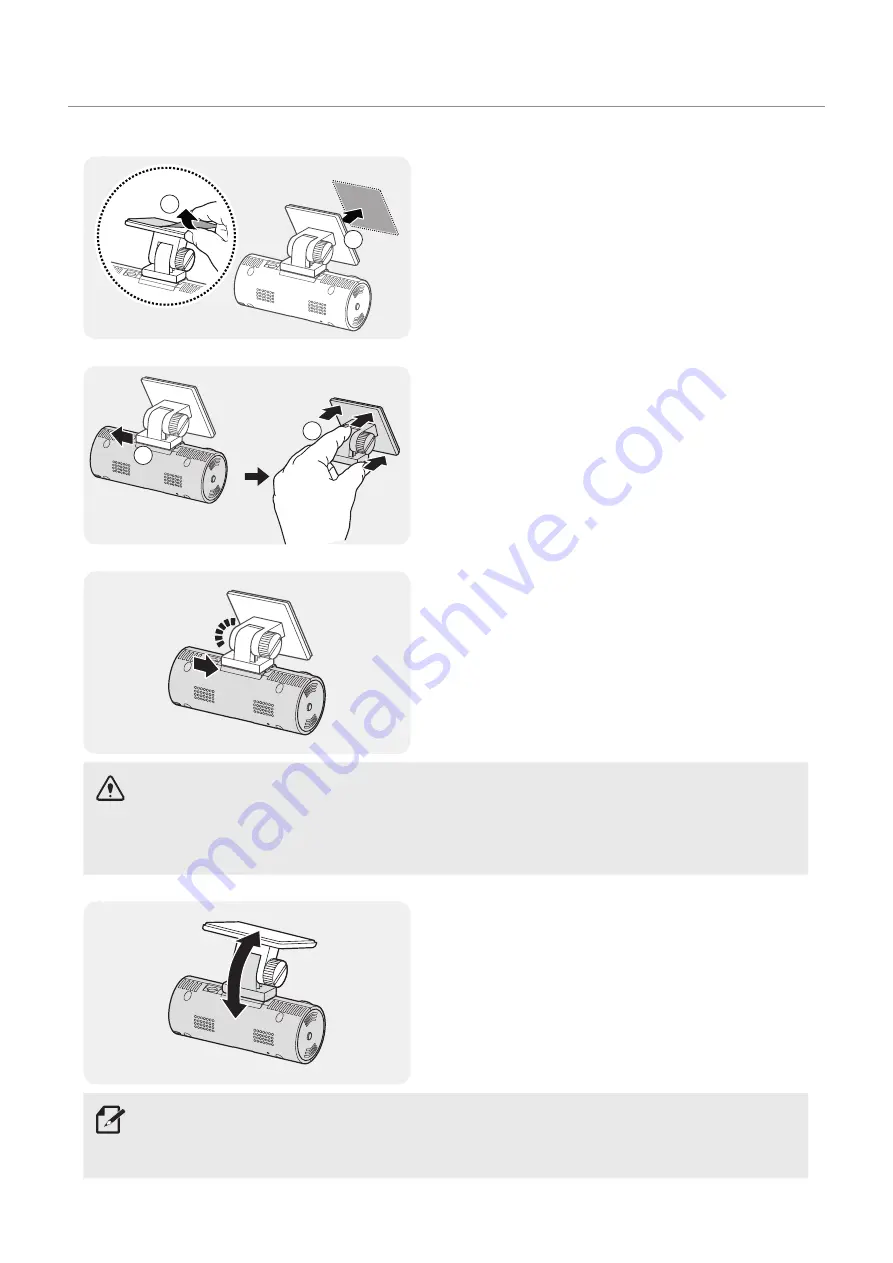
Remove the protective film from the adhesive 
mount, and then press the mount to the 
installation location.

Remove the product from the mount and push the 
mount against the windshield to ensure that the 
mount is firmly fixed.

Align the product to the mount, and then slide it 
into the locking position until you hear a click.

• The product may fall and be damaged during vehicle operation if it is not firmly fixed to

the mount.

• If you need to remove the mount from the windshield to alter the installation location, be careful

not to damage the windshield’s film coat.

Set the vertical angle of the camera appropriately 
and tighten the screw of the mount firmly by using 
a flat-head screwdriver or a coin.

To confirm the camera angle, record a video after installation and check the video using the PC 
viewer. If necessary, adjust the camera angle again. 
For more information about the PC viewer, refer to "4. Using the PC viewer" on page 22.

2

2

1

1

Installing the product

Содержание DC-102

Страница 1: ...This product records videos while the vehicle is operating Read and follow the instructions in this guide to properly use and maintain the product DC 102 Dash Cam User Guide...

Страница 2: ...an accident Depending on the vehicle s configuration or operating conditions such as the installation of remote door lock devices ECU settings or TPMS settings some product features may not be suppor...

Страница 3: ...re designed to provide reasonable protection against harmful interference in a residential installation This equipment generates uses and can radiate radio frequency energy and if not installed and us...

Страница 4: ...the PC viewer 4 24 4 1 System requirements 4 2 Installing the PC viewer 4 3 PC viewer screen layout 24 24 25 4 4 Playing recorded videos on the PC viewer 26 4 5 Video control menu overview 27 28 5 Set...

Страница 5: ...Provides useful information to help users better utilize the product s features Safety information for proper use Driving and product operation Do not operate the product while driving a vehicle Distr...

Страница 6: ...power cable Also do not place heavy objects on the power cable or pull insert or bend the power cable using excessive force Doing so may result in electrical fire or electrocution Use only genuine acc...

Страница 7: ...re If you drop mishandle or expose the product to external shocks it may cause damage and or result in the malfunction of the product Do not attempt to insert foreign objects into the device Avoid exc...

Страница 8: ...ter consumable Quick start guide Warranty CS information User guide stored in the microSD card The standard items may change without prior notice 1 1 2 Accessories sold separately Rear camera GPS rece...

Страница 9: ...Used to connect the power cable Mount connector Used to connect the mount Front camera lens Records the front view GPS port Used to connect the external GPS receiver optional for additional features...

Страница 10: ...tputs the voice guide and buzzer sounds to indicate the product s status Memory card slot Insert a memory card to save recordings Microphone Used for voice recording 1 2 3 Rear camera optional Adhesiv...

Страница 11: ...he product Ensure that the product is turned off before removing the memory card The recorded video files may be corrupted or lost if you remove the memory card while the product is on Ensure that the...

Страница 12: ...h cam installation arrange the power cable neatly so it does not interfere with vehcile controls or obscure the driver s view Note Arrange the wire so that cable does not interfere with the vehicle ai...

Страница 13: ...on the dashboard its GPS reception may be affected depending on the dashboard camera s installation location Adjust the installation location of the GPS navigating device to ensure that the two device...

Страница 14: ...ation if it is not firmly fixed to the mount If you need to remove the mount from the windshield to alter the installation location be careful not to damage the windshield s film coat Set the vertical...

Страница 15: ...anic 1 Connect the hardwire cable to the Dash Cam 2 Refer to the Installation Guide for Hardwiring the Dash Cam for fitting instructions Do not cut or modify the power cable yourself Doing so may dama...

Страница 16: ...location on the rear windshield where there is no defrost grid wire and the camera can record the entire rear view For vehicles with a sunshade attached to the rear windshield you must select a locat...

Страница 17: ...secure the rear camera to the rear windshield After securing the rear camera to the windshield it is hard to remove the camera or change the installation location due to the strong adhesive Remove the...

Страница 18: ...r camera cable to the rear camera s connection port For safe driving arrange the cables to prevent the driver s vision from being obstructed or interfering with driving Turn on the ACC or start the en...

Страница 19: ...the upper part of the front windshield and press the adhesive part firmly to secure it Before installation make sure the external GPS receiver s cable length is sufficient and check the cable routing...

Страница 20: ...es may be lost 3 3 Using the continuous recording feature Connect the power cable to the product s DC IN power port and then turn on the vehicle s electrical accessories or start the engine The status...

Страница 21: ...able the operating mode is switched to parking mode with the voice guide after the engine or electrical accessories are turned off Parking mode operates only when the hardwiring cable is connected The...

Страница 22: ...t and check the video file list In the memory card A file name is composed of the recording start date and time and the recording option REC_2019_08_01_10_25_30_F MP4 REC_2019_08_01_10_25_30_R MP4 Ens...

Страница 23: ...erating system other than those listed in the system requirements 4 2 Installing the PC viewer You can download the latest PC viewer software from the Brigade Website https brigade electronics com pro...

Страница 24: ...set the language for the PC viewer Displays the progress of video playback Displays the current and total running time of the current video Indicates the vehicle s driving speed at the time of record...

Страница 25: ...e playlist in the bottom right corner of the PC viewer screen The playlist section layout is as follows Select a folder Displays a list of videos in the selected folder Double click a video file after...

Страница 26: ...rent video The progress bar will move to the beginning of the video Skip forward by 10 sec Fast forward the video by 10 sec Play the next file Play the next file in the currently selected folder Enabl...

Страница 27: ...the memory card that is inserted in the product Refer to the following instructions to format the memory card From the PC Viewer click Settings Dash Cam Settings Memory Card Settings and click the For...

Страница 28: ...you set the sensitivity you must consider the road conditions traffic situation and your driving style From the PC Viewer click Settings Dashcam Setting Record Settings From Continuous Mode Incident...

Страница 29: ...the impact sensitivity for parking mode You can set the detection sensitivity for recording when impact is detected while parking Refer to the following instructions to set the parking impact sensitiv...

Страница 30: ...ideo for an extended period during parking connect the authentic Brigade external dash cam battery 5 2 7 Setting the battery cutoff voltage feature You can set the voltage limit to stop recording at w...

Страница 31: ...e click the dropdown list and select the desired language Click Save 5 3 2 Adjusting the voice guidance volume This menu allows you to adjust the voice guidance volume Follow the instructions to adjus...

Страница 32: ...the daylight saving time From the PC Viewer click Settings Dash Cam Settings System Settings From Daylight Saving select Enabled or Disabled Click Save 5 3 6 Setting the speed unit Follow the instruc...

Страница 33: ...lect Enabled or Disabled Click Save 5 3 9 Setting the mobile zone alert Follow the instructions to turn on or off the mobile zone alert From the PC Viewer click Settings Dash Cam Setting System Settin...

Страница 34: ...mware upgrade file to the root folder of the memory card While the power is disconnected from the product insert the memory card into the memory card slot on the product Connect the power cable to the...

Страница 35: ...een inserted in the correct direction Before inserting the memory card ensure that the metal contacts on the memory card are facing toward the lens of the product Turn off the power remove the memory...

Страница 36: ...ardwiring cable installation Camera sensor 2 12 M pixels 1 5 78 CMOS 1080P Angle of view Approximately 135 diagonally Video FHD 1920 X 1080 H 264 file extension MP4 Frame rate Maximum 30 fps Applies e...

Страница 37: ...fr info brigadegmbh de info italia brigade electronics com info brigade com pl hello brigade electronics com 44 0 1322 420 300 44 0 1322 420347 Before contacting a service center Please back up all i...

Страница 38: ...com This Class B digital apparatus complies with Canadian ICES 003 Cet appareil num rique de la classe B est conforme la norme NMB 003 du Canada Brigade Electronics Tested To Comply With FCC Standards...

Отзывы: