background image

25

5.

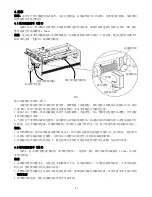
锯片垂直度及相对于台板运动平行度的校准(图 7-8)

推锯在出厂前已完成校准,但在运输过程中设备可能会受到影响,为了保证锯切的精确性,请在正式使

用前,按以下步骤进行校准:

注意:滑动台板前,需移除木质靠山,避免锯片在未校准前对靠山进行锯切。

1.摆动锯片,使图 7 位置的①处呈 90°状态,然后锁紧龙骨前后锁紧旋钮。
2.使用直角尺检查②③处的角度:
如均为 90°,进入步骤 3。
如位置②或③出现角度偏差,松开龙骨后锁紧旋钮,握住龙骨后端,轻微摆动龙骨,使锯片与台板呈 90°状
态。

重复步骤 1 和 2,直到位置①②③处的锯片均与台板垂直。

3.在锯片与台板垂直的状态下,检查指针,若指针未指向 90°,拧松指针锁紧螺丝,轻微拨动指针至 90°并
锁紧。

在锯片与台板垂直的状态下,锁紧龙骨前后锁紧旋钮,进行平行度的校准(以前端为基准进行校准):

4.在台板上放置一个内六角扳手(或者一张方形硬纸卡),一端轻触锯片,如图 8 所示。滑动台板,检查锯
片相对于台板运动的平行度。
5.如平行度存在偏差,略微松开龙骨后锁紧旋钮和两颗龙骨后固定螺丝以及对侧的一颗龙骨前固定螺丝,用
手固定住后耳轴,轻微敲击龙骨进行平行度调节,然后锁紧。

(根据个人操作习惯的不同,也可以后端为基准进行校准。)

重复步骤 1-5,直到满足要求。

如果想要获得高质量的精准锯切,校准是必不可少的,请在进行操作前,务必耐心完成该校准步骤。

图 7

图 8

台板行程

前面板

龙骨后锁紧旋钮

龙骨后固定螺丝

龙骨前锁紧旋钮

靠山锁紧块

龙骨前固定螺丝

后面板

前耳轴

后耳轴

龙骨后锁紧旋钮

直角尺

龙骨

1

2

3

指针锁紧螺丝

指针

龙骨前锁紧旋钮

Содержание JMPv2 Jointmaker Pro

Страница 1: ......

Страница 2: ...iew 2 2 Unpacking 6 3 Asemblying 6 4 Operation 7 5 Calibrating the Perpendicularity and Parallelism 12 6 Maintenance 13 7 Trouble shootings 14 8 Exploded View and Parts List 15 1 18 2 20 3 20 4 21 5 2...

Страница 3: ...1 English Version...

Страница 4: ...t do is your key to a successful and fruitful experience Cutting wood accurately by hand requires a great deal of practice a well made saw with sharp teeth and yet still remains difficult for many par...

Страница 5: ...are true when making most cuts with the Jointmaker Pro The sliding table is analogous to a workbench surface and the angled trap clamps act as a vise These elements become particularly crucial with t...

Страница 6: ...preferences and applications You will soon discover the general purpose cross cut blade that ships with the JMP will do the majority of cuts 4mm x 28 The 16 teeth per inch rip blade is useful for cutt...

Страница 7: ...e once or twice a year depending on use We recommend using the lubrication included with your Jointmaker Pro YOUR FIRST CUT Once your Jointmaker Pro is properly set up you are ready to make your first...

Страница 8: ...do is completing the following two steps 1 Install the blade height adjustment handle as shown in Fig 2 Fig 2 2 Fix the Jointmaker Pro to the stand or any other platforms by using the included M5x80 h...

Страница 9: ...osition of the stop as following steps 1 There are three nuts on the front shaft the two closest to the front plate are jam nuts need no adjustment and the third nut that can be adjusted for different...

Страница 10: ...ions make sure that the blade whose angle is adjusted will not interfere with the fence 2 After each adjustment of the blade angle the parallelism between the blade and table travel should be inspecte...

Страница 11: ...nformation 4 5 Using the Trap Jaws It is the most important aspect for repeatable results Because the saw is cutting from the bottom up you are fighting negative feed this is the tendency of the board...

Страница 12: ...e square A with its two sides against the table and blade respectively Inspect and calibrate the perpendicularity between the fence and table If any deviation in perpendicularity occurs loosen the fou...

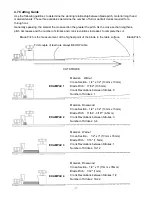
Страница 13: ...m Blade Pitch 17 32 13 5mm Crank Revolutions between Strokes 0 Number of Strokes 1 Material Rosewood Cross Section 1 2 x 1 2 13mm x 13mm Blade Pitch 11 64 3 16 4 5mm Crank Revolutions between Strokes...

Страница 14: ...ed on the premise that the blade has been perpendicular to the table The parallelism calibration takes the front end of keel as a standard 4 Position a hex key wrench or a hard card against the fence...

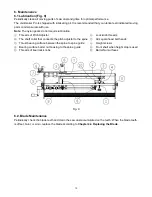
Страница 15: ...ock knob threads The shaft collar that connects the pitch adjustor to the spine All square head bolt heads Thrust bearing surface between the spine to spine guide Height screws Bearing surface barrel...

Страница 16: ...lates on each pass Your stock should be over the saw blade at all times never off of the saw blade 5 Replacing the blade according to Chapter 4 4 6 Depending on the wood types appropriately adjust the...

Страница 17: ...15 8 Exploded View and Parts List...

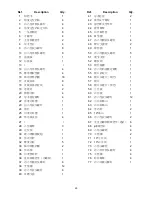
Страница 18: ...57 Blade 1 18 Linear bearing set block 4 58 Saw guide black 1 19 Connecting rod 2 59 Left table 1 20 Round rod guide 4 60 Right table 1 21 Nylon set screw 4 61 Hex countersunk head screw 12 22 Front t...

Страница 19: ...17...

Страница 20: ...maker Pro 41mm 45 268mm x 204 45mm 380mm 410mm x 49mm x 19mm 10 359mm x 89mm x 19mm 72 7 35mm 7 9mm 92mm x 44mm x 44mm 1 25mm 1 25mm 800mm 412mm 320mm 16 9kg 1 25mm 3 75mm JMP JMPv2 400 1 25mm 350 460...

Страница 21: ...JMP 400 0 03mm 12 7 400 0 03mm Jointmaker Pro 1 2 12 7mm 4 101 6mm 0 05 1 25mm 10 0 05 1 25mm 400 0 05 1 25mm 0 003mm 1 25 400 4 101 6mm 0 05 1 25mm 1 8 3 JMP 0 4mm 28 0 4mm 16 0 3mm 28 JMP A JMP 4 1...

Страница 22: ...20 2 1 1 3 2 1 2 2 2 M5x80 M5 1 2 3 4 5 A x2 6 x1 7 x1 1 2 5 4 3...

Страница 23: ...21 4 5 4 1 3 3 1 25mm 3 3 1 2 1 2 3 4 2 3 3 1 25mm 1 2 3...

Страница 24: ...22 4 3 4 1 2 a 8 b c 4 4 4 4 5 1 2 3 5 4...

Страница 25: ...23 4 5 6 4 6 6 1 2 3 6...

Страница 26: ...24 4 7 1 2 x 1 2 12 7mm x 12 7mm 17 32 13 5mm 0 1 1 2 x 1 2 12 7mm x 12 7mm 11 64 3 16 4 5mm 3 3 4 1 2 x 3 12 7mm x 76 2mm 1 16 1 5mm 1 10 12 1 2 x 3 12 7mm x 76 2mm 1 32 0 8mm 1 2 18 22 1 2 3 4...

Страница 27: ...25 5 7 8 1 7 90 2 90 3 90 1 2 3 90 90 4 8 5 1 5 7 8 1 2 3...

Страница 28: ...26 6 1 9 1 2 3 4 5 6 7 8 9 10 9 2 4 4...

Страница 29: ...27 7 1 2 3 4 5 6 7 1 5 2 2 3 3 4 5 4 5 4 4 6 7 5 4 2 4 4 4 4 4 1...

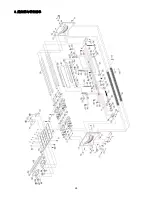
Страница 30: ...28 8...

Страница 31: ...2 9 8 49 1 10 8 50 5 11 1 51 1 12 1 52 1 13 53 1 14 4 54 1 15 4 55 1 16 16 56 1 17 8 57 1 18 4 58 1 19 2 59 1 20 4 60 1 21 4 61 12 22 1 62 1 23 1 63 1 24 1 64 2 25 1 65 10 1 26 4 66 2 27 67 6 28 3 68...

Страница 32: ......

Отзывы: