


1
8
1.概述
Jointmaker Pro 是世界上第一款固定的手动横
切锯,无需动力,切割精度高,噪音小,可以满足细
木工作和许多其他锯切应用上的要求。该设备设计了
2个可独立线性滑动的台板,配备有特别设计的细齿
锯片。Jointmaker Pro 重新定义了“手工锯切”,
专为有着极高锯切精度要求的工匠设计。
在你花费一两个小时使用过推锯之后,我们希望
你能与你的家人朋友分享你所发现的新功能,所有喜
欢在无噪音环境下进行艺术加工的人都会喜欢这款
工具。
在使用之前,请务必阅读此说明书。
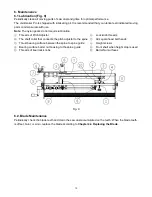
产品组成
锯片倾角调节旋钮:用于调节锯片倾角。
锯片高度调节手柄:用于调节锯片高度。
龙骨:通过摆动龙骨调节锯片摆角。
龙骨锁紧旋钮(前后各一个):用于锁紧龙骨。
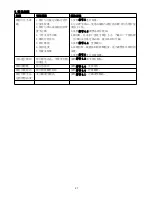
技术参数
最大切高
41mm
锯片摆角
±
45
°
滑动台板尺寸
268mm x 204.45mm
滑动台板行程
380mm
木制斜靠山尺寸
410mm x 49mm x 19mm
(斜面
10
°
)
木制直靠山尺寸
359mm x 89mm x 19mm
木制靠山燕尾槽
腰角
72
°
,深度
7.35mm
,
梯形短边
7.9mm
夹紧块尺寸
92mm x 44mm x 44mm
锯片倾角调节旋钮
每圈增量
1.25mm
锯片高度调节手柄
每圈增量
1.25mm
包装尺寸
800mm*412mm*320mm
净重
16.9kg
安全
推锯的安全注意点与其他的锋利工具没有什么
不同,都是一些常识。尽管推锯看上去没有什么危险,
但还是要注意安全。
每个台板的表面都刻有图形标记,此设计是用来
提醒你注意手指的位置,我们强烈建议你将手指放在
此区域之外,特别是当锯片倾斜时。
人体工程学设计
任何时候,推锯都需要被牢牢固定在工作台或者
支架上。如果在锯切过程中,推锯发生移动,这会使
你锯切的准确度和享受大打折扣。
推锯前面板高度应低于你的腰带线 1”(25mm)
左右的距离,在这个高度,你可以在不给背部或手臂
施加过度压力的情况下完成一个完整的锯切行程。如
果 可 能 的 话 , 我 们 建 议 尾 部 大 约 比 前 部 高 出
3”(75mm)。这种倾斜缩短了你手臂的行程,更加便
于观察工件,并在长时间的工作中减少了背部的压力
(可配合 JMP 支架达到此效果)。
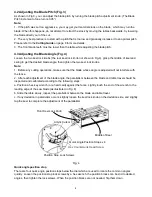
工件的固定
在使用手锯进行传统的锯切时,需要将木料夹在
工作台上或者用夹具固定。不管用哪种方法,为了获
得更好更准确的锯切效果,木料都需要被牢牢固定。
在使用推锯时,木料的固定要求同样适用。滑动
台板类似于工作台面,有角度的夹具就像是钳子。这
些因素对于推锯尤其重要,因为与其他的手工锯锯切
方向相反,你是从底部往顶部开始锯切。几乎所有的
情况下,我们都强烈建议您使用夹具将工件固定来保
证锯切的准确性和锯片的使用寿命。在倾斜锯片进行
锯切时,必须使用夹具。
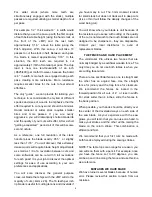
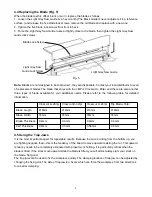
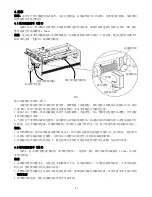
锯片倾角和锯片高度
JMPv2 推锯标配的锯片大约有 400 个锯齿。锯片
成角度的从台面上伸出,锯片后点比前点高,初始锯
切时,锯片最高点与台板之间的距离定义为锯片倾
角,可通过锯片倾角调节旋钮进行调节。
通过锯片高度调节手柄可使锯片整体上升或下
降,手柄每旋转一圈,调节增量为 1.25mm。
调节倾角可以调节同时与木料接触的锯齿数。在
锯切时,每一个锯齿的锯切量是相同的。根据木料的
宽度和硬度来调节锯片倾角,从而尽可能的减少锯切
过程中锯片受到的压力
理想的锯片倾角应该是每一个锯齿在锯切时都
毫无压力(齿槽处正好能装下前一个锯齿所锯切下的
锯屑)。在锯切时你几乎感觉不到阻力,并且在推动
台板时非常顺畅。
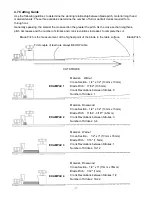
所有为推锯设计的锯片,其长度上都含有 350
至 460 个锯齿。由于锯片相对于台面来说是倾斜的,
所以每个锯齿的负载是完全一样的。
例 如 , 用 标 准 的 横 切 锯 片 可 以 一 次 将 一 块
1/2”x 1/2”(12.7mm x 12.7mm)的胡桃木横切为
两半。要正确设置完成此锯切,你需要调节锯片,使
前几个锯齿低于台面高度,用锯片倾角调节旋钮将锯
龙骨
靠山锁紧旋钮
锯片
靠山
锯片高度
调节手柄
锯片倾角调节旋钮
木质压紧块
台板
龙骨锁紧旋钮
Содержание JMPv2 Jointmaker Pro
Страница 1: ......
Страница 3: ...1 English Version...
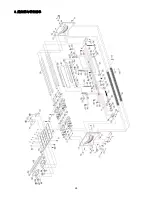
Страница 17: ...15 8 Exploded View and Parts List...
Страница 19: ...17...
Страница 22: ...20 2 1 1 3 2 1 2 2 2 M5x80 M5 1 2 3 4 5 A x2 6 x1 7 x1 1 2 5 4 3...
Страница 23: ...21 4 5 4 1 3 3 1 25mm 3 3 1 2 1 2 3 4 2 3 3 1 25mm 1 2 3...
Страница 24: ...22 4 3 4 1 2 a 8 b c 4 4 4 4 5 1 2 3 5 4...
Страница 25: ...23 4 5 6 4 6 6 1 2 3 6...
Страница 27: ...25 5 7 8 1 7 90 2 90 3 90 1 2 3 90 90 4 8 5 1 5 7 8 1 2 3...
Страница 28: ...26 6 1 9 1 2 3 4 5 6 7 8 9 10 9 2 4 4...
Страница 29: ...27 7 1 2 3 4 5 6 7 1 5 2 2 3 3 4 5 4 5 4 4 6 7 5 4 2 4 4 4 4 4 1...
Страница 30: ...28 8...
Страница 32: ......