


8
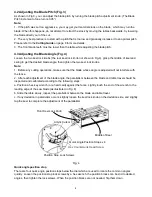
4.2 Adjusting the Blade Pitch (Fig. 3)
As shown in Fig.3, you can adjust the blade pitch by turning the blade pitch adjustment knob. (The Blade
Pitch increment of one turn is 0.05”)
Note:
1. If the pitch was set too aggressive, you may get your material stuck on the blade , which may ruin the
blade. When this happens, do not attempt to retract the stock by moving the tables backwards, try lowering
the blade directly out of the cut.
2. The very best practice is to start with a pitch that is too low and gradually increase it to an optimal pitch.
Please refer to the
Cutting Guide
on page 6 for more details.
3. The front blade teeth must be lower than the table while adjusting the blade pitch.
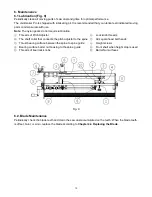
4.3 Adjusting the Blade Angle (Fig. 4)
Loosen the two keel lock knobs (the rear keel lock knob not shown in Fig.4), grasp the middle of keel and
swing to get the desired blade angle, then tighten the two keel lock knobs.
Note:
1. Before any cutting operations, make sure that the blade whose angle is adjusted will not interfere with
the fence.
2. After each adjustment of the blade angle, the parallelism between the blade and table travel should be
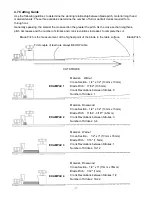
inspected and calibrated according to the following steps:
a. Position a hex key wrench (or a hard card) against the fence. Lightly touch the end of the wrench to the
leading edge of the saw blade (as illustrated in Fig. 8).
b. Slide the table slowly, inspect the parallelism between the blade and table travel.
c. If any deviation in parallelism occurs, slightly loosen the keel lock knob on the deviation side, and slightly
tap the keel to complete the adjustment of the parallelism.
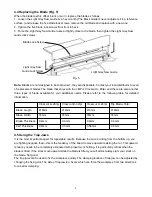
Fig. 4
Quick angle position stop
There are four quick angle position stops below the dial which are used to locate the common angles
quickly. Loosen the position stop lock screws by a hex wrench, the position blocks can be slid to desired
angles, then tighten the lock screws. When the position blocks are not needed, flip them down.
Position Stop Lock Screws
Acrylic Cursor
Quick Angle Position Stops x 4
Hex Countersunk Head Screw
Middle of Keel
Front Keel Lock Knob
Содержание JMPv2 Jointmaker Pro
Страница 1: ......
Страница 3: ...1 English Version...
Страница 17: ...15 8 Exploded View and Parts List...
Страница 19: ...17...
Страница 22: ...20 2 1 1 3 2 1 2 2 2 M5x80 M5 1 2 3 4 5 A x2 6 x1 7 x1 1 2 5 4 3...
Страница 23: ...21 4 5 4 1 3 3 1 25mm 3 3 1 2 1 2 3 4 2 3 3 1 25mm 1 2 3...
Страница 24: ...22 4 3 4 1 2 a 8 b c 4 4 4 4 5 1 2 3 5 4...
Страница 25: ...23 4 5 6 4 6 6 1 2 3 6...
Страница 27: ...25 5 7 8 1 7 90 2 90 3 90 1 2 3 90 90 4 8 5 1 5 7 8 1 2 3...
Страница 28: ...26 6 1 9 1 2 3 4 5 6 7 8 9 10 9 2 4 4...
Страница 29: ...27 7 1 2 3 4 5 6 7 1 5 2 2 3 3 4 5 4 5 4 4 6 7 5 4 2 4 4 4 4 4 1...
Страница 30: ...28 8...
Страница 32: ......