


12
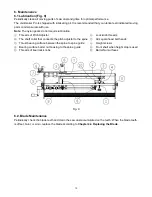
5. Calibrating the Perpendicularity and Parallelism (Fig.7&8)
The Jointmaker Pro has been calibrated in factory, however, to ensure the cutting accuracy which may be
influenced during transportation, please calibrate as follows:
Note:
Before sliding the table, the trap/straight fence must be removed to avoid the fence being cut by
blade without calibration.
1. Adjust the blade angle until the blade is perpendicular to table at position
①
in Fig. 7, tighten the front
and rear keel lock knob.
2. Inspect the angles at position
②③
by using a square:
If the angles at position
②③
are all 90°, enter Step 3;
If any angle deviation occurs at position
②
or
③
, loosen the rear keel lock knob, grasp the rear part of keel
and slightly swing it to make the blade be perpendicular to table.
●
Repeat Step 1 and 2 until the blade at position
①②③
is perpendicular to the table.
3. With the blade perpendicular to the table, inspect that if the indicator points to 90°. If not, loosen the
indicator lock screw, slightly adjust the indicator to 90° and tighten the screw.
●
With the front and rear keel lock knobs tightened, the parallelism calibration should be based on the
premise that the blade has been perpendicular to the table.(The parallelism calibration takes the front end
of keel as a standard )
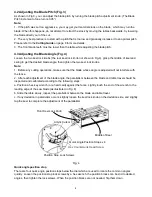
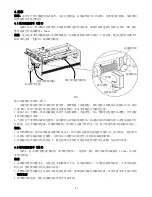
4.Position a hex key wrench (or a hard card) against the fence. Lightly touch the end of the wrench to the
leading edge of the saw blade (as illustrated in Fig. 8). Slide the table slowly to inspect the parallelism
between the blade and table travel.
5. If any deviation in parallelism occurs, slightly loosen the rear keel lock knob, two rear keel adjustable
screws and one of the two front keel adjustable screws, then hold the rear trunion tightly by hand and
slightly tap the keel to complete the adjustment of the parallelism.
(Depending on different using habits, the parallelism calibration also can be done by taking the rear end of
keel as a standard.)
●
Repeat Step1 to 5 until that the perpendicularity and parallelism are well calibrated.
Tip:
Calibration is essential for achieving high quality precision cutting performance, please be patient to
complete the calibration steps before formal cutting operations.
Fig.7
Fig. 8
Rear Keel Lock Knob
Square
Keel
1
2
3
Indicator Lock Screw
Indicator
Front Keel Lock Knob
Table Travel
Front Plate
Rear Keel Lock Knob
Rear Keel Adj. Screws
Front Keel Lock Knob
Fence Lock Plate
Front Keel Adj. Screws
Rear Plate
Front Trunion
Rear Trunion
Содержание JMPv2 Jointmaker Pro
Страница 1: ......
Страница 3: ...1 English Version...
Страница 17: ...15 8 Exploded View and Parts List...
Страница 19: ...17...
Страница 22: ...20 2 1 1 3 2 1 2 2 2 M5x80 M5 1 2 3 4 5 A x2 6 x1 7 x1 1 2 5 4 3...
Страница 23: ...21 4 5 4 1 3 3 1 25mm 3 3 1 2 1 2 3 4 2 3 3 1 25mm 1 2 3...
Страница 24: ...22 4 3 4 1 2 a 8 b c 4 4 4 4 5 1 2 3 5 4...
Страница 25: ...23 4 5 6 4 6 6 1 2 3 6...
Страница 27: ...25 5 7 8 1 7 90 2 90 3 90 1 2 3 90 90 4 8 5 1 5 7 8 1 2 3...
Страница 28: ...26 6 1 9 1 2 3 4 5 6 7 8 9 10 9 2 4 4...
Страница 29: ...27 7 1 2 3 4 5 6 7 1 5 2 2 3 3 4 5 4 5 4 4 6 7 5 4 2 4 4 4 4 4 1...
Страница 30: ...28 8...
Страница 32: ......