6
4
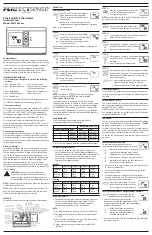
Programming Installer Settings
cont.
Press the
NEXT
and buttons at the same time to enter Installer Mode.
Factory
Installer Options
Default
Options
Comment
1
Temperature Scale
oe
6
F
oe
6
F, oe
6
C
Selects either Fahrenheit
or Celsius.
2
Auto Changeover
au oO
au oO ,
Either enables or disables
au oOFf
Auto Changeover.
3
System Type
iiC
ii C, 22 C,
Selects single stage conventional,
ii HP, 22 HP,
2 stage conventional, single stage
32 HP
heat pump, 2 stage heat pump
or 3 stage heat pump.
4
First Stage
iH6
iH6, iHE,
Not available with a heat pump
Fan Control
system. Selects between 1st stage
gas or electric heat.
5
Aux Stage Control
2HE
2HE, iH6
Only available with multi-stage heat
pump system. Selects multi-stage
gas or electric heat.
6
Fossil Fuel
auhAE
auhAE,
Only available with a multi-stage
Backup Option
auhA6
heat pump system. Locks out 1st
stage during 2nd stage heat call
for fossil fuel backup system
(AUXAG). With an electric backup
system (AUXAE), both stages will run.
7
AC Power
off-AC
off-AC,
Only available when thermostat is
Interrupt Warning
o -AC
installed as a hardwired unit. Select
between turning the AC power
interrupt warning off or on.
8
Compressor
cpop OF
cpopOF,
Only available with multi-stage
Power Outage
cpopO
heat pump and AC power connected.
Select between compressor lock
off and compressor lock on.
9
Short Cycle
cscp 5
cscp 5, cscp 4
Selects 5, 4, 3, 2 or 0 minutes for
Protection
cscp 3, cscp 2
compressor short cycle protection.
cscp 0
10
Residual Cooling
fa 60
fa 00, fa 30,
Selects 0, 30, 60 or 90 seconds
Fan Delay
fa 60, fa 90,
as the time the fan will stay on
after the cooling system has
satisfied the set point temperature
and turned off the compressor.
11
Recirculating
ci c0F
ci c0F, ci c0 ,
Selects between Recirculating
Fan Lock
Fan Lock off or on.
12
Set Sensor
se s i
se si,
Only available if external sensor is
Control
se sE,
installed. Selects between Internal
se sA
(I), External (E) and Averaging (A)
control of Internal (thermostat) and
External (remote indoor sensor) for
temperature control. Attaching an
outdoor sensor for outdoor
temperature display or balance
point control is automatically
detected. Test outdoor sensor
connection by pressing
BACK
and
NEXT
at the same time.
13
Set Security Level
sec 2
sec i,
Selects between level 1 or level 2
for Keypad Lock
sec 2
keypad lockout.
14
Dead Band
a 3
a 2,
Selects Auto Changeover Dead
a 3,
Band of 2, 3, 4, 5˚ F (1.0, 1.5, 2.0,
a 4,
2.5˚ C). Only available if Auto
a 5
Changeover is enabled in option 2.
IMPORTANT:
At installation, Remote
Indoor Sensor must be
at room temperature.
u
u
u
u
u
u
u
u
u
u
u
u
u
u
u
5
4
Programming Installer Settings
cont.
Status After RESET–Factory Default Settings
When the User
RESET
button is pressed, the following options will reset to the
factory defaults. All other settings are not changed when the
RESET
button
is pressed.
Function
Status After RESET
Temperature
Heat - 62° F, Cool - 83° F.
1st stage differential
0.2° F (0.1° C)
2nd stage differential
2° F (1.0° C)
3rd stage differential
2° F (1.0° C)
Filter, UV and Humidity Pad
0 days-No Warning, Timer reset
Check Monitor
Short Cycle Timer
Reset
Recirculating Fan
Timer reset, 24 minute off cycle. With recirculating
lock set to ON (See Installer Settings), fan state
defaults to CIRC.
Setting Thermostat Installer Options
The Installer Options section allows the system and programming parameters
to be set up at installation. The Installer Options mode is menu driven. As the
different options are programmed, unnecessary options will be eliminated. For
example, if the system is set to single stage heat pump, Option 5, selecting
the AUX stage fan control will no longer be available.
The Installer Option mode is entered by holding the
NEXT
and buttons together
for 3 seconds. Installer Option 1 (Temperature Scale) will be displayed. Press-
ing the or buttons will scroll between choices. To scroll to the next installer
option, press the
NEXT
button. To scroll backwards between installer options,
press the
BACK
button. The thermostat will return to normal operating mode
by pressing the
NEXT
and
BACK
buttons at the same time.
NOTE:
The thermostat will return to normal operating mode automat
ically
after 30 seconds if no buttons are pressed.
NOTE:
Any changes to Installer Option 3 (System Type) will cause Options 4, 5
and 6 to reset to the default values that are dependent on system selection.