background image

34

Printer-Applicator-System PAM 3000

Special Settings for the Operation

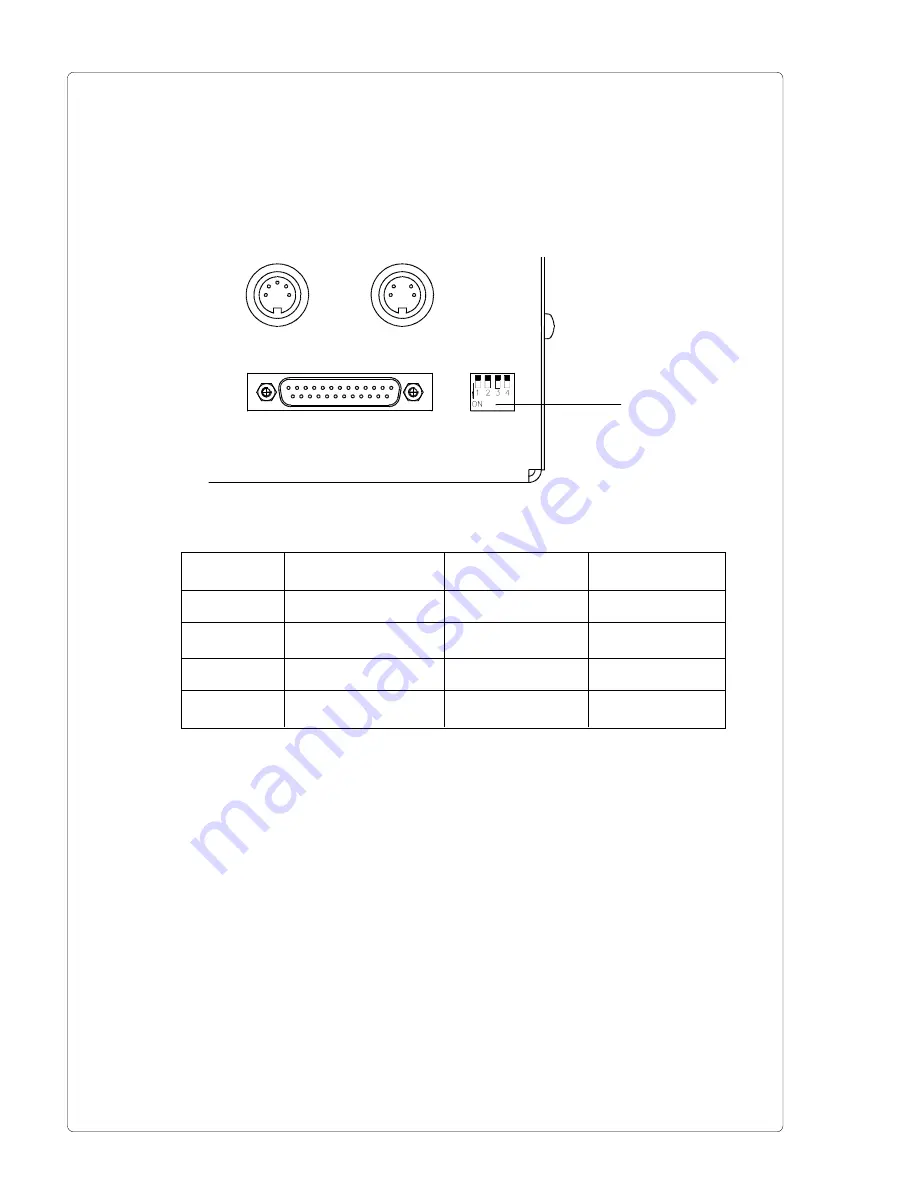
There are integrated four DIP-switches to determine several types of operation.  The DIP-

switches are located in the opening (

1

) at the right side of the printer.

Fig.  8e

DIP-switches

1

DIP-switch

Parameter

ON

OFF

1

Label format

small

large

2

Recycle part

not installed

installed

3

Applicator

installed

not installed

4

Print repeat

no

yes

DIP-switch 1-This switch is set on "ON" when small labels are used.  By using large labels

the switch has to set on "OFF".

DIP-switch 2- If the switch is set on "ON" it is not possible to dispose the bad labels

recognized by a scanner at a recycle part.

If the switch is set on "OFF" it is possible to apply the bad labels on the recycle

part.

It is recommended to set the switch always on "ON" if no scanner is used.

DIP-switch 3- If the switch is set on "ON" the printer notices that there is an applicator to carry

out the further steps after printing.

If the switch is set on "OFF" it is necessary to guarantee the correct further

processing of the applying process by other features for example manually or

by industrial robots.

DIP-switch 4- If the switch is set on "ON" a bad label recognized by a scanner will not printed

again.

If the switch is set on "OFF" the print of a bad label recognized by a scanner

will be repeated.

It is recommended to set the switch always on "ON" if no scanner is used.

Содержание PAM 3000

Страница 1: ...Edition 6 02 PAM 3000 Printer Applicator System Operator s Manual...

Страница 2: ...reserve the right to alter specifications without notice Donn es technique modifiables sans pr vais Technische nderungen vorbehalten Identification Solutions Division 6555 W Good Hope Road PO Box 2131...

Страница 3: ...manual nor any translation may be reproduced or transmitted in any form or by any means for any purpose other than the purchaser s personal use without the express written permission of W H Brady Co E...

Страница 4: ...13 Transfer Ribbon 14 2 General Safety Instructions 15 3 Delivery Contents 15 4 Component Location 16 Printer 16 Applicator 19 5 Mounting the Applicator 20 Installation 20 Slide Valve 21 Pad Unit 22...

Страница 5: ...al Operation with the Pre dispense Key 47 14 Optionen 48 KeyboardAdapter 48 Installation of the Keyboard Adapter 48 Key Assignment 49 Special Key Functions 49 Memory Cards 50 Preparing the Memory Card...

Страница 6: ...onnector C 3 PLC Interface Port C 4 Pin Assignment C 4 Circuit Diagrams of Inputs and Outputs C 5 Explanation of the Signals C 6 Scanner Connector C 8 Pin Assignment C 8 Circuit Diagrams of Input and...

Страница 7: ...nd suggestions regarding additions or corrections to improve future editions of this manual Please let us know if you have any questions Important information contained in this manual is marked as fol...

Страница 8: ...from the size of the label supply roll For the receipt of the print data PAM 3000 has a serial RS 232 interface The printer is designated to work in the dispense mode In this mode only each one label...

Страница 9: ...t style bold italic underlined mirror inverted outlined revers grey Font rotation Bitmap fonts Bar codes 0 90 180 270 Scaleable fonts optional texts in circular format Speedo and TrueType fonts alignm...

Страница 10: ...kg Operating voltage Switcheable between 230 V A C 50 Hz or 115 V A C 60 Hz Maximum 1 5 A at 230 V 3 A at 115 V power input Circuit protection T 4 A at 230 V T 6 3 A at 115 V Compressed Operating pre...

Страница 11: ...or data transfer as an option The standard length of each cable is 1 50 m Warning Light By using the warning light it is possible to recognize the state of the printer with one view Warning Sensors Th...

Страница 12: ...important specifications in order to ensure high quality printing and to avoid damage to the printhead or early wear Using labels which we have tested and which we recommend to our customers will gua...

Страница 13: ...10 G Distance of the first printing point from the edge of silicon liner 2 H Distance of the label sensor from the edge of silicon liner variable I Width of the perforation mark 5 K Height of the per...

Страница 14: ...rinthead and the sensors With some ribbons the color rubs off and soils the printhead All of these effects contribute to poor print quality We have carried out numerous tests with many different ribbo...

Страница 15: ...o a computer etc Also switch power off on all appliances before disconnecting Do not expose the printer to any moisture or use in damp or wet areas In operation moving or rotating parts are easily acc...

Страница 16: ...3 Ribbon take up hub 4 Ribbon supply hub 5 Print mechanism 6 Guide roller 7 Media rewind hub 8 Knurled knob 9 Adapter 10 Flange 11 Media supply hub 12 Swing arm with guide roller 13 Pre dispense key...

Страница 17: ...b Detailed view of the print mechanism 1 Adjusting plate 2 Printhead 3 Print roller 4 Feed roller 5 Pinch roller 6 Transport locking lever 7 Peel off table 8 Label edge sensor 9 Brake 10 Media guide a...

Страница 18: ...r with power switch 3 Parallel interface port 4 Serial interface port 5 Scanner connector 6 Connector warning sensor transfer ribbon end 7 Connector warning sensor label end 8 PLC interface port 9 DIP...

Страница 19: ...19 Printer Applicator System PAM 3000 Applicator Fig 4d Front view 1 Connector for the electronics 2 Pad holder 3 Pad 4 Turn cylinder 5 Slide valve 6 Lift cylinder 1 2 3 4 5 6...

Страница 20: ...ide of the applicator are inserted into the long hole 2 and the guide hole 3 on the side of the printer Fig 5a Installing the applicator 1 2 1 1 3 1 4 4 3 Plug the connector of the applicator s electr...

Страница 21: ...e pad from its upper position as the compressed air supply is closed and the applicator is switched off But the slide valve should only be opened bleed if it is necessary to move the pad for mounting...

Страница 22: ...holder the small format type 1200 and the large format type 1100 The small format is recommended for use of small labels with a height up to 25 mm The pad is specific designed for each label format wh...

Страница 23: ...format 2 3 3 2 Changing the pad 1 Remove the vacuum tube 2 from the pad 3 2 Loosen the screw on the lower side of the pad 3 3 Remove the pad 3 4 Attach the new pad to the pad holder 1 5 Fasten the new...

Страница 24: ...bel by the pad There is an equipment 1 at the front side of the printer to attach the blow tube Fig 5h Installing the blow tube 1 3 2 1 Screw the blow tube into the equipment 1 on the front side of th...

Страница 25: ...s 5 The air connector 1 is located at the side of the printer The push in fitting is suitable for a 8mm tube CAUTION Make sure that the compressed air supply is switched off while connecting the print...

Страница 26: ...where a large number of loadable fonts or complex graphics have to be printed For the Centronics interface use the 36 pin interface connector 1 Additionally PAM 3000 has a PLC interface with 25 pin c...

Страница 27: ...ctor To change the voltage setting open the cover 2 and remove the voltage selector from the power unit CAUTION If you have changed the operating voltage of your printer the fuses need replacing as st...

Страница 28: ...adapters 3 onto the supply hub Put the first adapter 3 onto the supply hub 2 and slide it to the wind plate 4 until it blocks Tighten the knurled srew 1 Put the second adapter onto the supply hub 2 an...

Страница 29: ...thead 9 as shown in figure 7b It is particularly important to ensure that the media strip slides properly through the fittings of the photocell assembly 10 6 Feed the label stock out of the side of th...

Страница 30: ...de must face the opposite side of the printhead 2 Hold tight the ribbon supply hub 5 and rotate the knurled knob 6 clockwise until it stops That way the transfer ribbon roll 4 will be attached to the...

Страница 31: ...depending on the format of the labels as well as some special settings for the type of operation Mechanical Adjustments Adjusting the Level of the Lift Cylinder Unit There are three screws at the fron...

Страница 32: ...the pad 3 Tighten the screws 2 Fig 8b Side adjustment Tuning of the Blow Tube When applying large labels it is necessary to install a blow tube additionally The blow tube 2 for the supporting air can...

Страница 33: ...re not square or rectangular in shape It is important to ensure that the sensor itself the position of which is indicated by a green mark in the sensor housing is positioned so that the space between...

Страница 34: ...e the bad labels recognized by a scanner at a recycle part If the switch is set on OFF it is possible to apply the bad labels on the recycle part It is recommended to set the switch always on ON if no...

Страница 35: ...keys together for at least 5 seconds will switch into the SETUP mode CAN key LED ONL off 9 Control Panel Fig 9 Control Panel The control panel of the PAM 3000 is fitted with 4 function keys with indi...

Страница 36: ...USE mode LED PSE on System Mode PRINT FF key Provides label feed The leading edge of the next label to be printed is in print position CAN key short pressing Cancels the current print job Switch to th...

Страница 37: ...n The list of parameters is brought up in a row and may be run through repeatedly Each time a parameter setting has been changed there will be a request for confirmation There will not be a general re...

Страница 38: ...eflect Top Reflect Peel position This function is not usable for PAM 3000 x x mm x x mm x mm x mm x mm x mm Heat level Basic adjustment of the darkness depending on the printhead 9 indicates the light...

Страница 39: ...xxxx xx xx YYYY Character set Setting of the character set Windows 1252 Windows 1250 ISO 8895 1 Codepage 850 EBCDIC Macintosh Codepage 852 ISO 8895 8 Debug mode The Debug mode represents a tool for th...

Страница 40: ...nition of the Printer Info Display Printer info 1 RS 232 RTS CTS Fig 11 a Printer info display 1 On the first page the selected interface default setting RS232 and the handshake or protocol default se...

Страница 41: ...selected settings Transfer print 1 ON Default 0 OFF Label sensor 8 Bottom Reflect 4 Gap sensor Default 0 Top Reflect For example Figure 11d 5 Transfer print ON 1 Gap sensor 4 C Indicates that the setu...

Страница 42: ...gaps between labels nor control the ribbon feed For questions or future reference print and retain one copy of the label format for each label printed Start of Monitor Mode ASCII Dump Mode To start t...

Страница 43: ...ASCII Dump Mode The following figures show the normal appearance of a printed label and the appearance of the same label when its commands are printed in ASCII Dump mode Fig 12a Normal label Fig 12b T...

Страница 44: ...e 90 position 2 Moving down 3 Stop 4 Turning into the 0 position 5 Moving down 6 Applying 7 Moving up 8 Stop 9 Turning into the 90 position 10 Moving up 11 Turning into the 0 position 90 Applying 1 Tu...

Страница 45: ...Make sure that the pad is not covered by a label when switching on the device Switch on the compressed air supply Switch on the power supply 2 of the Printer Applicator System The printer carries out...

Страница 46: ...Printhead is moved up Pad is moved to the peel off table vacuum is switched on Label is peeled off by moving back the peel off table and taken by the pad of the applicator module Pad is driven to move...

Страница 47: ...and the peel off table is driven to move to the front The label is placed onto the product Then the lift cylinder is driven to move the pad back into the upper end position If the label is removed fro...

Страница 48: ...adapter is designed for use with all keyboards which fulfill the following requirements MF 2 compatible having a 5pin DIN plug supporting code set 3 and also operating with a maximum of 15 kBaud CAUT...

Страница 49: ...th the ALT key Some of the special characters cannot be shown in the display of the printer In that case the PAM 3000 will use a character which looks similar to the required character NOTICE When usi...

Страница 50: ...ay be read from an imprint 3 on the back of the card If you want to format the card or write on it switch off the write protection For replacing or inserting the battery in sRAM cards refer to the ins...

Страница 51: ...ds to write onto a memory card The easiest way is to write on the card using the card drive of the printer and transfer the data via interface For saving a label you need to put the label design comma...

Страница 52: ...card Confirm the selection by pressing the key 4 If you have chosen a label with a set number of labels to print the printer will instantly start printing 5 For labels with a variable number of labels...

Страница 53: ...e delivery contents of the light The warning light has to contact to the printer by inserting the connection cable 2 of the warning light into the 4 pin connector 3 During the operation the lamps have...

Страница 54: ...3 to the mounting plate The hexagon socket head screw 3 must be used at this side where the elongated hole is located in the sensor holder 4 Plug the cable 4 into the 5 pin connector 10 at the side o...

Страница 55: ...sensor is on 3 Loosen the screws 1 and move the sensor holder to the right as far as possible The LED at the sensor is off 4 Slowly move back the sensor holder to the left until the LED at the sensor...

Страница 56: ...w of compressed air into the system A connector for the compressed air supply 1 is located at both variations of service units The connector is suitable for a 1 4 coupling plug Fig 14h Service unit va...

Страница 57: ...electrical charge in the print area Fig 14l Antistatic brush It is very easy to fix the brush The antistatic brush has only to put off with its clamps 3 on the axle 1 The direction of putting off is s...

Страница 58: ...Printer Applicator System PAM 3000 58 This page is intentionally left blank...

Страница 59: ...processing a print job an error has occured which may be corrected by the operator and also allows you to continue the print job after fault correction Display The display shows alternately the type...

Страница 60: ...e switch printer off and on again If the fault remains again call for Service CAN key Cancels the current print job Switch into ONLINE mode LED ONL on LED CAN off LED PSE off If ONLINE mode cannot be...

Страница 61: ...k the printer for proper operation of its mechanics and pneumatics Call for service After pausing to cool down the printhead the print job will be contin ued automatically If the fault recurs repeated...

Страница 62: ...job Cancel current print job Set software to direct thermal mode Restart print job Tighten the supply roll of transfer ribbon by turning the knurled knob at the supply hub Possible cause Label has no...

Страница 63: ...r operation of its mechanics and pneumatics Call for service Check the printer for proper operation of its mechanics and pneumatics Call for service Format the memory card Use the correct type of card...

Страница 64: ...ocess or reformat the memory card Deactivate write protection Possible cause Pad has not reached the upper position within 2s after the lift cylinder has moved back Pad has left the starting position...

Страница 65: ...is not correct adjusted Adjust printhead service Printhead is dirty Clean printhead Printhead is defective failure of heat elements Replace printhead service Label is not inserted in the label edge s...

Страница 66: ...A 8 Printer Applicator System PAM 3000 This page is intentionally left blank...

Страница 67: ...is can cause a deterioriation of the print quality e g different contrasts on the label appearance of light horizontal lines etc In that case the printhead needs cleaning WARNING Disconnect power supp...

Страница 68: ...Printer Applicator System PAM 3000 B 2 This page is intentionally left blank...

Страница 69: ...85 18 RDATA Receive Data RS 422 RS 485 19 RDATA Receive Data RS 422 RS 485 20 DTR Data Terminal Ready Table C 1 Signals of the serial interface connector Fig C 1 Connector of the serial interface side...

Страница 70: ...ntrol the printer by RS 422 RS 485 interface only the signals TDATA TDATA RDATA and RDATA are necessary Check the pin assignment for the interface of your computer and use the pin assignment of the pr...

Страница 71: ...GND 30 GND 4 DATA 3 13 SLCT 22 GND 31 nc 5 DATA 4 14 nc 23 GND 32 nc 6 DATA 5 15 nc 24 GND 33 nc 7 DATA 6 16 GND 25 GND 34 nc 8 DATA 7 17 nc 26 GND 35 nc 9 DATA 8 18 nc 27 GND 36 nc PIN 18 PIN 1 PIN 1...

Страница 72: ...for all outputs 8 XEDG output No existing print job No existing print job 9 EXF input External error External error 10 EUEB input Label is taken Recycle part in position 11 STRT input Start signal St...

Страница 73: ...able C 4 Input pairs of signals For each signal X IN there is a separate reverse line X IN R via plug connector From that the following pairs of signals result All outputs are recognized through solid...

Страница 74: ...ed The last label printed before the error occured will be repeated Pressing the key will stop the print job and reset the printer XDNB is active if the contact between PIN4 and R L PIN7 is opened XEP...

Страница 75: ...current flows between PIN13 and PIN25 ESP 90 labelling variation with applicator The label should be applied in the 90 position ESP is active when current flows between PIN13 and PIN25 XTIV Position o...

Страница 76: ...DRW input GoodRead Scan result 3 XSCA output TopScan 6 24P Operating voltage 24V Si T 100mA 7 DRWR input GoodRead revers line 8 XSCAR output TopScan revers line Table C 5 Signals of the scanner connec...

Страница 77: ...The signal indicates the good result of scanning DRW is active when current flows between PIN2 and PIN7 XSCA TopScan The printed label should be scanned In this state the contact between PIN3 and R L...

Страница 78: ...Printer Applicator System PAM 3000 C 10 This page is intentionally left blank...

Страница 79: ...D 1 Printer Applicator System PAM 3000 Appendix D Setup Selectable Character Tables Table D 1 Character Set Windows 1252 Table D 2 Character Set Windows 1250...

Страница 80: ...D 2 Printer Applicator System PAM 3000 Table D 3 Character Set ISO 8859 1 Table D 4 Character Set Codepage 850...

Страница 81: ...D 3 Printer Applicator System PAM 3000 Table D 5 Character Set EBCDIC Table D 6 Character Set Macintosh...

Страница 82: ...D 4 Printer Applicator System PAM 3000 Table D 7 Character Set Codepage 852 Table D 8 Character Set ISO 8859 8...

Страница 83: ...5560434 Printhead NM3004 UA21B x 5905395 Swing Drive CRB1BW30 270 S x 5945056 Pinch Roller x 5945066 Print Roller PAM 3000 x 5945120 Label Sensor Assy PAM 3000 x 5945122 PCB Driver Electronics x 59451...

Страница 84: ...E 2 Printer Applicator System PAM 3000 This page is intentionally left blank...

Страница 85: ...ys 35f Fuse 37 47 G Gap Sensor 10 38 Graphic Elements 9 Graphic File Type 9 H Head above A 3 Head below A 3 Head too hot A 3 Heat Level 38 Host stop error A 3 I Interface 8ff 18 26 38 41f 46 C 1ff Int...

Страница 86: ...nt Width 7 Product Description 8ff Programming 7 Protocol 26 C 2 Protocol Error A 5 PSE key 35f R Read error A 5 RESTORE 37 Rewinder internal 29 Ribbon Supply Hub 16 30 RS 232 8 9 26 38 40 48 C 1f RS...

Страница 87: ...Regulations 98 37 EU Machine Safety EN 292 2 1995 06 EC Low Voltage Regulations 73 23 EEC Data and Office Machine Safety EN60950 1992 A1 1993 A2 1993 EC Electromagnetic Compatibility Regulations 89 33...

Отзывы: