43
Witbox
User Manual
English
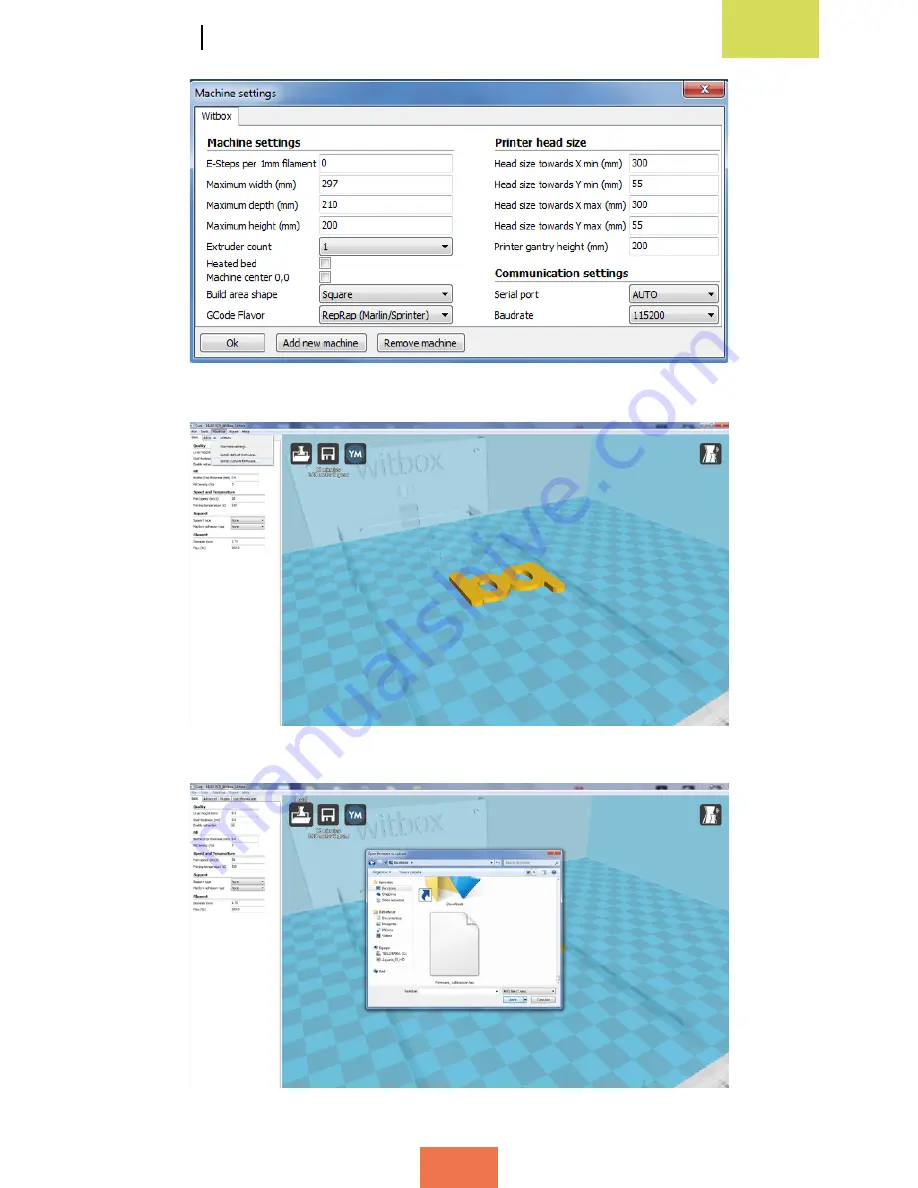
Figure 4.14
Main printer menu
Figure 4.15
Select Install custom firmware
Figure 4.16
Select the firmware you wish to load onto the printer
Страница 1: ...Witbox User Manual Witbox...
Страница 2: ...ce The images of the device shown in this manual are not binding and may be subject to change bq will not be held responsible for any performance or compatibility issues arising as a result of the mod...
Страница 3: ...side panels 14 Attaching the top panel 14 Attaching the print base 15 Attaching the spool and support 16 Connecting the power cable 17 Setting up 17 Control panel 17 Home screen 18 Main menu 18 Print...
Страница 4: ...th Cura 35 Main Cura interface 36 Mouse controls 37 Printing an object 37 Loading the object 38 Rotating the object 38 Changing the size of the object 39 Simmetry 39 View mode 41 Exporting the object...
Страница 5: ...x User Manual English 64 How to package your Witbox for transportation 73 Safety precautions 75 Technical specifications 77 Correctly disposing of the product 78 Declaration of compliance 73 FCC Notif...
Страница 6: ...ment Fabrication FFF which builds objects by adding one layer of melted polymer filament on top of another until the item has been completed Online resources for the Witbox You can find the most up to...
Страница 7: ...side panels and one top panel USB cable Power cable Spool of 1 75 mm PLA filament Metal spool holder SD card preloaded with 3D test models Printed test object Four underside supports Maintenance kit c...
Страница 8: ...English 8 Witbox User Manual Print base 2 side panels and 1 top panel Set of 2 keys USB cable Power cable Spool of 1 75 mm PLA filament Metal spool holder SD card Printed test object...
Страница 9: ...9 Witbox User Manual English 2 cleaning needles 3 Allen keys 1 5 2 5 and 4 mm Replacement Hot End 4 underside supports Spatula Wire brush...
Страница 10: ...operation 6 Extruder Device comprising the Hot End the filament feeder motor and the fan 7 Filament spool Spool of thermoplastic material with a thickness of 1 75 mm 8 PLA The material that the filame...
Страница 11: ...11 Witbox User Manual English 3 4 5 6 7 9 12 11 2 1...
Страница 12: ...printed cover on top To remove the cover first undo the two round plastic tabs connecting it to the bottom piece fig 2 1 Then lift the cover using the handles near the top fig 2 2 it should lift off e...
Страница 13: ...in order to protect it To avoid scratching the table take care when moving the printer and try not to drag it Attaching the side panels Remove the plastic protectors from both sides of the side panels...
Страница 14: ...d four screws place them in the holes in the corners of the panel and press down on them with your fingers fig 2 8 Attaching the print base Open the door at the front using the keys you will find in t...
Страница 15: ...s shown in figure 2 10 Attaching the spool and support The spool of filament needs to be placed on a spool holder First attach the metal support to the rear of the printer by inserting the short end i...
Страница 16: ...connectingthepowercable makesuretheswitchisinthe 0 position fig 2 12 Then connect the cable to the printer and plug the other end into the power socket fig 2 13 Figure 2 13 Plug the cable into the pow...
Страница 17: ...the figure of 22 C corresponds to the current temperature of the Hot End whilethefigureof0 Ccorrespondstothetemperaturewewishtoreachwhenprinting begins it is 0 C because nothing is currently being pr...
Страница 18: ...nd FW info This last option tells you which version of the firmware is installed Generally when you access a sub menu the first option in the list will allow you to go back to the previous screen Belo...
Страница 19: ...x in order to start printing Unload select this option to unload the filament once the printer has finished printing or if you wish to change the filament spool Move Axis sub menu The Move Axis sub me...
Страница 20: ...or the Z axis motor while all three options are available for the X and Y axis motors The extruder motor can only be moved by 0 1 or 1 mm at a time Level Plate sub menu This sub menu fig 3 7 allows yo...
Страница 21: ...ts of high quality is having a correctly levelled base The levelling process adjusts the print base so that the distance from the base to the extruder is the same at every point Why is it so important...
Страница 22: ...he levelling process step by step instructions will be given on the LCD screen To level the print base you need to adjust the three screws located underneath the base support fig 3 9 1 Place a sheet o...
Страница 23: ...ed underneath the print base Turn them to the right to move the base away from the extruder and to the left to move it closer The sheet of paper should just about be able to pass between the base and...
Страница 24: ...herefore very important to ensure correct adhesion particularly with regard to the first few layers of material Once you have levelled the print base correctly we recommend that you do the following i...
Страница 25: ...ust be loaded at the rear of the Witbox via the connector attached to the Fibonacci guide tube fig 3 18 It is very important that you position the spool so that the loose end of the filament is on the...
Страница 26: ...essories you will find a plastic object of medium quality this was printed using your printer before it left the factory in order to make sure the printer was working correctly Go to the main menu and...
Страница 27: ...that came with the printer fig 3 23 How to remove objects from the print base Sometimes objects may adhere too firmly to the print base and become difficult to remove If you are still unable to remove...
Страница 28: ...up until it reaches a temperature of 220 C You can monitor the temperature increase on the LCD screen 2 Once the desired temperature has been reached the extruder will extrude filament for a number o...
Страница 29: ...n the same speed you must keep this parameter at 100 How to change the filament during printing Version 1 3 of the firmware allows you to change the filament while the printing process is ongoing This...
Страница 30: ...unload the filament as swiftly as possible The screen will then display the message Press to continue Select this option once you have removed the filament completely 3 The screen will now display th...
Страница 31: ...possible Installing and configuring the program Compatible operating systems Cura is compatible with the following operating systems Windows XP or later Mac 10 6 Snow Leopard or later Unix Ubuntu 12 1...
Страница 32: ...s official website www bq com gb products witbox html Becauseitisafreeprogram Curaisconstantlyevolving forthisreason werecommend that you download the most recent version for your operating system Con...
Страница 33: ...r fig 4 2 In the printer selection window fig 4 2 specify the printer you wish to set up For the Witbox click on Other Then click on Next in order to select the Witbox as your main printer fig 4 3 Fig...
Страница 34: ...Manual After you have selected the Witbox as your main printer a window will appear to tell you that the setup process is complete fig 4 4 Click on Finish to go to the main Cura interface fig 4 5 Fig...
Страница 35: ...e Tools Machine Expert and Help options 2 Settings window Here you can adjust the print parameters for the object The window contains four tabs Basic Advanced Plugins and Start End GCode 3 Load This f...
Страница 36: ...Cura the default controls are as follows Left mouse button selects objects Click and hold down the left mouse button to drag and move the object around the print area This option is useful if you wis...
Страница 37: ...to a layered gcode file To do this click the Load button and a window will pop up where you can select the file you wish to convert fig 4 6 The majority of 3D design programs allow you to save a pre d...
Страница 38: ...size of the object This option allows you to change the size of your object The object s size ratio is maintained so any change made to one parameter will automatically result in the corresponding ad...
Страница 39: ...ct you wish to print There are three symmetry options to be used depending on the axis to which the symmetry is to be applied fig 4 9 View mode This option allows you to view the object you wish to pr...
Страница 40: ...t transparent allowing you to see through it and examine internal areas that would otherwise be hidden X Ray this mode allows you to view objects that will be contained inside other objects For exampl...
Страница 41: ...ra and made all the necessary adjustments the next step is to export the object to the SD card To do so insert the SD card into your computer and click on Save toolpath fig 4 12 This will save your fi...
Страница 42: ...st version of the firmware from bq s official website www bq com fig 4 13 The downloaded file will be in hex format 2 Connect the printer to your computer using the USB cable 3 Accessthemainmenuandgot...
Страница 43: ...43 Witbox User Manual English Figure 4 14 Main printer menu Figure 4 15 Select Install custom firmware Figure 4 16 Select the firmware you wish to load onto the printer...
Страница 44: ...tbox User Manual 5 The new firmware will be automatically loaded onto the printer fig 4 17 6 Your printer has now been updated fig 4 18 Figure 4 18 Software update complete Figure 4 17 Software update...
Страница 45: ...o the Hot End where it is melted at high temperature and deposited in layers onto the print base The Witbox uses a 12 V Nema 17 DC stepper motor with a torque rating of 4000 g cm Extruder body as the...
Страница 46: ...this is the part that melts the polymer filament As this element is more complicated we will look at it in greater detail later on in this manual Figure 5 2 Interior of the extruder Figure 5 3 Consti...
Страница 47: ...uide the filament The section nearest the die has fins in order to help dissipate the heat generated by the die Polytetrafluoroethylene PTFE tube this is located inside the screw and helps prevent fri...
Страница 48: ...base to travel along the Z axis i e up and down As the object is printed the print base is gradually lowered so that space is created for more layers to be added to the object The main parts of the Z...
Страница 49: ...axis Theyalsoprovidetheprinterwithextrastabilitywhilethe base support is moving along the Z axis Skids these connect the guide rails to the print base unit and help ensure smooth travel along the Z ax...
Страница 50: ...RepRap community You can find all the diagrams and blueprints related to the board at the link below www reprap org wiki RAMPS_1 4 Freaudino Mega 2560 v2 0 design derived from the Arduino Mega 2560 4x...
Страница 51: ...r Manual English Most important connections on the board Figure 5 9 Most important connections on the controller board Blower Hot End Extruder motor Endstops LCD screen Power X axis motor Y axis motor...
Страница 52: ...successfully perform maintenance operations www mibqyyo com videos s witbox Cleaning your Witbox IfyouusetheWitboxfrequently dirtanddebriscanaccumulateintheprinter sinterior and on its exterior To mak...
Страница 53: ...an the nozzle and keep it in optimum condition 1 First load the filament in order to check whether the nozzle is genuinely blocked To do this follow the step by step instructions on page 25 2 If you r...
Страница 54: ...nector 6 Insert one of the needles supplied with the printer into the nozzle and drag out any leftover filament that may be there fig 6 3 Take care when performing this action and avoid touching the n...
Страница 55: ...sily You can also watch an instructional video by following the link below http goo gl Qnw6ou For this operation you will need Replacement Hot End 1 5 mm Allen key 2 5 mm Allen key You can find all th...
Страница 56: ...3 Select the options Control Cooldown to cool the Hot End so that it can be replaced with the new part 4 Turn off the printer via the switch at the back and unplug the power cable 5 Unscrew the printe...
Страница 57: ...der by pressing down on the connector and pulling the tube upwards 7 Remove the blower using the 2 5 mm Allen key 8 Remove the fan and heat sink using the 2 5 mm Allen key The fan will remain partiall...
Страница 58: ...Witbox User Manual 9 Unscrew the extruder and detach it from the X axis carriage 10 Disconnect the cables from the heater cartridge and thermistor 11 Using the 1 5 mm Allen key undo the set screw on t...
Страница 59: ...Gently remove the Hot End and replace it with the new unit 13 Push the new Hot End in as far as it will go ensuring the cables are pointing backwards and screw it in firmly to make sure it won t slid...
Страница 60: ...in carefully taking care not to damage the cables 16 Putthefanandheatsinkbackintoplace Theheatsinkmustbepositionedbetween the fan and the extruder 17 Connect the cables Position the thermistor cable u...
Страница 61: ...al English 18 To check that everything is OK slide the motor along the X axis 19 Screw the blower back on 20 Reconnect the Fibonacci tube pressing down on the blue circle 21 Use the four screws to rea...
Страница 62: ...esidue etc to accumulate on the X and Y axis guide rails and on the Z axis spindle These accumulations can cause excessive friction in the printer s movements resulting in noise and printing errors To...
Страница 63: ...ompletely the four screws that hold the X axis rails in place 7 Move the X axis carriage along the rails by hand 8 Position the carriage on the left hand side and tighten the two screws on that side 9...
Страница 64: ...where we recommend that you follow the steps below in order to ensure the printer is not damaged while in transit 1 Unload the filament from the extruder To do so switch on the Witbox and select the o...
Страница 65: ...holder and place them in the box of accessories 4 Detach the two side panels the top panel and the print base and place them in the box of accessories 5 Turn off the printer using the switch at the re...
Страница 66: ...the extruder over to the left hand side of the printer in order to immobilise it on the X axis Immobilise the extruder using a cable tie View from above of the extruder immobilised on the X axis Cut t...
Страница 67: ...der to immobilize it on the Y axis Immobilise the extruder on the Y axis using one long cable tie or two short ones joined together View from above of the extruder immobilised on the Y axis To allow t...
Страница 68: ...ase on which the printer will sit Arrange the foam pieces as shown below Foam base on which the printer will sit View from above of the foam base with the four buffers Fold the four panels downwards T...
Страница 69: ...lish Place the four buffers in their respective slots Turn the foam base back over and place it in the cardboard box The cardboard box in which the foam base will be placed Add the final foam section...
Страница 70: ...urethere is nothing loose inside it as loose items could cause damage during transit 10 Wrap the Witbox in its protective bag and place the protective foam corner pieces in the four corners of the box...
Страница 71: ...English 12 Place the box of accessories onto the top protection you have just assembled Position the four side buffers Fold the side pieces upwards as shown in the picture Place the assembled top prot...
Страница 72: ...e cover over the foam structure and secure it using the two circular white coloured fasteners turn them until you can see the image of the locked padlock 14 Finally place the protective brown box over...
Страница 73: ...ed spaces such as boxes cupboards etc as the device will not be able to cool down correctly Avoid placing the Witbox near heat sources such as radiators and devices that emit a large amount of heat as...
Страница 74: ...hed off i e the switch is in the 0 position and the power cable is unplugged from the mains Allow the device to cool if it has been used recently Make sure the front door of the printer remains closed...
Страница 75: ...and Z Igus E chains Igus screw drive for the Z axis with flexible motor coupling Powder coated steel supports and moving parts 3 point cushioned levelling system for the print base Quick change print...
Страница 76: ...e environment Cura Permitted file types gco gcode Compatible operating systems Windows XP and later Mac OS X and later Linux Connections Standard SDHC card reader 4 GB SD card included Type B USB port...
Страница 77: ...O complies with Part 15 of the FCC Rules Operation is subject to the following two conditions this device may not cause harmful interference and this device must accept any interference received inclu...
Страница 78: ...ference by one or more of the following measures Reorient or relocate the receiving antenna Increase the separation between the equipment and receiver Connect the equipment into an outlet on a circuit...
Страница 79: ...Witbox User Manual English For more information contact witbox bq com www bq com...