background image

PAGE

MENU

AUTO IM

AGE

MUTE

VOLUME

FOCUS

ZOOM

ON-OFF

NORMAL

CURSOR

COMPUTER/

MCI

VIDEO

FREEZE

/

NO SHO

W

D. ZOO

M

LASER

16

BEFORE OPERATION

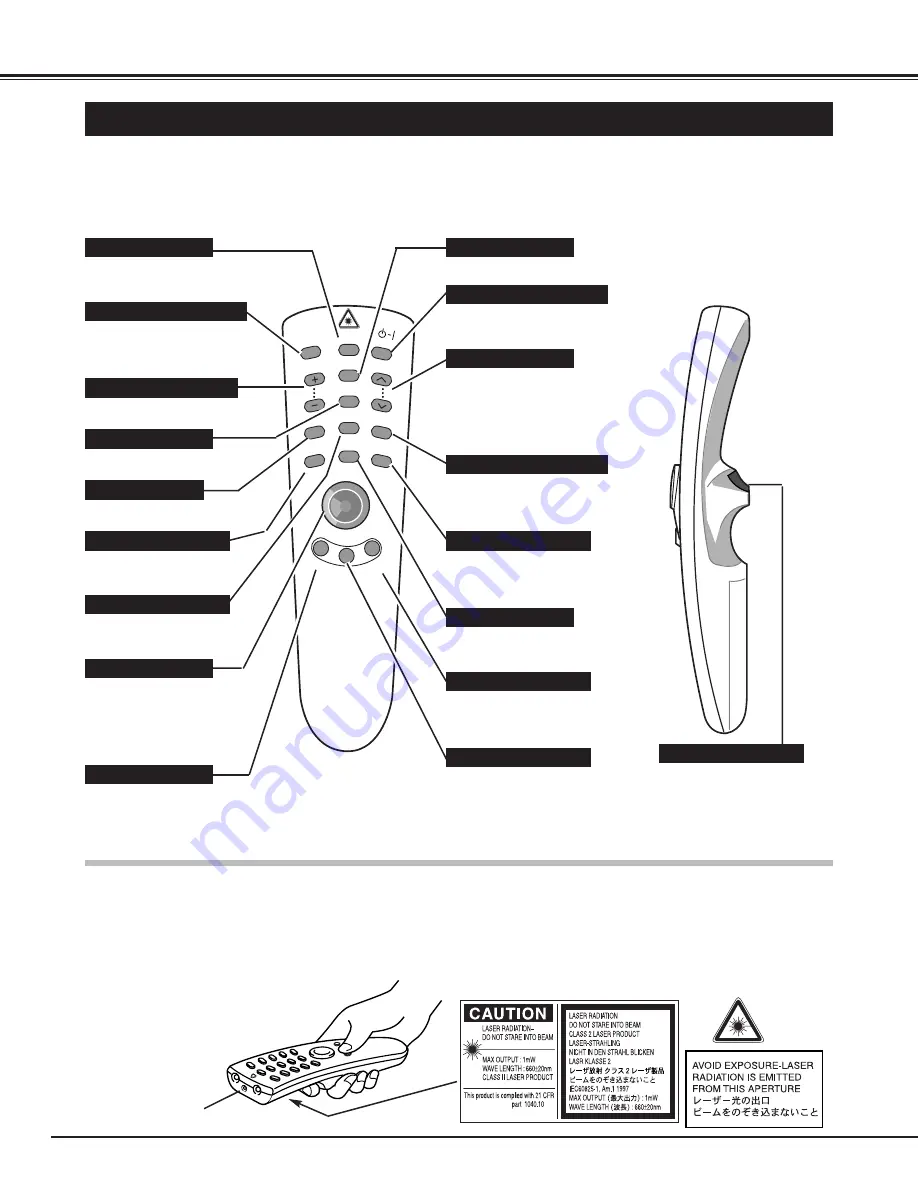
OPERATION OF THE REMOTE CONTROL

COMPUTER / MCI BUTTON

Used to select either the
COMPUTER source or the
MCI mode. (P25)

This remote control unit is not only able to operate the projector but also usable as a wireless mouse for a PC.
The POINT button and two CLICK buttons are used for wireless mouse operation. (Refer to page 41.)
The Wireless mouse is usable when PC mouse pointer is displayed on the screen.  The wireless mouse cannot
be used when the On-Screen Menu is displayed.

VIDEO BUTTON

Used to select VIDEO
source. (P31)

VOLUME BUTTONS

Used to adjust volume. (P24)

Used to execute the item selected, or to
increase or decrease the values in
certain items such as CONTRAST or
BRIGHTNESS.  It is also used to expand
the image in DIGITAL ZOOM mode.
(P30, 36)

FOCUS BUTTON

Used to adjust focus. (P23)

MUTE BUTTON

Used to mute sound. (P24)

AUTO IMAGE BUTTON

Use to operate AUTO IMAGE
function. (P 29)

FRONT CLICK BUTTON

Used as right button of PC mouse
in wireless mouse operation.  It is
also used to compress the image in
DIGITAL ZOOM mode. (P30, 36)

POINT BUTTON

Used to select an item on the
MENU or to move cursor on
screen.  It is also used to pan
the image in DIGITAL ZOOM
mode.  (P30, 36)

LASER BUTTON

Used to operate laser pointer
function.  The laser beam is
emitted while pressing this
button.

ZOOM BUTTON

Used to adjust zoom. (P23)

POWER ON-OFF BUTTON

Used to turn the projector on
or off. (P22)

PAGE BUTTON

Used to move to next or to
previous page of the data in
memory card.  These buttons
are activated in MCI mode
only. (P34)

FREEZE / NO SHOW BUTTON

Used to stop the picture or to
turn the picture into black
image. (P23)

CURSOR BUTTON

Used to display CURSOR on
the screen. (P23)

NORMAL BUTTON

Used to reset to normal
picture adjustment preset by
the factory. (P29, 32)

MENU BUTTON

Used to call MENU operation.
(P19)

D.ZOOM BUTTON

Used to turn the projector into
DIGITAL ZOOM mode.
(P30, 36.)

LASER POINTER button

This remote control emits a laser beam as the Laser Pointer from the Laser Light Window.  When the LASER button is pressed, the laser
light goes on:  When the button is released, light goes off. Laser light is emitted with the RED light which tells the laser beam being emitted.
The laser emitted is a class 

II

laser; therefore, do not look into the Laser Light Window or shine the laser beam on yourself or other people.  The three marks

to the right are the caution labels for the laser beam.

CAUTION

:  Use of controls or adjustments or performance of procedures other than those specified herein may result in hazardous radiation exposure.

Laser Light Window

SELECT BUTTON

These caution labels are put on the remote control.

Содержание CP-15t

Страница 1: ...USER S GUIDE BOXLIGHT CP 15t BOXLIGHT...

Страница 2: ...ils to work properly see TROUBLESHOOTING section on pages 44 45 and try the solution marked for each problem WARNING TO REDUCE THE RISK OF FIRE OR ELECTRIC SHOCK DO NOT EXPOSE THIS APPLIANCE TO RAIN O...

Страница 3: ...ector yourself as opening or removing covers may expose you to dangerous voltage or other hazards Refer all servicing to qualified service personnel Unplug this projector from wall outlet and refer se...

Страница 4: ...TMENT 32 PICTURE SCREEN ADJUSTMENT 32 SETTING MENU 40 SETTING LANGUAGE 40 OPERATING WIRELESS MOUSE 41 MAINTENANCE 42 TROUBLESHOOTING 44 TECHNICAL SPECIFICATIONS 46 BASIC OPERATION 22 TURNING ON OFF TH...

Страница 5: ...djustments to project picture images from PC Accessories This projector comes with the parts listed below Check to make sure all are included If any parts are missing contact to Boxlight Owner s Manua...

Страница 6: ...ctor following attention should be taken Do not put a flammable object near this part Keep heat sensitive objects away from the exhaust vent Do not touch this part especially the screws and metallic p...

Страница 7: ...5 7 2177mm 4 3 109mm 200 4064 x 3048 114 3 2903mm 5 7 145mm 300 6096 x 4572 171 4 4354mm 8 6 218mm ROOM LIGHT The brightness in the room greatly influences the quality of the image Darkening the light...

Страница 8: ...er systems having a grounded neutral conductor To reduce the risk of electrical shock do not plug into any other type of power system Consult your authorized dealer or service station if your are not...

Страница 9: ...net when carrying the pro jector with this bag Do not transport the projector through a courier or transport services with this bag The projector can be damaged CAUTION IN CARRYING OR TRANSPORTING THE...

Страница 10: ...eed to be reset This can be done by pressing the RESET button with a pen which will shut down the unit Turn the projector off and restart the unit Do not use the RESET function excessively COMPUTER IN...

Страница 11: ...Stereo Not supplied Terminals of the Projector Use either the VIDEO jack or S VIDEO jack When both jacks are connected the S VIDEO jack has priority over the VIDEO jack Video Audio Output S VIDEO Outp...

Страница 12: ...E COMPUTERS VGA SVGA XGA SXGA VGA Cable supplied Monitor Output Desktop type Laptop type Monitor Audio Speaker stereo Audio Amplifier MCI Serial Cable supplied Mouse Cable for Serial Port supplied Mou...

Страница 13: ...ING THE PROJECTOR To disconnect MOUSE CABLE 1 Hold the portion B of the connector with one hand 2 Pull the portion A to the arrow direction and remove connector CONTROL PORT AUDIO OUT AUDIO IN MONITOR...

Страница 14: ...pe Laptop type Monitor Audio Speaker stereo Audio Amplifier Mouse Cable for ADB Port supplied Audio Cable stereo not supplied Monitor Cable not supplied ADB port Audio Output Audio Input To each termi...

Страница 15: ...OFF 1 2 3 4 5 6 OFF OFF ON ON ON ON 21 MODE 1152 x 870 15 CONNECTING THE PROJECTOR CONTROL PORT AUDIO OUT AUDIO IN MONITOR OUT COMPUTER IN To disconnect MOUSE CABLE 1 Hold the portion B of the connect...

Страница 16: ...the image in DIGITAL ZOOM mode P30 36 LASER BUTTON Used to operate laser pointer function The laser beam is emitted while pressing this button ZOOM BUTTON Used to adjust zoom P23 POWER ON OFF BUTTON U...

Страница 17: ...insure safe operation please observe the following precautions Use 2 AA type alkaline batteries Replace two batteries at the same time Do not use a new battery with a used battery Avoid contact with w...

Страница 18: ...e data in the memory card plugged into PC CARD SLOT These buttons are used to stop or resume AUTO PLAY function Page buttons are activated in MCI mode only Refer to P34 This indicator lights in green...

Страница 19: ...ough ON SCREEN MENU 1 2 3 5 4 You can control and adjust this projector through ON SCREEN MENU Refer to the following pages to operate the each adjustment on the ON SCREEN MENU 1 MOVING THE POINTER 2...

Страница 20: ...n of the image Refer to P30 SOUND MENU Used to adjust the Sound Volume or to select Mute Refer to P24 SCREEN MENU Used to adjust the size of the image Refer to P30 AUTO IMAGE MENU Used to adjust Fine...

Страница 21: ...Refer to P34 MENU BAR IN MCI MODE Press MENU BUTTON while being in MCI mode These icons have the same function as the Computer Mode POSITION MENU Used to adjust the position of the image Refer to P36...

Страница 22: ...ower off The message disappears after 4 seconds TURNING ON OFF THE PROJECTOR When the TEMPERATURE WARNING indicator flashes red the projector is automatically turned off Wait at least 5 minutes before...

Страница 23: ...sing POINT UP or DOWN button FOCUS The message disappears after 4 seconds PICTURE FREEZE NO SHOW FUNCTION Press the FREEZE NO SHOW button on the Remote Control Unit to freeze the picture or turn the p...

Страница 24: ...o increase the volume point the arrow to and then press the SELECT button To decrease the volume point the arrow to and then press the SELECT button To cut off the audio sound point the arrow to Mute...

Страница 25: ...puters Note The projector may provide the messages below The projector cannot discriminate or detect the input signal from the computer Adjust and set the computer system manually Refer to page 26 The...

Страница 26: ...n the selected Mode Mode free Closes the PC ADJUST Menu Quit When the parameter data adjustments are set select Stored and press the SELECT button OK dialog box is displayed for confirmation 4 To sele...

Страница 27: ...eq kHz V Freq Hz XGA 10 1024 x 768 XGA 11 1024 x 768 XGA 12 1024 x 768 Interlace XGA 13 1024 x 768 62 04 77 07 XGA 14 1024 x 768 61 00 75 70 XGA15 1024 x 768 35 522 43 48 46 90 58 20 XGA 8 1024 x 768...

Страница 28: ...lay From 0 to 127 This item can be adjusted by pressing the FINE SYNC button on the Top Control or the Remote Control Unit Total dots The number of the total dots in one horizontal period Adjust the n...

Страница 29: ...unction In that case manual adjustments are required to correct the image Refer to PICTURE IMAGE ADJUSTMENT on page 28 to adjust Fine sync or Total dots and PICTURE POSITION ADJUSTMENT on page 30 to a...

Страница 30: ...ICTURE POSITION Menu Quit This projector cannot display in a resolution more than 1280 X 1024 If your computer s screen resolution is higher than 1280 X 1024 set the resolution lower before connecting...

Страница 31: ...nd press the SELECT button Another dialog box VIDEO SYSTEM Menu will appear The display also appears by pressing the SYSTEM button on the Top Control or the Remote Control Units Press the POINT DOWN b...

Страница 32: ...From 0 to 63 Tint Point to to adjust the color more purple and select to adjust more green From 0 to 63 Contrast Point to to lighten the image and select to deepen the image From 0 to 63 Brightness P...

Страница 33: ...Refer to SMARTMEDIA AND PC CARD ADAPTER on pages 38 and 39 for operation NOTE Some PCMCIA Adapter or PC Card are not compatible with for this projector and cannot provide the image data In that case u...

Страница 34: ...nu will appear Press the POINT DOWN button and a red arrow icon will appear Move the arrow to Index and then press the SELECT button The table of Indexes in the memory card will appear 3 Press POINT U...

Страница 35: ...umber of the total dots in one horizontal period Adjust the number to match your PC image Contrast Point to to make the image lighter and select to make the image darker From 0 to 63 Brightness Point...

Страница 36: ...REEN menu and SCREEN ADJUST menu will disappear The magnifying glass icon and the message D Zoom is displayed to indicate Digital Zoom mode 2 Expand function To expand the image size press SELECT butt...

Страница 37: ...the data in the memory card may be damaged Move the arrow to or and press the SELECT button Connect the computer and the projector with MCI cable supplied refer to page 12 13 Connect the projector wi...

Страница 38: ...t Area Affix Write Protect Sticker onto Write Protect Area to prevent from accidental erasure Index Area Affix Index Label onto Index Area CAUTION Write Protect Sticker is not available for PC When PC...

Страница 39: ...uring storage Humidity less than 95 during use during storage PC Card Adapter Do not bend it drop it subject it to strong forces or shocks or place where strong static electrical charge can be generat...

Страница 40: ...this function Refer to page 43 Lamp age SETTING LANGUAGE Press the MENU button and the ON SCREEN MENU will appear Press POINT LEFT RIGHT buttons to select LANGUAGE and press the SELECT button Another...

Страница 41: ...ouse for a PC installation of the mouse driver not supplied is required Make sure that the mouse driver is properly installed in your computer And make sure that the mouse port of the computer connect...

Страница 42: ...r Filters follow the cleaning procedures below AIR FILTER CARE AND CLEANING Remove the air filter from the filter cover 3 Clean the air filter with a vacuum cleaner 4 CAUTION Do not operate the projec...

Страница 43: ...acement Monitor Timer is reset the LAMP REPLACEMENT indicator stops lighting Turn the projector on and press the MENU button and the ON SCREEN MENU will appear Press the POINT LEFT RIGHT buttons to se...

Страница 44: ...READY indicator will light green again and the projector may be turned on by pressing the power ON OFF button Check the TEMPERATURE WARNING indicator If the indicator flashes red the projector cannot...

Страница 45: ...s inserted properly into PC CARD SLOT Check SmartMedia or PC Card Adapter is set properly Check MCI mode is selected Check the image data is recorded in the memory card properly Start the projector ag...

Страница 46: ...mber of Pixels Color System Scanning Frequency Projection Image size Diagonal Horizontal Resolution Built in Speaker Voltage Power Consumption Operating Temperature Storage Temperature Accessories LCD...

Страница 47: ...symbol on the nameplate means the product is Listed by Underwriters Laboratories Inc It is designed and manufactured to meet rigid U L safety standards against risk of fire casualty and electrical haz...

Страница 48: ...the foregoing limited warranty if the Product has been damaged due to abuse misuse neglect accident unusual physical or electrical stress unauthorized modification tampering alterations or service ot...

Отзывы: