background image

Routine Service and Maintenance

4.28

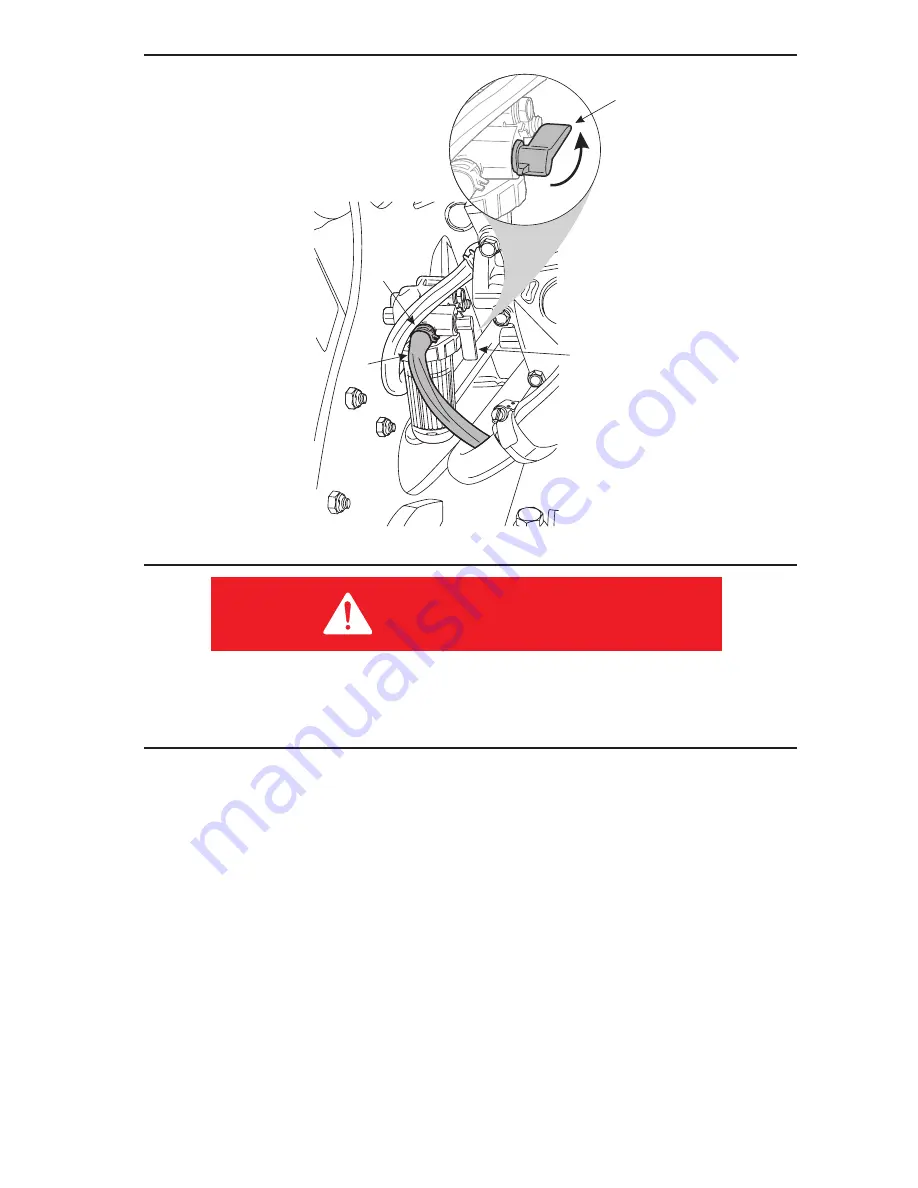
Figure 4-28 Fuel Line to Fuel Filter/Water Separator


•  MAKE SURE TO CLEAN UP ANY SPILLED FUEL FROM IN AND AROUND 

THE ENGINE COMPARTMENT OF THE MACHINE. 
•  SPILLED FUEL MAY BE IGNITED BY A HOT ENGINE.

1

2

3

4

DANGER

Содержание 322D

Страница 1: ...nufactured by 322D Operator s Manual Phone Morbark LLC Sales 800 831 0042 8507 S Winn Rd P O Box 1000 Parts and Service 800 255 8839 Winn Michigan 48896 www boxerequipment com www morbark com B I G P...

Страница 2: ...60 7 22 16 8 Your machine s Model Weight and Power Rating along with Serial Number and Date of Manufacture of your machine are located on the right side panel at the top The Engine information is loca...

Страница 3: ...S EXCLUSIVE REMEDY The exclusive remedy of the purchaser in the event the product does not conform to this Warranty shall be repair or replacement of the product at the option of Morbark without charg...

Страница 4: ...on the programs offered by the engine supplier Wear Items including but not limited to such items as lubricants anti freeze fluids filters belts bearings hoses and fittings etc Manufacturer s limited...

Страница 5: ...rt date in service date and not returning this form may result in denial of warranty entitlements To restart the equipment in service date simply complete the form below and mail e mail or fax the com...

Страница 6: ...IV Affix Stamp Here Morbark LLC 8507 S Winn Rd P O Box 1000 Winn MI 48898...

Страница 7: ...ons indicated whenever you see the Safety Alert symbol no matter which signal word appears next to the Safety Alert symbol INDICATES A HAZARDOUS SITUATION THAT IF NOT AVOIDED IS VERY LIKELY TO CAUSE D...

Страница 8: ...Controls 2 3 Machine Decals Front View 2 4 Machine Decals Rear View 2 5 Operating Controls Description 2 6 Section 3 Pre Start Inspection and Operation 3 1 Pre Start Inspection 3 1 Daily Service Chec...

Страница 9: ...e Procedures 4 13 Weekly Maintenance Procedures 4 16 Monthly Maintenance Procedures 4 19 Fuel System Air Bleeding Procedures 4 22 Annual Maintenance Procedures 4 23 General Maintenance 4 27 Draining F...

Страница 10: ...ob site Resume work only when the operating area is clear Keep all non operating personnel away from the machine during operation Passengers must never be allowed to ride on the machine or any attachm...

Страница 11: ...er the work area stop machine operation until the work area is clear Prior to unloading the unit and starting to work inspect the path you will travel and work site area for potential hazards Some of...

Страница 12: ...suming work Be alert to any unusual reaction to any of the controls If anything unusual is noticed shut the machine down and thoroughly inspect it to determine the cause of the problem Do not operate...

Страница 13: ...or work site hazards Be sure the area has adequate light and is well ventilated NEVER operate the machine inside a closed area Clean up any oil grease mud water or snow which might cause the floor su...

Страница 14: ...able causing fire or an explosion If electrolyte is splashed into your eyes flush them immediately with clean water and seek medical attention If electrolyte is swallowed seek medical attention immedi...

Страница 15: ...and remove the cap gradually WARNING Boxer Brush Sweeper Attachment Silica Dust Caution An OSHA ruling has established new permissible exposure limits PEL for occupa tional exposure to respriable crys...

Страница 16: ...HE MACHINE BEFORE BEGINNING THE FUELING PROCESS KEEP THE FUEL NOZZLE IN CONSTANT CONTACT WITH THE RIM OF THE MACHINES FUEL TANK WHEN FILLING A PORTABLE GAS CONTAINER ALWAYS PLACE IT ON THE GROUND NEVE...

Страница 17: ...tion 1 Attachment mounting plate 2 Loader arms 3 Boom lift cylinder 4 Hydraulic cooler 5 Radiator filler pressure cap 6 Engine radiator 7 Left track assembly 8 Front tie down ring 9 Right track assemb...

Страница 18: ...nt mounting plate 2 Operating controls 3 Hand grip 4 Operator s Platform 5 Air cleaner assembly 6 Manual holder 7 Fuel Tank 8 Fuel filler cap fuel gauge 9 Safety support 10 Loader arms 11 Attachment h...

Страница 19: ...nd grip 3 Attachment tilt control 4 Right travel motor control 5 Left travel motor control 6 Loader arm lift control 7 Engine throttle 8 Auxiliary attachment activation control Operator presence 9 Eng...

Страница 20: ...ion 1 Crush hazard decal 2 Model number decal 3 Danger zone decal 4 Burn hazard decal 5 Battery explosion hazard decal 6 Boxer decal 7 Front tie down location decal 8 Rear tie down location decal 9 Mo...

Страница 21: ...perator s Manual warning decal 9 Small Boxer decal 10 Danger zone decal 11 Safety instructions decal 12 Operating controls decal 13 Shutdown instruction decal 14 Attachment security decal 15 ISO 46 Hy...

Страница 22: ...ntrol Pushing the lever forward rotates the right side wheels for forward travel Pulling the lever backwards rotates the right side wheels for reverse travel 7 Left Travel Motor Control Pushing the le...

Страница 23: ...oaded and when released will automatically move from the FORWARD motion position to the NEUTRAL position stopping attachment motion If you want to reverse the operation of the attachment move the auxi...

Страница 24: ...tart Inspection It is very important to do a visual inspection of the machine before beginning operation This inspection should include Check all decals and warning signs for damage Check engine oil C...

Страница 25: ...iator 3 Air Filter 3 Fuel Filter Water Separator 3 Engine Idle Speed Check and Clean Battery Terminals and Battery Hydraulics Hydraulic Filter Hydraulic Fluid Level Hydraulic Hoses 3 3 and A 3 Grease...

Страница 26: ...and check oil level The correct level is between those two lines Figure3 1 Engine Oil Level Check If the engine oil level is below the bottom line carefully add the proper amount of oil through the en...

Страница 27: ...again Make sure to securely reinstall the dipstick into the dipstick tube before starting the engine Check engine fuel and fill as needed be sure engine is OFF 3 The Boxer has one saddle fuel tank Ite...

Страница 28: ...ressure DO NOT check until the engine radiator is cool to the touch When the radiator is cool to the touch remove the radiator cap Item 1 Figure 3 4 and check the radiator fluid level The proper coola...

Страница 29: ...unit is a suction fan which draws air from inside the machine Check the engine side of the radiator Item 1 Figure 3 5 to make sure that debris has not been sucked against the radiator blocking air flo...

Страница 30: ...and Local regulations If water needs to be removed If the fuel bowl does not fill with fuel it may be necessary to air bleed the fuel system See Section 4 Fuel System Air Bleed instructions 1 2 CAUTI...

Страница 31: ...tector DO NOT USE YOUR BARE HANDS If you are injected with hydraulic oil or any other fluids immediately seek treatment by a doctor trained in the treatment of penetrating fluid injuries Visually insp...

Страница 32: ...rming any service work underneath the raised loader arm assembly 12 Grease pivot shafts with proper type of grease There are 13 grease points on this machine see Figure 3 9 Before starting the engine...

Страница 33: ...Pre Start Inspection and Operation 3 10 Figure 3 9Lubrication Points NOTE Extremely dusty or dirty working conditions may require more frequent service replacement...

Страница 34: ...nto the cylinder rod 6 Fully reinsert the safety lock pin Item 4 Figure 3 10 securing the cylinder lock in the support position Make sure that the safety lock pin goes behind the loader arm cylinder r...

Страница 35: ...t and idle engine speeds 3 Rotate the ignition key counterclockwise to the PREHEAT position Item 3 Figure 3 12 to allow the glo plugs to warm the engine cylinders for approximately 10 seconds The Low...

Страница 36: ...ine off 5 Leave the throttle setting at about the halfway position and allow the engine to idle This will begin warming the engine coolant and hydraulic oil When warming the hydraulic oil the operator...

Страница 37: ...osition on Trailer 3 When the machine is positioned on the trailer properly lower the attachment to the trailer deck 4 Shut the engine off and remove the key 5 Secure the unit to the transport vehicle...

Страница 38: ...e 3 14Travel Chains and Binders Lifting Procedures When it becomes necessary to lift the machine 1 Use a lifting device that can safely lift 4 000 lbs 1820 Kg 2 Use appropriate lifting chains Item 1 F...

Страница 39: ...ide holes causing a popping noise called cogging This situation is part of the track drive systems safety design and indicates that this portion of the safety system is functioning properly The coggin...

Страница 40: ...3 17 Figure 3 17 Reverse Travel Right Turn During Forward Travel Left Turn During Forward Travel To turn to the right move the left hand control lever farther forward than the right control lever The...

Страница 41: ...control lever The farther forward the right control is moved the faster the left turn will be made See Figure 3 21 Figure 3 21 Left Hand Turn in Reverse Spin Turn Make sure to use the machine hand ho...

Страница 42: ...r the machine Keep attachments as low as possible when traveling on slopes or rough terrain Figure 3 23 Slide Slope Travel Keep the heavy end of the machine towards the uphill direction when traveling...

Страница 43: ...the attachment to the machine If the lock pin does not drop into the locked position start the engine and tilt the attachment slightly forwards or backwards until the lock pins snap into place Figure...

Страница 44: ...nting plate to remove any debris that might interfere with the attachment installation 2 Start the machines engine lower the loader arm and tilt the mounting plate forwards NOTE Make sure that both of...

Страница 45: ...ure 3 28 Attachment Installed 5 Shut the engine off 6 Rotate the attachment lock pins Item 1 Figure 3 28 and Item 1 Figure 3 29 into the locked position securing the attachment to the machine Figure 3...

Страница 46: ...Rotate the attachment lock pins to the UNLOCKED position Item 1 Figure 3 30 Figure 3 30 Attachment Locks in Unlocked Position 4 Start the engine and rotate the mounting plate downwards 5 Back away fr...

Страница 47: ...TE Make sure that both of the attachment lock pins Item 1 Figure 3 31 and Item 3 Figure 3 32 are in the unlocked position Figure 3 31 Attachment Locks in Unlocked Position 3 Slowly drive towards the a...

Страница 48: ...attachment lock pins Item 1 Figure 3 33 Item 1 Figure 3 34 into the locked position securing the attachment to the machine Figure 3 34 Attachment Locks in Locked Position 8 Start the engine and raise...

Страница 49: ...nt position This will release the hydraulic pressure locked in the auxiliary hydraulic lines Leave the control lever in the detent position Figure 3 35 Auxiliary Control Lever b Remove the protective...

Страница 50: ...ng on the attachment hoses to make sure that the quick connects are seated properly 12 Make sure that the hydraulic hoses are routed so that they will not be in the way or damaged during machine opera...

Страница 51: ...your left hand squeeze the OPERATOR PRESENCE control lever Item 1 Figure 3 38 towards the hand grip to activate the FORWARD motion of the attachment NOTE The OPERATOR PRESENCE lever is spring loaded a...

Страница 52: ...ver 5 When using a trencher tiller or other attachment that requires the machine to move while the attachment is in operation move the travel control levers slightly in either the forward or reverse p...

Страница 53: ...Item 1 Figure 3 39 to align the notch on the collar with the lock button Item 2 Figure 3 39 4 Slide the collar backwards on the female quick connect Item 4 Figure 3 39 until it stops against the lock...

Страница 54: ...nd A C Engine Radiator 3 Air Filter 3 R R Fuel Filter Water Separator 3 3 R Engine Idle Speed 3 Check and Clean Battery Terminals and Battery 3 3 Hydraulics Hydraulic Filter R Hydraulic Fluid Level 3...

Страница 55: ...use fuel could spill onto hot engine parts and ignite or explode Make sure engine is turned off 2 Check engine fuel and fill as needed a The Boxer has one saddle tank Item 1 Figure 4 1 on the left sid...

Страница 56: ...s Figure 4 2 Oil Level Check c If the engine oil level is below the add line carefully add the proper amount of oil through the engine oil filler Item 1 Figure 4 3 To reach the oil filler cap remove t...

Страница 57: ...that is only for any high heat overflow Do not add coolant to this container It will not be drawn into the engine If coolant is required make sure to add the proper coolant as shown in the Engine Man...

Страница 58: ...Maintenance 4 5 Figure 4 5 Radiator Air Flow Inspection 6 Check the fuel filter water separator to make sure that there is no water in the filter bowl Item 1 Figure 4 6 Figure 4 6 Engine Fuel Filter W...

Страница 59: ...he filter assembly to catch any spilled fuel 3 Rotate the filter bowl Item 1 Figure 4 6 and remove it from the filter assembly 4 Dispose of the fuel and water in the bowl according to State and Local...

Страница 60: ...g temperature fill as needed with the proper hydraulic oil be sure engine is OFF a Unscrew the dipstick assembly and remove from the machine Item 1 Figure 4 8 b Make sure that the hydraulic fluid is n...

Страница 61: ...lve to their end Items 1 2 4 5 and 6 Figure 4 9 Inspect the connections and look for signs of leaking hydraulic fluid wear or damage g Carefully inspect both sets of quick couples Item 2 Figure 4 9 to...

Страница 62: ...Routine Service and Maintenance 4 9 Figure 4 9 Inspect Hydraulic Lines and Fittings 1 1 2 3 4 6 5...

Страница 63: ...ce capable of safely supporting4 000 lbs See Figure 4 11 or suggested location of the support devices b Tilt the bucket downwards until the cutting edge is touching the ground See Figure 4 11 c Lower...

Страница 64: ...1 Track Def lection Measurement and Adjustment e Remove track tension lock plate bolt Item 1 Figure 4 12 using a 9 16 wrench f Remove the adjustment bolt lock plate Item 2 Figure 4 12 Figure 4 12 Trac...

Страница 65: ...ure 4 13 securing the track adjusting wrench to the service access cover and then remove the wrench Figure 4 13 Track Adjustment Bolt Lock Plate h With the tracks still off the ground start the engine...

Страница 66: ...The hydraulic filter will be filled with hydraulic fluid Make sure to dispose of the used hydraulic filter in an appropriate manner and according to State and Local regulations Make sure to dispose of...

Страница 67: ...mount of hydraulic oil lubricate the rubber gasket on top of the new filter canister and install the filter onto the filter mount Figure 4 15 Hydraulic Oil Filter Do not over fill the hydraulic system...

Страница 68: ...oil level dip stick Item 1 Figure 4 16 check the hydraulic oil level Add the appropriate hydraulic fluid as needed through the filler port Item 2 Figure 4 16 on top of the hydraulic oil tank Make sure...

Страница 69: ...ions Items 5 and 6 Figure 4 17 for signs of leaking corrosion or damage Make sure that the battery clamp Item 3 Figure 4 17 is securely holding the battery in position If needed tighten the lock nut I...

Страница 70: ...re 4 18 Figure 4 18 Remove Protective Screen b Using compressed air or a garden hose Item 1 Figure 4 19 spray air water through the engine radiator from the outside to remove any built up dirt or debr...

Страница 71: ...Routine Service and Maintenance 4 18 Figure 4 19 Clean Engine Radiator c Reinstall and secure the protective screen 1...

Страница 72: ...ever it appears dirty typically every other time the main element is replaced Clean the area around the base of the inner element before removing it so dirt does not get into the engine d Do not wash...

Страница 73: ...AS BEEN ALLOWED TO COOL BEFORE PERFORMING THIS OPERATION MAKE SURE THAT THERE ARE NO OPEN FLAMES IN THE WORK AREA ONLY PERFORM THIS PROCEDURE IN AN AREA WITH PROPER VENTILATION DO NOT SMOKE WHILE PERF...

Страница 74: ...ny spilled fuel c Rotate the filter bowl Item 3 Figure 4 21 and remove it from the filter assembly d Dispose of the fuel and water in the bowl according to State and Local regulations e Remove the pap...

Страница 75: ...is a NEGATIVE ground system Figure 4 22 Battery and Tie Downs 5 4 1 2 3 6 Fuel System Air Bleeding Procedure 1 Loosen the air bleed bolt Item 1 Figure 4 23 DO NOT remove this bolt 2 Crank the engine u...

Страница 76: ...if any signs of damage are noted Extremely dusty or dirty working conditions may require more frequent service replacement Figure 4 24 Hydraulic Tank Drain Plug c When all of the hydraulic fluid has...

Страница 77: ...re 4 25 and fill the hydraulic tank with the proper hydraulic fluid Chevron Rykon Premium ISO 46 or equivalent until the fluid level is just below the upper marker hole in the dipstick Figure 4 25 Hyd...

Страница 78: ...touch a Remove the protective screen Item 1 Figure 4 26 from over the engine radiator and hydraulic radiator b Position a container of suitable size under the front of the machine c Remove the radiato...

Страница 79: ...50 mix of radiator coolant and water according to the specifications in the Engine Manual Make sure to fill the radiator only to the bottom of filler neck Item 1 Figure 4 27 Figure 4 27 Radiator Fill...

Страница 80: ...fuel line 6 Loosen spring clamp Item 3 Figure 4 28 on the incoming fuel line Item 4 Figure 4 28 and slide the clamp along the fuel line away from the filter assembly 7 Place a suitable sized container...

Страница 81: ...intenance 4 28 Figure 4 28 Fuel Line to Fuel Filter Water Separator MAKE SURE TO CLEAN UP ANY SPILLED FUEL FROM IN AND AROUND THE ENGINE COMPARTMENT OF THE MACHINE SPILLED FUEL MAY BE IGNITED BY A HOT...

Страница 82: ...stalled Move lever to neutral position Battery is dead Charge the battery If battery does not hold a charge replace the battery Electrical connections are corroded or loose Check electrical connection...

Страница 83: ...system Drain fuel in tank into an appropriate storage container and dispose of bad fuel properly Refill fuel tank with fresh clean fuel Empty fuel water separator bowl Replace fuel filter 15 Amp fuse...

Страница 84: ...r cap Contact Service Dealer Abnormal engine vibration Engine mounting bolts are loose Tighten engine mounting bolts With the engine turned off the boom creeps down ward more then 3 per hour less than...

Страница 85: ...lace rubber track Track guide fingers worn damaged or missing Replace rubber track Starter does not turn the engine over Auxiliary hydraulics Operator presence lever is either in Forward or Reverse po...

Страница 86: ...ader Arms Three position spring centered lever control Up neutral down Bucket Attachment Tilt Three position spring centered lever control Ex tend neutral and curl Auxiliary Attachment Control Two pos...

Страница 87: ...Engine rpm was set 3 000 rpm The hand arm and whole body vibration measurements were made with the operator present Vibration Test hand arm Declared value is 5 1 m s2 Vibration Test whole body Declar...

Страница 88: ...the slope of the hill 16 THIS IS A 15 DEGR EE SLOP E DO NOT TRAVEL ACROSS OR UP AND DOWN A SLOPE GREATER THAN 15 DEGREES To avoid serious injury operate your unit up and down the face of slopes Travel...

Страница 89: ...Manufactured by BIG POWER IN ALL PLACES Phone Morbark LLC Sales 800 831 0042 8507 S Winn Rd P O Box 1000 Parts and Service 800 255 8839 Winn Michigan 48896 www boxerequipment com www morbark com...

Отзывы:

Похожие инструкции для 322D