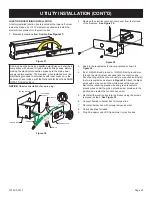
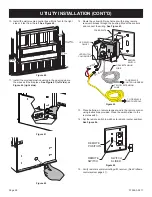
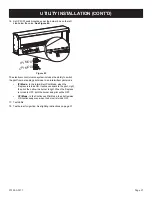
background image

Page 12

37355-0-0217

SAFETY INFORMATION FOR USERS OF LP GAS

Propane (LP Gas) is a flammable gas which can cause fires and 

explosions. In its natural state, propane is odorless and colorless. 

You may not know all the following safety precautions which can 

protect both you and your family from an accident. Read them 

carefully now, then review them point by point with the members 

of your household. Someday when there may not be a minute 

to lose, everyone’s safety will depend on knowing exactly what 

to do. If, after reading the following information, you feel you still 

need more information, please contact your gas supplier.

LP GAS WARNING ORDER

If a gas leak happens, you should be able to smell the gas 

because of the odorant put in by the gas supplier. That's 

your signal to go into immediate action!

• 

Do not operate electric switches, light matches, or use your 

phone. Do not do anything that could ignite the gas.

•   Get everyone out of the building, vehicle, trailer, or area. Do 

that IMMEDIATELY.

•   Close all gas tank or cylinder supply valves.

•   LP Gas is heavier than air and may settle in low areas such 

as basements. When you have reason to suspect a gas leak, 

keep out of basements and other low areas. Stay out until 

firefighters declare them to be safe.

•   Use your neighbor’s phone and call a trained LP Gas service 

person and the fire department. Even though you may not 

continue to smell gas, do not turn on the gas again. Do not 

re-enter the building, vehicle, trailer, or area.

•   Finally,


let the service man and firefighters check for 

escaped gas. Have them air out the area before you return. 

Properly trained LP Gas service people should repair the 

leak, then check and relight the gas fireplace for you.

NO ODOR DETECTED - ODOR FADE

Some people cannot smell well. Some people cannot smell the 

chemical put into the gas. You must find out if you can smell the 

odorant in propane. Smoking can decrease your ability to smell. 

Being around an odor for a time can affect your sensitivity or 

ability to detect that odor. Sometimes other odors in the area 

mask the gas odor. People may not smell the gas odor or their 

minds are on something else. Thinking about smelling a gas odor 

can make it easier to smell.

The odorant in LP Gas is colorless, and it can fade under some 

circumstances. For example, if there is an underground leak, 

the movement of the gas through soil can filter the odorant. The 

odorants is subject to oxidation. Fading can occur if there is rust 

inside the storage tank or in iron gas pipes.

The odorant in escaped gas can adsorb or absorb onto 

or into walls, masonry and other materials and fabrics in 

a room. That will take some of the odorant out of the gas, 

reducing its odor intensity.

LP Gas may stratify in a closed area, and the odor intensity could 

vary at different levels. Since it is heavier than air, there may be 

more odor at lower levels. Always be sensitive to the slightest 

gas odor. If you detect any odor, treat it as a serious leak. 

Immediately go into action as instructed earlier.

SOME POINTS TO REMEMBER

• 

Learn to recognize the odor of LP Gas. Your local LP Gas 

Dealer can give you a Scratch and Sniff pamphlet. Use it to 

find out what the propane odor smells like. If you suspect 

that your LP Gas has a weak or abnormal odor, call your LP 

Gas Dealer.

• 

If you are not qualified, do not light pilot lights, perform 

service, or make adjustments to fireplaces on the LP Gas 

system. If you are qualified, consciously think about the odor 

of LP Gas prior to and while lighting pilot lights or performing 

service or making adjustments.

• 

Sometimes a basement or a closed-up house has a musty 

smell that can cover up the LP Gas odor. Do not try to light 

pilot lights, perform service, or make adjustments in an area 

where the conditions are such that you may not detect the 

odor if there has been a leak of LP Gas.

• 

Odor fade, due to oxidation by rust or adsorption on walls 

of new cylinders and tanks, is possible. Therefore, people 

should be particularly alert and careful when new tanks or 

cylinders are placed in service. Odor fade can occur in new 

tanks, or reinstalled old tanks, if they are filled and allowed 

to set too long before refilling. Cylinders and tanks which 

have been out of service for a time may develop internal rust 

which will cause odor fade. If such conditions are suspected 

to exist, a periodic sniff test of the gas is advisable. If you 

have any question about the gas odor, call your LP Gas 

dealer. A periodic sniff test of the LP Gas is a good safety 

measure under any condition.

• 

If, at any time, you do not smell the LP Gas odorant and 

you think you should, assume you have a leak. Then take 

the same immediate action recommended above for the 

occasion when you do detect the odorized LP Gas.

• 

If you experience a complete gas out, (the container is under 

no vapor pressure), turn the tank valve off immediately. If the 

container valve is left on, the container may draw in some air 

through openings such as pilot light orifices. If this occurs, 

some new internal rusting could occur. If the valve is left 

open, then treat the container as a new tank. Always be sure 

your container is under vapor pressure by turning it off at the 

container before it goes completely empty or having it refilled 

before it is completely empty.

Содержание VFLL60SP90LN-1

Страница 1: ...inity of this or any other appliance WHAT TO DO IF YOU SMELL GAS Do not try to light any appliance Do not touch any electrical switch do not use any phone in your building Immediately call your gas su...

Страница 2: ...6 Clearances 17 Framing Options 18 19 Adding Nailing Flanges Standoff Brackets 20 22 Utility Installation 23 28 Installation OPTION 1 Clean Face 29 OPTION 1 Clean Face Non Combustible Board Installati...

Страница 3: ...ACKAGE Figure 2 5 Carefully remove the bundle from inside the fireplace This bundle contains two center glass supports and the burner deflector glass panels Put the bundle in an out of the way place t...

Страница 4: ...in a zero clearance enclosure This means combustible material such as framing lumber can come in contact with the top and side standoff spacers and secured to combustible framing using the framing bra...

Страница 5: ...ote Receiver 1 17 Button Switch 2 18 Mounting Bracket 1 19 Wall Plate 1 20 Inner Top Deflector Optional Installation 2 21 Glass Support Center 2 22 Glass Support Side 2 23 Center Reflector Assembly 1...

Страница 6: ...to scale Description Quantity Supplied 4 x 1 2 Phillips Screw 4 10 X 1 2 Hex Head Screw 28 8 x 1 1 2 Inch Screw 18 Nailing Flange 8 See Parts Lists on page 46 for replacement parts Do not order batter...

Страница 7: ...media should only be placed as shown in Figure 55 7 Do not use rock wool embers or lava rock 8 Avoid the use of decorative or scented candles while the fireplace is in operation Soot may be produced...

Страница 8: ...ory set and may not be altered GAS SUPPLY PRESSURES inches water column GAS TYPE MAXIMUM MINIMUM MANIFOLD NAT 10 5 7 0 3 5 LP 13 0 11 0 10 0 HOMEOWNER REFERENCE INFORMATION We recommend that you recor...

Страница 9: ...Never place decorative media material on or next to the burner REQUIRED ACCESSORIES PART NUMBER VFLL60 DESCRIPTION DFL601BL Decorative Front Beveled 3 4 inch Black DFL602BL Decorative Front Beveled 1...

Страница 10: ...of Materials in a Vertical Tube Furnace at 750C are considered non combustible Install the fireplace out of household traffic and away from furniture and draperies The high temperatures produced by th...

Страница 11: ...Get fresh air at once Have fireplace serviced Some people pregnant women persons with heart or lung disease anemia those under the influence of alcohol those at high altitudes are more affected by car...

Страница 12: ...can adsorb or absorb onto or into walls masonry and other materials and fabrics in a room That will take some of the odorant out of the gas reducing its odor intensity LP Gas may stratify in a closed...

Страница 13: ...ered in the venturi inlet and or is not aligned with the venturi Any misalignment of the burner orifice may be corrected by bending the shutter cap holding the orifice to the inlet of the venturi tube...

Страница 14: ...all appliances installed in that space Rooms communicating directly with the space in which the appliances are installed through openings not furnished with doors are considered a part of the unconfin...

Страница 15: ...dth of the firebox opening 60 H The height to the firebox standoffs 18 15 16 K Height from the bottom of the firebox to the gas line opening 3 4 L Depth from the front of the firebox to gas line openi...

Страница 16: ...firebox standoffs 18 15 16 K Height from the bottom of the firebox to the gas line opening 3 4 L Depth from the front of the firebox to gas line opening 7 13 16 M Depth from rear of firebox to gas li...

Страница 17: ...al provided with the fireplace is larger than required for this installation Material may be trimmed to the proper size Wear eye and breathing protection when cutting non combustible board NOTICE If i...

Страница 18: ...vide support to the bottom of the fireplace 2 Refer to Junction Box Wiring Section on pages 27 30 for details on electrical requirements 3 Verify gas and electrical lines are ready for fireplace insta...

Страница 19: ...37355 0 0217 Page 19 FRAMING OPTIONS CONT D C C C OPTION 1 OPTION 1 OPTION 1 OPTION 2 OPTION 2 OPTION 2 C C OPTION 1 OPTION 3 OPTION 2 OPTION 3 Figure 18 Framing Dimensions A...

Страница 20: ...ith two 10 x 12 screws each in pair of holes closer to the face of the fireplace Leave the nailing flanges flat until after you lift the fireplace into the framing See Figure 24 5 8 BOARD 1 4 BOARD BO...

Страница 21: ...top with screws There are holes located in the top of the fireplace for each standoff bracket The holes closer to the front edge of the fireplace are for mounting non combustible board around the ope...

Страница 22: ...g above the fireplace as shown in Figure 31 SCREW INTO EACH BRACKET Figure 31 OPTION 1 10b OPTION 2 Secure 6 standoff brackets with drywall screws to the framed opening above the fireplace as shown in...

Страница 23: ...eaks by the installer A leak testing solution or soap should be used for testing leaks on all exposed connections After testing is complete all solutions should be cleaned off On unexposed connections...

Страница 24: ...gas control to aid in servicing The National Fuel Gas Code requires that a drip leg be installed near the gas inlet See Figure 36 This should consist of a vertical length of pipe tee connected into th...

Страница 25: ...GROUND BLACK COVER PLATE SNAP IN RECEPTACLE ACCESS PLATE 120V POWER SUPPLY Figure 38 2 Remove the electrical access cover panel from the left end of the fireplace See Figure 39 Figure 39 3 Snap in th...

Страница 26: ...r harness through the bushing Mount the controls and connect the wiring See Figure 43 REMOTE SWITCH COVER PLATE YEL BLACK GRAY EXTENSION WIRE YELLOW EXTENSION WIRE RED BLACK TO FIREPLACE CONTROL HARNE...

Страница 27: ...tanding pilot mode to an intermittent pilot mode IPI Mode In the Intermittent Pilot Mode when the fireplace is turned ON it will cause spark to the pilot Light the pilot then allow the burner to light...

Страница 28: ...ELECTRONIC CONTROL MODULE WHITE BLUE BLUE WHITE ORANGE GREEN YELLOW BLACK BLACK AC DC POWER ADAPTOR REMOTE RECEIVER ON REMOTE OFF IGNITOR SENSOR RED BLACK EXTENSION HARNESS NOT USED NOT USED Figure 46...

Страница 29: ...ace This type of installation will allow for finishing around the fireplace face with high temperature paint See pages 32 33 and 34 for installing the fireplace for installation OPTION 2 Flush Mount S...

Страница 30: ...ackets No screws are allowed into the fireplace See Figure 50 Figure 50 2 Place upper non combustible board above fireplace opening to required height and secure with screws in approved area 3 Place s...

Страница 31: ...when finishing non combustible panel and drywall joints around fireplace Tile or non combustible materials can be applied on top of the non combustible board and finished wall as their instructions re...

Страница 32: ...installation will allow for applying tile marble stone or other non combustible materials over the face of the fireplace cabinet up to the flange opening See pages 29 30 and 31 for installation OPTIO...

Страница 33: ...Screws are allowed in framing and top mounting brackets No screws are allowed into the fireplace face See Figure 55 Figure 55 2 Place the non combustible board above fireplace opening to required heig...

Страница 34: ...ults when finishing non combustible panel and drywall joints around fireplace Tile or non combustible materials can be applied on top of the non combustible board and finished wall as their instructio...

Страница 35: ...ck side of the outdoor kit and the top surface of the fireplace are non combustible zones See Figure 59 Figure 59 3a Figure 60 shows minimum recommended coverage over the face of the outdoor kit This...

Страница 36: ...ive Glass options are available in various colors and package sizes Choose the size appropriate for your fireplace See list on page 9 CAUTION To prevent injury use gloves and eye protection while appl...

Страница 37: ...ox Carefully angle in the left side of the glass and then slide the glass to the left Settle the glass into the slots by gently lowering it See Figures 64 67 TOP VIEW GLASS PANEL Figure 64 TOP VIEW GL...

Страница 38: ...AD BEFORE LIGHTING A This appliance has a pilot which can be lit by hand or by switching the remote receiver switch to the ON position When lighting the pilot follow these instructions exactly B Befor...

Страница 39: ...ause the flame sensor to cool When the flame sensor cools the fireplace will shut down Correct Pilot Flame Pattern Figure 68 PILOT FLAME CHARACTERISTICS Flames from the pilot front center of burner as...

Страница 40: ...s A Mode Button is provided to Index between the features and a Thermostat Button is used to turn on off or index through thermostat functions See Figures 62 and 63 Blue LCD Display UP DOWN Arrow Butt...

Страница 41: ...erify that the power supply AC DC adapter is present and that the batteries inside the remote switch and remote control are fresh and installed with correct polarity Make sure all the connections betw...

Страница 42: ...Clean flame sensor and pilot igniter See maintenance homeowner manual Pilot not grounded well Check ground connections Sensor Wire loose Check sensor wire terminals Gas pressure incorrect Adjust gas...

Страница 43: ...urner flame Incorrect gas supply or pressure Check gas supply pressure Blocked orifice Check orifice opening Clogged or dirty burner ports Clean burner ports Faulty valve Replace valve High altitude A...

Страница 44: ...ailure to use only parts specifically approved with this heater may result in property damage or personal injury 5 12 10 BURNER ASSEMBLY WALL PANEL ASSEMBLY 2 3 17 18 14 13 21 23 22 20 22 19 16 15 40...

Страница 45: ...x Cover A Also requires R11597 and R11598 B Also requires R1978 INDEX NO PART NO VFLL60SP DESCRIPTION 1 36787 Standoff Bracket 6 Required 2 36774 Non Combustible Board Top 2 Required 3 36825 Non Combu...

Страница 46: ...Page 46 37355 0 0217 Date Dealer Name Service Technician Name Service Performed Notes SERVICE TECHNICIAN NOTES...

Страница 47: ...se and can be ordered by your Service Person or Dealer Proof of purchase is required for warranty parts All parts listed in the Parts List have a Part Number When ordering parts first obtain the Model...

Страница 48: ...rols Thermostats Accessories and Parts Should any remote control thermostat accessory or other part fail because of defective workmanship within one year from the date of purchase Empire will repair o...

Отзывы: